Page 1508 of 1943
EM1IZ±02
A13904
Front BumperR/B (ABS)
Air Cleaner
Assembly Engine Coolant
Reservoir Tank
Engine Under
CoverOuter Front Cowl
Top Panel Air Inlet
Brake Reservoir
Tank
Wiper Motor and
Wiper Link
Assembly
Cowl Top Ventilator
Lower LH
Cowl Top Ventilator
Lower RH
Wiper Arm
Hood to Cowl Top
Seal
N´m (kgf´cm, ft´lbf) : Specified torque
26 (265, 19)
7 (71, 62 in. lbf)
26 (265, 19)
11.5 (117, 8)
Head Light RH
EM±50
± ENGINE MECHANICALENGINE UNIT
1166 Author�: Date�:
2001 PRIUS (RM778U)
ENGINE UNIT
COMPONENTS
Page 1678 of 1943
 Noise from brakes
1. Pad or lining (Cracked or distorted)
2. Installation bolt (Loose)
3. Disc or drum (Scored)
4. Pad support")
± BRAKETROUBLESHOOTING
BR±3
1518 Author�: Date�:
2001 PRIUS (RM778U) Noise from brakes
1. Pad or lining (Cracked or distorted)
2. Installation bolt (Loose)
3. Disc or drum (Scored)
4. Pad support plate (Loose)
5. Sliding pin (Worn)
6. Pad or lining (Dirty)
7. Pad or lining (Glazed)
8. Tension or return spring (Faulty)
9. Anti±squeal shim (Damaged)
10.Shoe hold±down spring (Damaged)BR±23
BR±32
BR±26
BR±26
BR±32
BR±23
BR±26
BR±23
BR±32
BR±23
BR±32
BR±32
BR±23
BR±32
Brake warning light lights up*1
(Parking brake pedal released)
1. Brake fluid level
2. Hydraulic brake booster power supply system (Faulty)
BR±41
Brake warning light lights up and brake warning buzzer sounds*2Hydraulic brake booster power supply system (Faulty)BR±41
ABS warning light lights up*31. Anti±lock brake system (Faulty)
2. Hydraulic brake booster power supply system (Faulty)
BR±41
*1, *3: The light may stay on for about 60 seconds after the engine has been started. It is normal if it goes
out after a while.
*
2, *3: Depressing the brake pedal repeatedly may turn on the warning light and buzzer. It is normal if the
light goes out and the buzzer stops sounding after a few seconds.
Page 1761 of 1943
 Headlight flickers.
1. Bulb
2. Wire Harness±
±
Headlight is dark.1. Bulb
2. Wire Harness±
±
Taillight does not co")
BE±4
± BODY ELECTRICALTROUBLESHOOTING
1671 Author�: Date�:
2001 PRIUS (RM778U) Headlight flickers.
1. Bulb
2. Wire Harness±
±
Headlight is dark.1. Bulb
2. Wire Harness±
±
Taillight does not come on with light control switch in TAIL.1. Taillight Control Relay
2. Wire HarnessBE±20
±
Taillight does not go out with light control switch in OFF.1. Taillight Control Relay
2. Wire HarnessBE±20
±
Headlight does not come on with engine running and light control
switch in OFF.
1. ECU±B Fuse
2. GAUGE Fuse
3. Daytime Running Light Main Relay
4. Daytime Running Light Relay
5. Alternator L Terminal
6. Body ECU
7. Parking Brake Switch
8. Wire HarnessBE±12
BE±12
BE±20
BE±20
±
DI±678
BE±42
±
TURN SIGNAL AND HAZARD WARNING SYSTEM
SymptomSuspect AreaSee page
ºHazardº and ºTurnº do not light up.
1. GAUGE Fuse
2. TURN HAZ Fuse
3. Ignition Switch
4. Turn Signal Flasher Relay
5. Wire HarnessBE±12
BE±12
BE±17
BE±25
±
Hazard warning light does not light up.
(Turn is normal)1. Hazard Warning Switch
2. Wire HarnessBE±25
±
Turn signal does not light up.
(Hazard is normal)1. Turn Signal Switch
2. Wire HarnessBE±25
±
Turn signal does not light up in one direction.1. Turn Signal Switch
2. Wire HarnessBE±25
±
Only one bulb does not light up.1. Bulb
2. Wire Harness±
±
INTERIOR LIGHT SYSTEM
This system uses the multiplex communication system, so check diagnosis system of the multiplex commu-
nication system before you proceed with troubleshooting.
SymptomSuspect AreaSee page
All the lights do not come ON.DOME FuseBE±12
The driver door courtesy light does not come ON when the
driver's door is opened.1. Driver's Door Courtesy Switch
2. Wire Harness
3. Body ECUBE±27
±
±
The passenger door courtesy light does not come ON when the
passenger's door is opened.1. Passenger's Door Courtesy Switch
2. Wire Harness
3. Body ECUBE±27
±
DI±678
The room light does not come on when the rear±right door is
opened.
1. Rear±Right Door Courtesy Switch
2. Wire Harness
3. Body ECU
4. Room LightBE±27
±
DI±678
±
The room light does not come on when the rear±left door is
opened.
1. Rear±Left Door Courtesy Switch
2. Wire Harness
3. Body ECU
4. Room LightBE±27
±
DI±678
±
Only one of the bulbs comes ON.Bulb±
Page 1764 of 1943

Warning Lights:
COMBINATION METER
SymptomSuspect AreaSee page
Warning light do not light up. (Except Discharge, Open")
± BODY ELECTRICALTROUBLESHOOTING
BE±7
1674 Author�: Date�:
2001 PRIUS (RM778U)
Warning Lights:
COMBINATION METER
SymptomSuspect AreaSee page
Warning light do not light up. (Except Discharge, Open Door and
SRS)
1. GAUGE Fuse
2. Meter Circuit Plate
3. DC/DC converter
4. Wire Harness±
BE±39
±
±
Fuel Level warning light does not light up.
1. Bulb
2. Meter Circuit Plate
3. Fuel Tank Assembly
4. Wire Harness±
BE±39
±
±
Low Oil Pressure warning light does not light up.
1. Bulb
2. Low Oil Pressure Warning Switch
3. Meter Circuit Plate
4. Wire Harness±
BE±42
BE±39
±
ABS warning light does not light up.
1. Bulb
2. ABS ECU
3. Wire Harness±
DI±351
±
Seat Belt warning light does not light up.
1. Bulb
2. Buckle Switch
3. Meter Circuit
4. Wire Harness±
BE±42
BE±42
±
Brake warning light does not light up.
1. Bulb
2. Parking Brake Switch
3. Brake Fluid Level Warning Switch
4. Meter Circuit Plate
5. Wire Harness±
BE±42
BE±42
BE±39
±
SRS Warning light does not light up.
1. Bulb
2. Airbag Sensor Assembly
3. Meter Circuit Plate
4. Wire Harness±
DI±495
BE±39
±
Open Door warning light does not light up.
1. DOME Fuse
2. Bulb
3. Door Courtesy Switch
4. Meter Circuit Plate
5. Wire Harness±
±
BE±27
BE±39
±
Indicator Lights:
COMBINATION METER
SymptomSuspect AreaSee page
High beam indicator light does not light up.
1. Bulb
2. Meter Circuit Plate
3. Wire Harness
4. Headlight System±
BE±39
±
BE±20
Turn indicator light does not light up.
1. Bulb
2. Meter Circuit Plate
3. Wire Harness
4. Turn Signal and Hazard Warning System±
BE±39
±
BE±25
Malfunction indicator light does not light up.
1. Bulb
2. ECM
3. Meter Circuit Plate
4. Wire Harness±
±
BE±39
±
Indicator lights do not light up. (Except Turn, Hi±beam and
security)1. GAUGE Fuse
2. Wire Harness±
±
Page 1782 of 1943
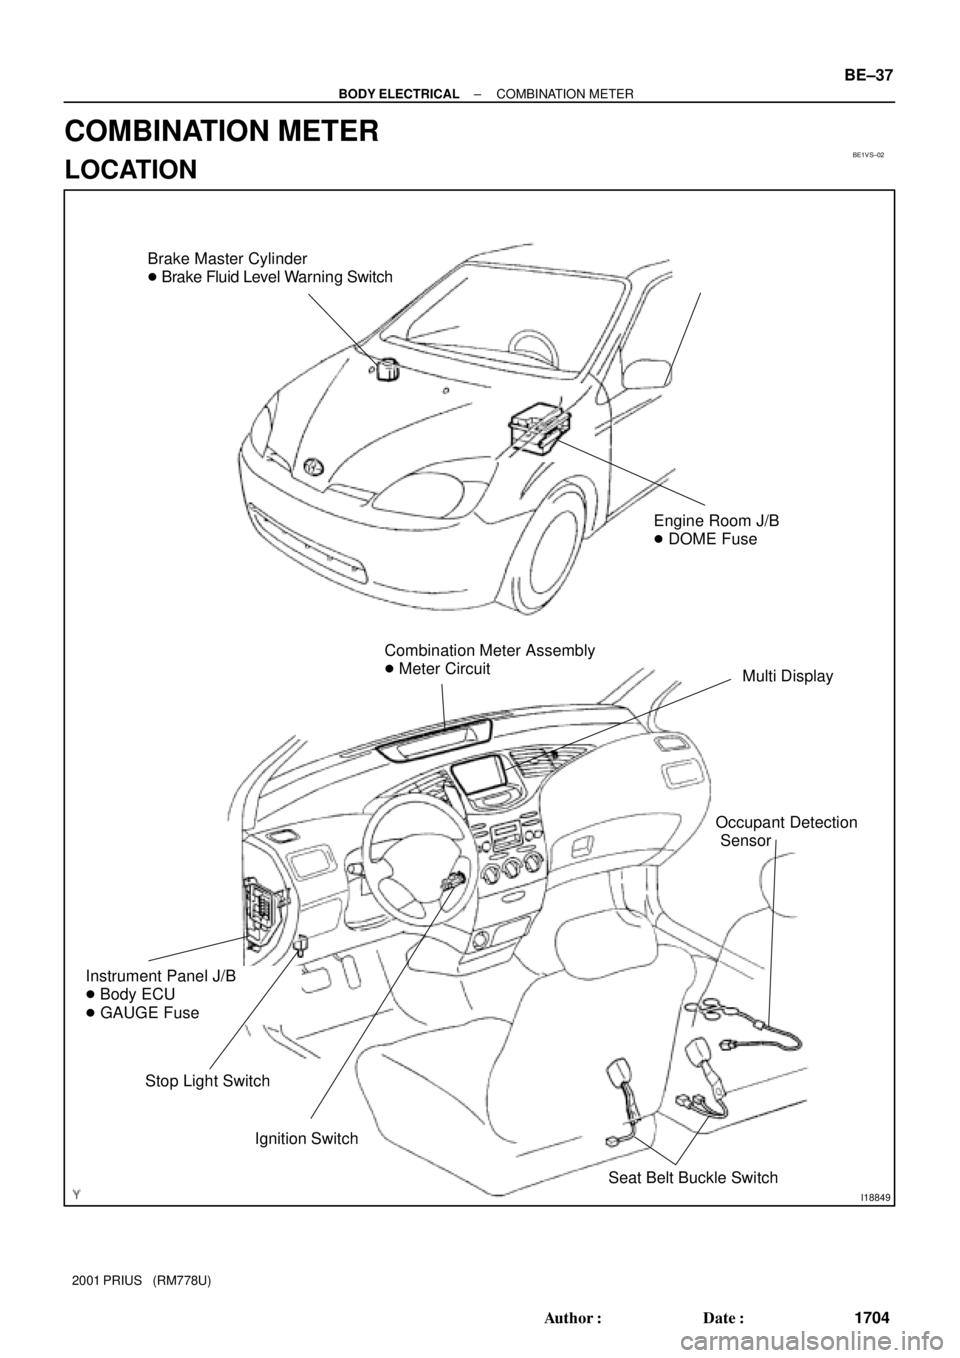
BE1VS±02
I18849
Brake Master Cylinder
� Brake Fluid Level Warning Switch
Combination Meter Assembly
� Meter Circuit
Multi Display
Ignition Switch
Instrument Panel J/B
� Body ECU
� GAUGE Fuse
Stop Light Switch
Engine Room J/B
� DOME Fuse
Seat Belt Buckle Switch
Occupant Detection
Sensor
± BODY ELECTRICALCOMBINATION METER
BE±37
1704 Author�: Date�:
2001 PRIUS (RM778U)
COMBINATION METER
LOCATION
Page 1790 of 1943

9. INSPECT BRAKE WARNING SYSTEM L")
BE1217
BatteryWarning Light
Ignition
Switch
I11650
BE0044
BatteryWarning Light
Ignition
Switch
Z11183
± BODY ELECTRICALCOMBINATION METER
BE±45
2001 PRIUS (RM778U)
9. INSPECT BRAKE WARNING SYSTEM LIGHT
(a) Disconnect the connector from the brake fluid warning
switch.
(b) Connect terminals of the wire harness side of the level
warning switch connector.
(c) Start the engine, check that the warning light lights up.
If the warning light does not light up, test the bulb or wire har-
ness.
10. INSPECT BRAKE FLUID LEVEL WARNING SWITCH
CONTINUITY
(a) Remove the reservoir tank cap and strainer.
(b) Disconnect the connector.
(c) Check that no continuity exists between terminals with the
switch OFF (float up).
(d) Use syphon, etc. to take fluid out of the reservoir tank.
(e) Check that continuity exists between terminals with the
switch ON (float down).
(f) Pour the fluid back in the reservoir tank.
If operation is not as specified, replace the switch.
11. INSPECT PARKING BRAKE WARNING LIGHT
(a) Disconnect the connector from the parking brake switch.
(b) Ground terminal of the wire harness side connector.
(c) Start the engine, check that the warning light lights up.
If the warning light does not light up, test the bulb or inspect wire
harness.
12. INSPECT PARKING BRAKE SWITCH CONTINUITY
(a) Check that continuity exists between terminal and switch
body with the switch ON (switch pin released).
(b) Check that no continuity exists between terminal and
switch body with the switch OFF (switch pin pushed in).
If operation is not as specified, replace the switch or inspect
ground point.
Page 1895 of 1943

INSPECTION
CAUTION:
Replace the seat belt assembly (outer belt, inner belt, bolts,
nuts or sill±bar) if it has been use")
BO3T5±01
BO0632
BO0633
45° 15° BO±88
± BODYSEAT BELT
2001 PRIUS (RM778U)
INSPECTION
CAUTION:
Replace the seat belt assembly (outer belt, inner belt, bolts,
nuts or sill±bar) if it has been used in a severe impact. The
entire assembly should be replaced even if damage is not
obvious.
1. RUNNING TEST (IN SAFE AREA)
(a) Fasten the front seat belts.
(b) Drive the car at 10 mph (16 km/h) and slam on the brakes.
Check that the belt locks and cannot be extended at this
time.
HINT:
Conduct this test in a safe area. If the belt does not lock, remove
the belt mechanism assembly and conduct the following static
check. Also, whenever installing a new belt assembly, verify the
proper operation before installation.
2. Driver 's seat belt (ELR):
STATIC TEST
(a) Make sure that the belt locks when pulled out quickly.
(b) Remove the locking retractor assembly.
(c) Tilt the retractor slowly.
(d) Make sure that belt can be pulled out at a tilt of 15 degrees
or less, and cannot be pulled out over 45 degrees of tilt.
lf a problem is found, replace the assembly.
3. Except driver's seat belt (ALR/ELR):
STATIC TEST
(a) Make sure that the belt locks when pulled out quickly.
(b) Remove the locking retractor assembly.
(c) Pull out the whole belt and measure the length of the
whole belt.
Then retract the belt slightly and pull it out again.
(d) Make sure that the belt cannot be extended further.
If a problem is found,replace the assembly.

Air Cleaner
Assembly Engine Coolant
Reservoir Tank
Engine Under
CoverOuter Front Cowl
Top Panel Air Inlet
Brake Reservoir
Tank
Wiper Motor and
Wiper Link")