Page 68 of 2572

'05 HIGHLANDER_U (L/O 0409)
338
2005 HIGHLANDER from Nov. '04 Prod. (OM48570U)
�Make sure to set the jack prop-
erly in the jack point. Raising
the vehicle with jack improper-
ly positioned will damage the
vehicle or may allow the ve-
hicle to fall off the jack and
cause personal injury.
�Never get under the vehicle
when the vehicle is supported
by the jack alone.
�Use the jack only for lifting
your vehicle during wheel
changing.
�Do not raise the vehicle with
someone in the vehicle.
�When raising the vehicle, do
not place any objects on top
of or underneath the jack.
�Raise the vehicle only high
enough to remove and change
the tire.NOTICE
Do not continue driving with a
deflated tire. Driving even a
short distance can damage a
tire and wheel beyond repair.
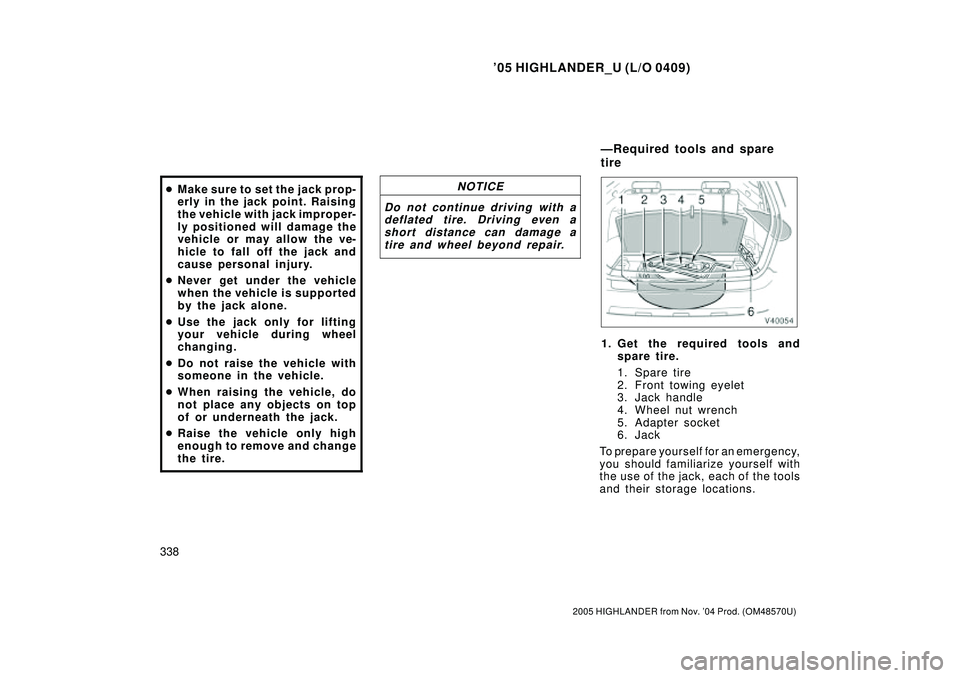
1. Get the required tools and
spare tire.
1. Spare tire
2. Front towing eyelet
3. Jack handle
4. Wheel nut wrench
5. Adapter socket
6. Jack
To prepare yourself for an emergency,
you should familiarize yourself with
the use of the jack, each of the tools
and their storage locations.
Ð R eq u ired to o ls an d sp are
tire
Page 70 of 2572
'05 HIGHLANDER_U (L/O 0409)
340
2005 HIGHLANDER from Nov. '04 Prod. (OM48570U)
To detach the spare tire:
1. Vehicles with aluminium wheelsÐ
Remove the inside spare tire cov-
er by turning it counterclockwise.2. Pull the strap and open the center
deck board.3. Vehicles with third seatÐ
If the third seat is upright, hang
the center deck board on the
right- side head restraint.
Page 72 of 2572
'05 HIGHLANDER_U (L/O 0409)
342
2005 HIGHLANDER from Nov. '04 Prod. (OM48570U)
7. Pull out the spare tire and stand
it up against the bumper.8. Remove the holding bracket.
Vehicles with aluminium wheelsÐ
Remove the spare tire cover.2. Block the wheel diagonally op-
posite the flat tire to keep the
vehicle from rolling when it is
jacked up.
When blocking the wheel, place a
wheel block in front of one of the front
wheels or behind one of the rear
wheels.
ÐBlocking the wheel
Page 74 of 2572
'05 HIGHLANDER_U (L/O 0409)
344
2005 HIGHLANDER from Nov. '04 Prod. (OM48570U)
CAUTION
Never use oil or grease on the
bolts or nuts. The nuts may loose
and the wheels may fall off,
which could cause a serious ac-
cident.
5. Position the jack at the correct
jack point as shown.
Make sure the jack is positioned on
a level and solid place.6. After making sure that no one
is in the vehicle, raise it high
enough so that the spare tire
can be installed.
Remember you will need more ground
clearance when putting on the spare
tire than when removing the flat tire.
To raise the vehicle, insert the jack
handle into the jack (it is a loose fit)
and turn it clockwise. As the jack
touches the vehicle and begins to lift,
double- check that it is properly posi-
tioned.
ÐPositioning the jack ÐRaising your vehicle
Page 75 of 2572
'05 HIGHLANDER_U (L/O 0409)
345
2005 HIGHLANDER from Nov. '04 Prod. (OM48570U)
CAUTION
Never get under the vehicle when
the vehicle is supported by the
jack alone.
7. Remove the wheel nuts and
change tires.
Lift the flat tire straight off and put it
aside.
Roll the spare wheel into position and
align the holes in the wheel with the
bolts. Then lift up the wheel and get
at least the top bolt started through
its hole. Wiggle the tire and press it
back over the other bolts.Before putting on wheels, remove any
corrosion on the mounting surfaces
with a wire brush or such. Installation
of wheels without good metal- to- met-
al contact at the mounting surface can
cause wheel nuts to loosen and
eventually cause a wheel to come off
while driving.
ÐChanging wheels
Page 78 of 2572

'05 HIGHLANDER_U (L/O 0409)
348
2005 HIGHLANDER from Nov. '04 Prod. (OM48570U)
11. Check the air pressure of the re-
placed tire.
Adjust the air pressure to the specifi-
cation designated on page 410 in
Section 8. If the pressure is lower,
drive slowly to the nearest service
station and fill to the correct pressure.
Do not forget to reinstall the tire infla-
tion valve cap as dirt and moisture
could get into the valve core and
possibly cause air leakage. If the cap
is missing, have a new one put on as
soon as possible.
12.Restow all the tools, jack and
flat tire securely.
As soon after changing wheels as
possible, tighten the wheel nuts to the
torque specified on page 410 in Sec-
tion 8 with a torque wrench. Have a
technician repair the flat tire and re-
place the spare tire with it.
Initial adjustment of the tire pres-
sure warning system is necessary
after you have replaced your tires
or wheels. See Tire pressure
warning systemº on page 161 in
Section 1- 7.CAUTION
Before driving, make sure all the
tools, jack and flat tire are se-
curely in place in their storage
location to reduce the possibility
of personal injury during a colli-
sion or sudden braking.
If your vehicle becomes stuck in snow,
mud, sand, etc., then you may attempt
to rock the vehicle free by moving it
forward and backward.
Two- wheel drive modelsÐ
Turn off the traction control system to
become unstuck to allow the tires to
spin enough to remove the vehicle from
the obstruction. (For details, see Trac-
tion control system (two- wheel drive
models)º on page 156 in Section 1- 7.)
CAUTION
Do not attempt to rock the vehicle
free by moving it forward and back-
ward if people or objects are any-
where near the vehicle. During the
rocking operation the vehicle may
suddenly move forward or backward
as it becomes unstuck, causing injury
or damage to nearby people or ob-
jects.
ÐAfter changing wheels If your vehicle becomes stuck
Page 2354 of 2572

05CL9-03
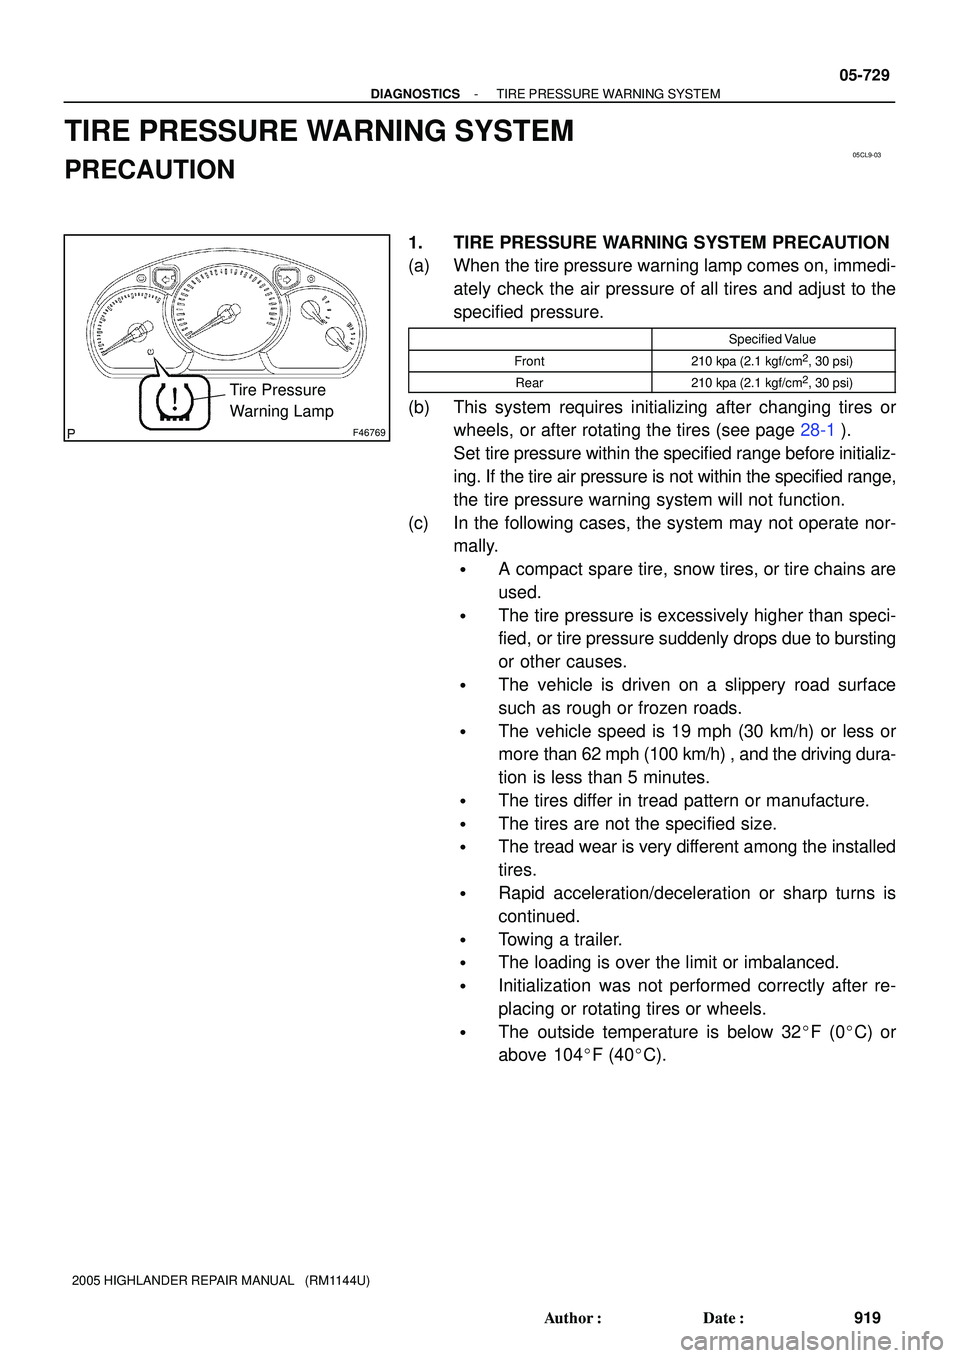
F46769
Tire Pressure
Warning Lamp
- DIAGNOSTICSTIRE PRESSURE WARNING SYSTEM
05-729
919 Author�: Date�:
2005 HIGHLANDER REPAIR MANUAL (RM1144U)
TIRE PRESSURE WARNING SYSTEM
PRECAUTION
1. TIRE PRESSURE WARNING SYSTEM PRECAUTION
(a) When the tire pressure warning lamp comes on, immedi-
ately check the air pressure of all tires and adjust to the
specified pressure.
Specified Value
Front210 kpa (2.1 kgf/cm2, 30 psi)
Rear210 kpa (2.1 kgf/cm2, 30 psi)
(b) This system requires initializing after changing tires or
wheels, or after rotating the tires (see page 28-1).
Set tire pressure within the specified range before initializ-
ing. If the tire air pressure is not within the specified range,
the tire pressure warning system will not function.
(c) In the following cases, the system may not operate nor-
mally.
�A compact spare tire, snow tires, or tire chains are
used.
�The tire pressure is excessively higher than speci-
fied, or tire pressure suddenly drops due to bursting
or other causes.
�The vehicle is driven on a slippery road surface
such as rough or frozen roads.
�The vehicle speed is 19 mph (30 km/h) or less or
more than 62 mph (100 km/h) , and the driving dura-
tion is less than 5 minutes.
�The tires differ in tread pattern or manufacture.
�The tires are not the specified size.
�The tread wear is very different among the installed
tires.
�Rapid acceleration/deceleration or sharp turns is
continued.
�Towing a trailer.
�The loading is over the limit or imbalanced.
�Initialization was not performed correctly after re-
placing or rotating tires or wheels.
�The outside temperature is below 32�F (0�C) or
above 104�F (40�C).
Page 2425 of 2572
BODY PANEL REPLACEMENT
F12093
POINT
1 Cut the new part so that it overlaps the previous cut location by approximately 20 mm (0.79 in.).
2 Attach the weld bolt to center of the bearing surface.
PART NAME
[C] Rear Floor Side Panel Rear Extension
[E] Rear Floor Pan No.2 Extension
[H] Spare Wheel Carrier Bracket[D] Rear Floor Panel Extension
[F] Weld Bolt [G] Rear Floor Heat Insulator No.3 BracketBP-57
INSTALLATION
�Temporarily install the new parts and measure each part of the new parts in accordance with the body dimension
diagram. (See the body dimension diagram)
�Inspect the fitting of the related parts around the new parts before welding. This affects the appearance of the
finish.
�After welding, apply the polyurethane foam to the corresponding parts.
�After welding, apply body sealer and under-coating to the corresponding parts.
�After applying the top coat layer, apply anti-rust agent to the inside of the necked section structural weld spots.