Page 172 of 373

3-8
Setting the Tone
BASS: Slide the lever to the right or left to increase or
decrease bass.
TREBLE: Slide the lever to the right or left to increase
or decrease treble. If a station is weak or noisy, you may
want to decrease the treble.
Adjusting the Speakers
BAL: Press this knob lightly so it extends.
Turn this knob to move the sound to the left or right
speakers. The middle position balances the sound
between the speakers.
FADE: Press this knob lightly so it extends.
Turn this knob to move the sound to the front or rear
speakers. The middle position balances the sound
between the speakers.
Push these knobs back into their stored positions when
you're not using them.Playing a Cassette Tape
Your tape player is built to work best with tapes that are
up to 30 to 45 minutes long on each side. Tapes longer
than that are so thin they may not work well in this player.
While the tape is playing, use the VOL, FADE, BAL,
BASS and TREB controls just as you do for the radio.
The display will show an arrow to show which side of
the tape is playing. When the down indicator arrow is
lit, selections listed on the bottom side of the cassette are
playing. When the up arrow is lit, selections listed on the
top side of the cassette are playing. The tape player
automatically begins playing the other side when it
reaches the end of the tape.
If E and a number appear on the radio display, the tape
won't play because of an error.
�E10: The tape is tight and the player can't turn the
tape hubs. Remove the tape. Hold the tape with the
open end down and try to turn the right hub
counterclockwise with a pencil. Turn the tape over
and repeat. If the hubs do not turn easily, your tape
may be damaged and should not be used in the
player. Try a new tape to make sure your player is
working properly.
Page 175 of 373

Playing the Radio
POWER/VOL: Push this knob to turn the system on
and off. To increase volume, turn the knob clockwise.
Turn it counterclockwise to")
3-11 AM-FM Stereo with Compact Disc
Player (Option)
Playing the Radio
POWER/VOL: Push this knob to turn the system on
and off. To increase volume, turn the knob clockwise.
Turn it counterclockwise to decrease volume.
RECALL: Display the time with the ignition off by
pressing this knob. When the radio is playing, press this
knob to recall the station frequency.Finding a Station
AM/FM: Press this button to switch between AM, FM1
and FM2. The display shows your selection.
TUNE: Press this knob lightly so it extends. Turn it to
choose radio stations. Push the knob back into its stored
position when you're not using it.
SEEK: Press the up or down arrow to go to the next
higher or lower station and stay there.
PUSHBUTTONS: The six numbered pushbuttons let
you return to your favorite stations. You can set up to
18 stations (six AM, six FM1 and six FM2) by
performing the following steps:
1. Turn the radio on.
2. Press AM/FM to select the band.
3. Tune in the desired station.
4. Press and hold one of the six numbered pushbuttons until
SET appears on the display. Whenever you press that
numbered pushbutton, the station you set will return.
5. Repeat the steps for each pushbutton.
Page 178 of 373

Playing the Radio
POWER/VOL: Push this knob to turn the system on
and off. To increase volume, turn the knob clockwise.
Turn it c")
3-14 AM-FM Stereo with Compact Disc Player
and Equalizer (If Equipped)
Playing the Radio
POWER/VOL: Push this knob to turn the system on
and off. To increase volume, turn the knob clockwise.
Turn it counterclockwise to decrease volume.
RECALL: Press this button briefly to recall the station
being played or to display the clock. If you press the
knob when the ignition is off, the clock will show for a
few seconds.Finding a Station
AM/FM: Press this button to switch between AM, FM1
and FM2. The display shows your selection.
TUNE: Press this knob lightly so it extends. Turn it to
choose radio stations. Push the knob back into its stored
position when you're not using it.
SEEK: Press the up or down arrow to go to the next
higher or lower station and stay there.
PUSHBUTTONS: The six numbered pushbuttons let
you return to your favorite stations. You can set up to
18 stations (six AM, six FM1 and six FM2) by
performing the following steps:
1. Turn the radio on.
2. Press AM/FM to select the band.
3. Tune in the desired station.
4. Press and hold one of the six numbered pushbuttons until
SET appears on the display. Whenever you press that
numbered pushbutton, the station you set will return.
5. Repeat the steps for each pushbutton.
Page 199 of 373

4-13
Speed limit signs near curves warn that you should
adjust your speed. Of course, the posted speeds are
based on good weather and road conditions. Under less
favorable conditions you'll want to go slower.
If you need to reduce your speed as you approach a
curve, do it before you enter the curve, while your front
wheels are straight ahead.
Try to adjust your speed so you can ªdriveº through the
curve. Maintain a reasonable, steady speed. Wait to
accelerate until you are out of the curve, and then
accelerate gently into the straightaway.
Steering in Emergencies
There are times when steering can be more effective than
braking. For example, you come over a hill and find a
truck stopped in your lane, or a car suddenly pulls out
from nowhere, or a child darts out from between parked
cars and stops right in front of you. You can avoid these
problems by braking
-- if you can stop in time. But
sometimes you can't; there isn't room. That's the time for
evasive action
-- steering around the problem.
Your vehicle can perform very well in emergencies like
these. First apply your brakes. See ªBraking in
Emergenciesº earlier in this section. It is better to
remove as much speed as you can from a possible
collision. Then steer around the problem, to the left or
right depending on the space available.
An emergency like this requires close attention and a
quick decision. If you are holding the steering wheel at
the recommended 9 and 3 o'clock positions, you can
turn it a full 180 degrees very quickly without removing
either hand. But you have to act fast, steer quickly, and
just as quickly straighten the wheel once you have
avoided the object.
The fact that such emergency situations are always
possible is a good reason to practice defensive driving at
all times and wear safety belts properly.
Page 244 of 373
5-18 How to Add Coolant to the Radiator
NOTICE:
Your engine has a specific radiator fill procedure.
Failure to follow this procedure could cause your
engine to overheat and be severely damaged.
The radiator pressure cap is located on the passenger's
side in the front of the engine compartment, near the
battery and the diagonal cross brace. See ªEngine
Compartment Overviewº in the Index for more
information on location.
1. You can remove the radiator pressure cap when
the cooling system, including the radiator pressure
cap and upper radiator hose, is no longer hot.
Turn the pressure cap slowly counterclockwise until
it first stops. (Don't press down while turning
the pressure cap.)
If you hear a hiss, wait for that to stop.
A hiss means there is still some pressure left.
Page 245 of 373
5-19
2. Then keep turning the pressure cap, but now push
down as you turn it. Remove the pressure cap.
CAUTION:
You can be burned if you spill coolant on hot
engine parts. Coolant contains ethylene glycol
and it will burn if the engine parts are hot
enough. Don't spill coolant on a hot engine.
3. If you have the 3800 V6 engine, remove the 3800
Series II V6 engine cover shield to access the bleed valve.
A. Clean the area around the engine oil fill tube and cap
before removing. Twist the oil fill tube, with cap
attached, counterclockwise and remove it.
B. If you have the supercharged engine, remove the nut
in the center of the cover shield.
C. Lift the engine cover shield at the front, slide the
catch tab out of the engine bracket and remove the
cover shield.
D. Put the oil fill tube, with cap attached, in the valve
cover oil fill hole until you're ready to replace the
cover shield.
Page 247 of 373
5-21
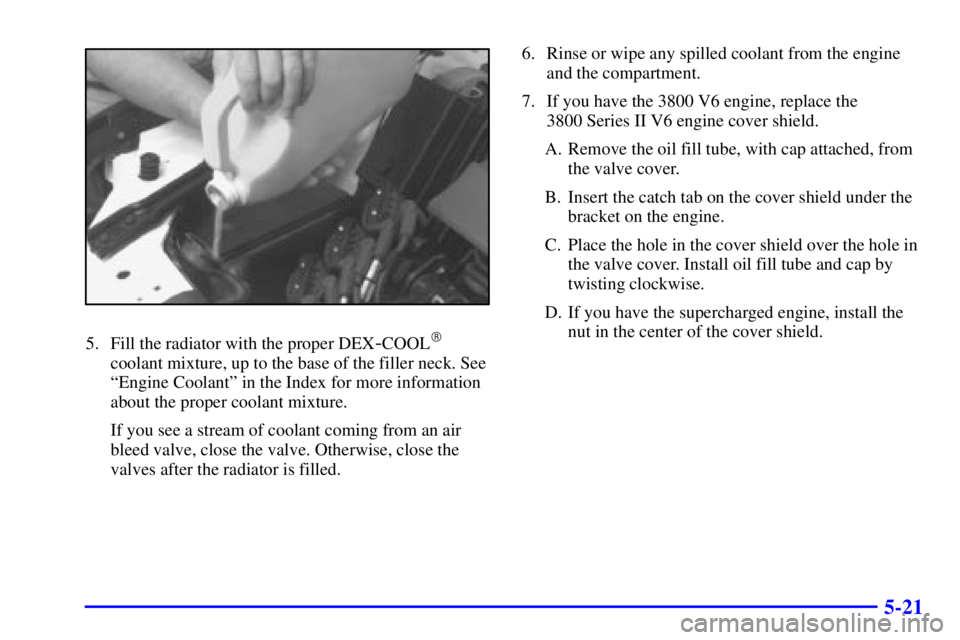
5. Fill the radiator with the proper DEX-COOL�
coolant mixture, up to the base of the filler neck. See
ªEngine Coolantº in the Index for more information
about the proper coolant mixture.
If you see a stream of coolant coming from an air
bleed valve, close the valve. Otherwise, close the
valves after the radiator is filled.6. Rinse or wipe any spilled coolant from the engine
and the compartment.
7. If you have the 3800 V6 engine, replace the
3800 Series II V6 engine cover shield.
A. Remove the oil fill tube, with cap attached, from
the valve cover.
B. Insert the catch tab on the cover shield under the
bracket on the engine.
C. Place the hole in the cover shield over the hole in
the valve cover. Install oil fill tube and cap by
twisting clockwise.
D. If you have the supercharged engine, install the
nut in the center of the cover shield.
Page 251 of 373
5-25 Removing the Spare Tire and Tools
The equipment you'll need
is in the trunk.
Turn the center nut on the compact spare tire cover
counterclockwise to remove it.
Remove the compact spare tire. See ªCompact Spare
Tireº in the Index for more information about the
compact spare tire.