Page 2 of 133
1- Adjustable side vent.
2 - Side window demisting vents.
3 - Lights stalk, fog lamps* and
horn.
4 - Steering wheel with airbag.
5 - Windscreen demisting vents.
6 - Steering lock and ignition.
7 - Windscreen wash-wipe
control.
8 - Adjustable central vents.
9 - Audio equipment*. 10
- Heating/Ventilation,
Air conditioning controls*.
11 - Controls:
Lighter Hazard warning lightsRear screen and mirrors demisting.
12 - Passenger airbag.
13 - Glove box.
14 - Storage compartment.
15 - Ashtray.
16 - Gear lever.
17 - Handbrake. 18
- Audio remote control*.
19 - Fuse box.
20 - Bonnet opening control.
21 - Passenger airbag
disarming switch*.
22 - Control for rear window lock.
23 - Headlamp height
adjustment.
- Instrument dials lighting rheostat.
24 - Controls for:
- Electric mirrors.
- Electric windows.
* According to specification.
YOUR 306 CABRIOLET AT A GLANCE 3
Page 8 of 133
96
12
34
A
94
ELECTRIC WINDOWS
1. Driver's electric window
Manual mode: press or pull the switch lightly. The window stops as soon as the switch is released.
Automatic mode: press or pull the switch firmly. One touch completely opens
or closes the window. Automatic opening and closing only work when the engine is running.
2. PassengerÕs electric window.
3. Left rear electric window.
4. Right rear electric window.
YOUR 306 CABRIOLET AT A GLANCE
8
ADJUSTING THE HEIGHT OF THE STEERING WHEEL Push the handle to unlock the steering wheel. Adjust the steering wheel to the desired height and pull the handleto lock it into position.
ELECTRIC MIRRORS
Turn the knob
Ato the right or to the left to select the
corresponding mirror.
Move the knob in all four directions to adjust the mirror.
Page 10 of 133
46
1
12
YOUR 306 CABRIOLET AT A GLANCE11
ELECTRIC HOOD Opening
- Switch on the ignition.
- Unlock and raise the front of the hood by approximately 10 inches (25 cm) using thetwo side handles 1.
- Press switch 2until the opera-
tion has been completed.
Closing
- Turn the ignition key to position M and lower the front windows.
- Press switch 2until the opera-
tion has been completed.
- Secure the two side handles 1.
Page 12 of 133
56
123
123
45
YOUR 306 CABRIOLET AT A GLANCE
12
5 Recirculation of interior air.
VENTILATION/HEATING/AIR CONDITIONING
1 Air flow adjustment.
2 Temperature adjustment.
3 Air distribution.
Windscreen and side windows. Windscreen, side windows and footwells. Footwells. Central and side vents.
4 Air conditioning on/off.
Page 30 of 133

Using the centre handle and a side handle, fold down the front of thehood, position the side handle hooksin their housings and secure the twohandles.
ELECTRIC HOOD: CLOSING Inside the vehicle:
- Turn the ignition key to position
M
(engine not running, oil pressure warning light on) and lower thefront windows.
- Press the switch 4on the central
console until the operation hasbeen completed (hood unfoldeduntil it stops not quite flush with thewindscreen).
4 As a safety precaution, opening and closingoperations must be car-
ried out when stationary.Driving with the hood
cover open is prohibited. If the boot is not closed, the hood cannot be opened or raised. If the front of the hood is not raised, the hood cannot beopened. Do not carry out too many opera- tions in succession as there is arisk that the battery may becomeflat. Do not place anything in the com- partment reserved for storing thehood as there is a risk of damage. Before opening the hood:
- Ensure that the hood and rear screen are clean.
- Ensure that the hood is dry, oth- erwise the compression it is subjected to when it is foldedwill result in marks or evenstains caused by moisture overtime.
Y OUR 306 CABRIOLET IN DETAIL 47
Page 33 of 133
- Hold the side flaps 7in the open
position using one of the straps 2.
- Disconnect the heated rear screen harness connector 8.
HARD-TOP : REMOVAL
Tools
Your Hard-top is supplied with a tool kit containing: 1
- A storage case.
2 - Two retaining straps.
3 - A screwdriver with two heads.
4 - A pair of gloves.
5 - A special spanner.
6 - A 17mm flat spanner.
6
3
5 1 4
2
11
98
7
2
5
9
12
14
Apply the handbrake. Switch on the ignition.Open all the windows.
Switch off the ignition.
- Unscrew the covers
11on the quar-
ter panels.
- Release the rear fasteners 9using
the special spanner 5(a quarter
turn from the front to the rear of the vehicle.
WARNING The removal-refitting operations described below should have beendemonstrated by your PEUGEOTdealer on handover of your vehicle. If your Hard-top was supplied as an
accessory, the first removal opera-tion must be carried out by an
approved dealer. The operationmust be carried out by three people.
Y
OUR 306 CABRIOLET IN DETAIL
50
Page 34 of 133

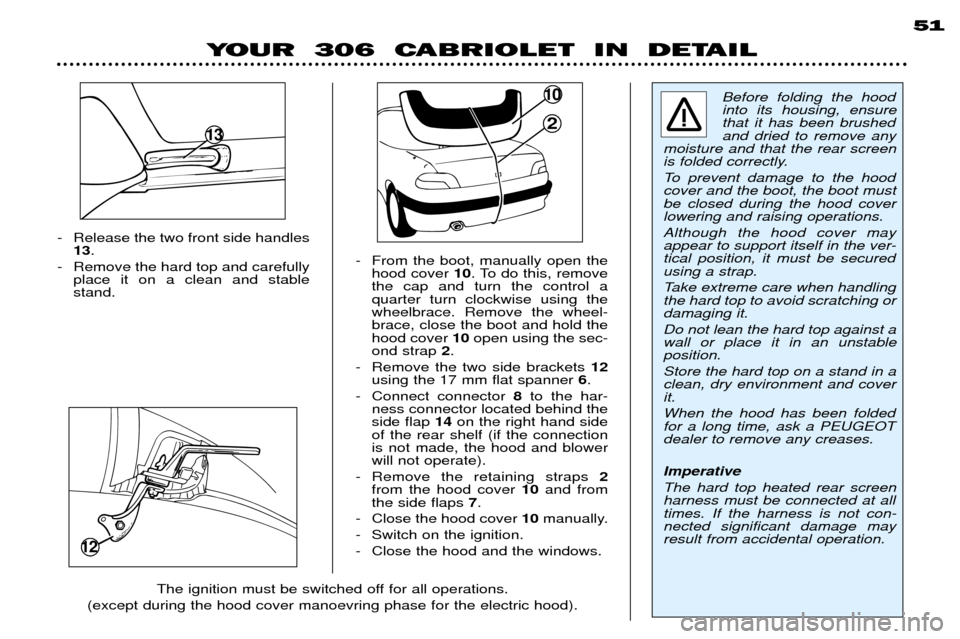
- Release the two front side handles13 .
- Remove the hard top and carefully place it on a clean and stable stand. - From the boot, manually open the
hood cover 10. To do this, remove
the cap and turn the control aquarter turn clockwise using thewheelbrace. Remove the wheel-brace, close the boot and hold thehood cover 10open using the sec-
ond strap 2.
- Remove the two side brackets 12
using the 17 mm flat spanner 6.
- Connect connector 8to the har-
ness connector located behind theside flap 14on the right hand side
of the rear shelf (if the connectionis not made, the hood and blowerwill not operate).
- Remove the retaining straps 2
from the hood cover 10and from
the side flaps 7.
- Close the hood cover 10manually.
- Switch on the ignition.
- Close the hood and the windows.
12
13
10
2 Before folding the hood into its housing, ensurethat it has been brushedand dried to remove any
moisture and that the rear screen
is folded correctly.
To prevent damage to the hood cover and the boot, the boot mustbe closed during the hood coverlowering and raising operations. Although the hood cover may appear to support itself in the ver-tical position, it must be securedusing a strap.
Take extreme care when handling the hard top to avoid scratching ordamaging it. Do not lean the hard top against a wall or place it in an unstableposition. Store the hard top on a stand in a clean, dry environment and coverit. When the hood has been folded for a long time, ask a PEUGEOTdealer to remove any creases. Imperative The hard top heated rear screen harness must be connected at alltimes. If the harness is not con-nected significant damage mayresult from accidental operation.
The ignition must be switched off for all operations.
(except during the hood cover manoevring phase for the electric hood).
Y OUR 306 CABRIOLET IN DETAIL 51
Page 35 of 133

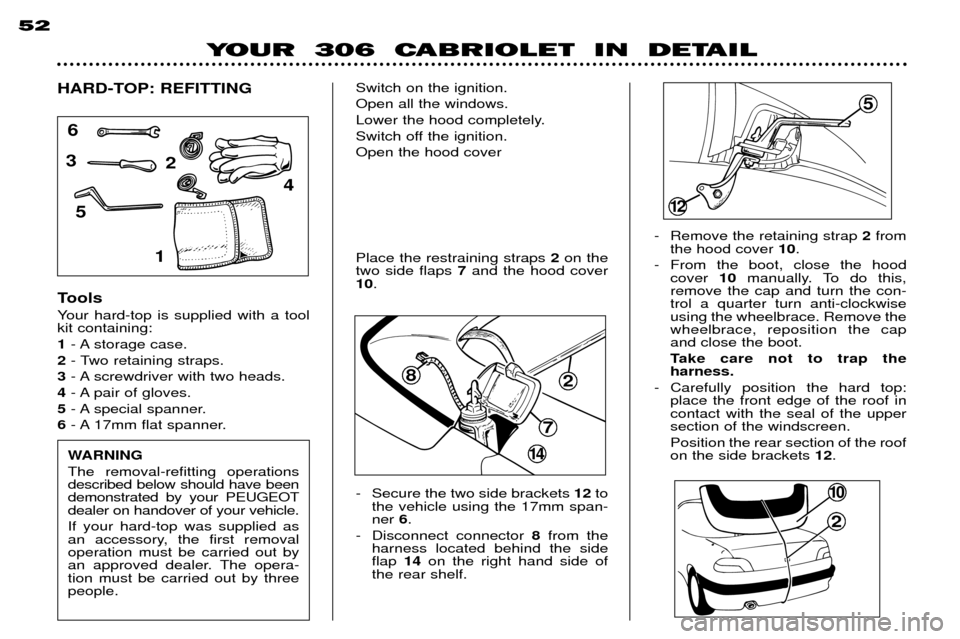
- Secure the two side brackets 12to
the vehicle using the 17mm span- ner 6.
- Disconnect connector 8from the
harness located behind the sideflap 14on the right hand side of
the rear shelf. - Remove the retaining strap
2from
the hood cover 10.
- From the boot, close the hood cover 10manually. To do this,
remove the cap and turn the con-trol a quarter turn anti-clockwiseusing the wheelbrace. Remove thewheelbrace, reposition the capand close the boot.
Take care not to trap the harness.
- Carefully position the hard top: place the front edge of the roof incontact with the seal of the uppersection of the windscreen. Position the rear section of the roof on the side brackets 12.
Place the restraining straps
2on the
two side flaps 7and the hood cover
10 .
HARD-TOP: REFITTING
Tools
Your hard-top is supplied with a tool kit containing: 1
- A storage case.
2 - Two retaining straps.
3 - A screwdriver with two heads.
4 - A pair of gloves.
5 - A special spanner.
6 - A 17mm flat spanner.
6
3
5 1 4
2
10
14
2
82
7
5
12
Switch on the ignition. Open all the windows.
Lower the hood completely.
Switch off the ignition.Open the hood cover
WARNING The removal-refitting operations described below should have beendemonstrated by your PEUGEOTdealer on handover of your vehicle. If your hard-top was supplied as
an accessory, the first removaloperation must be carried out by
an approved dealer. The opera-tion must be carried out by threepeople.
Y OUR 306 CABRIOLET IN DETAIL
52