Page 154 of 263
OWatch for slippery spots (glare ice).
These may appear on an otherwise
clear road in shaded areas. If a patch
of ice is seen ahead, brake before
reaching it. Try not to brake while on
the ice, and avoid any sudden steer-
ing maneuvers.
ODo not use the cruise control on
slippery roads.
OSnow can trap dangerous exhaust
gases under your vehicle. Keep
snow clear of the exhaust pipe and
from around your vehicle.
ENGINE BLOCK HEATER (if so
equipped)
An engine block heater to assist extreme
cold temperature starting is available
through an authorized NISSAN dealer.
WARNING
Do not use your heater with an un-
grounded electrical system or two-
pronged (cheater) adapters. You can be
injured by an electrical shock if you use
an ungrounded connection.
Starting and driving
5-27
ZX
Page 158 of 263
5. Raise the hood to warn other traffic and
to signal professional road assistance
personnel that you require assistance.
6. Have all passengers get out of the ve-
hicle and stand in a safe place away from
traffic and clear of the vehicle.
WARNING
OMake sure the parking brake is se-
curely applied and the manual trans-
mission is shifted into R (Reverse),
or the automatic transmission into P
(Park).
ONever change tires when the vehicle
is on a slope, ice or slippery areas.
This is hazardous.
ONever change tires if oncoming traf-
fic is close to your vehicle. Wait for
professional road assistance.
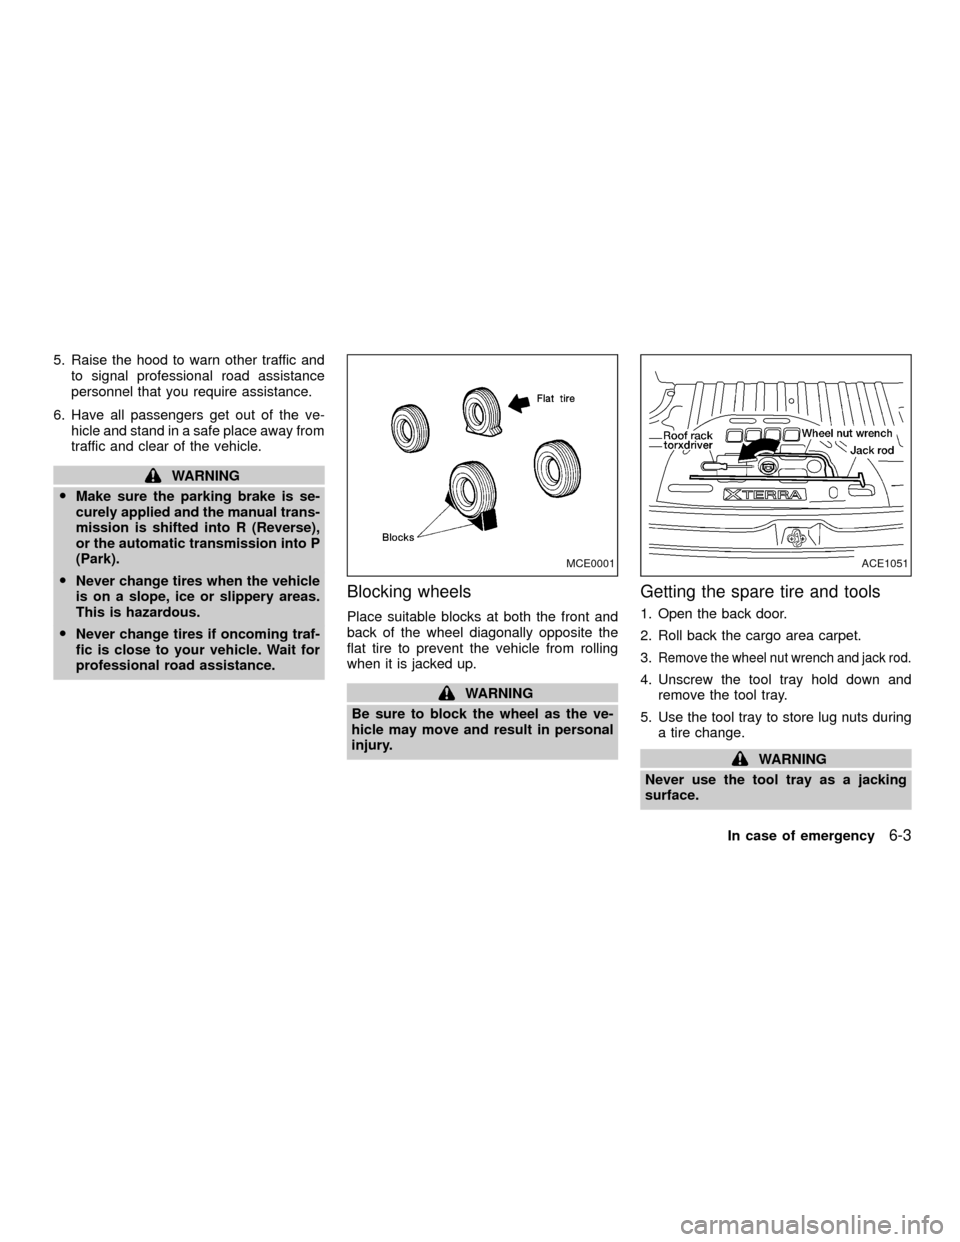
Blocking wheels
Place suitable blocks at both the front and
back of the wheel diagonally opposite the
flat tire to prevent the vehicle from rolling
when it is jacked up.
WARNING
Be sure to block the wheel as the ve-
hicle may move and result in personal
injury.
Getting the spare tire and tools
1. Open the back door.
2. Roll back the cargo area carpet.
3.
Remove the wheel nut wrench and jack rod.
4. Unscrew the tool tray hold down and
remove the tool tray.
5. Use the tool tray to store lug nuts during
a tire change.
WARNING
Never use the tool tray as a jacking
surface.
MCE0001ACE1051
In case of emergency6-3
ZX
Page 160 of 263
rod engaged in the spare tire winch and
turn the jack rod counter clockwise to
lower the spare tire.
10.Once the spare tire is completely low-
ered, reach under the vehicle, remove
the retainer chain, and carefully slide the
tire from under the rear of the vehicle.
CAUTION
Be sure to center the spare tire sus-
pending plate on the wheel and then lift
the spare tire.
CE0047MACE1040
In case of emergency6-5
ZX
Page 162 of 263
ONever jack up the vehicle more than
necessary.
ONever use blocks on or under the
jack.
ONever use the tool tray as a jacking
surface.
ODo not allow passengers to stay in
the vehicle while it is on the jack.
ODo not start or run engine while
vehicle is on the jack. It may cause
the vehicle to move. This is espe-
cially true for vehicles with limited
slip differential carriers.
WARNING
OIncorrect wheel nuts or improperly
tightened wheel nuts can cause the
wheel to become loose or come off.
This could cause an accident.
ODo not use oil or grease on the wheel
studs or nuts. This could cause the
nuts to become loose.
Installing the spare tire
1. Clean any mud or dirt from the surface
between the wheel and hub.
2. Carefully put the spare tire on and tighten
the wheel nuts finger tight.
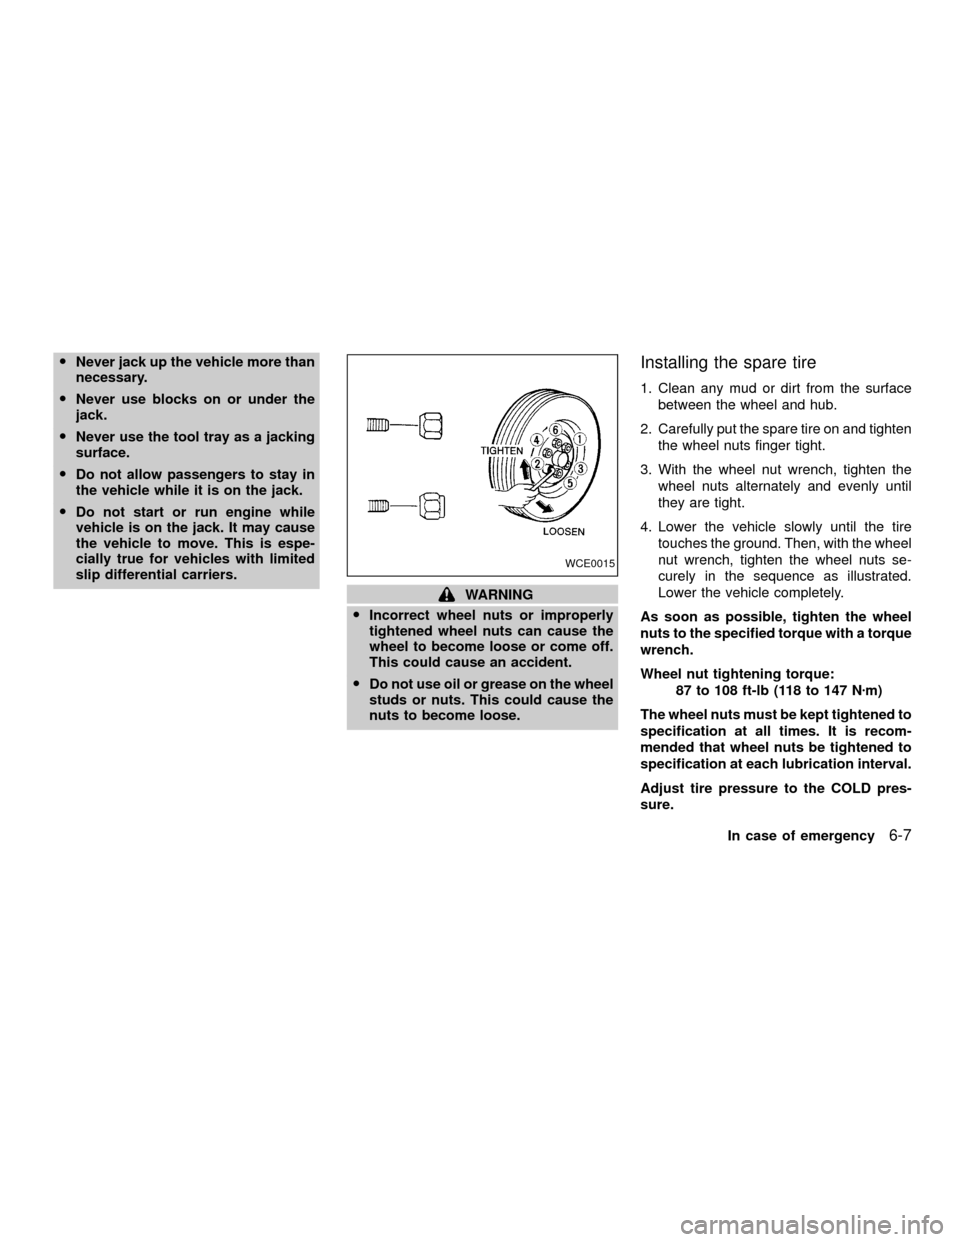
3. With the wheel nut wrench, tighten the
wheel nuts alternately and evenly until
they are tight.
4. Lower the vehicle slowly until the tire
touches the ground. Then, with the wheel
nut wrench, tighten the wheel nuts se-
curely in the sequence as illustrated.
Lower the vehicle completely.
As soon as possible, tighten the wheel
nuts to the specified torque with a torque
wrench.
Wheel nut tightening torque:
87 to 108 ft-lb (118 to 147 Nzm)
The wheel nuts must be kept tightened to
specification at all times. It is recom-
mended that wheel nuts be tightened to
specification at each lubrication interval.
Adjust tire pressure to the COLD pres-
sure.
WCE0015
In case of emergency6-7
ZX
Page 167 of 263
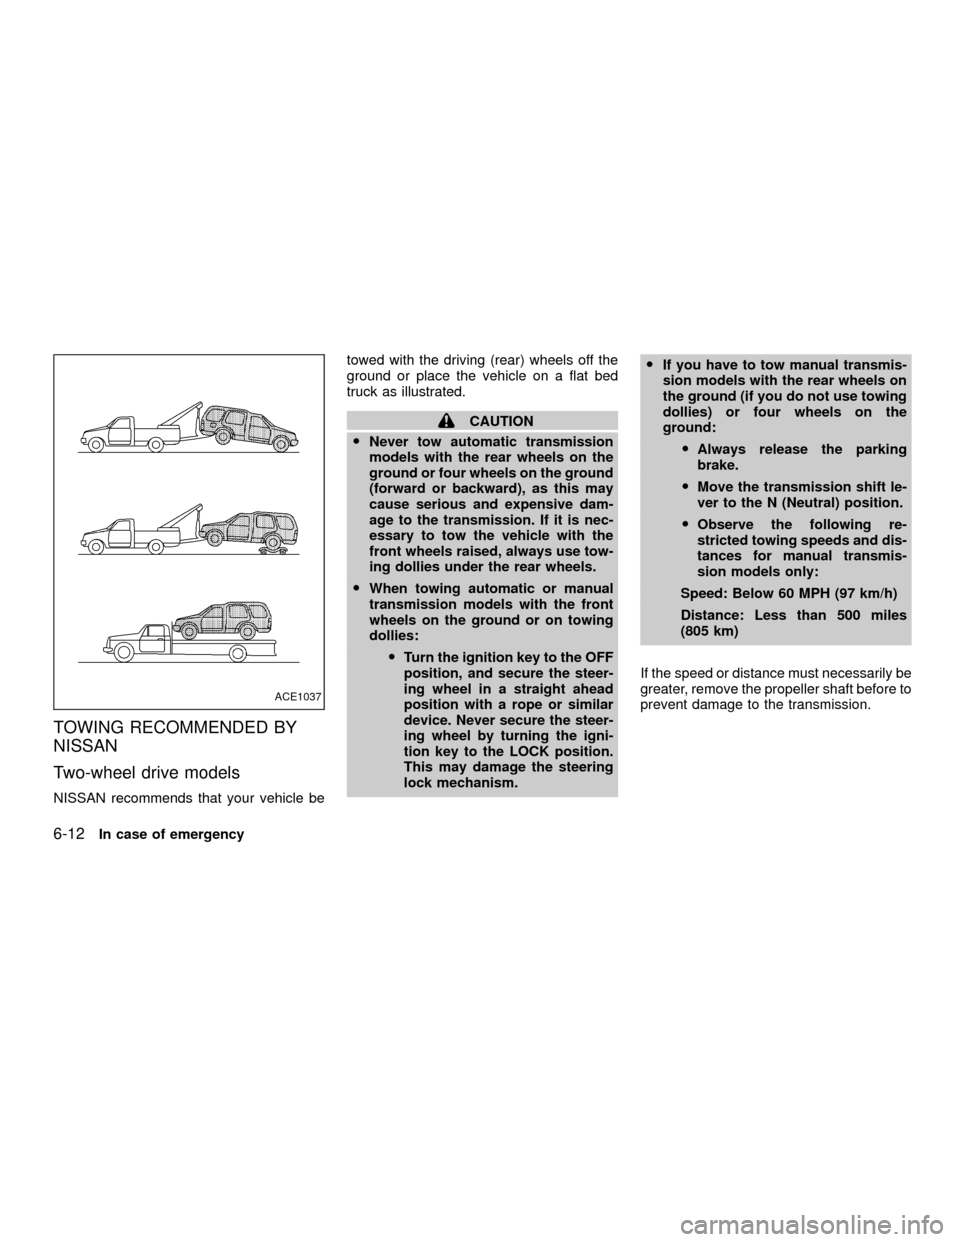
TOWING RECOMMENDED BY
NISSAN
Two-wheel drive models
NISSAN recommends that your vehicle betowed with the driving (rear) wheels off the
ground or place the vehicle on a flat bed
truck as illustrated.
CAUTION
ONever tow automatic transmission
models with the rear wheels on the
ground or four wheels on the ground
(forward or backward), as this may
cause serious and expensive dam-
age to the transmission. If it is nec-
essary to tow the vehicle with the
front wheels raised, always use tow-
ing dollies under the rear wheels.
OWhen towing automatic or manual
transmission models with the front
wheels on the ground or on towing
dollies:
OTurn the ignition key to the OFF
position, and secure the steer-
ing wheel in a straight ahead
position with a rope or similar
device. Never secure the steer-
ing wheel by turning the igni-
tion key to the LOCK position.
This may damage the steering
lock mechanism.OIf you have to tow manual transmis-
sion models with the rear wheels on
the ground (if you do not use towing
dollies) or four wheels on the
ground:
OAlways release the parking
brake.
OMove the transmission shift le-
ver to the N (Neutral) position.
OObserve the following re-
stricted towing speeds and dis-
tances for manual transmis-
sion models only:
Speed: Below 60 MPH (97 km/h)
Distance: Less than 500 miles
(805 km)
If the speed or distance must necessarily be
greater, remove the propeller shaft before to
prevent damage to the transmission.
ACE1037
6-12In case of emergency
ZX
Page 168 of 263
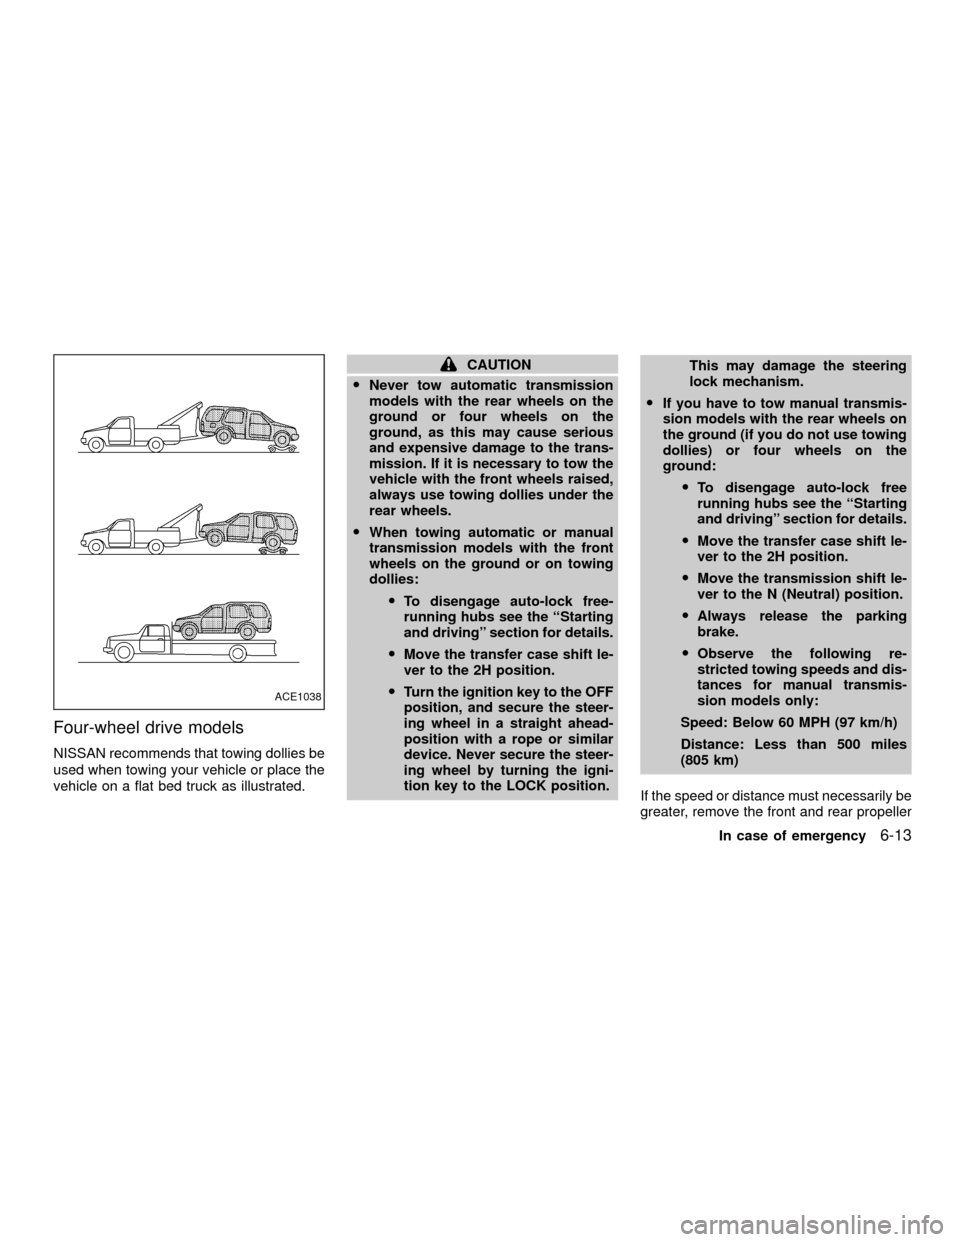
Four-wheel drive models
NISSAN recommends that towing dollies be
used when towing your vehicle or place the
vehicle on a flat bed truck as illustrated.
CAUTION
ONever tow automatic transmission
models with the rear wheels on the
ground or four wheels on the
ground, as this may cause serious
and expensive damage to the trans-
mission. If it is necessary to tow the
vehicle with the front wheels raised,
always use towing dollies under the
rear wheels.
OWhen towing automatic or manual
transmission models with the front
wheels on the ground or on towing
dollies:
OTo disengage auto-lock free-
running hubs see the ``Starting
and driving'' section for details.
OMove the transfer case shift le-
ver to the 2H position.
OTurn the ignition key to the OFF
position, and secure the steer-
ing wheel in a straight ahead-
position with a rope or similar
device. Never secure the steer-
ing wheel by turning the igni-
tion key to the LOCK position.This may damage the steering
lock mechanism.
OIf you have to tow manual transmis-
sion models with the rear wheels on
the ground (if you do not use towing
dollies) or four wheels on the
ground:
OTo disengage auto-lock free
running hubs see the ``Starting
and driving'' section for details.
OMove the transfer case shift le-
ver to the 2H position.
OMove the transmission shift le-
ver to the N (Neutral) position.
OAlways release the parking
brake.
OObserve the following re-
stricted towing speeds and dis-
tances for manual transmis-
sion models only:
Speed: Below 60 MPH (97 km/h)
Distance: Less than 500 miles
(805 km)
If the speed or distance must necessarily be
greater, remove the front and rear propeller
ACE1038
In case of emergency6-13
ZX
Page 177 of 263
When performing any inspection or mainte-
nance work on your vehicle, always take
care to prevent serious accidental injury to
yourself or damage to the vehicle. The
following are general precautions which
should be closely observed.
WARNING
OPark the vehicle on a level surface,
apply the parking brake securely and
block the wheels to prevent the ve-
hicle from moving. For manual trans-
mission models, move the shift lever
to N (Neutral). For automatic trans-
mission models, move the shift lever
to P (Park).
OBe sure the ignition key is in the OFF
or LOCK position when performing
any parts replacement or repairs.
ONever leave the engine or automatic
transmission related component
harnesses disconnected while the
ignition switch is in the ON position.
ONever connect or disconnect the bat-
tery or any transistorized compo-
nent while the ignition switch is in
the ON position.O
If you must work with the engine run-
ning, keep your hands, clothing, hair
and tools away from moving fans,
belts, and any other moving parts.
OIt is advisable to secure or remove
any loose clothing and remove any
jewelry, such as rings, watches, etc.
before working on your vehicle.
OAlways wear eye protection when-
ever you work on your vehicle.
OIf you must run the engine in an
enclosed space such as a garage, be
sure there is proper ventilation for
exhaust gases to escape.
ONever get under the vehicle while it
is supported only by a jack. If it is
necessary to work under the vehicle,
support it with safety stands.
OKeep smoking materials, flame and
sparks away from the fuel tank and
battery.
OOn gasoline engine models with the
multiport fuel injection (MFI) system,
the fuel filter or fuel lines should be
serviced by an authorized NISSAN
dealer because the fuel lines are
under high pressure even when the
engine is off.
CAUTION
ODo not work under the hood while
the engine is hot. Turn the engine off
and wait until it cools down.
ONever connect or disconnect either
the battery or any transistorized
component connector while the igni-
tion is on.
OAvoid contact with used engine oil
and coolant. Improperly disposed
engine oil, engine coolant and/or
other vehicle fluids can damage the
environment. Always conform to lo-
cal regulations for disposal of ve-
hicle fluid.
This ``Do-it-yourself'' section gives instruc-
tions regarding only those items which are
relatively easy for an owner to perform.
You should be aware that incomplete or
improper servicing may result in operating
difficulties or excessive emissions, and
could affect your warranty coverage.If in
doubt about any servicing, have it done
by an authorized NISSAN dealer.
MAINTENANCE
PRECAUTIONS
8-2Do-it-yourself
ZX
Page 182 of 263
1. Remove the splash shield.
ORemove the six push pins.
ORemove the six bolts and the splash
shield.
2. Remove the radiator drain cap. Open the
radiator drain plug located at the bottom
of the radiator. Drain the engine coolant.
OWaste coolant must be disposed of
properly.
OCheck your local regulations.3. Remove the cylinder block drain plug(s).
ADI1113ADI1054WDI0054
Do-it-yourself8-7
ZX