2001 NISSAN XTERRA fog light
[x] Cancel search: fog lightPage 44 of 263

2 Instruments and controls
Meters and gauges ................................................2-2
Speedometer and odometer .............................2-3
Tachometer ........................................................2-5
Engine coolant temperature gauge ...................2-5
Fuel gauge ........................................................2-6
Warning/indicator lights and chimes ......................2-7
Checking bulbs ..................................................2-7
Warning lights ....................................................2-8
Indicator lights .................................................2-10
Chimes............................................................. 2-11
Security system ....................................................2-12
Vehicle security system (if so equipped).........2-12
Windshield wiper and washer switch ...................2-15
Switch operation ..............................................2-15
Rear window wiper and washer switch
(if so equipped) ....................................................2-16
Rear window defogger switch ..............................2-17
Headlight and turn signal switch ..........................2-17
Headlight switch ..............................................2-17
Turn signal switch............................................2-18
Front fog light switch (if so equipped)..................2-19Hazard warning flasher switch .............................2-19
Horn ......................................................................2-20
Cigarette lighter (accessory) and ash tray ...........2-20
Power point (if so equipped) ...........................2-21
Storage .................................................................2-22
Map pocket ......................................................2-22
Cup holders .....................................................2-22
Glove box ........................................................2-23
Luggage hooks ................................................2-24
Tonneau cover .................................................2-25
Windows .............................................................2-25
Power windows (if so equipped) .....................2-25
Manual windows ..............................................2-27
Skyroof (if so equipped) .......................................2-27
Tilting the skyroof ............................................2-27
Removing/installing..........................................2-28
Interior light...........................................................2-29
Map lights (if so equippped).................................2-30
Illuminated entry system ......................................2-30
Battery saver ...................................................2-30
ZX
Page 60 of 263

To defog the rear window, start the engine
and push the rear window defogger switch
on. The rear window defogger indicator light
on the switch comes on. Push the switch
again to turn the defogger off.
The rear window defogger automatically
turns off after approximately 15 minutes.
CAUTION
When cleaning the inner side of the
window, be careful not to scratch or
damage the rear window defogger.HEADLIGHT SWITCH
Lighting
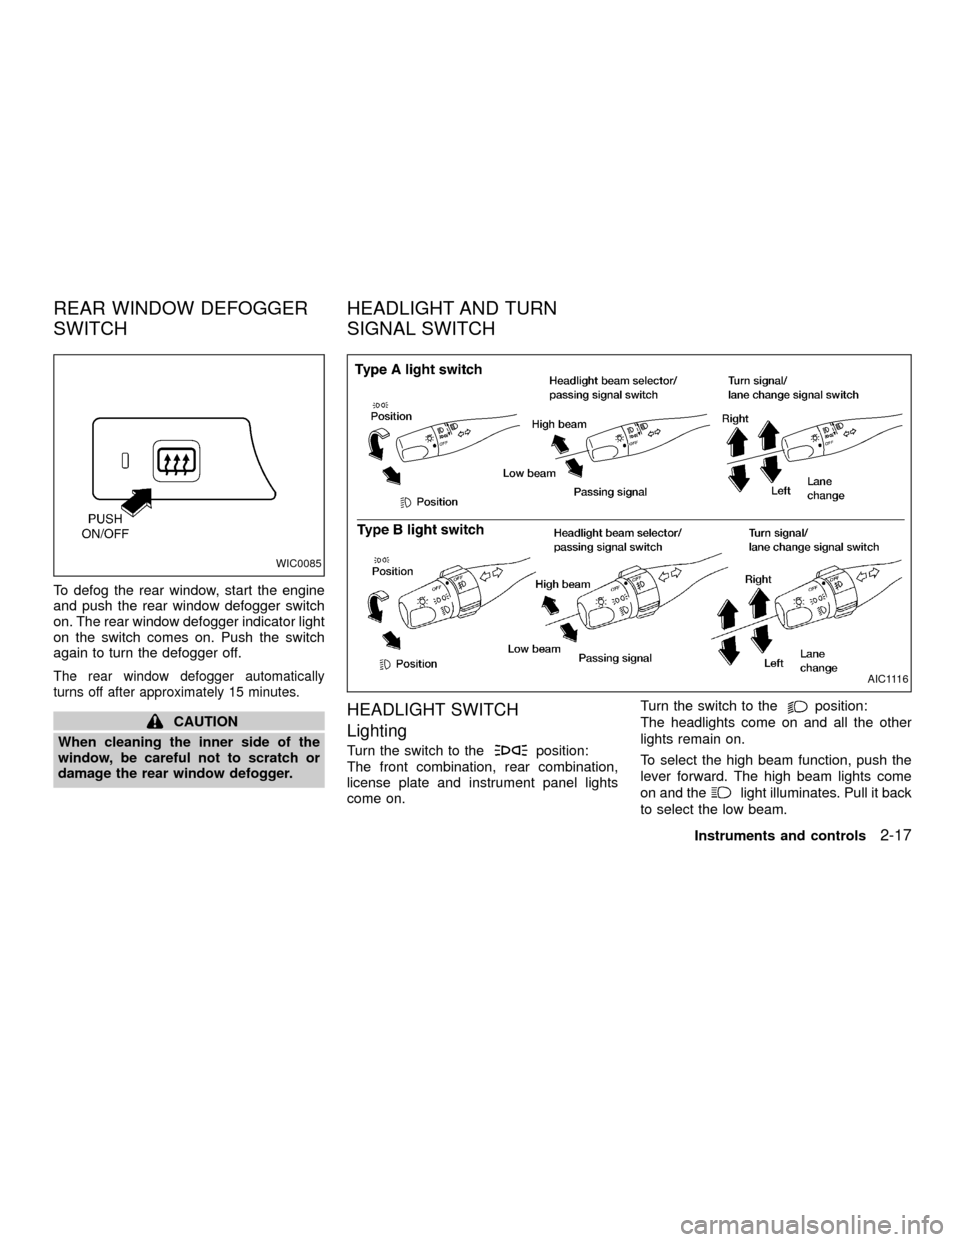
Turn the switch to theposition:
The front combination, rear combination,
license plate and instrument panel lights
come on.Turn the switch to the
position:
The headlights come on and all the other
lights remain on.
To select the high beam function, push the
lever forward. The high beam lights come
on and the
light illuminates. Pull it back
to select the low beam.
WIC0085
AIC1116
REAR WINDOW DEFOGGER
SWITCHHEADLIGHT AND TURN
SIGNAL SWITCH
Instruments and controls2-17
ZX
Page 62 of 263

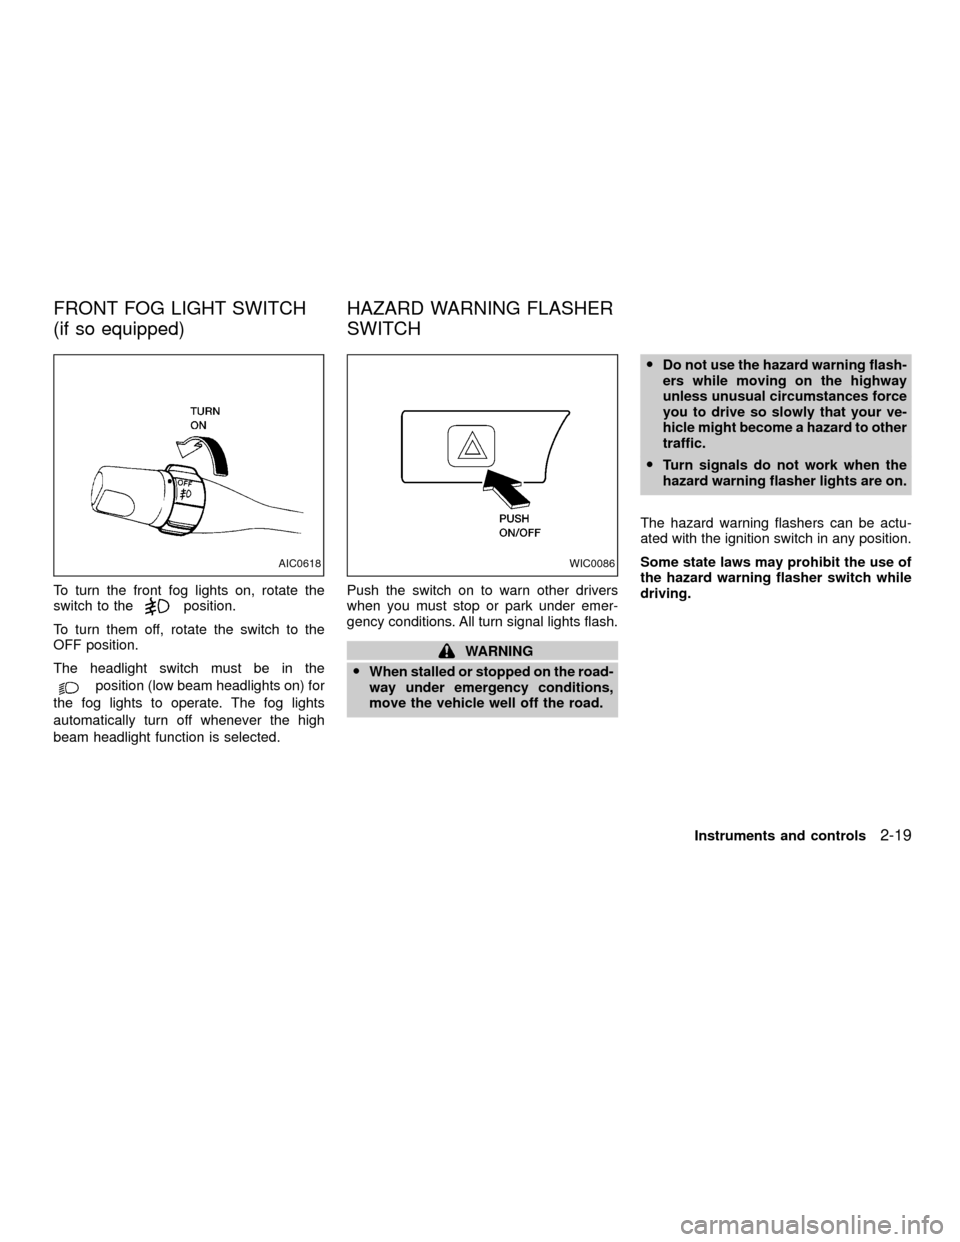
To turn the front fog lights on, rotate the
switch to theposition.
To turn them off, rotate the switch to the
OFF position.
The headlight switch must be in the
position (low beam headlights on) for
the fog lights to operate. The fog lights
automatically turn off whenever the high
beam headlight function is selected.Push the switch on to warn other drivers
when you must stop or park under emer-
gency conditions. All turn signal lights flash.
WARNING
OWhen stalled or stopped on the road-
way under emergency conditions,
move the vehicle well off the road.ODo not use the hazard warning flash-
ers while moving on the highway
unless unusual circumstances force
you to drive so slowly that your ve-
hicle might become a hazard to other
traffic.
OTurn signals do not work when the
hazard warning flasher lights are on.
The hazard warning flashers can be actu-
ated with the ignition switch in any position.
Some state laws may prohibit the use of
the hazard warning flasher switch while
driving.
AIC0618WIC0086
FRONT FOG LIGHT SWITCH
(if so equipped)HAZARD WARNING FLASHER
SWITCH
Instruments and controls2-19
ZX
Page 64 of 263

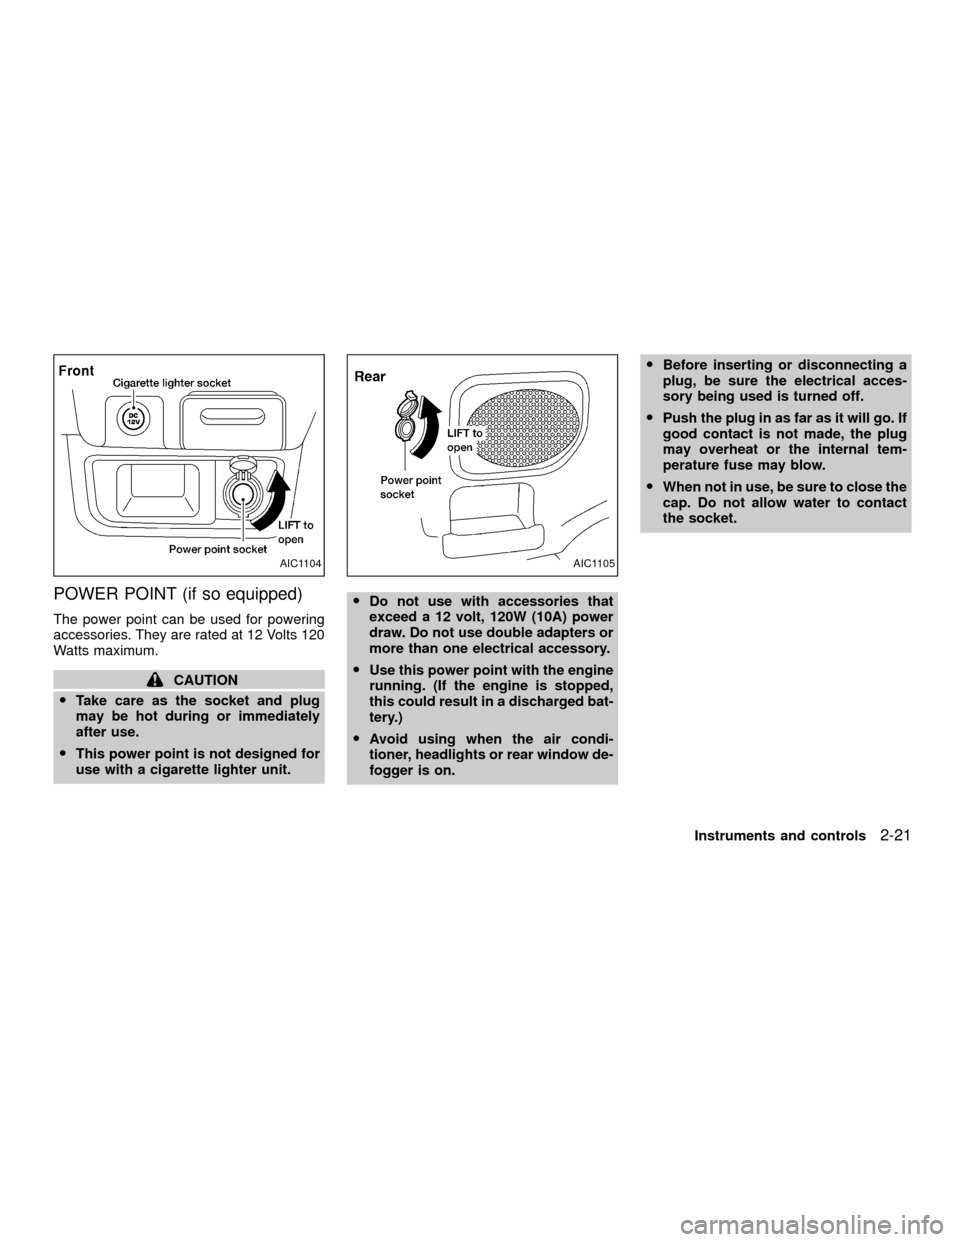
POWER POINT (if so equipped)
The power point can be used for powering
accessories. They are rated at 12 Volts 120
Watts maximum.
CAUTION
OTake care as the socket and plug
may be hot during or immediately
after use.
OThis power point is not designed for
use with a cigarette lighter unit.ODo not use with accessories that
exceed a 12 volt, 120W (10A) power
draw. Do not use double adapters or
more than one electrical accessory.
OUse this power point with the engine
running. (If the engine is stopped,
this could result in a discharged bat-
tery.)
OAvoid using when the air condi-
tioner, headlights or rear window de-
fogger is on.OBefore inserting or disconnecting a
plug, be sure the electrical acces-
sory being used is turned off.
OPush the plug in as far as it will go. If
good contact is not made, the plug
may overheat or the internal tem-
perature fuse may blow.
OWhen not in use, be sure to close the
cap. Do not allow water to contact
the socket.
AIC1104AIC1105
Instruments and controls2-21
ZX
Page 93 of 263

OFF position (indicator light off):
Outside air is drawn into the passenger
compartment and distributed through the
selected outlets.
Use the OFF position for normal heater or
air conditioner operation.
ON position (indicator light on):
Interior air is recirculated inside the vehicle.
Push the
button to the on position
when:
Odriving on a dusty road.
Oto prevent traffic fumes from entering the
passenger compartment.
Ofor maximum cooling when using the air
conditioner.
Air conditioner button
(if so equipped)
Start the engine, move the fan control dial to
the desired (one to four) position, and push
the air conditioner button to turn on the air
conditioner. The indicator light comes on
when the air conditioner is operating. To turn
off the air conditioner, push the button
again.The air conditioner cooling function op-
erates only when the engine is running.
HEATER OPERATION
Heating
This mode is used to direct most of the hot
air to the front and rear floor outlets. Rear
passenger heat is provided by the front
system through floor outlets located under
both front seats. A small amount of air also
flows from the defrost outlets.
1. Push the
button (if so equipped) to
the off position for normal heating.
2. Turn the air control dial to the
posi-
tion.
3. Turn the fan control dial to the desired
position.
4. Turn the temperature control dial to the
desired position between the middle and
the hot position.
Ventilation
This mode directs outside air from the side
and center vents.
1. Push the
button (if so equipped) to
the off position.2. Turn the air control dial to the
posi-
tion.
3. Turn the fan control dial to the desired
position.
4. Turn the temperature control dial to the
desired position.
Defrosting or defogging
This mode directs the air to the defrost
outlets to defrost/defog the windows.
1. Turn the air control dial to the
posi-
tion.
2. Turn the fan control dial to the desired
position.
3. Turn the temperature control dial to the
desired position.
When the
position is selected, the air
conditioner automatically turns on (however
the indicator light will not illuminate) if the
outside temperature is more than
45ÉF(7ÉC). This dehumidifies the air which
helps defog the windshield. The
mode automatically turns off, allow-
ing outside air to be drawn into the passen-
ger compartment to further improve the
defogging performance.
4-4Heater, air conditioner and audio systems
ZX
Page 94 of 263

Bi-level heating
The bi-level mode directs warmed air to the
side and center vents and to the front and
rear floor outlets.
1. Push the
button (if so equipped) to
the off position.
2. Turn the air control dial to the
posi-
tion.
3. Turn the fan control dial to the desired
position.
4. Turn the temperature control dial to the
the desired position.
Heating and defogging
This mode directs a portion of the air to the
defrost outlets to defrost/defog the win-
dows, and also directs air to the front and
rear floor outlets to heat the cabin.
1. Turn the air control dial to the
posi-
tion.
2. Turn the fan control dial to the desired
position.
3. Turn the temperature control dial to the
desired position between the middle and
the hot position.When the
position is selected, the air
conditioner automatically turns on (however
the indicator light will not illuminate) if the
outside temperature is more than 45ÉF
(7ÉC). This dehumidifies the air which helps
defog the windshield. The
mode auto-
maticallly turns off, allowing outside air to be
drawn into the passenger compartment to
further improve the defogging performance.
Operating tips
Clear snow and ice from the wiper
blades and air inlet in front of the wind-
shield. This improves heater operation.
AIR CONDITIONER OPERATION
(if so equipped)
Start the engine, move the fan control dial to
the desired (one to four) position, and push
in the air conditioner button to activate the
air conditioner. When the air conditioner is
on, cooling and dehumidifying functions are
added to the heater operation.
The air conditioner cooling function op-
erates only when the engine is running.
Cooling
This mode directs cooled and dryed air to
the side and center vents to cool and dehu-
midify the cabin.
1. Push the
button to the off position.
2. Turn the air control dial to the
posi-
tion.
3. Turn the fan control dial to the desired
position.
4. Push on the air conditioner button. The
indicator light comes on.
5. Turn the temperature control dial to the
desired position.
For quick cooling when the outside tem-
perature is high, push the
button to
the ON position. Be sure to return the air
recirculation button to the OFF position for
normal cooling.
Dehumidified heating
This mode directs warmed and dryed air to
the front and rear floor outlets to heat and
dehumidify the cabin.
1. Push the
button to the off position.
Heater, air conditioner and audio systems
4-5
ZX
Page 95 of 263

2. Turn the air control dial to theposi-
tion.
3. Turn the fan control dial to the desired
position.
4. Push on the air conditioner button. The
indicator light comes on.
5. Turn the temperature control dial to the
desired position.
Dehumidified defogging
This mode directs warmed and dryed air to
the defrost outlets to defrost/defog the win-
dows.
1. Turn the air control dial to the
posi-
tion.
2. Turn the fan control dial to the desired
position.
3. Push on the air conditioner button. The
indicator light comes on.
4. Turn the temperature control dial to the
desired position.
When the
,or positions in between
are selected, the air conditioner automati-
cally turns on (however the indicator light
will not illuminate) if the outside temperatureis more than 45ÉF(7ÉC). This dehumidifies
the air which helps defog the windshield.
The
mode automatically turns off, al-
lowing outside air to be drawn into the
passenger compartment to further improve
the defogging performance.
Operating tips
OKeep windows and sunroof closed while
the air conditioner is in operation.
OAfter parking in the sun, drive for two or
three minutes with the windows open to
vent hot air from the passenger compart-
ment. Then, close the windows. This
allows the air conditioner to cool the
interior more quickly.
OThe air conditioning system should be
operated for approximately ten min-
utes at least once a month. This helps
prevent damage to the system due to
lack of lubrication.
OIf the engine coolant temperature
gauge indicates engine coolant tem-
perature over the normal range, turn
the air conditioner off. See ``If your
vehicle overheats'' in the ``In case of
emergency'' section of this manual.
AIR FLOW CHARTS
The following charts show the button and
dial positions forMAXIMUM AND QUICK
heating, cooling or defrosting.The air recir-
culation switch should always be in the
OFF position for heating and defrosting.
4-6Heater, air conditioner and audio systems
ZX
Page 176 of 263

8 Do-it-yourself
Maintenance precautions .......................................8-2
Engine compartment check locations ....................8-3
Engine cooling system ...........................................8-5
Checking engine coolant level ..........................8-5
Changing engine coolant ..................................8-6
Engine oil ...............................................................8-9
Checking engine oil level ..................................8-9
Changing engine oil ........................................8-10
Changing engine oil filter.................................8-12
Automatic transmission fluid ................................8-13
Temperature conditions for checking ..............8-13
Power steering fluid..............................................8-14
Brake and clutch fluid...........................................8-15
Window washer fluid ............................................8-16
Window washer fluid reservoir ........................8-16
Battery ..................................................................8-16
Jump starting ...................................................8-17
Drive belts ............................................................8-18
Spark plugs ..........................................................8-19
Replacing spark plugs .....................................8-19
Air cleaner ............................................................8-20Windshield wiper blades ......................................8-22
Cleaning ..........................................................8-22
Replacing .........................................................8-22
Parking brake and brake pedal ............................8-24
Checking parking brake...................................8-24
Checking brake pedal .....................................8-24
Brake booster ..................................................8-25
Clutch pedal .........................................................8-26
Checking clutch pedal .....................................8-26
Fuses ....................................................................8-27
Passenger compartment .................................8-27
Multi-remote controller battery replacement ........8-28
Lights ....................................................................8-29
Headlights ........................................................8-29
Fog lights (if so equipped)...............................8-31
Exterior and interior lights ...............................8-32
Wheels and tires ..................................................8-34
Tire pressure ...................................................8-34
Types of tires ...................................................8-34
Tire chains .......................................................8-35
Changing wheels and tires ..............................8-36
ZX