2001 NISSAN X-TRAIL breaks
[x] Cancel search: breaksPage 56 of 3833
EM-6
[QR]
PRECAUTIONS
Precautions For Liquid Gasket
EBS00MRW
REMOVAL OF LIQUID GASKET
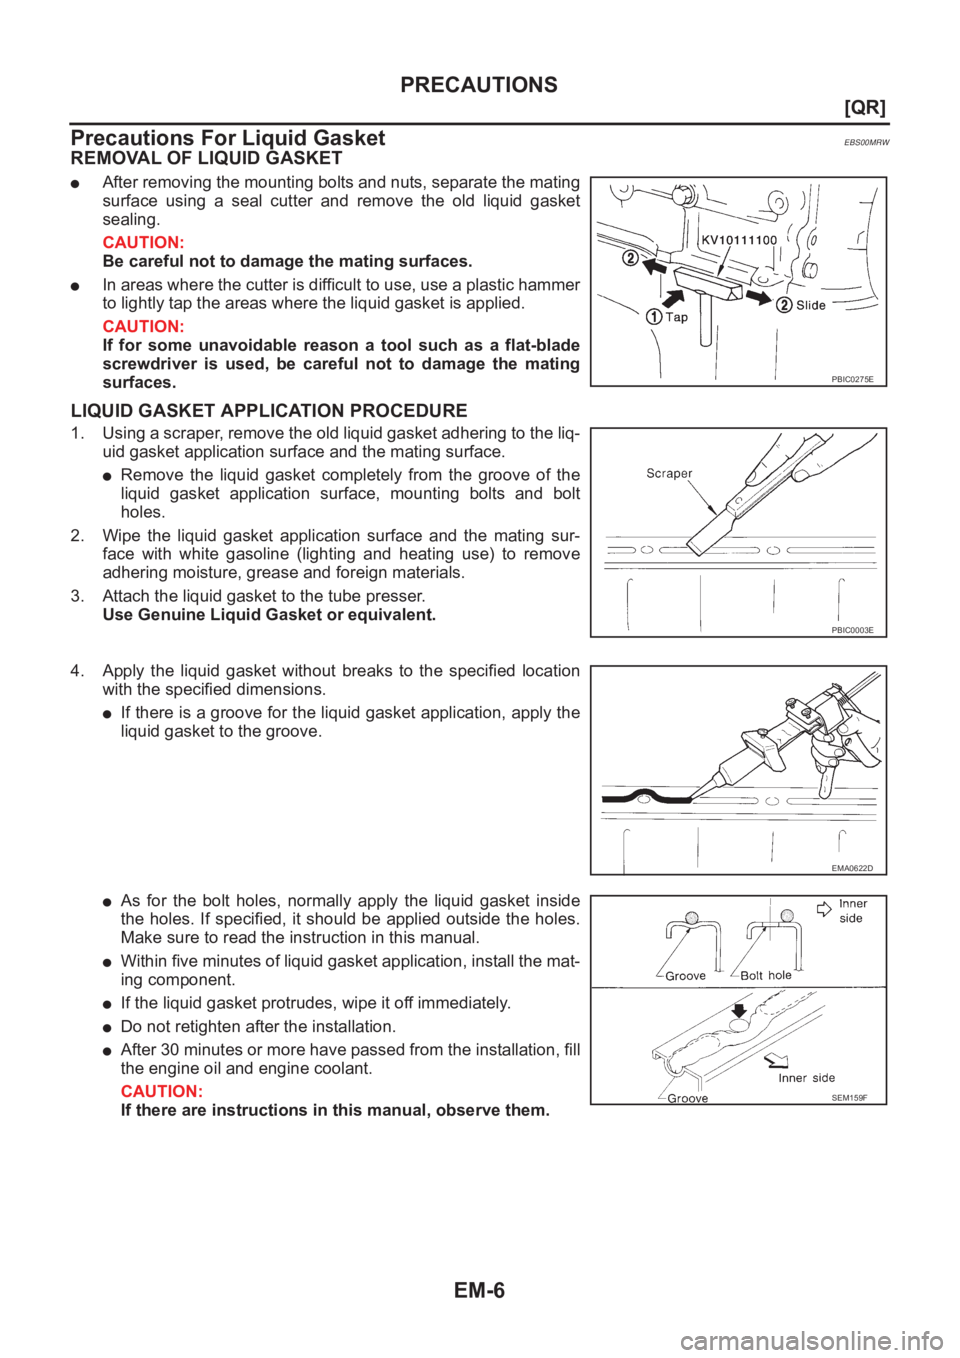
●After removing the mounting bolts and nuts, separate the mating
surface using a seal cutter and remove the old liquid gasket
sealing.
CAUTION:
Be careful not to damage the mating surfaces.
●In areas where the cutter is difficult to use, use a plastic hammer
to lightly tap the areas where the liquid gasket is applied.
CAUTION:
If for some unavoidable reason a tool such as a flat-blade
screwdriver is used, be careful not to damage the mating
surfaces.
LIQUID GASKET APPLICATION PROCEDURE
1. Using a scraper, remove the old liquid gasket adhering to the liq-
uid gasket application surface and the mating surface.
●Remove the liquid gasket completely from the groove of the
liquid gasket application surface, mounting bolts and bolt
holes.
2. Wipe the liquid gasket application surface and the mating sur-
face with white gasoline (lighting and heating use) to remove
adhering moisture, grease and foreign materials.
3. Attach the liquid gasket to the tube presser.
Use Genuine Liquid Gasket or equivalent.
4. Apply the liquid gasket without breaks to the specified location
with the specified dimensions.
●If there is a groove for the liquid gasket application, apply the
liquid gasket to the groove.
●As for the bolt holes, normally apply the liquid gasket inside
the holes. If specified, it should be applied outside the holes.
Make sure to read the instruction in this manual.
●Within five minutes of liquid gasket application, install the mat-
ing component.
●If the liquid gasket protrudes, wipe it off immediately.
●Do not retighten after the installation.
●After 30 minutes or more have passed from the installation, fill
the engine oil and engine coolant.
CAUTION:
If there are instructions in this manual, observe them.
PBIC0275E
PBIC0003E
EMA0622D
SEM159F
Page 161 of 3833
PRECAUTIONS
EM-111
[YD22DDTi]
C
D
E
F
G
H
I
J
K
L
MA
EM
Precautions For Liquid GasketEBS00ODW
REMOVAL OF LIQUID GASKET
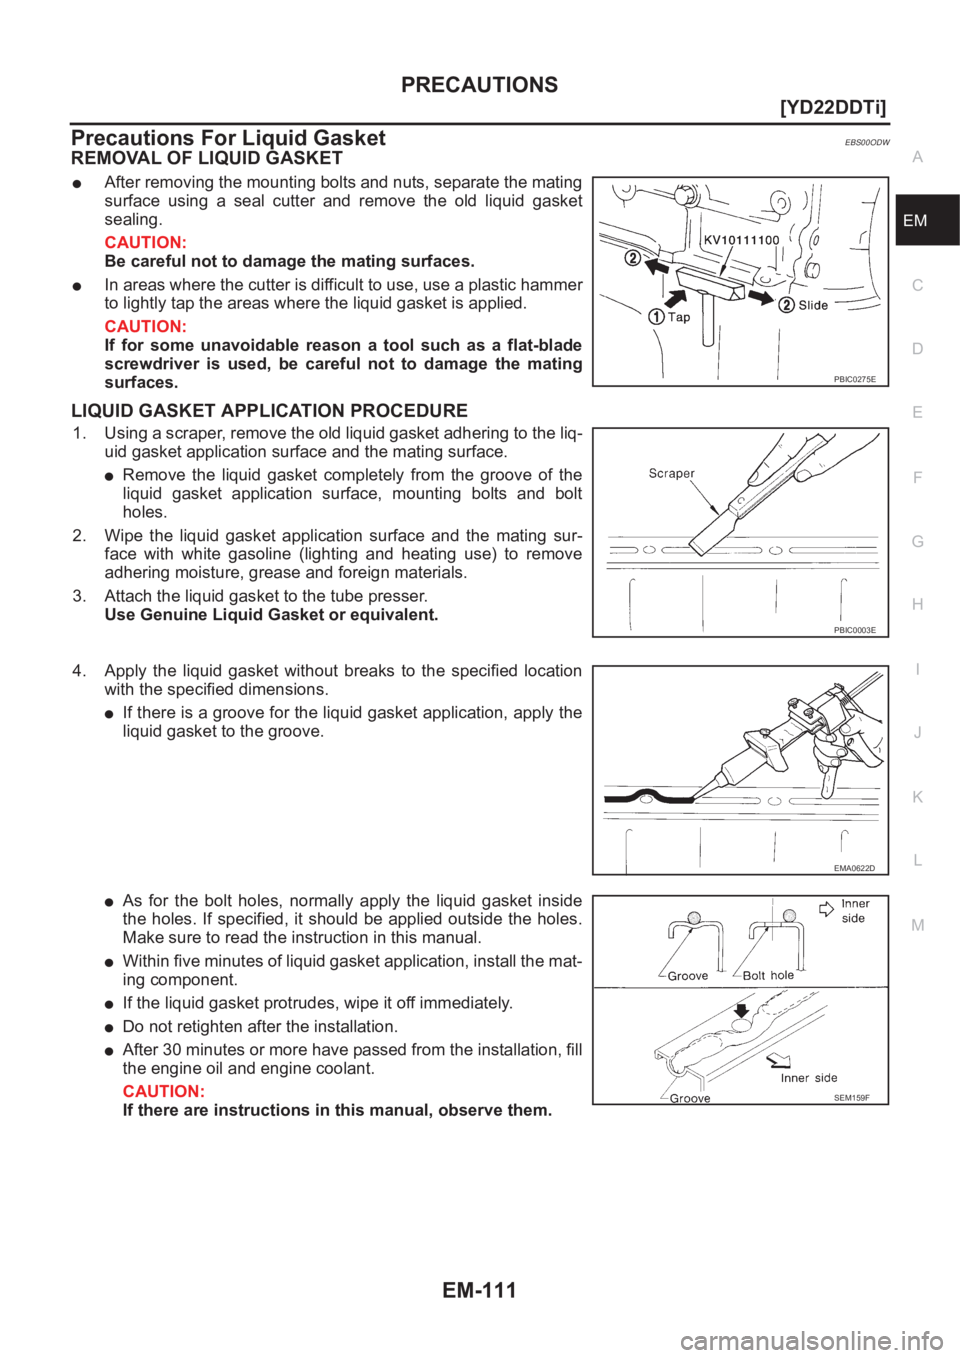
●After removing the mounting bolts and nuts, separate the mating
surface using a seal cutter and remove the old liquid gasket
sealing.
CAUTION:
Be careful not to damage the mating surfaces.
●In areas where the cutter is difficult to use, use a plastic hammer
to lightly tap the areas where the liquid gasket is applied.
CAUTION:
If for some unavoidable reason a tool such as a flat-blade
screwdriver is used, be careful not to damage the mating
surfaces.
LIQUID GASKET APPLICATION PROCEDURE
1. Using a scraper, remove the old liquid gasket adhering to the liq-
uid gasket application surface and the mating surface.
●Remove the liquid gasket completely from the groove of the
liquid gasket application surface, mounting bolts and bolt
holes.
2. Wipe the liquid gasket application surface and the mating sur-
face with white gasoline (lighting and heating use) to remove
adhering moisture, grease and foreign materials.
3. Attach the liquid gasket to the tube presser.
Use Genuine Liquid Gasket or equivalent.
4. Apply the liquid gasket without breaks to the specified location
with the specified dimensions.
●If there is a groove for the liquid gasket application, apply the
liquid gasket to the groove.
●As for the bolt holes, normally apply the liquid gasket inside
the holes. If specified, it should be applied outside the holes.
Make sure to read the instruction in this manual.
●Within five minutes of liquid gasket application, install the mat-
ing component.
●If the liquid gasket protrudes, wipe it off immediately.
●Do not retighten after the installation.
●After 30 minutes or more have passed from the installation, fill
the engine oil and engine coolant.
CAUTION:
If there are instructions in this manual, observe them.
PBIC0275E
PBIC0003E
EMA0622D
SEM159F
Page 283 of 3833
PRECAUTIONS
LU-3
[QR]
C
D
E
F
G
H
I
J
K
L
MA
LU
[QR]PRECAUTIONSPFP:00001
Precautions For Liquid GasketEBS00ODQ
REMOVAL OF LIQUID GASKET
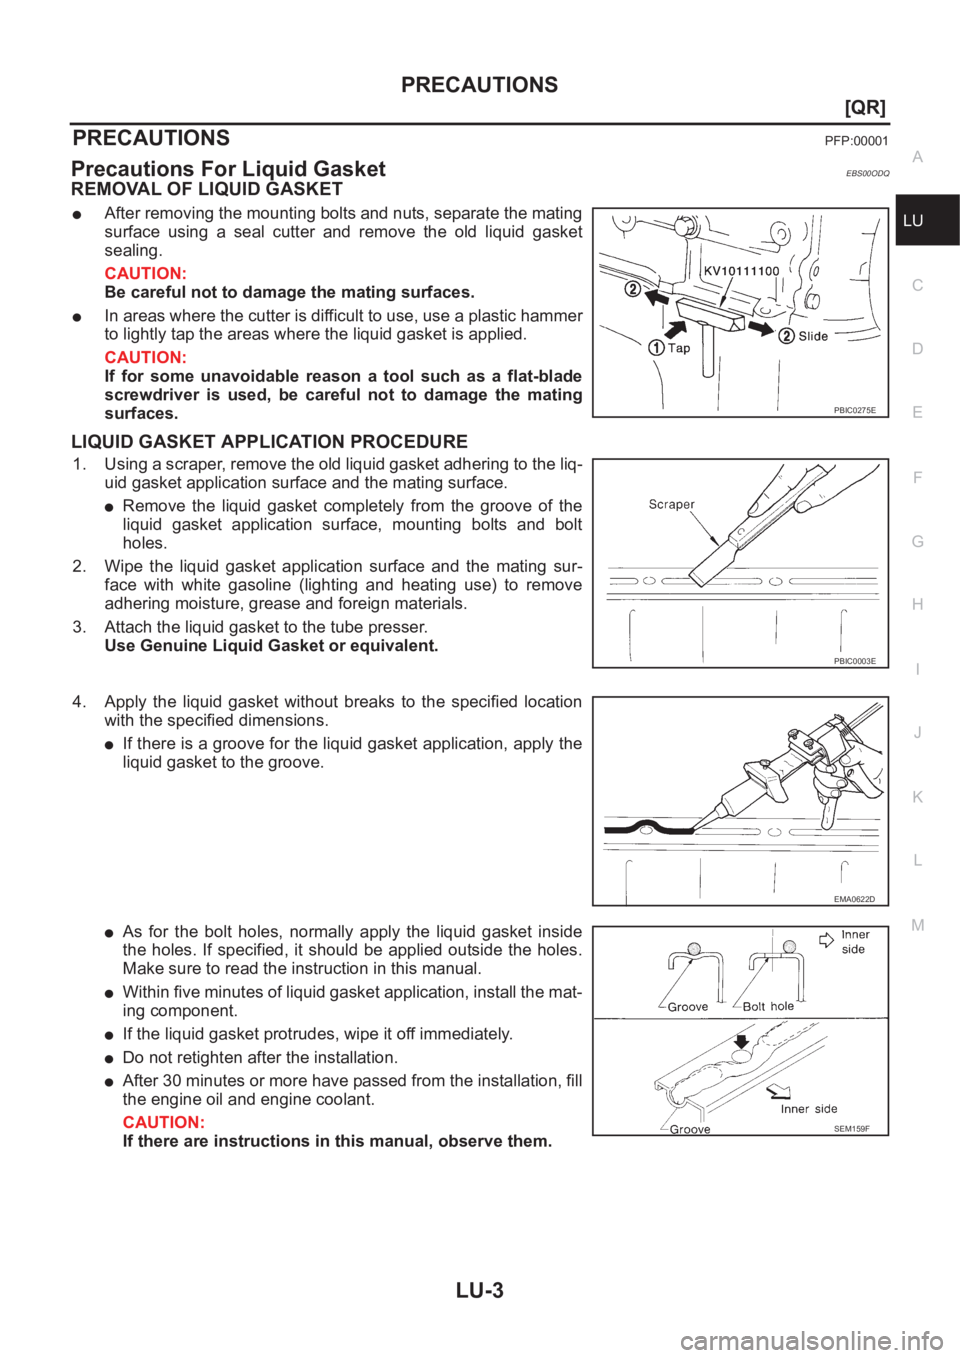
●After removing the mounting bolts and nuts, separate the mating
surface using a seal cutter and remove the old liquid gasket
sealing.
CAUTION:
Be careful not to damage the mating surfaces.
●In areas where the cutter is difficult to use, use a plastic hammer
to lightly tap the areas where the liquid gasket is applied.
CAUTION:
If for some unavoidable reason a tool such as a flat-blade
screwdriver is used, be careful not to damage the mating
surfaces.
LIQUID GASKET APPLICATION PROCEDURE
1. Using a scraper, remove the old liquid gasket adhering to the liq-
uid gasket application surface and the mating surface.
●Remove the liquid gasket completely from the groove of the
liquid gasket application surface, mounting bolts and bolt
holes.
2. Wipe the liquid gasket application surface and the mating sur-
face with white gasoline (lighting and heating use) to remove
adhering moisture, grease and foreign materials.
3. Attach the liquid gasket to the tube presser.
Use Genuine Liquid Gasket or equivalent.
4. Apply the liquid gasket without breaks to the specified location
with the specified dimensions.
●If there is a groove for the liquid gasket application, apply the
liquid gasket to the groove.
●As for the bolt holes, normally apply the liquid gasket inside
the holes. If specified, it should be applied outside the holes.
Make sure to read the instruction in this manual.
●Within five minutes of liquid gasket application, install the mat-
ing component.
●If the liquid gasket protrudes, wipe it off immediately.
●Do not retighten after the installation.
●After 30 minutes or more have passed from the installation, fill
the engine oil and engine coolant.
CAUTION:
If there are instructions in this manual, observe them.
PBIC0275E
PBIC0003E
EMA0622D
SEM159F
Page 293 of 3833
OIL COOLER
LU-13
[QR]
C
D
E
F
G
H
I
J
K
L
MA
LU
OIL COOLERPFP:21305
Removal and InstallationEBS00KO8
WARNING:
Be careful not to get burned when the engine and engine oil are hot.
CAUTION:
●When removing oil cooler, prepare a shop cloth to absorb any engine oil leakage or spillage.
●Completely wipe off any engine oil that adhere to the engine and the vehicle.
REMOVAL
1. Remove front RH wheel and engine room right side cover.
2. Drain engine coolant by removing cylinder block drain plug and radiator drain cock. Refer to CO-9,
"Changing Engine Coolant" .
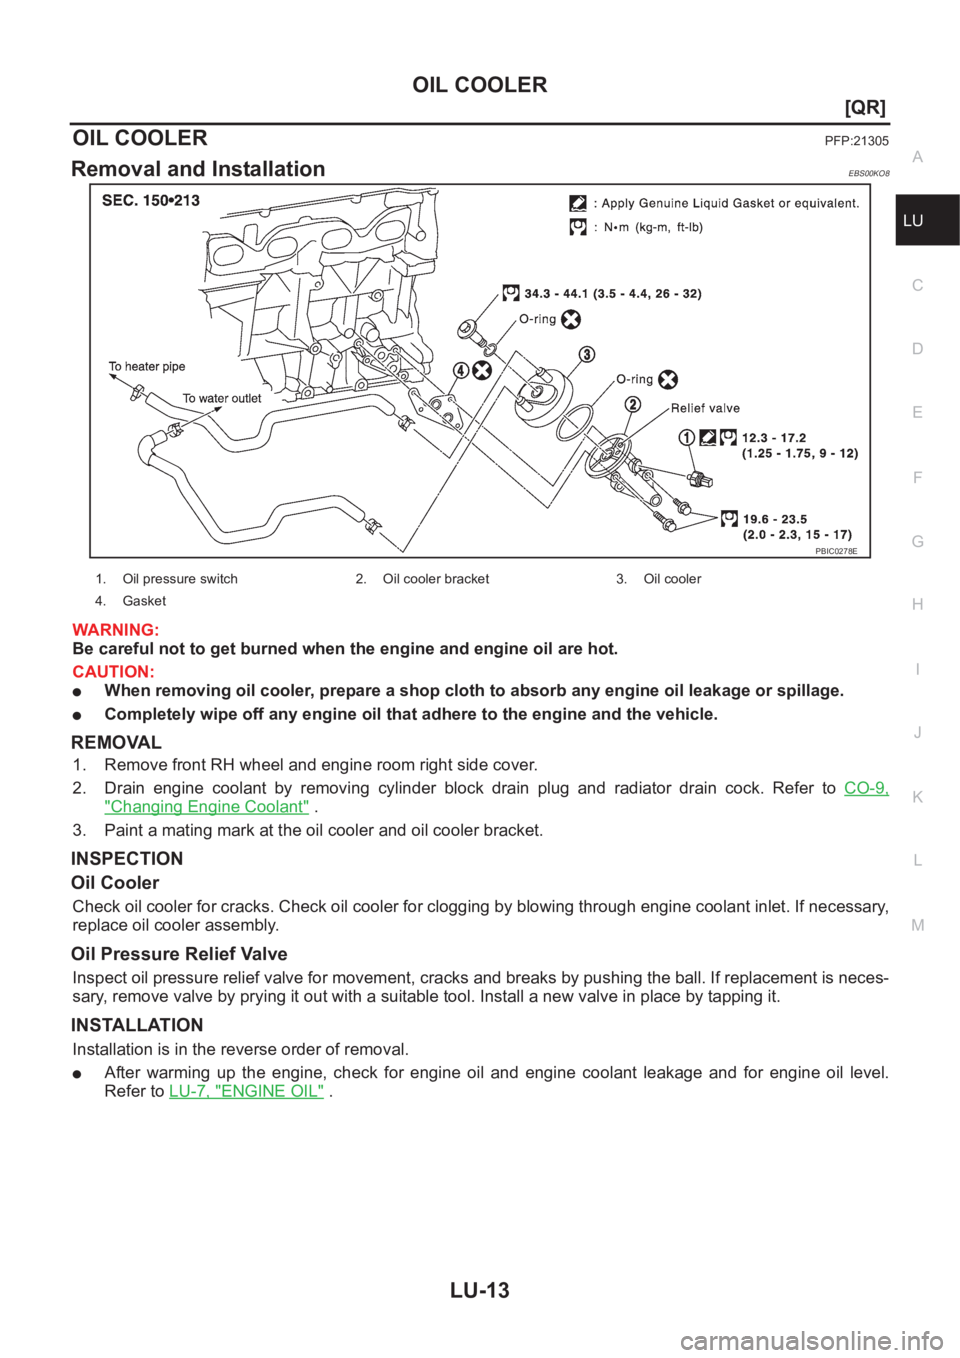
3. Paint a mating mark at the oil cooler and oil cooler bracket.
INSPECTION
Oil Cooler
Check oil cooler for cracks. Check oil cooler for clogging by blowing through engine coolant inlet. If necessary,
replace oil cooler assembly.
Oil Pressure Relief Valve
Inspect oil pressure relief valve for movement, cracks and breaks by pushing the ball. If replacement is neces-
sary, remove valve by prying it out with a suitable tool. Install a new valve in place by tapping it.
INSTALLATION
Installation is in the reverse order of removal.
●After warming up the engine, check for engine oil and engine coolant leakage and for engine oil level.
Refer to LU-7, "
ENGINE OIL" .
PBIC0278E
1. Oil pressure switch 2. Oil cooler bracket 3. Oil cooler
4. Gasket
Page 295 of 3833
PRECAUTIONS
LU-15
[YD22DDTi]
C
D
E
F
G
H
I
J
K
L
MA
LU
[YD22DDTi]PRECAUTIONSPFP:00001
Precautions For Liquid GasketEBS00MRV
REMOVAL OF LIQUID GASKET
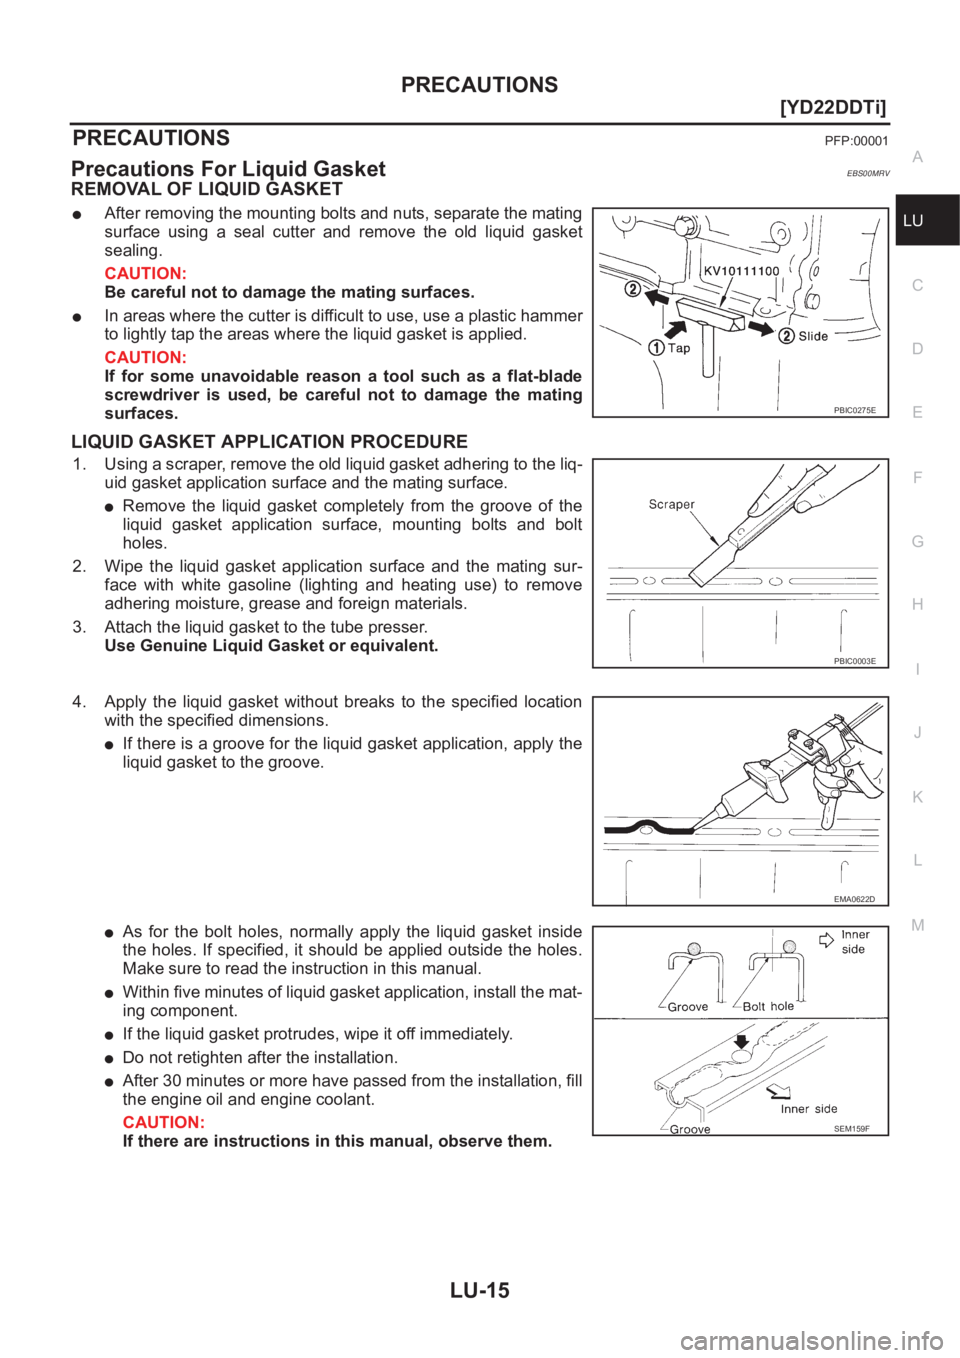
●After removing the mounting bolts and nuts, separate the mating
surface using a seal cutter and remove the old liquid gasket
sealing.
CAUTION:
Be careful not to damage the mating surfaces.
●In areas where the cutter is difficult to use, use a plastic hammer
to lightly tap the areas where the liquid gasket is applied.
CAUTION:
If for some unavoidable reason a tool such as a flat-blade
screwdriver is used, be careful not to damage the mating
surfaces.
LIQUID GASKET APPLICATION PROCEDURE
1. Using a scraper, remove the old liquid gasket adhering to the liq-
uid gasket application surface and the mating surface.
●Remove the liquid gasket completely from the groove of the
liquid gasket application surface, mounting bolts and bolt
holes.
2. Wipe the liquid gasket application surface and the mating sur-
face with white gasoline (lighting and heating use) to remove
adhering moisture, grease and foreign materials.
3. Attach the liquid gasket to the tube presser.
Use Genuine Liquid Gasket or equivalent.
4. Apply the liquid gasket without breaks to the specified location
with the specified dimensions.
●If there is a groove for the liquid gasket application, apply the
liquid gasket to the groove.
●As for the bolt holes, normally apply the liquid gasket inside
the holes. If specified, it should be applied outside the holes.
Make sure to read the instruction in this manual.
●Within five minutes of liquid gasket application, install the mat-
ing component.
●If the liquid gasket protrudes, wipe it off immediately.
●Do not retighten after the installation.
●After 30 minutes or more have passed from the installation, fill
the engine oil and engine coolant.
CAUTION:
If there are instructions in this manual, observe them.
PBIC0275E
PBIC0003E
EMA0622D
SEM159F
Page 309 of 3833
PRECAUTIONS
CO-3
[QR]
C
D
E
F
G
H
I
J
K
L
MA
CO
[QR]PRECAUTIONSPFP:00001
Precautions For Liquid GasketEBS00MRX
REMOVAL OF LIQUID GASKET
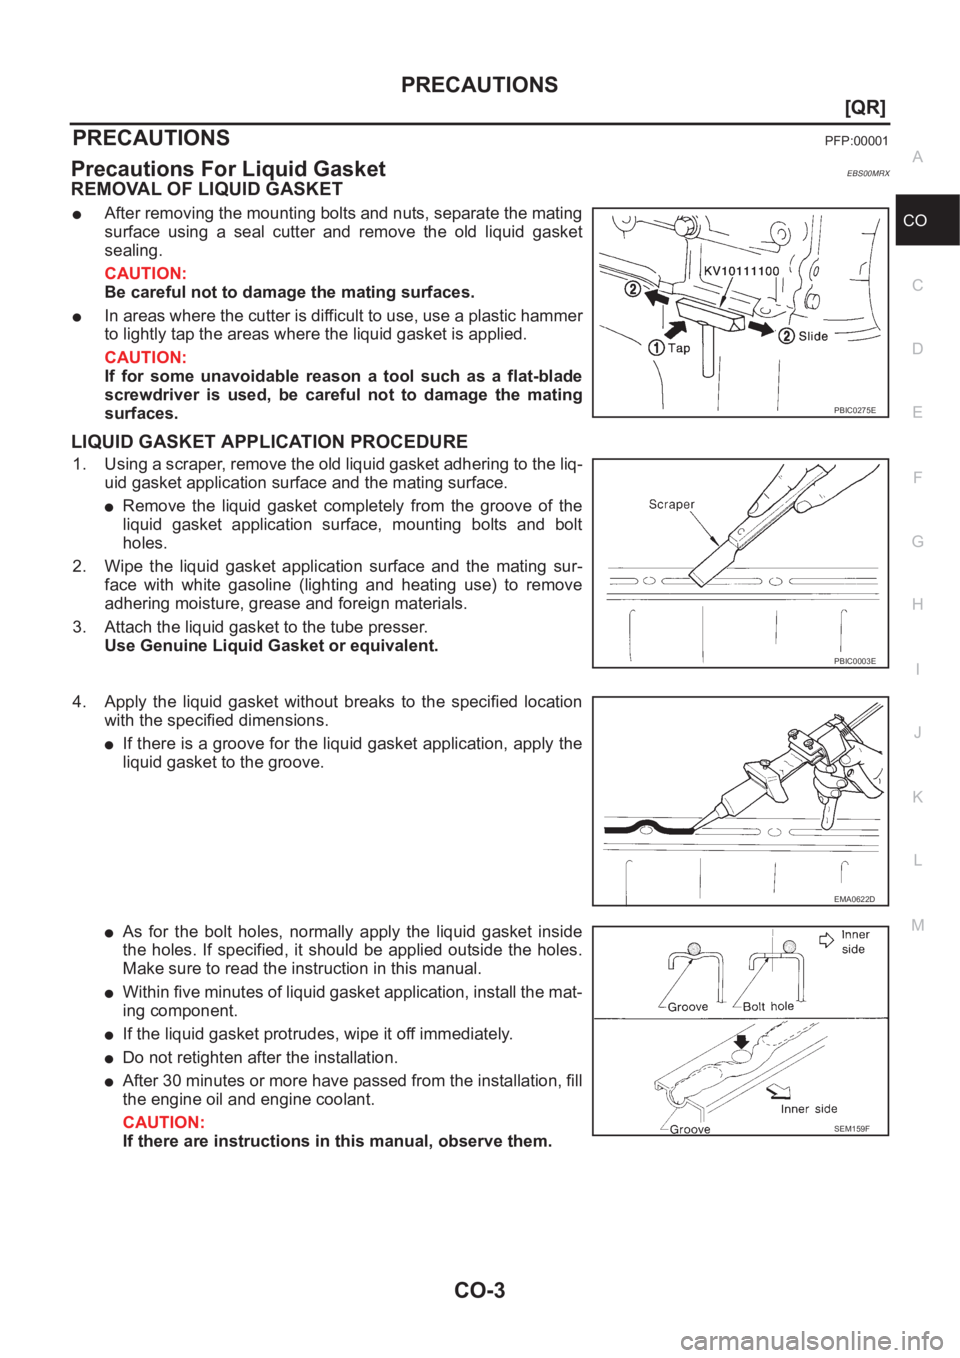
●After removing the mounting bolts and nuts, separate the mating
surface using a seal cutter and remove the old liquid gasket
sealing.
CAUTION:
Be careful not to damage the mating surfaces.
●In areas where the cutter is difficult to use, use a plastic hammer
to lightly tap the areas where the liquid gasket is applied.
CAUTION:
If for some unavoidable reason a tool such as a flat-blade
screwdriver is used, be careful not to damage the mating
surfaces.
LIQUID GASKET APPLICATION PROCEDURE
1. Using a scraper, remove the old liquid gasket adhering to the liq-
uid gasket application surface and the mating surface.
●Remove the liquid gasket completely from the groove of the
liquid gasket application surface, mounting bolts and bolt
holes.
2. Wipe the liquid gasket application surface and the mating sur-
face with white gasoline (lighting and heating use) to remove
adhering moisture, grease and foreign materials.
3. Attach the liquid gasket to the tube presser.
Use Genuine Liquid Gasket or equivalent.
4. Apply the liquid gasket without breaks to the specified location
with the specified dimensions.
●If there is a groove for the liquid gasket application, apply the
liquid gasket to the groove.
●As for the bolt holes, normally apply the liquid gasket inside
the holes. If specified, it should be applied outside the holes.
Make sure to read the instruction in this manual.
●Within five minutes of liquid gasket application, install the mat-
ing component.
●If the liquid gasket protrudes, wipe it off immediately.
●Do not retighten after the installation.
●After 30 minutes or more have passed from the installation, fill
the engine oil and engine coolant.
CAUTION:
If there are instructions in this manual, observe them.
PBIC0275E
PBIC0003E
EMA0622D
SEM159F
Page 329 of 3833
PRECAUTIONS
CO-23
[YD22DDTi]
C
D
E
F
G
H
I
J
K
L
MA
CO
[YD22DDTi]PRECAUTIONSPFP:00001
Precautions For Liquid GasketEBS00MRY
REMOVAL OF LIQUID GASKET
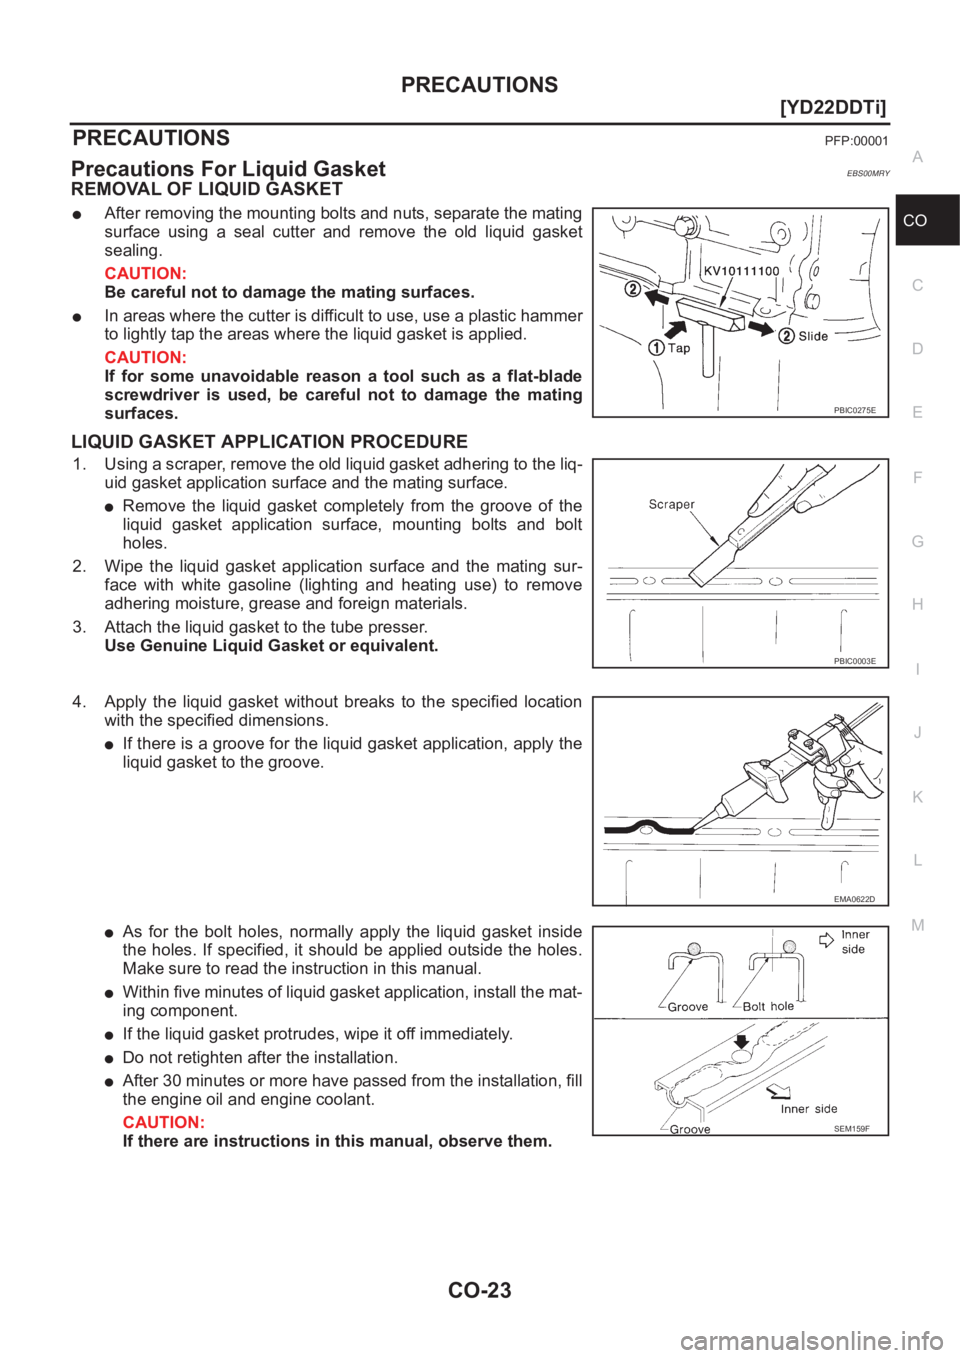
●After removing the mounting bolts and nuts, separate the mating
surface using a seal cutter and remove the old liquid gasket
sealing.
CAUTION:
Be careful not to damage the mating surfaces.
●In areas where the cutter is difficult to use, use a plastic hammer
to lightly tap the areas where the liquid gasket is applied.
CAUTION:
If for some unavoidable reason a tool such as a flat-blade
screwdriver is used, be careful not to damage the mating
surfaces.
LIQUID GASKET APPLICATION PROCEDURE
1. Using a scraper, remove the old liquid gasket adhering to the liq-
uid gasket application surface and the mating surface.
●Remove the liquid gasket completely from the groove of the
liquid gasket application surface, mounting bolts and bolt
holes.
2. Wipe the liquid gasket application surface and the mating sur-
face with white gasoline (lighting and heating use) to remove
adhering moisture, grease and foreign materials.
3. Attach the liquid gasket to the tube presser.
Use Genuine Liquid Gasket or equivalent.
4. Apply the liquid gasket without breaks to the specified location
with the specified dimensions.
●If there is a groove for the liquid gasket application, apply the
liquid gasket to the groove.
●As for the bolt holes, normally apply the liquid gasket inside
the holes. If specified, it should be applied outside the holes.
Make sure to read the instruction in this manual.
●Within five minutes of liquid gasket application, install the mat-
ing component.
●If the liquid gasket protrudes, wipe it off immediately.
●Do not retighten after the installation.
●After 30 minutes or more have passed from the installation, fill
the engine oil and engine coolant.
CAUTION:
If there are instructions in this manual, observe them.
PBIC0275E
PBIC0003E
EMA0622D
SEM159F
Page 376 of 3833
EC-26
[QR25(WITH EURO-OBD)]
PRECAUTIONS
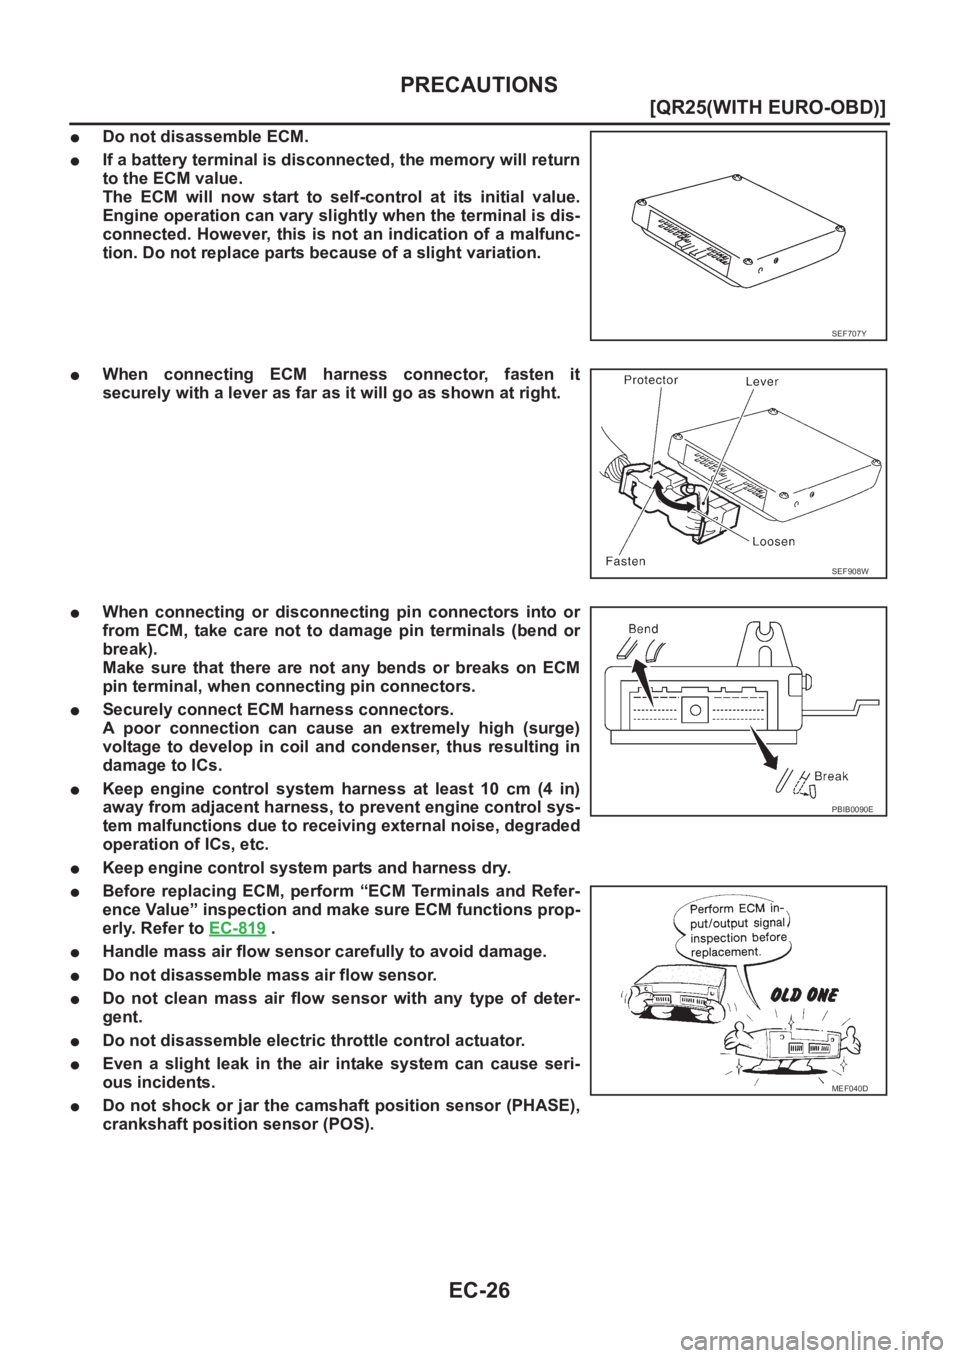
●Do not disassemble ECM.
●If a battery terminal is disconnected, the memory will return
to the ECM value.
The ECM will now start to self-control at its initial value.
Engine operation can vary slightly when the terminal is dis-
connected. However, this is not an indication of a malfunc-
tion. Do not replace parts because of a slight variation.
●When connecting ECM harness connector, fasten it
securely with a lever as far as it will go as shown at right.
●When connecting or disconnecting pin connectors into or
from ECM, take care not to damage pin terminals (bend or
break).
Make sure that there are not any bends or breaks on ECM
pin terminal, when connecting pin connectors.
●Securely connect ECM harness connectors.
A poor connection can cause an extremely high (surge)
voltage to develop in coil and condenser, thus resulting in
damage to ICs.
●Keep engine control system harness at least 10 cm (4 in)
away from adjacent harness, to prevent engine control sys-
tem malfunctions due to receiving external noise, degraded
operation of ICs, etc.
●Keep engine control system parts and harness dry.
●Before replacing ECM, perform “ECM Terminals and Refer-
ence Value” inspection and make sure ECM functions prop-
erly. Refer to EC-819
.
●Handle mass air flow sensor carefully to avoid damage.
●Do not disassemble mass air flow sensor.
●Do not clean mass air flow sensor with any type of deter-
gent.
●Do not disassemble electric throttle control actuator.
●Even a slight leak in the air intake system can cause seri-
ous incidents.
●Do not shock or jar the camshaft position sensor (PHASE),
crankshaft position sensor (POS).
SEF707Y
SEF908W
PBIB0090E
MEF040D