2001 NISSAN SENTRA hood release
[x] Cancel search: hood releasePage 74 of 240

3 Pre-driving checks and adjustments
Keys .......................................................................3-2
Nissan vehicle immobilizer system
(NVIS) keys (if so equipped) .............................3-2
Doors ......................................................................3-3
Locking with key ................................................3-3
Locking with inside lock knob............................3-4
Locking with power door lock switch
(if so equipped)..................................................3-4
Child safety rear door lock ................................3-4
Multi-remote control system (if so equipped).........3-5
How to use multi-remote control system...........3-5
Battery replacement ..........................................3-8
Hood .......................................................................3-9
Trunk lid................................................................3-10Opener operation ............................................3-10
Key operation ..................................................3-11
Interior trunk lid release (if so equipped) ........3-12
Fuel filler lid ..........................................................3-13
Opener operation ............................................3-13
Fuel filler cap ...................................................3-13
Steering wheel .....................................................3-14
Tilt operation ....................................................3-14
Sun visors ...........................................................3-15
Vanity mirror ....................................................3-15
Mirrors ..................................................................3-15
Inside mirror.....................................................3-15
Outside mirror remote control .........................3-16
ZX
Page 82 of 240

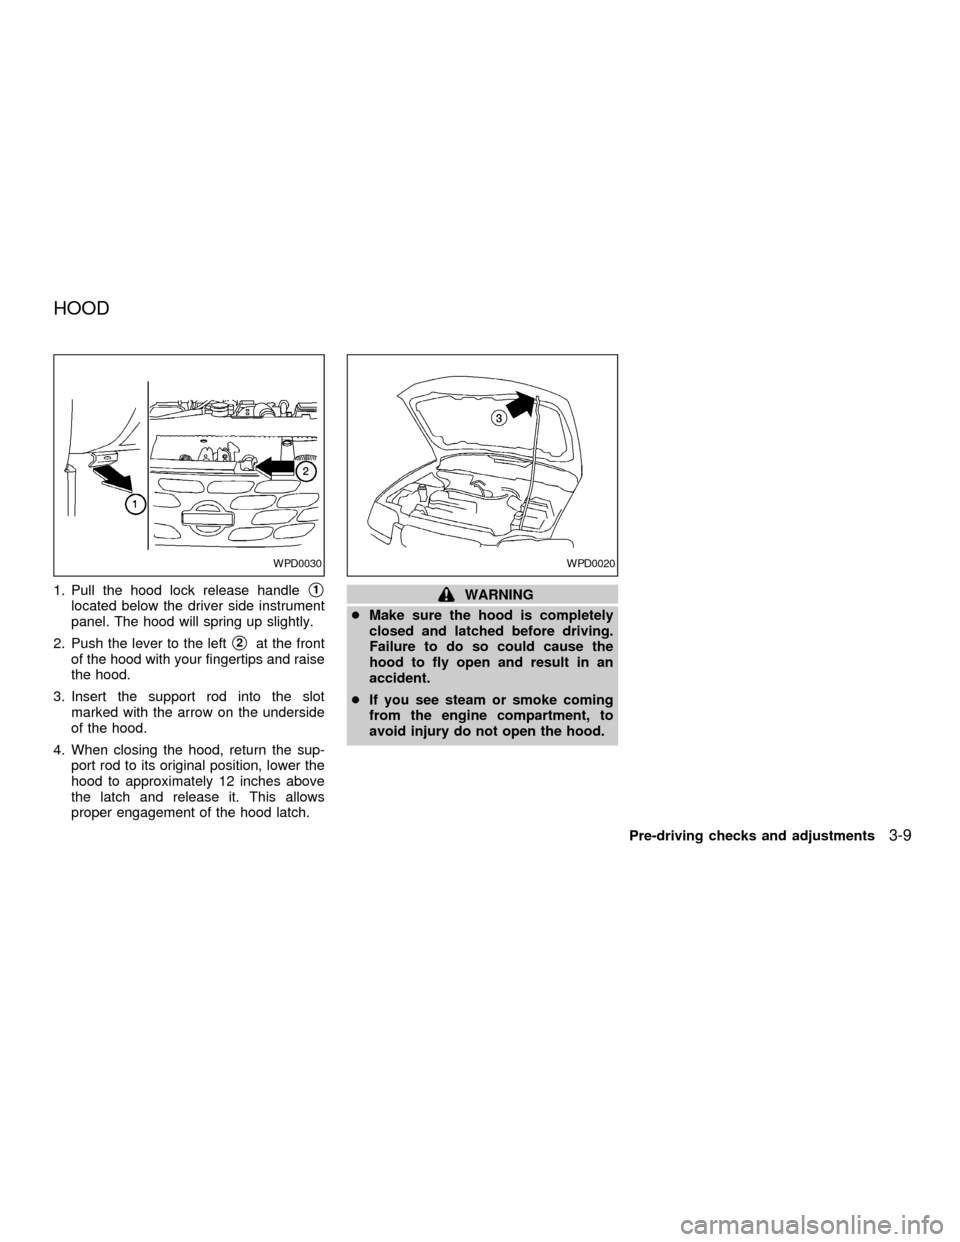
1. Pull the hood lock release handles1
located below the driver side instrument
panel. The hood will spring up slightly.
2. Push the lever to the left
s2at the front
of the hood with your fingertips and raise
the hood.
3. Insert the support rod into the slot
marked with the arrow on the underside
of the hood.
4. When closing the hood, return the sup-
port rod to its original position, lower the
hood to approximately 12 inches above
the latch and release it. This allows
proper engagement of the hood latch.
WARNING
cMake sure the hood is completely
closed and latched before driving.
Failure to do so could cause the
hood to fly open and result in an
accident.
cIf you see steam or smoke coming
from the engine compartment, to
avoid injury do not open the hood.
WPD0030WPD0020
HOOD
Pre-driving checks and adjustments3-9
ZX
Page 132 of 240

WARNING
cWhile driving on a slippery surface,
be careful when braking, accelerat-
ing or downshifting. Abrupt braking
or accelerating could cause the
wheels to skid and result in an acci-
dent.
cIf the engine is not running or is
turned off while driving, the power
assist for the brakes will not work.
Braking will be harder.
Wet brakes
When the vehicle is washed or driven
through water, the brakes may get wet. As a
result, your braking distance will be longer
and the vehicle may pull to one side during
braking.
To dry the brakes, drive the vehicle at a safe
speed while lightly pressing the brake pedal
to heat up the brakes. Do this until the
brakes return to normal. Avoid driving the
vehicle at high speeds until the brakes
function correctly.
ANTI-LOCK BRAKE SYSTEM
(ABS) (if so equipped)
The anti-lock brake system controls the
brakes at each wheel so the wheels do not
lock when braking abruptly or when braking
on slippery surfaces. The system detects the
rotation speed at each wheel and varies the
brake fluid pressure to prevent each wheel
from locking and sliding. By preventing wheel
lockup, the system helps the driver maintain
steering control and helps to minimize swerv-
ing and spinning on slippery surfaces.
Using the system
Depress the brake pedal and hold it down.
WARNING
Do not pump the brake pedal. Doing so
may result in increased stopping dis-
tances.
Normal operation
The anti-lock brake system does not oper-
ate at speeds below 3 to 6 MPH (5 to 10
km/h). The speeds vary according to road
conditions. When the anti-lock system
senses that one or more wheels are close tolocking up, the actuator (under the hood)
rapidly applies and releases hydraulic pres-
sure (like pumping the brakes very quickly).
While the actuator is working, you may feel
a pulsation in the brake pedal and hear a
noise or vibration from the actuator under
the hood. This is normal and indicates that
the anti-lock system is working properly.
However, the pulsation may indicate that
road conditions are hazardous and extra
care is required while driving.
Self-test feature
The anti-lock brake system is a sophisti-
cated device with electronic sensors, elec-
tric pumps, and hydraulic solenoids con-
trolled by a computer. The computer has a
built-in diagnostic feature that tests the sys-
tem each time you start the engine and
move the vehicle at a low speed in forward
or reverse. When the self-test occurs, you
may hear a ``clunk'' noise and/or feel a
pulsation in the brake pedal. This is normal
and is not an indication of any malfunction.
If the computer senses any malfunction, it
switches the anti-lock brake system OFF
and turns on the ABS brake warning light in
the dashboard. The brake system then op-
Starting and driving
5-19
ZX
Page 180 of 240

When you wax the surface of the hood, be
careful not to let wax get into the washer
nozzle. This may cause clogging or im-
proper windshield washer operation. If wax
gets into the nozzle, remove it with a needle
or small pin.
CHECKING PARK BRAKE
From the released position, pull the parking
brake lever up slowly and firmly. If the
number of clicks is out of the range listed
above, see an authorized NISSAN dealer.
CHECKING BRAKE PEDAL
With the engine running, check the distance
between the upper surface of the pedal and
the metal floor. If it is out of the range shown
above, see an authorized NISSAN dealer.
Self-adjusting brakes
Your vehicle is equipped with self-adjusting
brakes.
The front (and rear, if equipped) disc-type
brakes self-adjust every time the brake
pedal is applied. The rear drum-type brakes
also self-adjust every time the brake pedal
is applied.
ADI0613
WDI0036DI1020M
PARKING BRAKE AND BRAKE
PEDAL
Do-it-yourself8-23
ZX
Page 202 of 240

fied pressure if necessary. Check carefully
for damage, cuts or excessive wear.
Wheel nuts* ÐWhen checking the tires,
make sure no wheel nuts are missing, and
check for any loose wheel nuts. Tighten if
necessary.
Tire rotation* ÐTires should be rotated
every 7,500 miles (12,000 km).
Wheel alignment and balance ÐIf the
vehicle should pull to either side while driv-
ing on a straight and level road, or if you
detect uneven or abnormal tire wear, there
may be a need for a wheel alignment.
If the steering wheel or seat vibrates at
normal highway speeds, wheel balancing
may be needed.
Windshield wiper blades* ÐCheck for
cracks or wear if they do not wipe properly.
Doors and engine hood ÐCheck that all
doors and the hood operate properly. Also
ensure that all latches lock securely. Lubri-
cate hinges, latches, rollers and links if
necessary. Make sure the secondary latch
keeps the hood from opening when the
primary latch is released.
When driving in areas that use road salt orother corrosive materials, check lubrication
frequently.
Lights* ÐMake sure the headlamps, stop-
lights, tail lights, turn signal lights, and other
lights are all operating properly and installed
securely. Also check headlamp aim.
INTERIOR MAINTENANCE
The maintenance items listed here should
be checked on a regular basis, such as
when performing periodic maintenance,
cleaning the vehicle, etc.
Additional information on the following
items with an ``*'' is found in the ``Do-it-
yourself'' section of this manual.
Warning lights and chimes ÐMake sure
all warning lights and chimes are operating
properly.
Windshield wiper and washer* ÐCheck
that the wipers and washer operate properly
and that the wipers do not streak.
Windshield defroster ÐCheck that the air
comes out of the defroster outlets properly
and in sufficient quantity when operating the
heater or air conditioner.
Steering wheel ÐCheck for changes inthe steering conditions, such as excessive
freeplay, hard steering or strange noises.
Seats ÐCheck seat position controls such
as seat adjusters, seatback recliner, etc. to
ensure they operate smoothly and all
latches lock securely in every position.
Check that the head restraints move up and
down smoothly and the locks hold securely
in all latched positions.
Seat belts ÐCheck that all parts of the seat
belt system (For example buckles, anchors,
adjusters and retractors) operate properly
and smoothly, and are installed securely.
Check the belt webbing for cuts, fraying,
wear or damage.
Accelerator pedal ÐCheck the pedal for
smooth operation and make sure the pedal
does not catch or require uneven effort.
Keep the floor mat away from the pedal.
Clutch pedal* ÐMake sure the pedal
operates smoothly and check that it has the
proper free travel.
Brakes ÐCheck that the brakes do not pull
the vehicle to one side when applied.
Brake pedal and booster* ÐCheck the
pedal for smooth operation and make sure it
Maintenance
9-3
ZX
Page 236 of 240

H
Hazard warning flasher switch .................. 2-18
Head restraints ............................................ 1-5
Headlight aiming adjustment ..................... 8-30
Headlight and turn signal switch ............... 2-16
Headlights .................................................. 8-29
Heater
Heater and air conditioner controls ........ 4-3
Heater operation ..................................... 4-4
Hood release ............................................... 3-9
Horn ........................................................... 2-19
I
Ignition switch .............................................. 5-4
Immobilizer system ..................... 2-11, 3-2, 5-6
Increasing fuel economy............................ 5-16
Indicator lights and chimes (See warning/
indicator lights and chimes) ......................... 2-7
Inside mirror ............................................... 3-15
Instrument brightness control .................... 2-17
Interior light ................................................ 2-27
Interior trunk lid release ............................. 3-12
J
Jump starting ............................................... 6-8K
Key ............................................................... 3-2
Keyless entry system (See multi-remote
control system) ............................................ 3-5
L
Labels
Air conditioner specification label ....... 10-12
Emission control information label...... 10-12
Engine serial number ......................... 10-11
F.M.V.S.S. certification label .............. 10-11
Vehicle identification number (VIN)
plate .................................................... 10-10
Warning labels (for SRS) ..................... 1-16
LATCH (Lower Anchors and Tether for
Children) System ....................................... 1-32
License plate
Installing the license plate .................. 10-13
Light
Air bag warning light ..................... 1-16, 2-9
Brake light (See stop light) ................... 8-33
Bulb check/instrument panel .................. 2-7
Bulb replacement.................................. 8-33
Charge warning light .............................. 2-8
Front fog light switch ............................ 2-18
Headlight aiming adjustment ................ 8-30
Headlight and turn signal switch .......... 2-16
Headlights ............................................. 8-29
Interior light ........................................... 2-27Light bulbs ............................................ 8-29
Low washer fluid warning light ............... 2-9
Spotlights (See map light) .................... 2-27
Trunk light ............................................. 2-28
Warning/indicator lights and chimes ...... 2-7
Lock
Child safety rear door lock ..................... 3-4
Door locks............................................... 3-3
Fuel filler lid lock opener lever ............. 3-13
Power door locks .................................... 3-4
Trunk lid lock opener lever ................... 3-10
M
Maintenance
General maintenance ............................. 9-2
Inside the vehicle.................................... 9-3
Maintenance precautions ....................... 8-2
Outside the vehicle ................................. 9-2
Periodic maintenance schedules ............ 9-5
Seat belt maintenance.......................... 1-24
Under the hood and vehicle ................... 9-4
Malfunction indicator lamp (MIL) ............... 2-10
Manual windows ........................................ 2-25
Meters and gauges ...................................... 2-2
Mirror
Inside mirror.......................................... 3-15
Outside mirror control ........................... 3-16
Vanity mirror ......................................... 3-15
Multi-remote control system ........................ 3-5
11-3
ZX