2001 NISSAN SENTRA length
[x] Cancel search: lengthPage 31 of 240
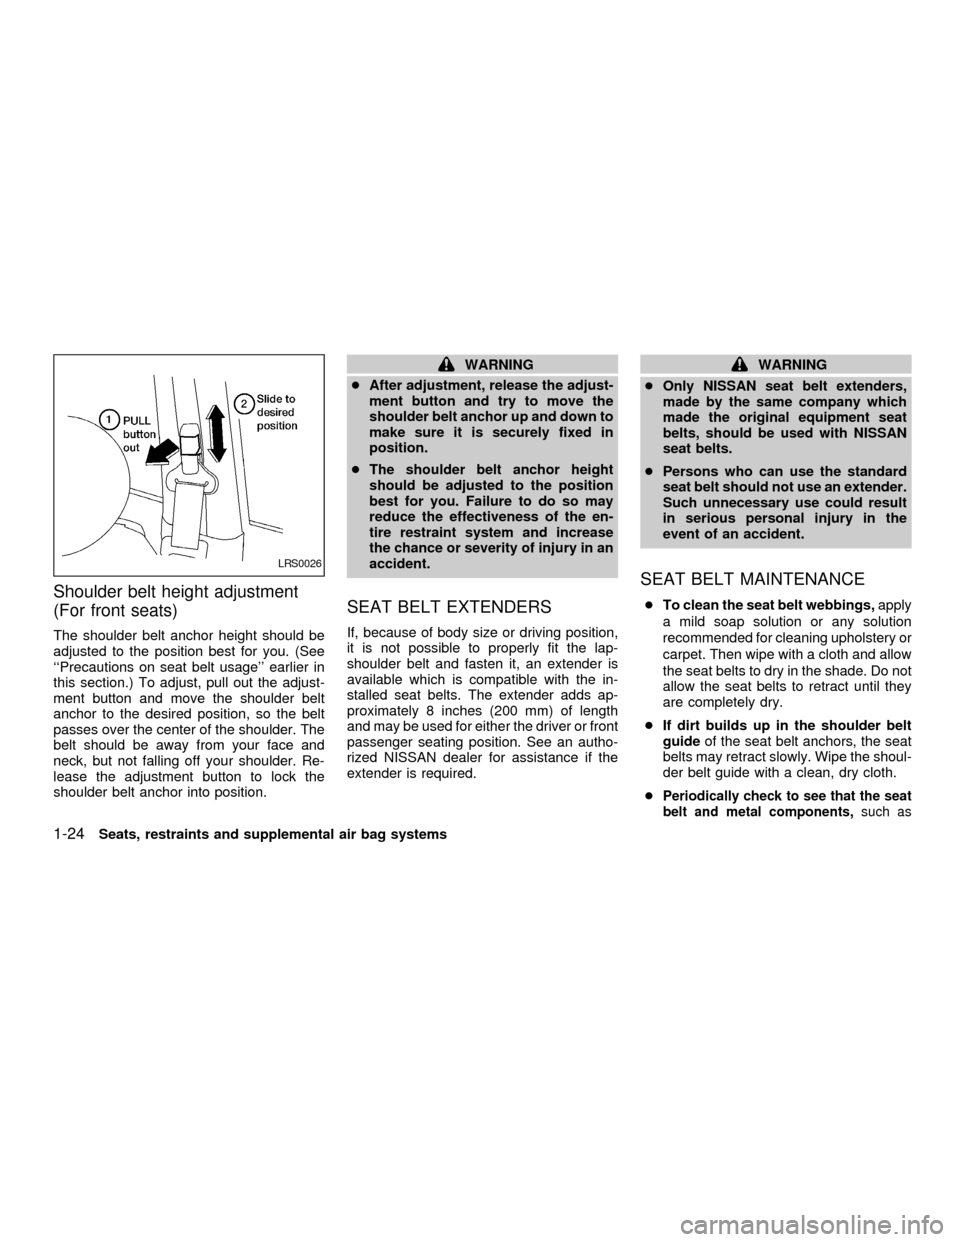
Shoulder belt height adjustment
(For front seats)
The shoulder belt anchor height should be
adjusted to the position best for you. (See
``Precautions on seat belt usage'' earlier in
this section.) To adjust, pull out the adjust-
ment button and move the shoulder belt
anchor to the desired position, so the belt
passes over the center of the shoulder. The
belt should be away from your face and
neck, but not falling off your shoulder. Re-
lease the adjustment button to lock the
shoulder belt anchor into position.
WARNING
cAfter adjustment, release the adjust-
ment button and try to move the
shoulder belt anchor up and down to
make sure it is securely fixed in
position.
cThe shoulder belt anchor height
should be adjusted to the position
best for you. Failure to do so may
reduce the effectiveness of the en-
tire restraint system and increase
the chance or severity of injury in an
accident.
SEAT BELT EXTENDERS
If, because of body size or driving position,
it is not possible to properly fit the lap-
shoulder belt and fasten it, an extender is
available which is compatible with the in-
stalled seat belts. The extender adds ap-
proximately 8 inches (200 mm) of length
and may be used for either the driver or front
passenger seating position. See an autho-
rized NISSAN dealer for assistance if the
extender is required.
WARNING
cOnly NISSAN seat belt extenders,
made by the same company which
made the original equipment seat
belts, should be used with NISSAN
seat belts.
cPersons who can use the standard
seat belt should not use an extender.
Such unnecessary use could result
in serious personal injury in the
event of an accident.
SEAT BELT MAINTENANCE
cTo clean the seat belt webbings,apply
a mild soap solution or any solution
recommended for cleaning upholstery or
carpet. Then wipe with a cloth and allow
the seat belts to dry in the shade. Do not
allow the seat belts to retract until they
are completely dry.
cIf dirt builds up in the shoulder belt
guideof the seat belt anchors, the seat
belts may retract slowly. Wipe the shoul-
der belt guide with a clean, dry cloth.
c
Periodically check to see that the seat
belt and metal components,such as
LRS0026
1-24Seats, restraints and supplemental air bag systems
ZX
Page 102 of 240
AM, FM1, or FM2. The selected band illu-
minates in the display.
2. Tune to the desired station.
3. Push the desired station select button for
more than 1.5 seconds. For example, in
the illustrations, ch2 is to be memorized.
The radio mutes when the select button
is pushed.
4. When the sound resumes, memorizing is
complete.
5. Other station select buttons can be set in
the same manner.
If the battery cable is disconnected, or if the
radio fuse opens, the radio memory is can-
celled. In that case, reset the desired sta-
tions.
Cassette tape player operation
Turn the ignition key to ACC or ON, and
carefully insert a cassette tape into the tape
door. The cassette tape automatically pulls
into the player.
The word TAPE and moving digital squares
illuminate on the right side of the display
window.
If the radio is already operating it automati-cally turns off and the cassette tape begins
to play.
CAUTION
Do not force the cassette tape into the
tape door. This could cause player
damage.
The cassette tape automatically changes
directions to play the other side when the
first side is complete. At this time, the mov-
ing digital squares illuminate on the left side
of the display window.
Precautions on cassette player opera-
tion
cTo maintain good quality sound, NIS-
SAN recommends using cassette
tapes of 60 minutes or shorter in
length.
cCassette tapes should be removed
from the player when not in use. Store
cassettes in their protective cases
and away from direct sunlight, heat,
dust, moisture and magnetic sources.
cDirect sunlight can cause the cassette
to become deformed. The use of de-
formed cassettes may cause the cas-
sette to jam in the player.cDo not use cassettes with labels
which are peeling and loose. If used,
the label could jam in the player.
cIf a cassette has loose tape, insert a
pencil through one of the cassette
hubs and rewind the tape firmly around
the hubs. Loose tape may cause tape
jamming and wavering sound quality.
cOver a period of time, the playback
head, capstan and pinch roller may
collect a tape coating residue as the
tape is played. This residue accumu-
lation can cause weak or wavering
sound, and should be removed peri-
odically with a head cleaning tape. If
the residue is not removed periodi-
cally, the player may need to be dis-
assembled for cleaning.
PLAY/STOP
Push the
button while the cassette
tape is playing to stop the tape. Push the
button again to play the tape.
Changing the direction of tape play
Push the(program) select button.
The moving digital squares illuminate on
either the right or left side of the display
Heater, air conditioner and audio systems
4-13
ZX
Page 115 of 240
WARNING
cDo not leave children, impaired
adults, or pets alone in your vehicle.
They could accidentally injure them-
selves or others through inadvertent
operation of the vehicle. Also, on
hot, sunny days, temperatures in a
closed vehicle could quickly become
high enough to cause severe or pos-
sibly fatal injuries to people or ani-
mals.
cClosely supervise children when
they are around cars to prevent them
from playing and becoming locked
in the trunk where they could be
seriously injured. Keep the car
locked, with the trunk closed, when
not in use, and prevent children's
access to car keys.
EXHAUST GAS (carbon monoxide)
WARNING
cDo not breathe exhaust gases; they
contain colorless and odorless car-bon monoxide. Carbon monoxide is
dangerous. It can cause uncon-
sciousness or death.
cIf you suspect that exhaust fumes
are entering the vehicle, drive with
all windows fully open, and have the
vehicle inspected immediately.
cDo not run the engine in closed
spaces such as a garage.
cDo not park the vehicle with the
engine running for any extended
length of time.
cKeep the trunk lid closed while driv-
ing, otherwise exhaust gases could
be drawn into the passenger com-
partment. If you must drive with the
trunk lid open, follow these precau-
tions.
1. Open all the windows.
2. Set the
air recirculation but-
ton (if so equipped) to off and the
fan control dial to 4 (high) to cir-
culate the air.cIf electrical wiring or other cable
connections must pass to a trailer
through the seal on the trunk lid or
the body, follow the manufacturer's
recommendation to prevent carbon
monoxide entry into the vehicle.
cThe exhaust system and body
should be inspected by a qualified
mechanic whenever:
a. The vehicle is raised for service.
b. You suspect that exhaust fumes
are entering into the passenger
compartment.
c. You notice a change in the sound
of the exhaust system.
d.
You have had an accident involv-
ing damage to the exhaust system,
underbody, or rear of the vehicle.
THREE-WAY CATALYST
The three-way catalyst is an emission con-
trol device installed in the exhaust system.
Exhaust gases in the three-way catalyst are
burned at high temperatures to help reduce
pollutants.
PRECAUTIONS WHEN
STARTING AND DRIVING
5-2Starting and driving
ZX
Page 217 of 240
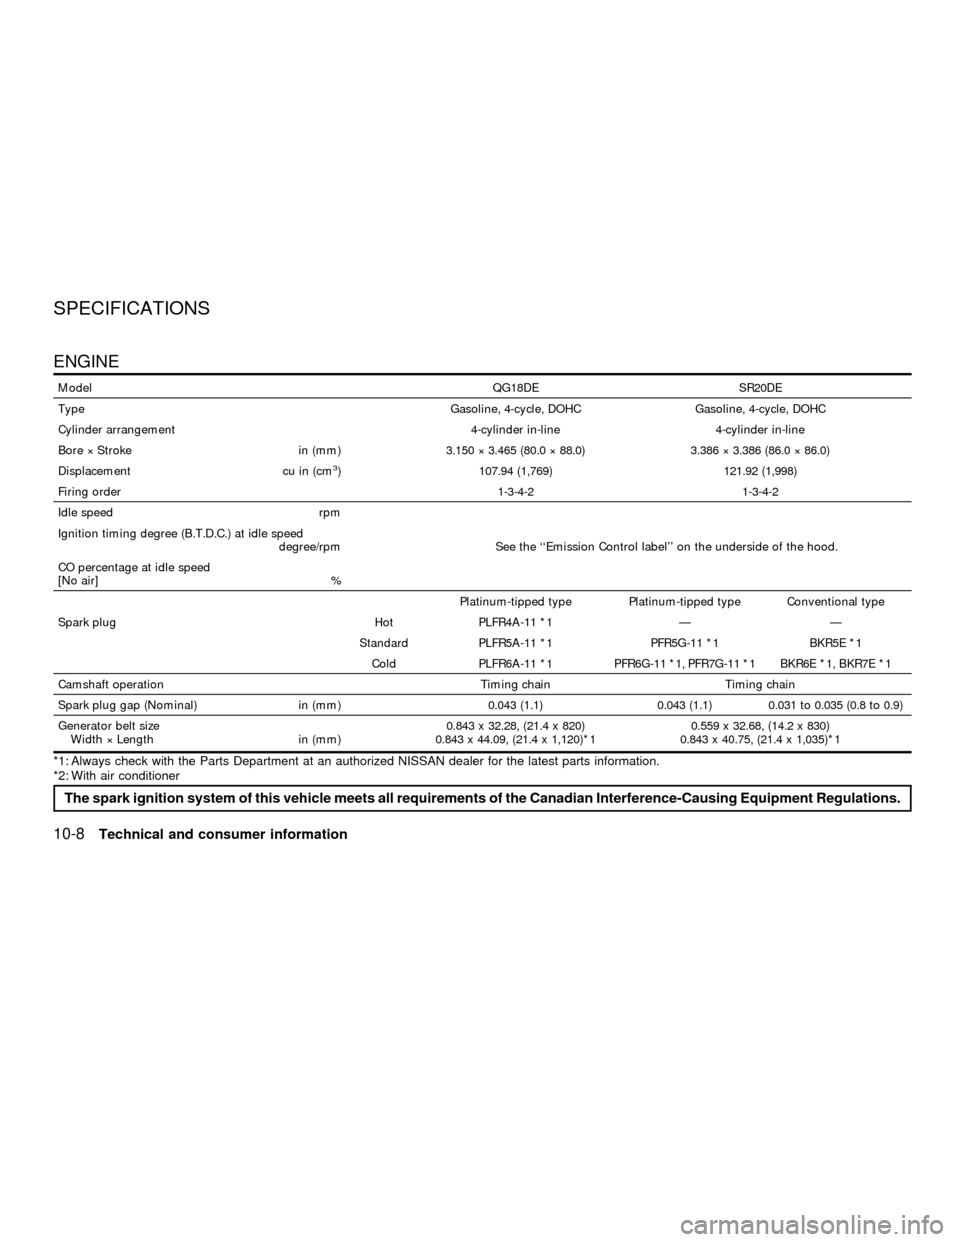
ENGINE
ModelQG18DE SR20DE
Type Gasoline, 4-cycle, DOHC Gasoline, 4-cycle, DOHC
Cylinder arrangement 4-cylinder in-line 4-cylinder in-line
Bore ý Stroke in (mm) 3.150 ý 3.465 (80.0 ý 88.0) 3.386 ý 3.386 (86.0 ý 86.0)
Displacement cu in (cm
3) 107.94 (1,769) 121.92 (1,998)
Firing order1-3-4-2 1-3-4-2
Idle speed rpm
See the ``Emission Control label'' on the underside of the hood. Ignition timing degree (B.T.D.C.) at idle speed
degree/rpm
CO percentage at idle speed
[No air] %
Platinum-tipped type Platinum-tipped type Conventional type
Spark plug Hot PLFR4A-11 *1 Ð Ð
Standard PLFR5A-11 *1 PFR5G-11 *1 BKR5E *1
Cold PLFR6A-11 *1 PFR6G-11 *1, PFR7G-11 *1 BKR6E *1, BKR7E *1
Camshaft operation Timing chain Timing chain
Spark plug gap (Nominal) in (mm) 0.043 (1.1) 0.043 (1.1) 0.031 to 0.035 (0.8 to 0.9)
Generator belt size
Width ý Length in (mm)0.843 x 32.28, (21.4 x 820)
0.843 x 44.09, (21.4 x 1,120)*10.559 x 32.68, (14.2 x 830)
0.843 x 40.75, (21.4 x 1,035)*1
*1: Always check with the Parts Department at an authorized NISSAN dealer for the latest parts information.
*2: With air conditioner
The spark ignition system of this vehicle meets all requirements of the Canadian Interference-Causing Equipment Regulations.
SPECIFICATIONS
10-8Technical and consumer information
ZX
Page 218 of 240
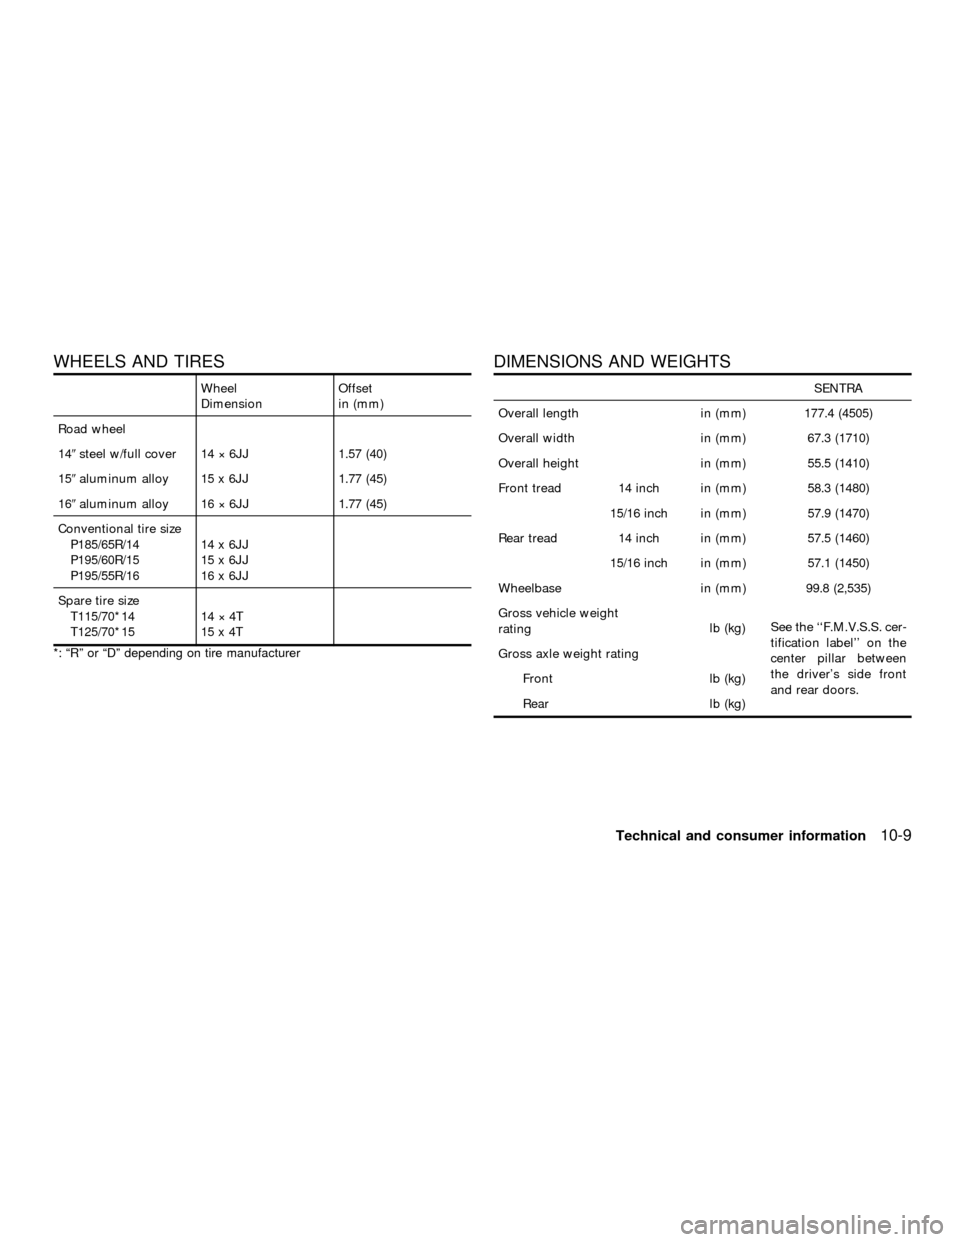
WHEELS AND TIRES
Wheel
DimensionOffset
in (mm)
Road wheel
149steel w/full cover 14 ý 6JJ 1.57 (40)
159aluminum alloy 15 x 6JJ 1.77 (45)
169aluminum alloy 16 ý 6JJ 1.77 (45)
Conventional tire size
P185/65R/14 14 x 6JJ
P195/60R/15 15 x 6JJ
P195/55R/16 16 x 6JJ
Spare tire size
T115/70*14 14 ý 4T
T125/70*15 15 x 4T
*: ªRº or ªDº depending on tire manufacturer
DIMENSIONS AND WEIGHTS
SENTRA
Overall length in (mm) 177.4 (4505)
Overall width in (mm) 67.3 (1710)
Overall height in (mm) 55.5 (1410)
Front tread 14 inch in (mm) 58.3 (1480)
15/16 inch in (mm) 57.9 (1470)
Rear tread 14 inch in (mm) 57.5 (1460)
15/16 inch in (mm) 57.1 (1450)
Wheelbase in (mm) 99.8 (2,535)
Gross vehicle weight
ratinglb (kg)See the ``F.M.V.S.S. cer-
tification label'' on the
center pillar between
the driver's side front
and rear doors. Gross axle weight rating
Front lb (kg)
Rear lb (kg)
Technical and consumer information10-9
ZX
Page 227 of 240

cAlways block the wheels on both vehicle
and trailer when parking. Parking on a
slope is not recommended; however, if
you must do so, and if your vehicle is
equipped with an automatic transmission,
first block the wheels and apply the park-
ing brake, and then move the transmis-
sion shift selector lever into the P (Park)
position. If you move the shift selector
lever to the P (Park) position before block-
ing the wheels and applying the parking
brake, transmission damage could occur.
cWhen going down a hill, shift into a lower
gear and use the engine braking effect.
When ascending a long grade, down-
shift the transmission to a lower gear
and reduce speed to reduce chances of
engine overloading and/or overheating.
cIf the engine temperature coolant rises
to an extremely high temperature when
the air conditioning system is on, turn off
the air conditioner. Coolant heat can be
additionally vented by opening the win-
dows, switching the fan control to high
and setting the temperature control to
the HOT position.
cTrailer towing requires more fuel than
normal circumstances.cAvoid towing a trailer for your vehicle's
first 500 miles (800 km).
cHave your vehicle serviced more often
than at intervals specified in the recom-
mended Maintenance Schedule.
cWhen making a turn, your trailer wheels
will be closer to the inside of the turn
than your vehicle wheels. To compen-
sate for this, make a larger than normal
turning radius during the turn.
cCrosswinds and rough roads adversely
affect vehicle/trailer handling, possibly
causing vehicle sway. When being
passed by larger vehicles, be prepared
for possible changes in crosswinds that
could affect vehicle handling. If swaying
does occur, firmly grip the steering
wheel, steer straight ahead, and imme-
diately (but gradually) reduce vehicle
speed. This combination helps to stabi-
lize the vehicle. Never increase speed.
cBe careful when passing other vehicles.
Passing while towing a trailer requires
considerably more distance than normal
passing. Remember the length of the
trailer must also pass the other vehicle
before you can safely change lanes.cTo maintain engine braking efficiency
and electrical charging performance, do
not use fifth gear (manual transmission)
or overdrive (automatic transmission).
cAvoid holding the brake pedal down too
long or too frequently. This could cause
the brakes to overheat, resulting in re-
duced braking efficiency.
When towing a trailer, change the oil in
the transmission more frequently. For
additional information see the ``Mainte-
nance'' section earlier in this manual.
10-18Technical and consumer information
ZX