2001 NISSAN QUEST window
[x] Cancel search: windowPage 20 of 304

CAUTION
cThe seats are heavy. Two people
should remove or install them.
cDo not sit in seats that have been
removed from the vehicle. They may
tip over and you could be injured.
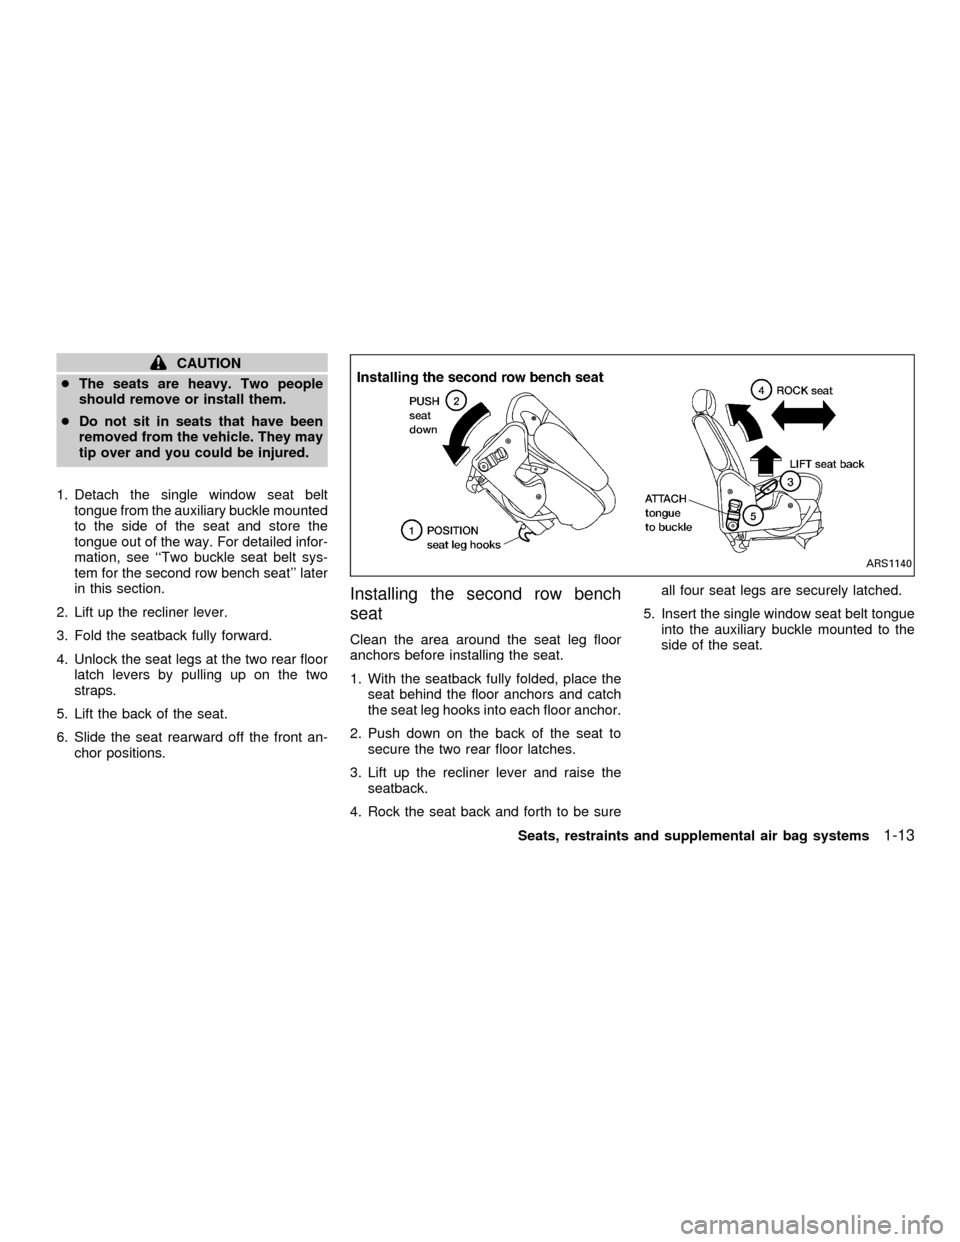
1. Detach the single window seat belt
tongue from the auxiliary buckle mounted
to the side of the seat and store the
tongue out of the way. For detailed infor-
mation, see ``Two buckle seat belt sys-
tem for the second row bench seat'' later
in this section.
2. Lift up the recliner lever.
3. Fold the seatback fully forward.
4. Unlock the seat legs at the two rear floor
latch levers by pulling up on the two
straps.
5. Lift the back of the seat.
6. Slide the seat rearward off the front an-
chor positions.
Installing the second row bench
seat
Clean the area around the seat leg floor
anchors before installing the seat.
1. With the seatback fully folded, place the
seat behind the floor anchors and catch
the seat leg hooks into each floor anchor.
2. Push down on the back of the seat to
secure the two rear floor latches.
3. Lift up the recliner lever and raise the
seatback.
4. Rock the seat back and forth to be sureall four seat legs are securely latched.
5. Insert the single window seat belt tongue
into the auxiliary buckle mounted to the
side of the seat.
ARS1140
Seats, restraints and supplemental air bag systems1-13
ZX
Page 54 of 304

One of the seat belt tongues has two ``win-
dows'' (or holes) and the other has only one
``window''. The seat belt tongue with one
window attaches to the auxiliary buckle
mounted to the side of the seat. The seat
belt tongue with two windows should bepositioned properly and fastened to the
buckle mounted in the middle of the seat.
When the two buckle seat belt system is not
in use, the webbing can be secured with the
seat belt clip. The seat belt clip should not
be used with a child seat or during seat belt
usage. The seat belt clip opening should
face the front of the vehicle.
A twisted belt may prevent the retractor
from working properly. If the two buckle seat
belt system is twisted, disengage the single
window tongue from the auxiliary buckle on
the side of the seat, remove the twist and
reinstall the tongue into the auxiliary buckle
until you hear a snap and feel the latch
engage.
Both tongues must be attached to their
appropriate buckles whenever someone
is riding in that seating position. If the
tongues are released to allow a third row
passenger to enter or exit, the tongues
must be reattached.
WRS0051
ARS1126
Seats, restraints and supplemental air bag systems1-47
ZX
Page 55 of 304

When the two-passenger bench seat is re-
moved from the vehicle, you must detach
the single window tongue from the auxiliary
buckle.
When the three-passenger bench seat is
moved up to the second row position, the
passenger seated near the passenger
side sliding door needs to use the double
window tongue and the standard buckle
only. Because the three-passenger
bench seat is wider and closer to the
passenger side sliding door, the single
window seat belt tongue and the auxiliary
buckle are not necessary.
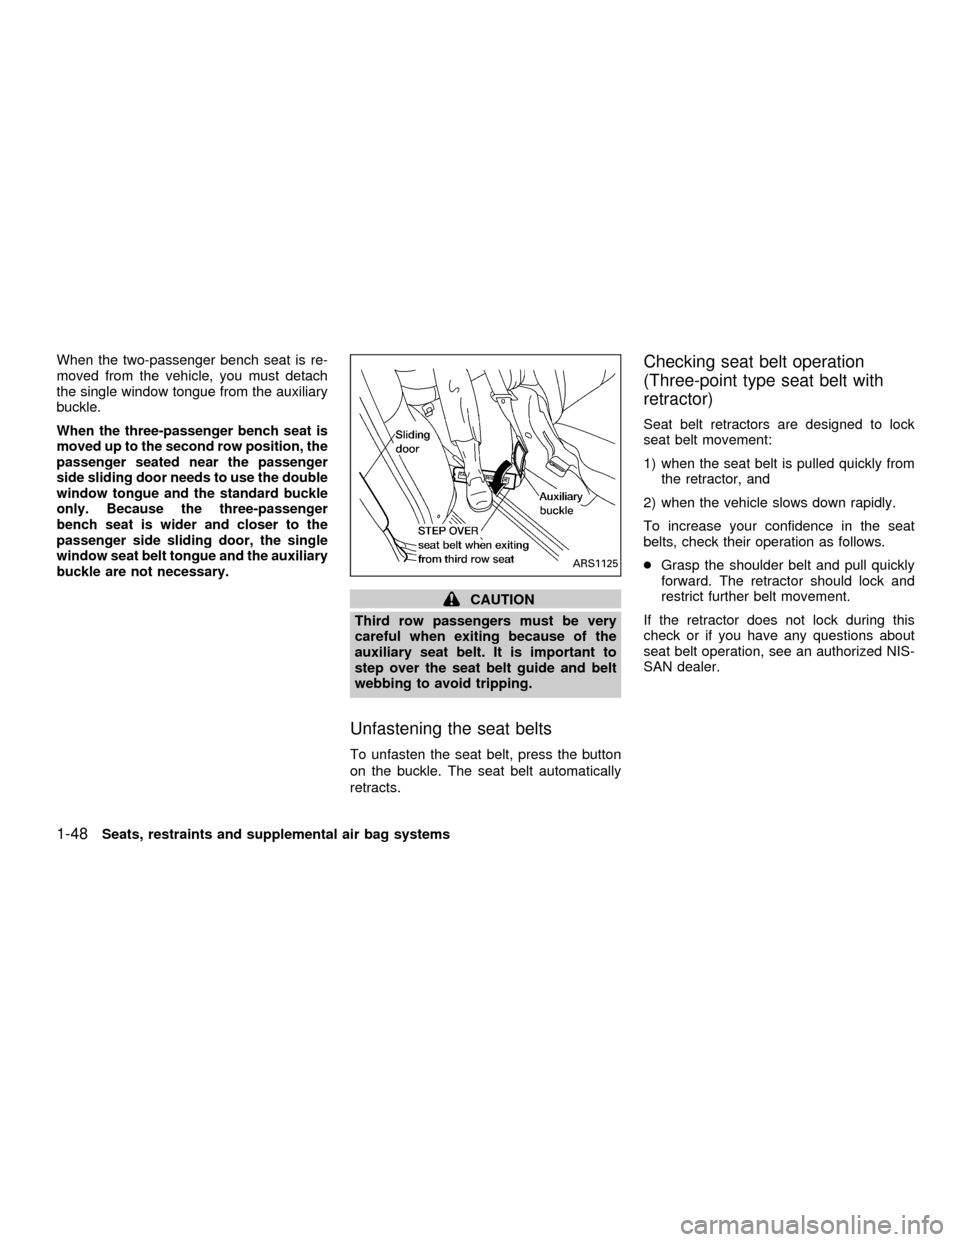
CAUTION
Third row passengers must be very
careful when exiting because of the
auxiliary seat belt. It is important to
step over the seat belt guide and belt
webbing to avoid tripping.
Unfastening the seat belts
To unfasten the seat belt, press the button
on the buckle. The seat belt automatically
retracts.
Checking seat belt operation
(Three-point type seat belt with
retractor)
Seat belt retractors are designed to lock
seat belt movement:
1) when the seat belt is pulled quickly from
the retractor, and
2) when the vehicle slows down rapidly.
To increase your confidence in the seat
belts, check their operation as follows.
cGrasp the shoulder belt and pull quickly
forward. The retractor should lock and
restrict further belt movement.
If the retractor does not lock during this
check or if you have any questions about
seat belt operation, see an authorized NIS-
SAN dealer.
ARS1125
1-48Seats, restraints and supplemental air bag systems
ZX
Page 56 of 304

THREE-PASSENGER BENCH
SEAT IN THE SECOND ROW
POSITION
Fastening the seat belts
When the three-passenger bench seat is
moved up to the second row position, the
passenger seated near the passenger
side sliding door needs to use the double
window tongue and the standard buckle
only. Because the three-passenger
bench seat is wider and closer to the
passenger side sliding door, the single
window seat belt tongue and the auxiliary
buckle are not necessary.
1. Adjust the seat.2. Slowly pull the seat belt out of the retrac-
tor and insert the tongue into the buckle
until you hear and feel the latch engage.3. Position the passenger side shoulder belt
in the shoulder belt retainer.
WRS0015WRS0052
Seats, restraints and supplemental air bag systems1-49
ZX
Page 89 of 304

2 Instruments and controls
Meters and gauges ................................................2-3
Speedometer and odometer .............................2-4
Tachometer........................................................2-4
Engine coolant temperature gauge ...................2-5
Fuel gauge ........................................................2-5
Message center (if so equipped) ...........................2-6
Warning/indicator lights and chimes ......................2-7
Checking bulbs ..................................................2-7
Warning lights ....................................................2-7
Indicator lights ...................................................2-9
Audible reminders............................................2-11
Vehicle security system (if so equipped) .............2-11
Windshield wiper and washer switch ...................2-14
Rear window wiper and washer switches ............2-15
Rear window defogger switch ..............................2-15
Headlight and turn signal switch ..........................2-15
Headlight control switch ..................................2-15
Autolamp switch (if so equipped) ....................2-17
Turn signal switch ........................................2-18
Cornering light .................................................2-18
Hazard warning flasher switch .............................2-18
Horn ......................................................................2-19Heated seats (if so equipped) ..............................2-19
Rear power socket ...............................................2-21
Cigarette lighter and ashtray (accessory) ............2-22
Storage .................................................................2-23
Map pockets ....................................................2-23
Conversation mirror .........................................2-23
Cup holders .....................................................2-24
Glove box ........................................................2-25
Cargo net .........................................................2-26
Parcel shelf (if so equipped) ...........................2-27
Luggage rack ...................................................2-29
Windows ...............................................................2-29
Power windows................................................2-29
Power vent windows (if so equipped) .............2-31
Manual vent windows ......................................2-31
Sunroof (if so equipped).......................................2-32
Interior lights .........................................................2-33
Luggage ...........................................................2-33
Personal reading light ..........................................2-33
Map lights .............................................................2-34
Illuminated entry system ......................................2-34
ZX
Page 101 of 304

Security indicator light
This light will illuminate for the vehicle secu-
rity system.
This light blinks whenever the ignition
switch is in the LOCK, OFF, or ACC posi-
tion. This function indicates the security
system equipped on the vehicle is opera-
tional.
How to activate the vehicle security
system
1. Close all windows.(The system can be
activated even if the windows are
open).
2. Remove the key from the ignition switch.
3. Close all doors and the hood.
4. Push the
button on the multi-remote
controller. All doors lock. The hazard
lights flash twice and the horn beeps
once to indicate all doors are locked.
cWhen the
button is pushed with all
doors locked, the hazard lights flash
twice and the horn beeps once as a
reminder that the doors are already
locked.
The horn may or may not beep once.
Refer to ``silencing the horn beep fea-
ture'' later in this section for details.
5. Confirm that the SECURITY indicator
light comes on. The SECURITY light
glows for about 30 seconds and then
begins to flash once every three seconds.
The system is now activated. If, during
this 30-second time period, the door is
unlocked by the key or the multi-remotecontroller, or the ignition key is turned to
ACC or ON, the system will not activate.
If the key is turned slowly when locking
the door, the system may not activate.
Furthermore, if the key is turned exces-
sively to the unlock position, the system
may be deactivated when the key is re-
moved. If the indicator light fails to glow
for 30 seconds, unlock the door once
and lock it again.
Even when the driver and/or passengers
are in the vehicle, the system will acti-
vate with all doors, hood and rear door
closed with the ignition key in the OFF
position.
Vehicle security system operation
The vehicle security system emits the fol-
lowing alarm:
cThe headlights and tail lights flash and
the horn sounds intermittently. In addi-
tion, the starter motor does not operate.
cThe alarm automatically turns off after
two to three minutes. However, the alarm
reactivates if the vehicle is tampered with
again. The alarm can be shut off by
unlocking a door with the key or by
LIC0004
2-12Instruments and controls
ZX
Page 104 of 304

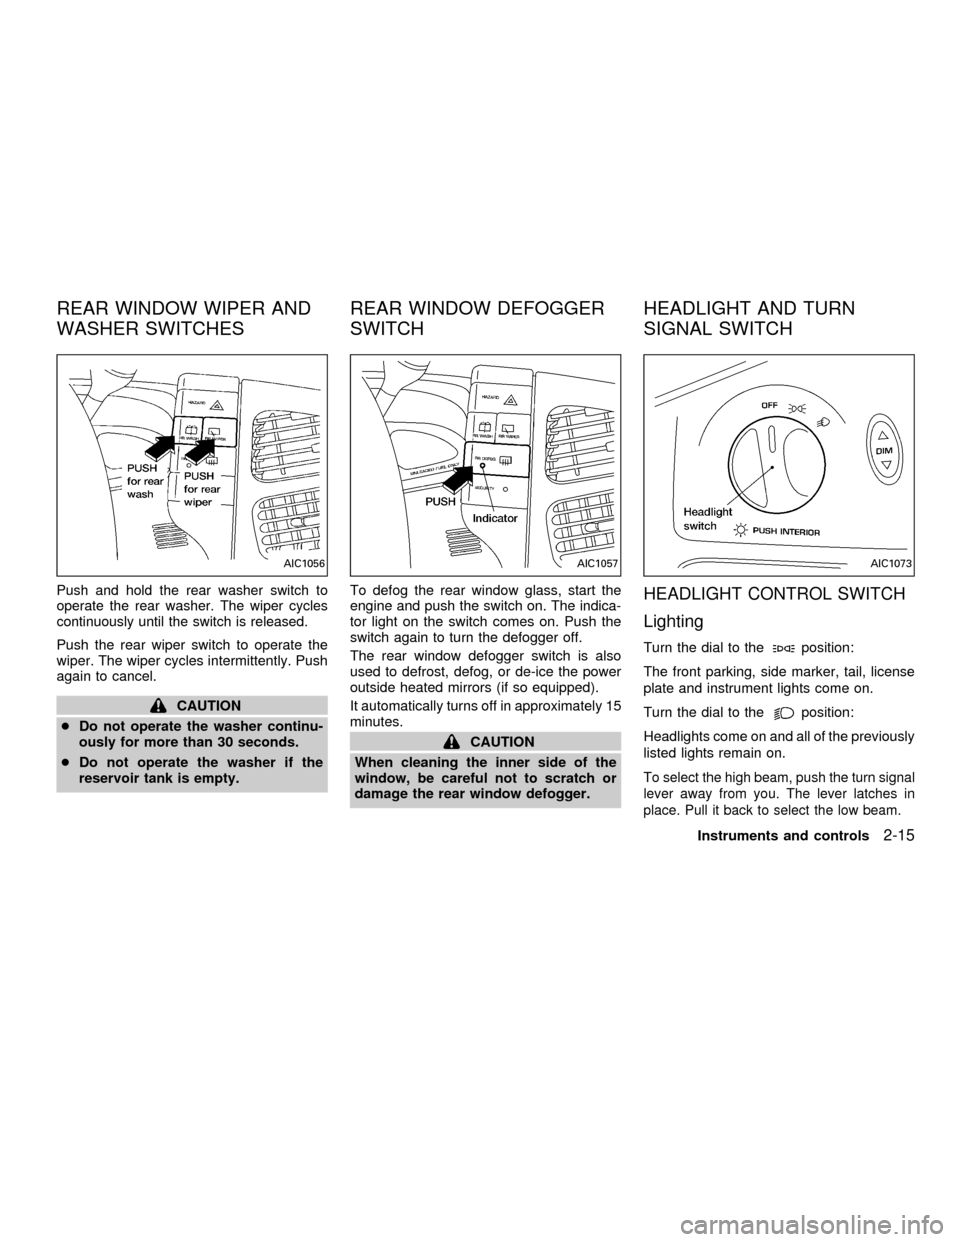
Push and hold the rear washer switch to
operate the rear washer. The wiper cycles
continuously until the switch is released.
Push the rear wiper switch to operate the
wiper. The wiper cycles intermittently. Push
again to cancel.
CAUTION
cDo not operate the washer continu-
ously for more than 30 seconds.
cDo not operate the washer if the
reservoir tank is empty.To defog the rear window glass, start the
engine and push the switch on. The indica-
tor light on the switch comes on. Push the
switch again to turn the defogger off.
The rear window defogger switch is also
used to defrost, defog, or de-ice the power
outside heated mirrors (if so equipped).
It automatically turns off in approximately 15
minutes.
CAUTION
When cleaning the inner side of the
window, be careful not to scratch or
damage the rear window defogger.
HEADLIGHT CONTROL SWITCH
Lighting
Turn the dial to theposition:
The front parking, side marker, tail, license
plate and instrument lights come on.
Turn the dial to the
position:
Headlights come on and all of the previously
listed lights remain on.
To select the high beam, push the turn signal
lever away from you. The lever latches in
place. Pull it back to select the low beam.
AIC1056AIC1057AIC1073
REAR WINDOW WIPER AND
WASHER SWITCHESREAR WINDOW DEFOGGER
SWITCHHEADLIGHT AND TURN
SIGNAL SWITCH
Instruments and controls2-15
ZX
Page 118 of 304

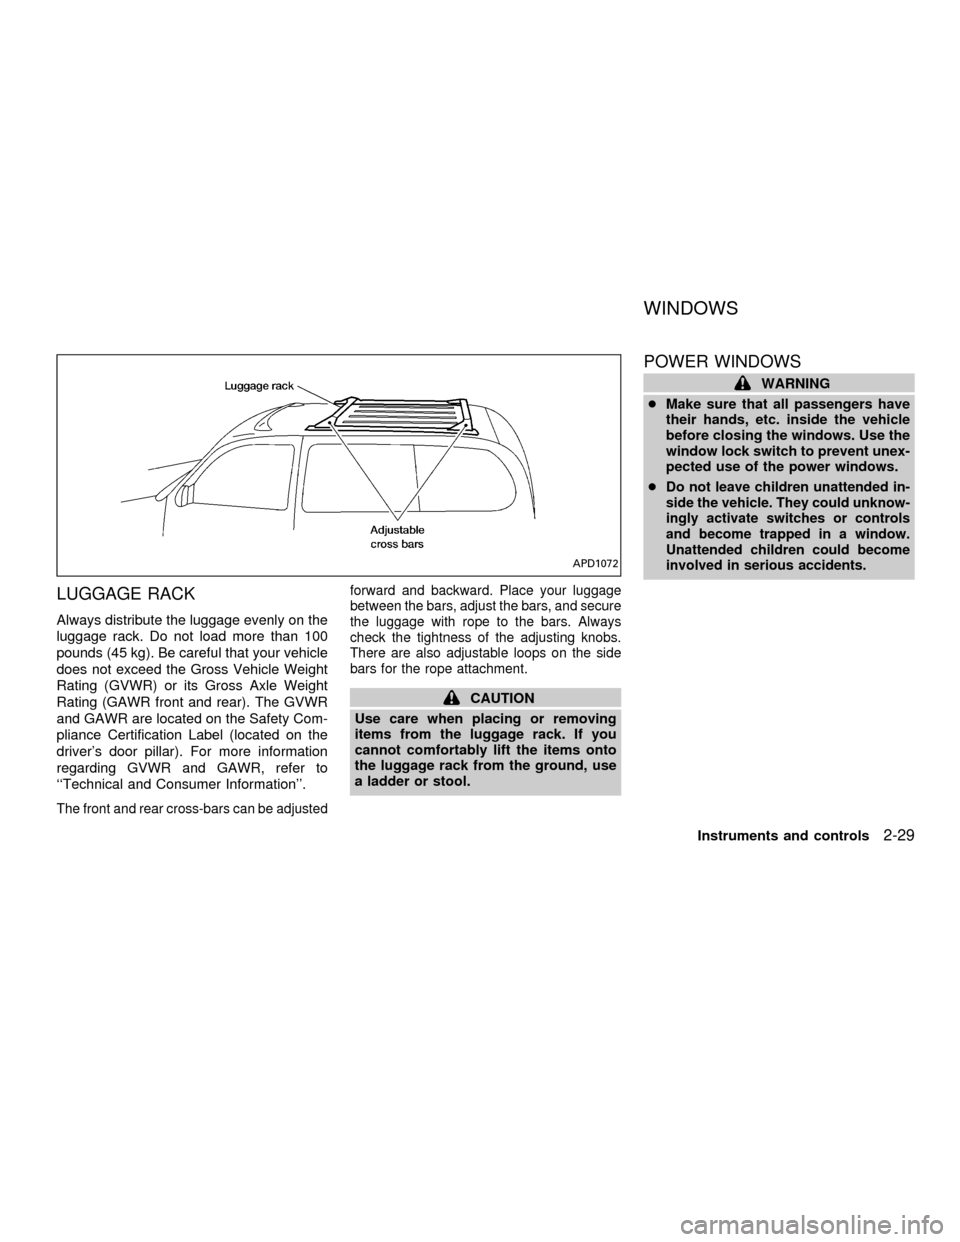
LUGGAGE RACK
Always distribute the luggage evenly on the
luggage rack. Do not load more than 100
pounds (45 kg). Be careful that your vehicle
does not exceed the Gross Vehicle Weight
Rating (GVWR) or its Gross Axle Weight
Rating (GAWR front and rear). The GVWR
and GAWR are located on the Safety Com-
pliance Certification Label (located on the
driver's door pillar). For more information
regarding GVWR and GAWR, refer to
``Technical and Consumer Information''.
The front and rear cross-bars can be adjustedforward and backward. Place your luggage
between the bars, adjust the bars, and secure
the luggage with rope to the bars. Always
check the tightness of the adjusting knobs.
There are also adjustable loops on the side
bars for the rope attachment.
CAUTION
Use care when placing or removing
items from the luggage rack. If you
cannot comfortably lift the items onto
the luggage rack from the ground, use
a ladder or stool.
POWER WINDOWS
WARNING
cMake sure that all passengers have
their hands, etc. inside the vehicle
before closing the windows. Use the
window lock switch to prevent unex-
pected use of the power windows.
c
Do not leave children unattended in-
side the vehicle. They could unknow-
ingly activate switches or controls
and become trapped in a window.
Unattended children could become
involved in serious accidents.
APD1072
WINDOWS
Instruments and controls2-29
ZX