2001 NISSAN QUEST steering wheel
[x] Cancel search: steering wheelPage 38 of 304
PRECAUTIONS ON SUPPLE-
MENTAL RESTRAINT SYSTEM
This supplemental restraint system descrip-
tion contains important information concern-
ing the driver and passenger supplemental
front air bags. The supplemental restraint
system air bags can help reduce impact
force to the driver and front passenger in
certain frontal collisions. The supplemental
air bags are designed tosupplementthe
crash protection provided by the seat belts
and arenot a substitutefor the seat belts.
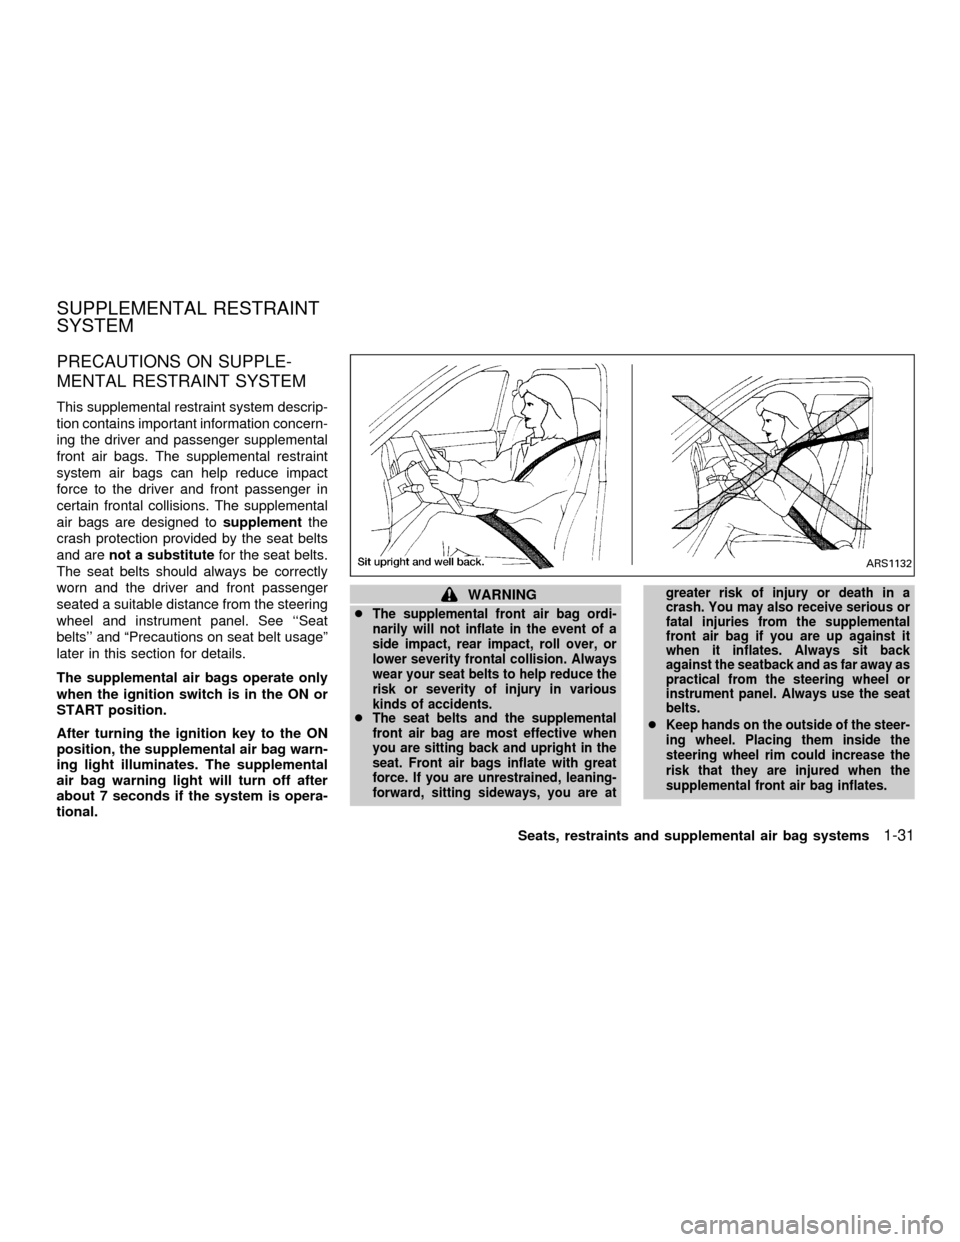
The seat belts should always be correctly
worn and the driver and front passenger
seated a suitable distance from the steering
wheel and instrument panel. See ``Seat
belts'' and ªPrecautions on seat belt usageº
later in this section for details.
The supplemental air bags operate only
when the ignition switch is in the ON or
START position.
After turning the ignition key to the ON
position, the supplemental air bag warn-
ing light illuminates. The supplemental
air bag warning light will turn off after
about 7 seconds if the system is opera-
tional.
WARNING
c
The supplemental front air bag ordi-
narily will not inflate in the event of a
side impact, rear impact, roll over, or
lower severity frontal collision. Always
wear your seat belts to help reduce the
risk or severity of injury in various
kinds of accidents.
cThe seat belts and the supplemental
front air bag are most effective when
you are sitting back and upright in the
seat. Front air bags inflate with great
force. If you are unrestrained, leaning-
forward, sitting sideways, you are atgreater risk of injury or death in a
crash. You may also receive serious or
fatal injuries from the supplemental
front air bag if you are up against it
when it inflates. Always sit back
against the seatback and as far away as
practical from the steering wheel or
instrument panel. Always use the seat
belts.cKeep hands on the outside of the steer-
ing wheel. Placing them inside the
steering wheel rim could increase the
risk that they are injured when the
supplemental front air bag inflates.
ARS1132
SUPPLEMENTAL RESTRAINT
SYSTEM
Seats, restraints and supplemental air bag systems1-31
ZX
Page 41 of 304

Supplemental front air bag system
The driver supplemental air bag is located in
the center of the steering wheel. The front
passenger supplemental air bag is mounted in
the dashboard above the glove box.
These systems are designed to meet optional
certification requirements under U.S. regula-
tions. They are also permitted in Canada. The
optional certification allows front air bags to
be designed to inflate somewhat less force-
fully than previously.However, all of the
information, cautions and warnings in this
manual still apply and must be followed.
The supplemental front air bag system is
designed to inflate in higher severity frontal
collisions, although it may inflate if the forces
in another type of collision are similar to those
of a higher severity frontal impact. It may not
inflate in certain frontal collisions. Vehicle
damage (or lack of it) is not always an indica-
tion of proper supplemental air bag system
operation.
When the supplemental front air bag in-
flates, a fairly loud noise may be heard,
followed by the release of smoke. This
smoke is not harmful and does not indicate
a fire. Care should be taken to not intention-ally inhale it, as it may cause irritation and
choking. Those with a history of a breathing
condition should get fresh air promptly.
The supplemental front air bags, along with
the use of seat belts, help to cushion the
impact force on the face and chest of the
occupant. They can help save lives and
reduce serious injuries. However, an inflat-
ing front air bag may cause facial abrasions
or other injuries. Front air bags do not
provide restraint to the lower body.
Seat belts should be correctly worn and the
driver and passenger seated upright as far
away as practical from the steering wheel or
instrument panel. The supplemental front air
bag inflates quickly in order to help protect
the front occupants. Because of this, the
force of the front air bag inflating can in-
crease the risk of injury if the occupant is too
close to, or is against, the air bag module
during inflation.The air bag deflates quickly
after a collision.
The supplemental air bags operate only
when the ignition switch is in the ON or
START position.
After turning the ignition key to the ON
position, the supplemental air bag warn-
WRS0075
1-34Seats, restraints and supplemental air bag systems
ZX
Page 42 of 304
ing light illuminates. The supplemental
air bag warning light will turn off after
about 7 seconds if the system is opera-
tional.WARNING
cDo not place any objects on the
steering wheel pad or on the instru-
ment panel. Also, do not place any
objects between any occupant and
the steering wheel or instrument
panel. Such objects may become
dangerous projectiles and cause in-
jury if the supplemental front air bag
inflates.
cRight after inflation, several air bag
system components will be hot. Do
not touch them; you may severely
burn yourself.
cNo unauthorized changes should be
made to any components or wiring
of the supplemental front air bag
system. This is to prevent accidental
inflation of the air bag or damage to
the air bag system.
cDo not make unauthorized changes
to your vehicle's electrical system,
suspension system or front end
structure. This could affect proper
operation of the supplemental front
air bag system.cTampering with the supplemental
front air bag system may result in
serious personal injury. For ex-
ample, do not change the front seat
assembly by placing material over
the steering wheel pad and above
the instrument panel or by installing
additional trim material around the
air bag system.
cWork around and on the supplemen-
tal front air bag system should be
done by an authorized NISSAN
dealer. Installation of electrical
equipment should also be done by
an authorized NISSAN dealer. The
yellow Supplemental Restraint Sys-
tem (SRS) wiring should not be
modified or disconnected. Unautho-
rized electrical test equipment and
probing devices should not be used
on the air bag system.
cThe SRS wiring harnesses are cov-
ered with yellow insulation either
just before the harness connectors
or over the complete harness for
easy identification.
Seats, restraints and supplemental air bag systems
1-35
ZX
Page 108 of 304
cDo not use the hazard warning flash-
ers while moving on the highway
unless unusual circumstances force
you to drive so slowly that your ve-
hicle might become a hazard to other
traffic.
cTurn signals do not work when the
hazard warning flasher lights are on.
The flashers can be actuated with the igni-
tion switch either OFF or ON.
Some state laws may prohibit the use of
the hazard warning flasher switch while
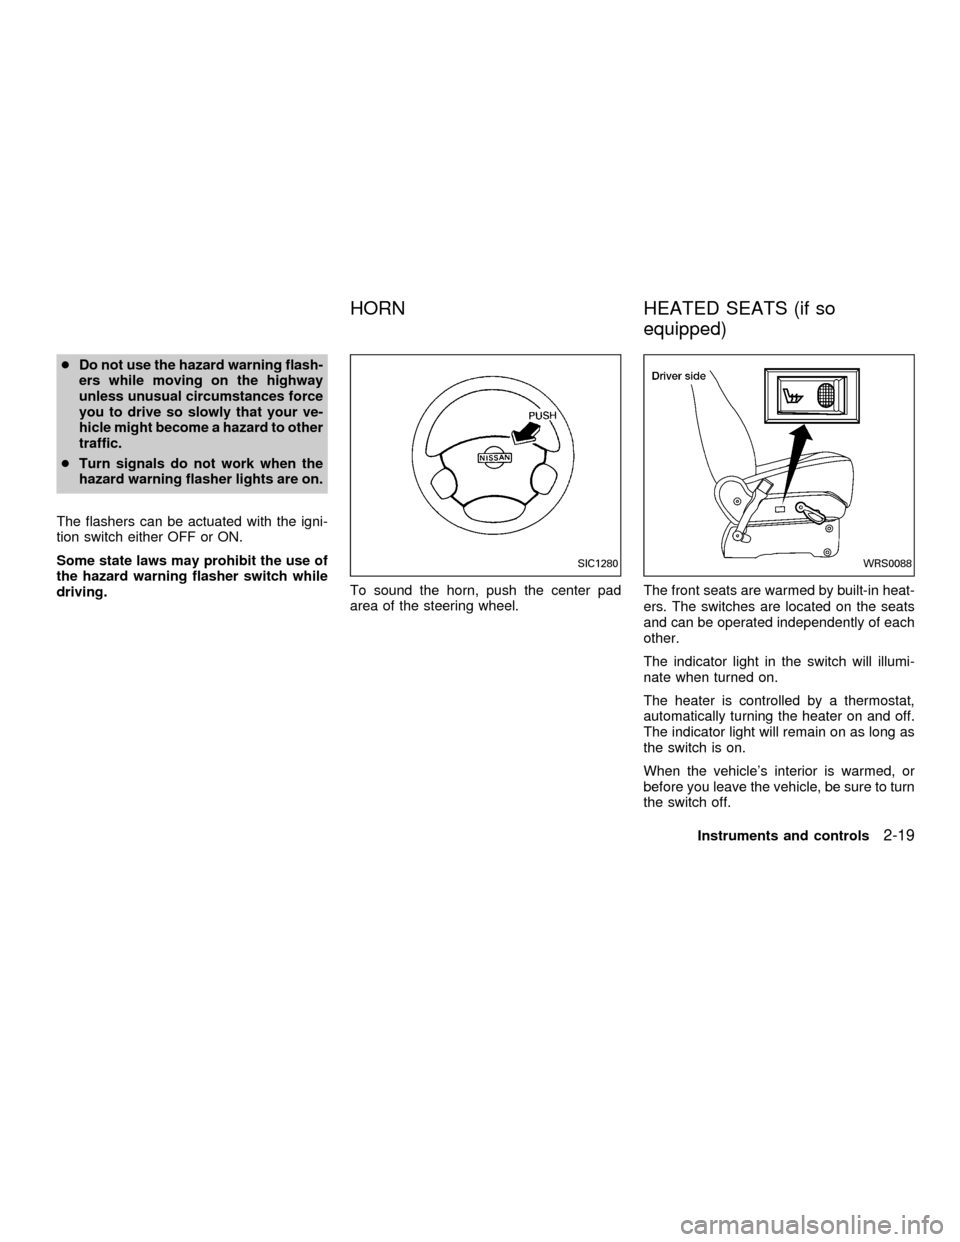
driving.To sound the horn, push the center pad
area of the steering wheel.The front seats are warmed by built-in heat-
ers. The switches are located on the seats
and can be operated independently of each
other.
The indicator light in the switch will illumi-
nate when turned on.
The heater is controlled by a thermostat,
automatically turning the heater on and off.
The indicator light will remain on as long as
the switch is on.
When the vehicle's interior is warmed, or
before you leave the vehicle, be sure to turn
the switch off.
SIC1280WRS0088
HORN HEATED SEATS (if so
equipped)
Instruments and controls2-19
ZX
Page 128 of 304

3 Pre-driving checks and adjustments
Keys .......................................................................3-2
Doors ......................................................................3-2
Locking with key ................................................3-3
Locking with inside lock knob............................3-3
Locking with power door lock switch.................3-4
Child safety sliding door locks...........................3-5
Multi-remote control system ...................................3-6
How to use multi-remote control system...........3-6
Battery replacement ..........................................3-8
Hood .......................................................................3-9
Rear door .............................................................3-10
Fuel filler lid ..........................................................3-10Opener operation ............................................3-10
Fuel filler cap ...................................................3-10
Steering wheel .....................................................3-11
Tilt operation ....................................................3-11
Sun visors.............................................................3-12
Vanity mirror ....................................................3-12
Mirrors ..................................................................3-12
Memory driver seat and mirrors
(if so equipped)................................................3-12
Inside mirror.....................................................3-14
Outside mirrors ................................................3-14
ZX
Page 138 of 304
completely closed before opening the
fuel door.
WARNING
cGasoline is extremely flammable and
highly explosive under certain con-
ditions. You could be burned or se-
riously injured if it is misused or
mishandled. Always stop the engine
and do not smoke or allow open
flames or sparks near the vehicle
when refueling.
c
Fuel may be under pressure. Turn the
cap one-half turn, and wait for any
``hissing'' sound to stop to prevent
fuel from spraying out and possibly
causing personal injury. Then re-
move the cap.
cDo not attempt to top off the fuel
tank after the fuel pump nozzle shuts
off automatically. Continued refuel-
ing may cause fuel overflow, result-
ing in fuel spray and possibly a fire.
cUse only an original equipment type
fuel filler cap as a replacement. It has
a built-in safety valve needed for
proper operation of the fuel system
and emission control system. Anincorrect cap can result in a serious
malfunction and possible injury.
cNever pour fuel into the throttle body
to attempt to start your vehicle.
CAUTION
cIf fuel is spilled on the vehicle body,
flush it away with water to avoid
paint damage.
cTighten until the fuel filler cap clicks.
Failure to tighten the fuel filler cap
properly may cause the
mal-
function indicator lamp (MIL) to illu-
minate. If the
lamp illuminates
because the fuel filler cap is loose or
missing, tighten or install the cap
and continue to drive the vehicle.
The
lamp should turn off after
a few driving trips. If thelamp
does not turn off after a few driving
trips, have the vehicle inspected by
an authorized NISSAN dealer.
cFor additional information, see the
``Malfunction indicator lamp (MIL)''
in the ``Instrument and controls''
section earlier in this manual.
TILT OPERATION
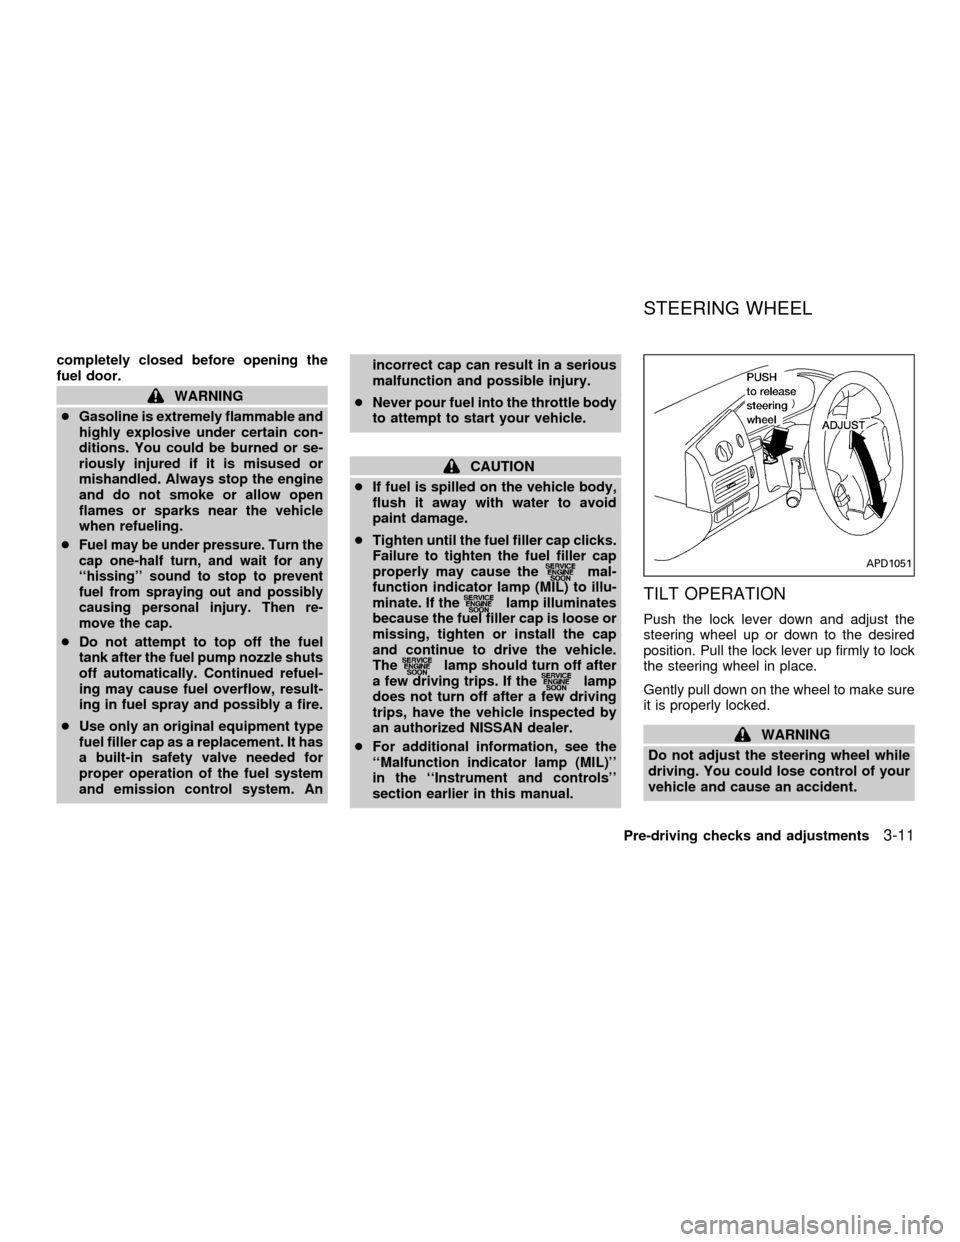
Push the lock lever down and adjust the
steering wheel up or down to the desired
position. Pull the lock lever up firmly to lock
the steering wheel in place.
Gently pull down on the wheel to make sure
it is properly locked.
WARNING
Do not adjust the steering wheel while
driving. You could lose control of your
vehicle and cause an accident.
APD1051
STEERING WHEEL
Pre-driving checks and adjustments3-11
ZX
Page 144 of 304

4Heater, air conditioner and audio systems
Ventilators ..............................................................4-2
Center ventilators ..............................................4-2
Side ventilators ..................................................4-2
Heater and air conditioner (manual) ......................4-3
Controls .............................................................4-3
Heater operation ................................................4-4
Air conditioner operation ...................................4-5
Air flow charts ....................................................4-7
Heater and air conditioner (automatic)
(if so equipped) ....................................................4-11
Automatic operation ........................................4-12
Rear seat air conditioner (if so equipped) ...........4-14
Controls ...........................................................4-14
Servicing air conditioning .....................................4-15
Audio system ........................................................4-16
Audio system ........................................................4-16
Radio ...............................................................4-16
Fm radio reception ..........................................4-16
Am radio reception ..........................................4-16Audio operation precautions ...........................4-17
FM-AM radio with cassette player...................4-19
FM-AM radio with cassette player and
compact disc (CD) player ................................4-25
Compact disc (CD) player
(if so equipped)................................................4-32
CD care and cleaning......................................4-33
Steering wheel switch for audio controls
(if so equipped)................................................4-34
Rear audio controls (if so equipped) ...............4-35
Antenna ...........................................................4-37
AutovisionTfamily entertainment system
(FES) (if so equipped) ..........................................4-37
Rear seat entertainment module
(RSEM) (if so equipped)..................................4-41
Care & maintenance........................................4-43
Troubleshooting ...............................................4-44
Specifications ..................................................4-45
Car phone or CB radio .........................................4-46
ZX
Page 177 of 304
rubbing the inner and outer edges with the
side of a pen or pencil as illustrated.
CAUTION
cDuring cold weather or rainy days,
the player may malfunction due to
the humidity. If this occurs, remove
the CD and dehumidify or ventilate
the player completely.
cThe player may skip while driving on
rough roads.
cThe CD player sometimes cannot
function when the compartment tem-
perature is extremely high. Decrease
the temperature before use.
cDo not expose the CD to direct sun-
light.
cDo not touch the playing surface of
the disc.
cDo not use 8 cm discs. They may
cause player damage even if using
with the optional adapter.
cRecordable compact discs (CD-R)
and rewritable compact discs (CD-
RW) may not function properly in the
CD player.
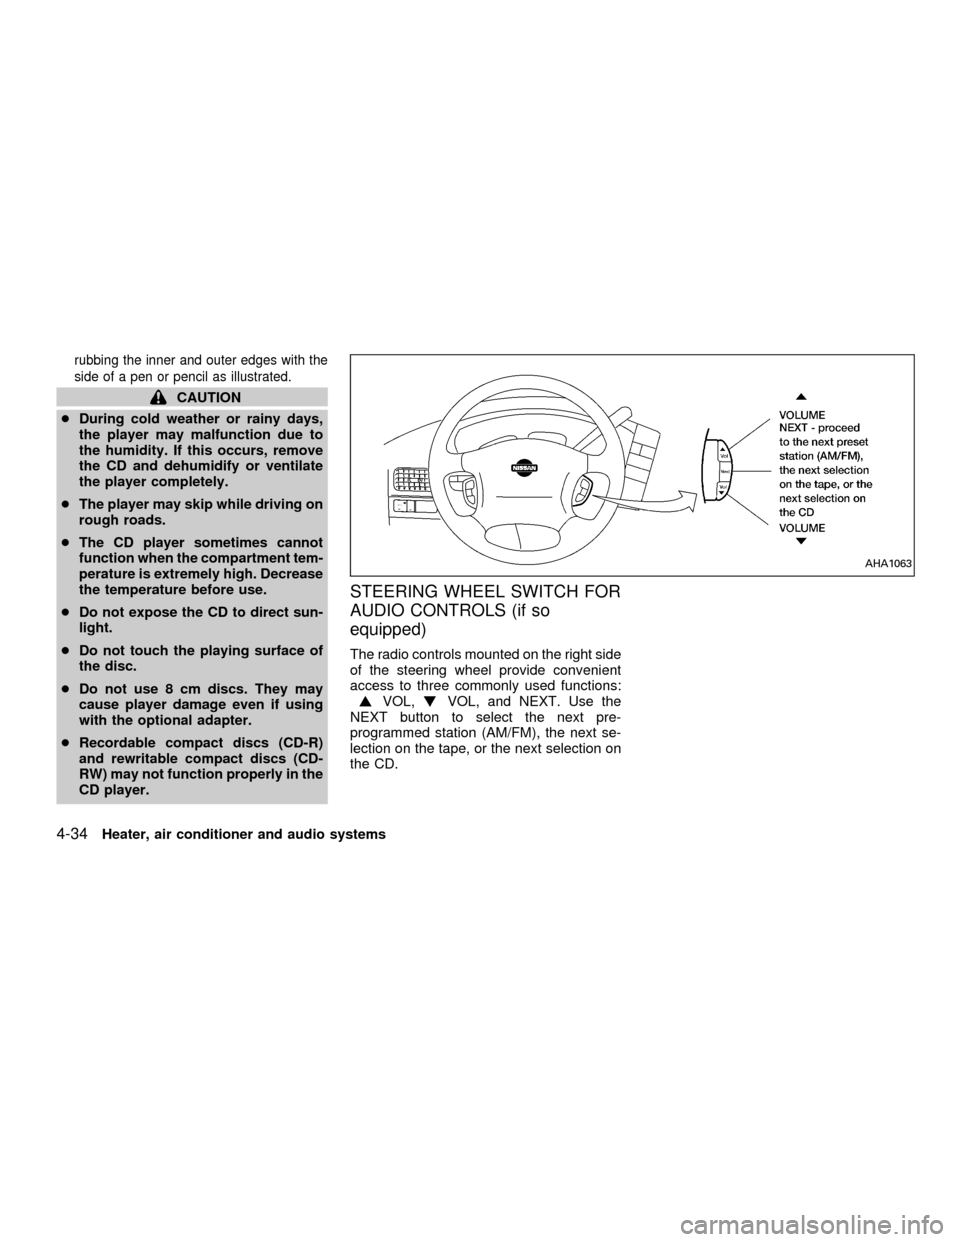
STEERING WHEEL SWITCH FOR
AUDIO CONTROLS (if so
equipped)
The radio controls mounted on the right side
of the steering wheel provide convenient
access to three commonly used functions:
VOL,VOL, and NEXT. Use the
NEXT button to select the next pre-
programmed station (AM/FM), the next se-
lection on the tape, or the next selection on
the CD.
AHA1063
4-34Heater, air conditioner and audio systems
ZX