2001 NISSAN QUEST bulb
[x] Cancel search: bulbPage 89 of 304

2 Instruments and controls
Meters and gauges ................................................2-3
Speedometer and odometer .............................2-4
Tachometer........................................................2-4
Engine coolant temperature gauge ...................2-5
Fuel gauge ........................................................2-5
Message center (if so equipped) ...........................2-6
Warning/indicator lights and chimes ......................2-7
Checking bulbs ..................................................2-7
Warning lights ....................................................2-7
Indicator lights ...................................................2-9
Audible reminders............................................2-11
Vehicle security system (if so equipped) .............2-11
Windshield wiper and washer switch ...................2-14
Rear window wiper and washer switches ............2-15
Rear window defogger switch ..............................2-15
Headlight and turn signal switch ..........................2-15
Headlight control switch ..................................2-15
Autolamp switch (if so equipped) ....................2-17
Turn signal switch ........................................2-18
Cornering light .................................................2-18
Hazard warning flasher switch .............................2-18
Horn ......................................................................2-19Heated seats (if so equipped) ..............................2-19
Rear power socket ...............................................2-21
Cigarette lighter and ashtray (accessory) ............2-22
Storage .................................................................2-23
Map pockets ....................................................2-23
Conversation mirror .........................................2-23
Cup holders .....................................................2-24
Glove box ........................................................2-25
Cargo net .........................................................2-26
Parcel shelf (if so equipped) ...........................2-27
Luggage rack ...................................................2-29
Windows ...............................................................2-29
Power windows................................................2-29
Power vent windows (if so equipped) .............2-31
Manual vent windows ......................................2-31
Sunroof (if so equipped).......................................2-32
Interior lights .........................................................2-33
Luggage ...........................................................2-33
Personal reading light ..........................................2-33
Map lights .............................................................2-34
Illuminated entry system ......................................2-34
ZX
Page 96 of 304
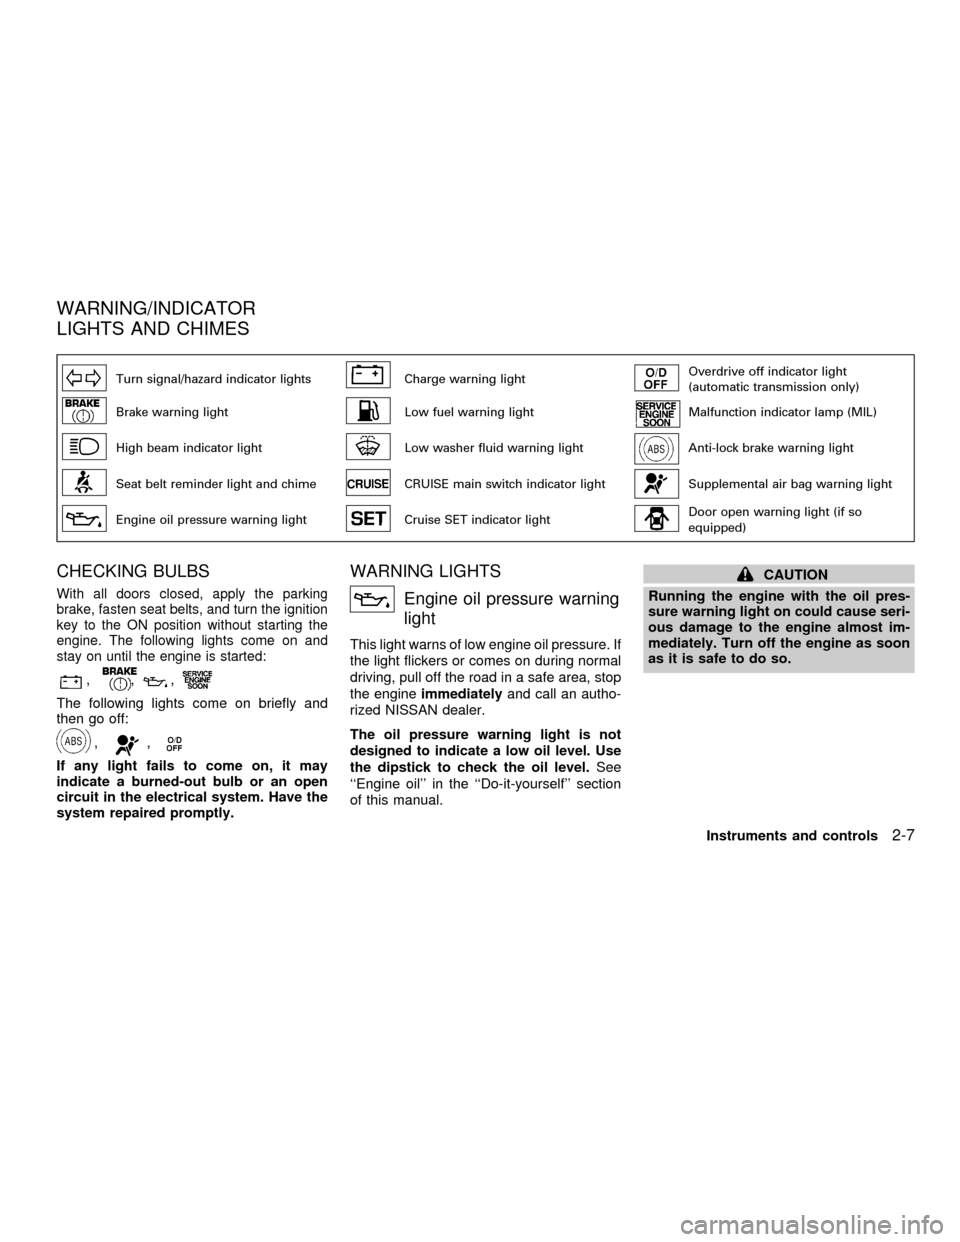
Turn signal/hazard indicator lightsCharge warning lightOverdrive off indicator light
(automatic transmission only)
Brake warning lightLow fuel warning lightMalfunction indicator lamp (MIL)
High beam indicator lightLow washer fluid warning lightAnti-lock brake warning light
Seat belt reminder light and chimeCRUISE main switch indicator lightSupplemental air bag warning light
Engine oil pressure warning lightCruise SET indicator lightDoor open warning light (if so
equipped)
CHECKING BULBS
With all doors closed, apply the parking
brake, fasten seat belts, and turn the ignition
key to the ON position without starting the
engine. The following lights come on and
stay on until the engine is started:
,,,
The following lights come on briefly and
then go off:
,,
If any light fails to come on, it may
indicate a burned-out bulb or an open
circuit in the electrical system. Have the
system repaired promptly.
WARNING LIGHTS
Engine oil pressure warning
light
This light warns of low engine oil pressure. If
the light flickers or comes on during normal
driving, pull off the road in a safe area, stop
the engineimmediatelyand call an autho-
rized NISSAN dealer.
The oil pressure warning light is not
designed to indicate a low oil level. Use
the dipstick to check the oil level.See
``Engine oil'' in the ``Do-it-yourself'' section
of this manual.
CAUTION
Running the engine with the oil pres-
sure warning light on could cause seri-
ous damage to the engine almost im-
mediately. Turn off the engine as soon
as it is safe to do so.
WARNING/INDICATOR
LIGHTS AND CHIMES
Instruments and controls2-7
ZX
Page 168 of 304

FM-AM RADIO WITH CASSETTE
PLAYER AND COMPACT DISC
(CD) PLAYER
Audio main operationTo turn the radio on, turn the ignition key to
ACC or ON. If you listen to the radio with the
engine not running, turn the key to the ACC
position.
Radio reception is affected by station signal
strength, distance from radio transmitter,buildings, bridges, mountains, and other
external influences. Intermittent changes in
reception quality normally are caused by
external influences.
Using a cellular phone in or near the
vehicle may influence radio reception
quality.
Power/Volume control
Push the VOL knob to turn the radio on.
Push the VOL knob once more to turn the
radio OFF.
The control buttons are illuminated when
the parking lamps or headlamps are on.
Only the text for the active controls will
illuminate for each specific type of media.
No bulbs or lights have malfunctioned. For
example when a cassette tape is being
played, SHUFFLE will not illuminate.
Turn the knob to the right to increase vol-
ume or to the left to decrease volume. If the
knob is set above a certain volume level and
the ignition is turned off, the volume will
come back on at a nominal listening level
when the ignition is turned back on.
AHA1058
Heater, air conditioner and audio systems4-25
ZX
Page 250 of 304
HEADLIGHTS
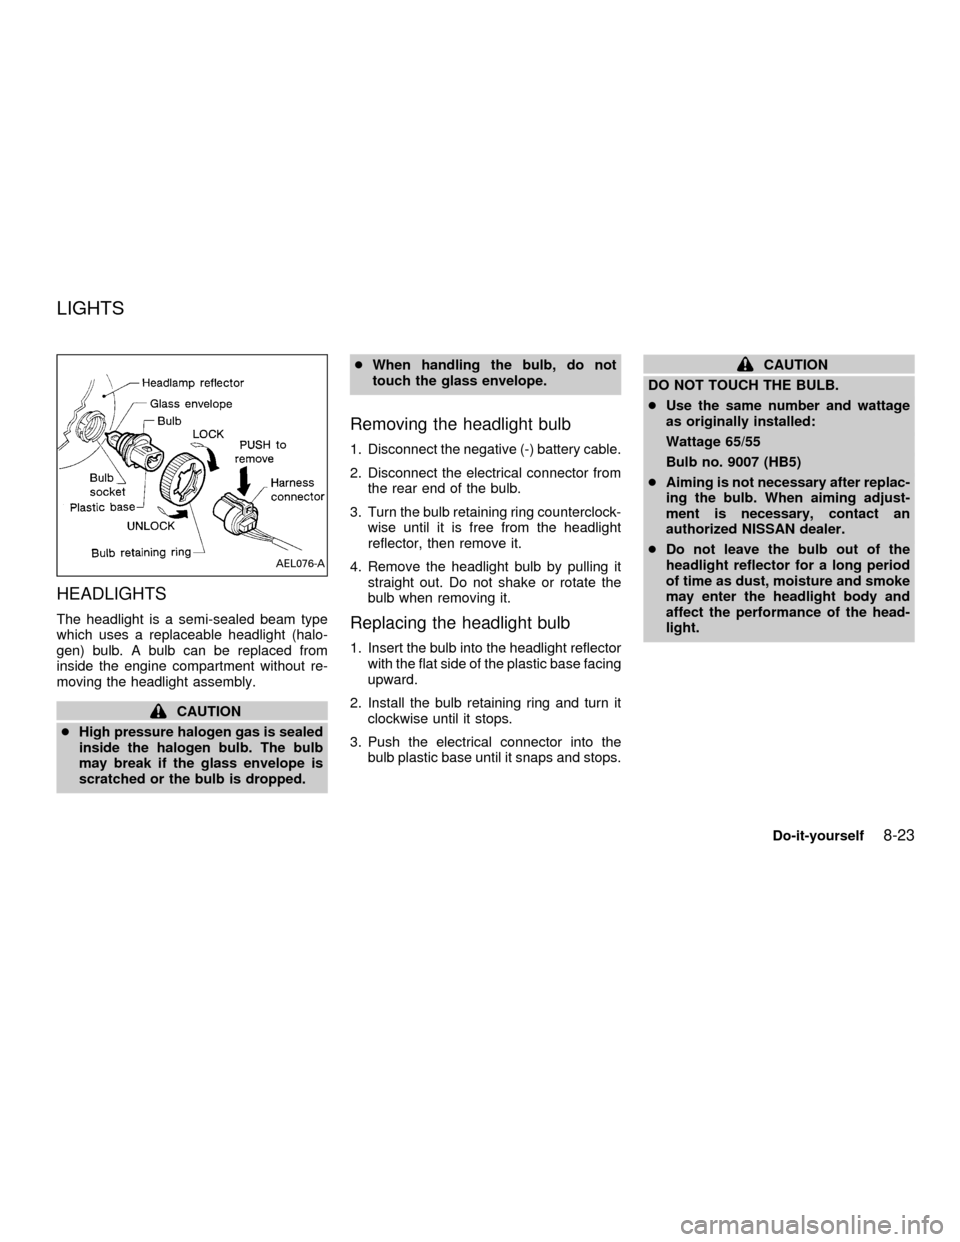
The headlight is a semi-sealed beam type
which uses a replaceable headlight (halo-
gen) bulb. A bulb can be replaced from
inside the engine compartment without re-
moving the headlight assembly.
CAUTION
cHigh pressure halogen gas is sealed
inside the halogen bulb. The bulb
may break if the glass envelope is
scratched or the bulb is dropped.cWhen handling the bulb, do not
touch the glass envelope.
Removing the headlight bulb
1. Disconnect the negative (-) battery cable.
2. Disconnect the electrical connector from
the rear end of the bulb.
3. Turn the bulb retaining ring counterclock-
wise until it is free from the headlight
reflector, then remove it.
4. Remove the headlight bulb by pulling it
straight out. Do not shake or rotate the
bulb when removing it.
Replacing the headlight bulb
1. Insert the bulb into the headlight reflector
with the flat side of the plastic base facing
upward.
2. Install the bulb retaining ring and turn it
clockwise until it stops.
3. Push the electrical connector into the
bulb plastic base until it snaps and stops.
CAUTION
DO NOT TOUCH THE BULB.
cUse the same number and wattage
as originally installed:
Wattage 65/55
Bulb no. 9007 (HB5)
cAiming is not necessary after replac-
ing the bulb. When aiming adjust-
ment is necessary, contact an
authorized NISSAN dealer.
cDo not leave the bulb out of the
headlight reflector for a long period
of time as dust, moisture and smoke
may enter the headlight body and
affect the performance of the head-
light.
AEL076-A
LIGHTS
Do-it-yourself8-23
ZX
Page 251 of 304

FOG LIGHTS
Replacing the fog light bulb
1. Remove the three splash shield screws
and three push pins.
2. Move the splash shield out of the way.
3. Disconnect electrical connector.
4. Rotate the bulb counterclockwise until it
is free from the fog light housing.
LDI0064
LDI0065
8-24Do-it-yourself
ZX
Page 252 of 304
EXTERIOR AND INTERIOR
LIGHTS
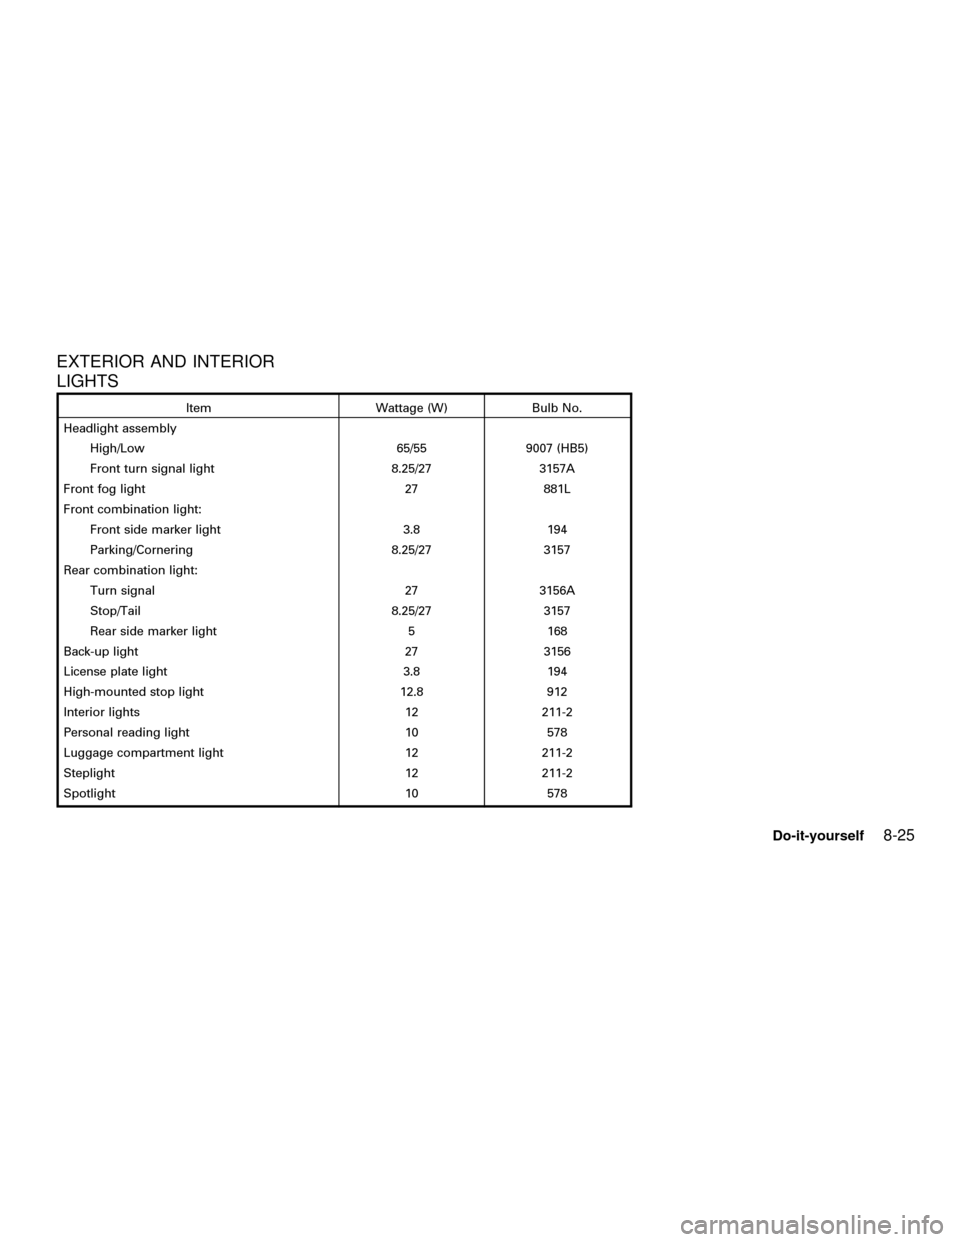
Item Wattage (W) Bulb No.
Headlight assembly
High/Low 65/55 9007 (HB5)
Front turn signal light 8.25/27 3157A
Front fog light 27 881L
Front combination light:
Front side marker light 3.8 194
Parking/Cornering 8.25/27 3157
Rear combination light:
Turn signal 27 3156A
Stop/Tail 8.25/27 3157
Rear side marker light 5 168
Back-up light 27 3156
License plate light 3.8 194
High-mounted stop light 12.8 912
Interior lights 12 211-2
Personal reading light 10 578
Luggage compartment light 12 211-2
Steplight 12 211-2
Spotlight 10 578
Do-it-yourself8-25
ZX
Page 253 of 304
Replacement procedures
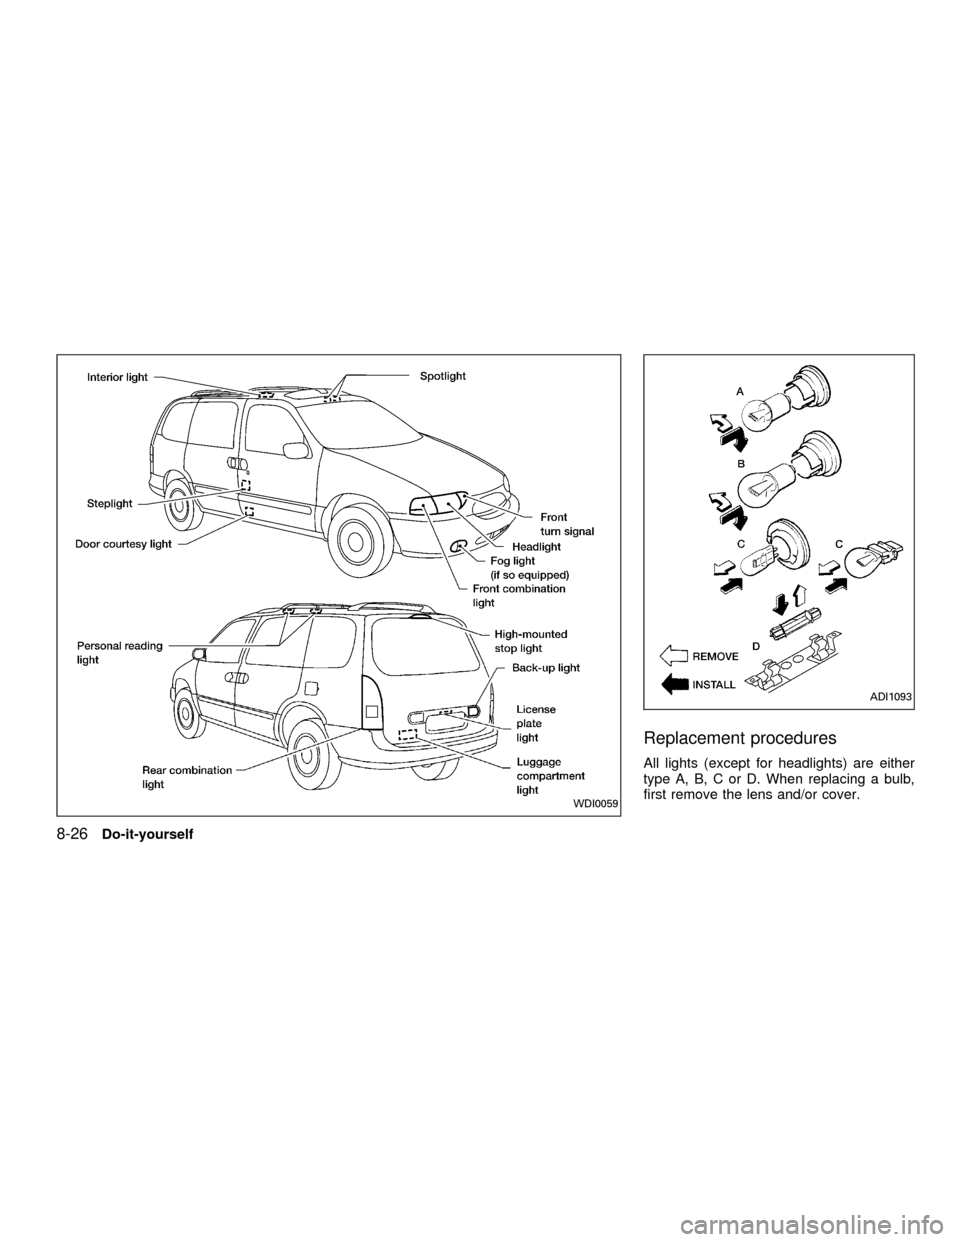
All lights (except for headlights) are either
type A, B, C or D. When replacing a bulb,
first remove the lens and/or cover.
WDI0059
ADI1093
8-26Do-it-yourself
ZX
Page 289 of 304
cDo not modify the vehicle exhaust
system, brake system, etc. to install
a trailer hitch.
cTo reduce the possibility of addi-
tional damage if your vehicle is
struck from the rear, where practical,
remove the hitch and/or receiver
when not in use.
cAfter the hitch is removed, seal the
bolt holes to prevent exhaust fumes,
water or dust from entering the pas-
senger compartment.
cRegularly check that all hitch mount-
ing bolts are securely mounted.
Tire pressures
cWhen towing a trailer, inflate the vehicle
tires to the recommended cold tire pres-
sure indicated on the tire placard (located
on the inside of the glove box lid).
cTrailer tire condition, size, load rating and
proper inflation pressure should be in
accordance with the trailer and tire
manufacturer's specifications.
Safety chains
Always use suitable safety chains between
your vehicle and the trailer. Safety chains
should be crossed and should be attached
to the hitch, not to the vehicle bumper or
axle. Be sure to leave enough slack in the
chains to permit turning corners.
Trailer lights
Trailer lights should comply with Federal
and/or local regulations. When wiring the
vehicle for towing, connect the stop and tail
light pickup into the vehicle electrical circuit.
Class I Trailer Tow electrical wiring provides
two circuits (right and left hand) to operate
trailer stop/turn tail lamps. Each individual
stop/turn circuit will operate only one com-
bination stop/turn light bulb (#1157, 3157,
2357, or 3357) on the trailer. Never add
more than one trailer light bulb to one
circuit.
10-16Technical and consumer information
ZX