2001 NISSAN MAXIMA ECO mode
[x] Cancel search: ECO modePage 2 of 247

IMPORTANT INFORMATION
ABOUT THIS MANUALYou will see various symbols in this manual.
They are used in the following ways:
WARNING
This is used to indicate the presence of a
hazard that could cause death or serious
personal injury. To avoid or reduce the
risk, the procedures must be followed
precisely.
CAUTION
This is used to indicate the presence of a
hazard that could cause minor or moder-
ate personal injury or damage to your
vehicle. To avoid or reduce the risk, the
procedures must be followed carefully.If you see this symbol, it meansDo not do
thisorDo not let this happen.
CALIFORNIA PROPOSITION 65
WARNING
WARNING
Engine Exhaust, some of its constitu-
ents, and certain vehicle components
contain or emit chemicals known to State
of California to cause cancer and birth
defects or other reproductive harm.
2000 NISSAN MOTOR CO., LTD.
TOKYO, JAPANAll rights reserved. No part of this Owner's Manual may
be reproduced or stored in a retrieval system, or trans-
mitted in any form, or by any means, electronic, me-
chanical, photocopying, recording or otherwise, without
the prior written permission of Nissan Motor Co., Ltd.
SIC0697Z
00.1.17/A33-D/V5.0
X
Page 35 of 247

does not go in front of the child's face
or neck. If it does, put the shoulder
belt behind the child restraint. If you
must install a front facing child re-
straint in the front seat, see instruc-
tions later in this section.
IWhen your child restraint is not in
use, store it in the trunk or keep it
secured with a seat belt to prevent it
from being thrown around in case of
a sudden stop or accident.
CAUTION
Remember that a child restraint left in a
closed vehicle can become very hot.
Check the seating surface and buckles
before placing your child in the child
restraint.
INSTALLATION ON REAR SEAT
OUTBOARD OR CENTER
POSITIONS
WARNING
IThe three-point belt on your vehicle is
equipped with a locking mode retrac-
tor which must be used when install-
ing a child restraint.
IFailure to do so will result in the child
restraint not being properly secured.
It could tip over or otherwise be un-
secured and cause injury to the child
in a sudden stop or collision.
Front facingWhen you install a child restraint in a rear
outboard or center seat, follow these steps:
1. Position the child restraint on the seat. It
can be placed in a front facing direction,
depending on the size of the child. Always
follow the restraint manufacturer's instruc-
tions.
SSS0153
1-30
Seats, restraints and supplemental air bag systems
Z
00.1.17/A33-D/V5.0
X
Page 42 of 247

WARNING
The child restraint anchor point is de-
signed to withstand only those loads
imposed by correctly fitted child re-
straints. Under no circumstance is it to
be used for adult seat belts or har-
nesses.Anchor point locationsAnchor points are located on the rear parcel
shelf finisher.
If you have any questions when installing a
top strap child restraint on the rear seat,
consult your NISSAN dealer for details.
INSTALLATION ON FRONT
PASSENGER SEAT
WARNING
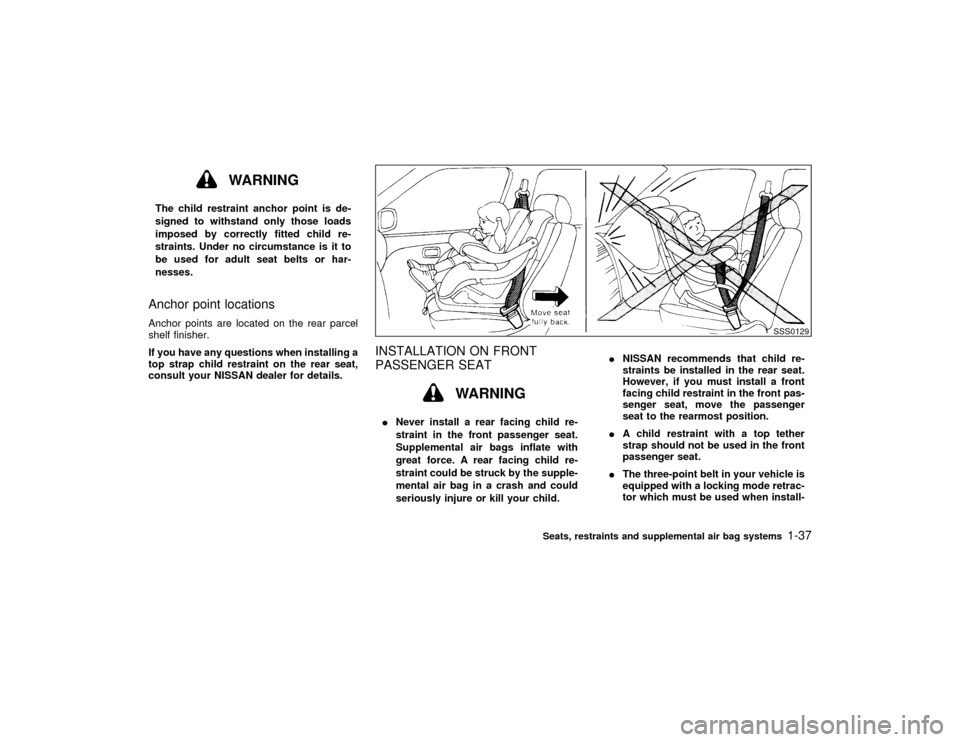
INever install a rear facing child re-
straint in the front passenger seat.
Supplemental air bags inflate with
great force. A rear facing child re-
straint could be struck by the supple-
mental air bag in a crash and could
seriously injure or kill your child.INISSAN recommends that child re-
straints be installed in the rear seat.
However, if you must install a front
facing child restraint in the front pas-
senger seat, move the passenger
seat to the rearmost position.
IA child restraint with a top tether
strap should not be used in the front
passenger seat.
IThe three-point belt in your vehicle is
equipped with a locking mode retrac-
tor which must be used when install-
SSS0129
Seats, restraints and supplemental air bag systems
1-37
Z
00.1.17/A33-D/V5.0
X
Page 56 of 247

light comes on when the parking brake is
applied.
Low brake fluid warning light:
The light warns of a low brake fluid level. If the
light comes on while the engine is running with
the parking brake not applied, stop the vehicle
and perform the following:
1. Check the brake fluid level. Add brake fluid
as necessary. See ªBrake and clutch fluidº
in the ªDo-it-yourselfº section.
WARNING
IYour brake system may not be work-
ing properly if the warning light is on.
Driving could be dangerous. If you
judge it to be safe, drive carefully to
the nearest service station for re-
pairs. Otherwise, have your vehicle
towed because driving it could be
dangerous.
IPressing the brake pedal with the
engine stopped and/or low brake fluid
level may increase your stopping dis-
tance and braking will require greaterpedal effort as well as greater pedal
travel.
IIf the brake fluid level is below the
MIN mark on the brake fluid reservoir,
do not drive until the brake system
has been checked at a NISSAN
dealer.
2. If the brake fluid level is correct, have the
warning system checked by a NISSAN
dealer.
or
Anti-lock brake
warning light (if so
equipped)
After turning the ignition key to the ON posi-
tion, the light will illuminate. The light will turn
off after about 2 seconds if the system is
operational.
If the light comes on while the engine is
running, it may indicate that the anti-lock brake
system is not functioning properly. Have the
system checked by your NISSAN dealer.
If an abnormality occurs in the system, the
anti-lock function will cease but the ordinary
brakes will continue to operate normally.If the light comes on while you are driving,
contact your NISSAN dealer for repair.
Low fuel warning light
This light comes on when the fuel in the tank is
getting low. Refuel as soon as it is convenient,
preferably before the fuel gauge reaches E.
There will be a small reserve of fuel remain-
ing in the tank when the fuel gauge needle
reaches E.INDICATOR LIGHTS
Overdrive off indicator light
This light comes on during driving when the
overdrive switch is pressed to prevent over-
drive operation.
The O/D OFF indicator light comes on for 2
seconds each time the ignition key is turned
ON. This shows the light is functioning prop-
erly.If the O/D OFF indicator light blinks for
approximately 8 seconds after coming on for
2 seconds, have your NISSAN dealer check
the transmission and repair it if necessary.The automatic transmission is equipped with
an electronic fail-safe mode. This system al-
lows the vehicle to be driven even in the event
of damage to the electrical circuits. If this
Instruments and controls
2-9
Z
00.1.17/A33-D/V5.0
X
Page 90 of 247

IDo not allow the remote controller to
become wet.
IDo not drop the remote controller.
IDo not strike the remote controller
sharply against another object.
IDo not place the remote controller for
an extended period in an area where
temperatures exceed 140ÉF (60ÉC).
If a multi-remote controller is lost or
stolen, NISSAN recommends erasing
the ID code of that controller. This will
prevent the controller from unautho-
rized use to unlock the vehicle. For in-
formation regarding the erasing proce-
dure, please contact an authorized
NISSAN dealer.HOW TO USE MULTI-REMOTE
CONTROL SYSTEM
Setting hazard indicator and horn
modeThis vehicle is set in hazard indicator and horn
mode when you first receive the vehicle.In hazard indicator and horn mode, when the
LOCK button is pushed, the hazard indicator
flashes twice and the horn chirps once. When
the UNLOCK button is pushed, the hazard
indicator flashes once.
If hazard indicator and horn mode is not nec-
essary, you can switch to hazard indicator only
mode by following the switching procedure.
In hazard indicator only mode, when the LOCK
button is pushed, the hazard indicator flashes
twice. When the UNLOCK button is pushed,
neither the hazard indicator nor the horn oper-
ates.
(Switching procedure)
Push the LOCK and UNLOCK buttons on the
multi-remote controller simultaneously for
more than 2 seconds to switch from one mode
to the other.
When pushing the buttons to set hazard indi-
cator only mode, the hazard indicator flashes 3
times.
When pushing the buttons to set hazard indi-
cator and horn mode, the hazard indicator
flashes once and the horn chirps once.
Pre-driving checks and adjustments
3-5
Z
00.1.17/A33-D/V5.0
X
Page 104 of 247

WARNING
IThe air conditioner cooling function
operates only when the engine is run-
ning.
IDo not leave children, impaired
adults, or pets alone in your vehicle.
On hot, sunny days, temperatures in
a closed vehicle could quickly be-
come high enough to cause severe or
possibly fatal injuries to people oranimals.
IDo not use the recirculation mode for
long periods as it may cause the
interior air to become stale and the
windows to fog up.
IPositioning of the heating or air con-
ditioning controls should not be done
while driving, so full attention may be
given to vehicle operation.
CONTROLS
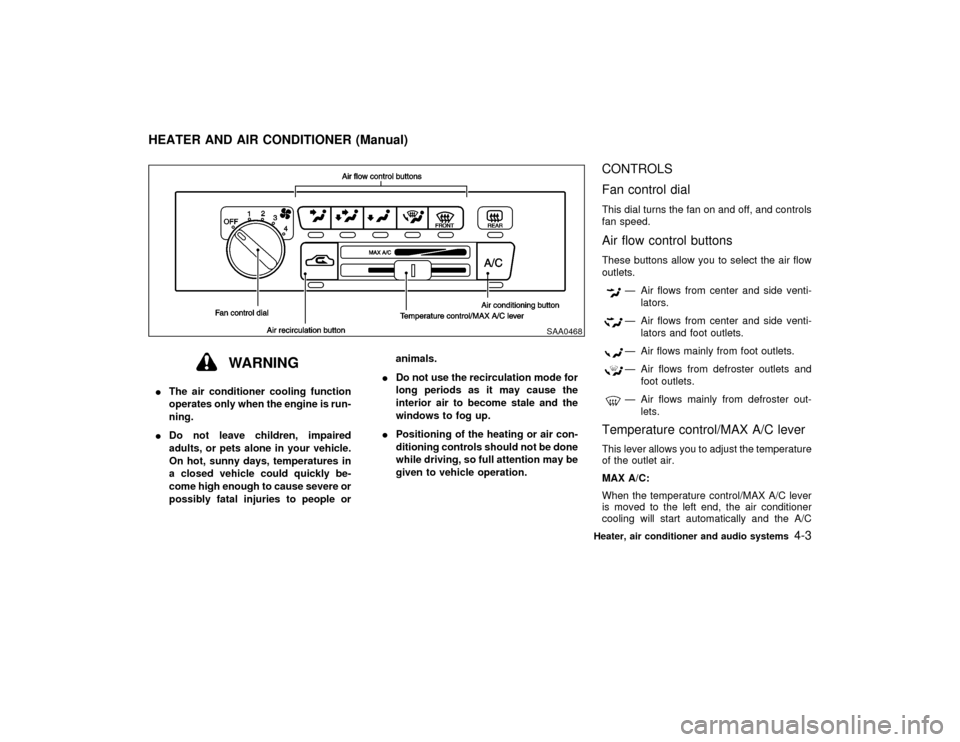
Fan control dialThis dial turns the fan on and off, and controls
fan speed.Air flow control buttonsThese buttons allow you to select the air flow
outlets.
Ð Air flows from center and side venti-
lators.Ð Air flows from center and side venti-
lators and foot outlets.Ð Air flows mainly from foot outlets.Ð Air flows from defroster outlets and
foot outlets.Ð Air flows mainly from defroster out-
lets.
Temperature control/MAX A/C leverThis lever allows you to adjust the temperature
of the outlet air.
MAX A/C:
When the temperature control/MAX A/C lever
is moved to the left end, the air conditioner
cooling will start automatically and the A/C
SAA0468
HEATER AND AIR CONDITIONER (Manual)
Heater, air conditioner and audio systems
4-3
Z
00.1.17/A33-D/V5.0
X
Page 110 of 247

WARNING
IThe air conditioner cooling function
operates only when the engine is run-ning.
IDo not leave children, impaired
adults, or pets alone in your vehicle.On hot, sunny days, temperatures in
a closed vehicle could quickly be-
come high enough to cause severe or
possibly fatal injuries to people or
animals.
IDo not use the recirculation mode for
long periods as it may cause the
interior air to become stale and the
windows to fog up.
IPositioning of the heating or air con-
ditioning controls should not be done
while driving, so full attention may be
given to vehicle operation.
Start the engine and operate the controls to
activate the air conditioner.
AUTOMATIC OPERATION
Cooling and/or dehumidified heating
(AUTO)This mode may be normally used all year
round as the system automatically works to
keep a constant temperature. Air flow distribu-
tion and fan speed are also controlled auto-
matically.
SAA0463
HEATER AND AIR CONDITIONER
(Automatic) (if so equipped)
Heater, air conditioner and audio systems
4-9
Z
00.1.17/A33-D/V5.0
X
Page 111 of 247

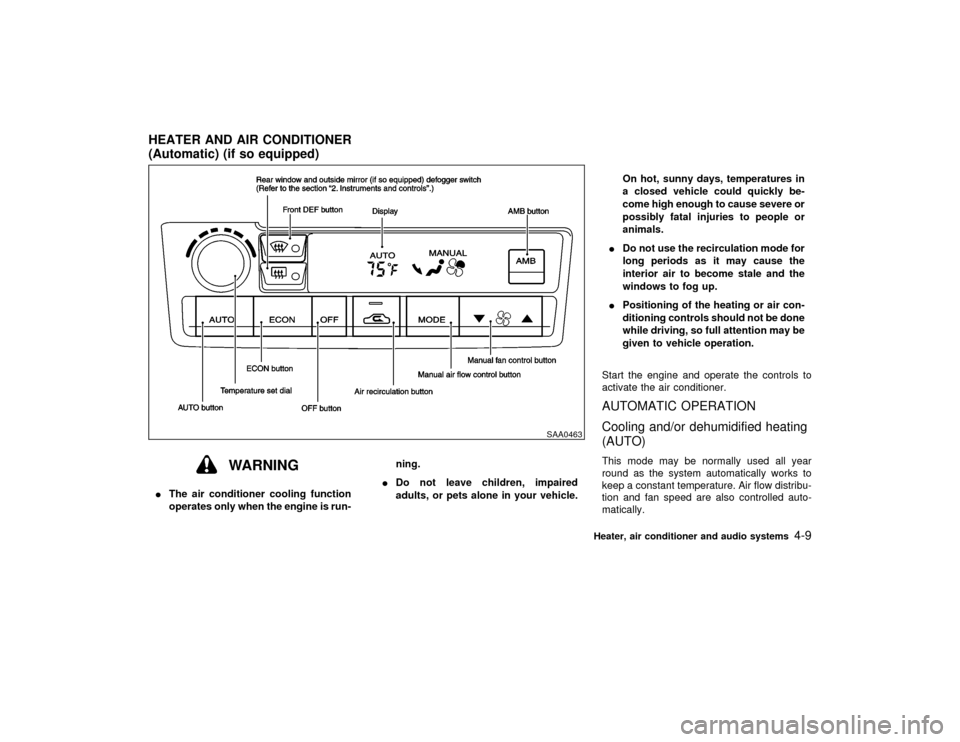
1. Push the AUTO button on. (AUTO will be
displayed.)
2. Turn the temperature set dial to the left or
right to set the desired temperature.
IAdjust the temperature set dial to about
75ÉF (24ÉC) for normal operation.
IThe temperature of the passenger compart-
ment will be maintained automatically. Air
flow distribution and fan speed are also
controlled automatically.Heating (ECON)The air conditioner does not activate. When
you need to heat only, use this mode.
1. Push the ECON (Economy) button on.
(ECON will be displayed.)
2. Turn the temperature set dial to the left or
right to set the desired temperature.
IThe temperature of the passenger compart-
ment will be maintained automatically. Air
flow distribution and fan speed are also
controlled automatically.
IDo not set the temperature lower than the
outside air temperature. Otherwise the sys-
tem may not work properly.
INot recommended if windows fog up.
Dehumidified defogging1. Push the DEF button
on. (The indica-
tor light on the button will come on.)
2. Turn the temperature set dial to the left or
right to set the desired temperature.
ITo quickly remove ice from the outside of
the windows, push the manual fan control
button
and set to the maximum posi-
tion.
IAs soon as possible after the windshield is
clean, push the AUTO button to return to
the auto mode.
IWhen the DEF button
is pushed, the
air conditioner will automatically be turned
on at outside temperatures above 23ÉF
(þ5ÉC) to defog the windshield, and the air
recirculate mode will automatically be
turned off.
Outside air is drawn into the passenger
compartment to improve the defogging per-
formance.
MANUAL OPERATION
Fan speed controlPush the fan control button
to manually
control the fan speed.Push the AUTO button to return to automatic
control of the fan speed.
Air recirculationPush the air recirculation button
to recir-
culate interior air inside the vehicle. The indi-
cator light on the switch will come on.
Push it again to make the air inlet controlled
automatically (FRESH, REC/FRE and
RECIRCULATION). The indicator will go out.
The air recirculation button will not be acti-
vated when the air conditioner is in DEF mode.
Air flow controlPushing the manual air flow control button
selects the air outlet to:
: Air flows from center and side ventila-
tors.: Air flows from center and side ventila-
tors and foot outlets.: Air flows mainly from foot outlets.: Air flow from defroster and foot out-
lets.
To turn system offPush the OFF button.
4-10
Heater, air conditioner and audio systems
Z
00.1.17/A33-D/V5.0
X