2001 NISSAN MAXIMA display
[x] Cancel search: displayPage 51 of 247

SPEEDOMETER AND ODOMETER
SpeedometerThe speedometer indicates vehicle speed.Odometer/Twin trip odometerThe odometer/twin trip odometer are displayed
when the ignition key is in the ON position.
The odometer records the total distance the
vehicle has been driven.
The twin trip odometer records the distance of
individual trips.Changing the display:
Pushing the reset knob changes the display as
follows:
TRIP A,TRIP B,TRIP A
Resetting the trip odometer:
Pushing the reset knob for more than 1 second
resets the trip odometer to zero.
TACHOMETERThe tachometer indicates engine speed in
revolutions per minute (r/min).
CAUTION
When engine speed approaches the red
zone, shift to a higher gear. Operating
the engine in the red zone may cause
serious engine damage.
SIC1227
SIC1249
2-4
Instruments and controls
Z
00.1.17/A33-D/V5.0
X
Page 76 of 247

WARNING
IIn an accident you could be thrown
from the vehicle through an open
sunroof. Always use seat belts and
child restraints.
IDo not allow anyone to stand up or
extend any portion of their body out
of the opening while the vehicle is in
motion or while the sunroof is clos-
ing.
CAUTION
IRemove water drops, snow, ice or
sand from the sunroof before open-
ing.
IDo not place any heavy object on the
sunroof or surrounding area.If the sunroof does not closeHave your NISSAN dealer check and repair
the sunroof.The digital clock displays time when the igni-
tion key is in ACC or ON.
If the power supply is disconnected, the clock
will not indicate the correct time. Readjust the
time.
ADJUSTING THE TIMEPush theHbutton to adjust the hour.
Push theMbutton to adjust the minute.
CEILINGThe ceiling light has a three-position switch.
When the switch is in the centerqposition, the
light will illuminate when a door is opened.
The light will stay on for about 30 seconds
when:
IThe doors are unlocked by the multi-remote
controller, a key or the lock-unlock switch
while all doors are closed.
IThe driver's door is opened and then closed
while the key is removed from the ignition
switch.
SIC0910
IC1226
CLOCK INTERIOR LIGHT
Instruments and controls
2-29
Z
00.1.17/A33-D/V5.0
X
Page 111 of 247

1. Push the AUTO button on. (AUTO will be
displayed.)
2. Turn the temperature set dial to the left or
right to set the desired temperature.
IAdjust the temperature set dial to about
75ÉF (24ÉC) for normal operation.
IThe temperature of the passenger compart-
ment will be maintained automatically. Air
flow distribution and fan speed are also
controlled automatically.Heating (ECON)The air conditioner does not activate. When
you need to heat only, use this mode.
1. Push the ECON (Economy) button on.
(ECON will be displayed.)
2. Turn the temperature set dial to the left or
right to set the desired temperature.
IThe temperature of the passenger compart-
ment will be maintained automatically. Air
flow distribution and fan speed are also
controlled automatically.
IDo not set the temperature lower than the
outside air temperature. Otherwise the sys-
tem may not work properly.
INot recommended if windows fog up.
Dehumidified defogging1. Push the DEF button
on. (The indica-
tor light on the button will come on.)
2. Turn the temperature set dial to the left or
right to set the desired temperature.
ITo quickly remove ice from the outside of
the windows, push the manual fan control
button
and set to the maximum posi-
tion.
IAs soon as possible after the windshield is
clean, push the AUTO button to return to
the auto mode.
IWhen the DEF button
is pushed, the
air conditioner will automatically be turned
on at outside temperatures above 23ÉF
(þ5ÉC) to defog the windshield, and the air
recirculate mode will automatically be
turned off.
Outside air is drawn into the passenger
compartment to improve the defogging per-
formance.
MANUAL OPERATION
Fan speed controlPush the fan control button
to manually
control the fan speed.Push the AUTO button to return to automatic
control of the fan speed.
Air recirculationPush the air recirculation button
to recir-
culate interior air inside the vehicle. The indi-
cator light on the switch will come on.
Push it again to make the air inlet controlled
automatically (FRESH, REC/FRE and
RECIRCULATION). The indicator will go out.
The air recirculation button will not be acti-
vated when the air conditioner is in DEF mode.
Air flow controlPushing the manual air flow control button
selects the air outlet to:
: Air flows from center and side ventila-
tors.: Air flows from center and side ventila-
tors and foot outlets.: Air flows mainly from foot outlets.: Air flow from defroster and foot out-
lets.
To turn system offPush the OFF button.
4-10
Heater, air conditioner and audio systems
Z
00.1.17/A33-D/V5.0
X
Page 112 of 247

AMBIENT TEMPERATURE
SWITCH (AMB)Push the ambient temperature switch. The
outside ambient temperature will be displayed
for approximately 5 seconds.
The ambient temperature sensor is located
in front of the radiator. The sensor may be
affected by road or engine heat, wind direc-
tion and other driving conditions. The dis-
play may differ from the actual ambient
temperature or the temperature displayed
on various signs or billboards.OPERATING TIPSWhen the engine coolant temperature and
outside air temperature are low, the air flow
from the foot outlets may not operate for a
maximum of 150 seconds. However, this is not
a malfunction. After the coolant temperature
warms up, the air flow from the foot outlets will
operate normally.The sensor on the instrument panel helps
maintain a constant temperature; do not put
anything on or around this sensor.The air conditioning system in your NISSAN
vehicle is charged with a refrigerant designed
with the environment in mind.This refrigerant
will not harm the earth's ozone layer.How-
ever, special charging equipment and lubricant
are required when servicing your NISSAN air
conditioner. Using improper refrigerants or lu-
bricants will cause severe damage to your air
conditioning system. See ªCapacities and rec-
ommended fuel/lubricantsº in the ª10. Techni-
cal and consumer informationº section for air
conditioning system refrigerant and lubricant
recommendations.
Your NISSAN dealer will be able to service
your environmentally friendly air conditioning
system.
WARNING
The air conditioner system contains re-
frigerant under high pressure. To avoid
personal injury, any air conditioner ser-
vice should be done only by an experi-
enced technician with proper equip-
ment.
HA1011
SERVICING AIR CONDITIONER
Heater, air conditioner and audio systems
4-11
Z
00.1.17/A33-D/V5.0
X
Page 117 of 247

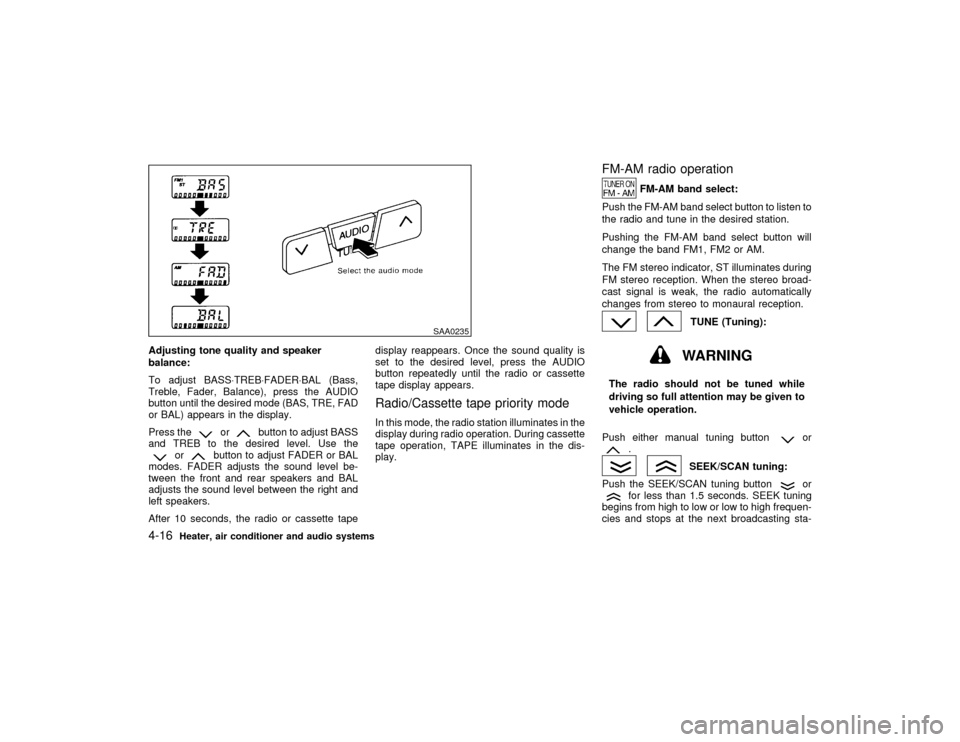
Adjusting tone quality and speaker
balance:
To adjust BASS×TREB×FADER×BAL (Bass,
Treble, Fader, Balance), press the AUDIO
button until the desired mode (BAS, TRE, FAD
or BAL) appears in the display.
Press the
or
button to adjust BASS
and TREB to the desired level. Use the
or
button to adjust FADER or BAL
modes. FADER adjusts the sound level be-
tween the front and rear speakers and BAL
adjusts the sound level between the right and
left speakers.
After 10 seconds, the radio or cassette tapedisplay reappears. Once the sound quality is
set to the desired level, press the AUDIO
button repeatedly until the radio or cassette
tape display appears.
Radio/Cassette tape priority modeIn this mode, the radio station illuminates in the
display during radio operation. During cassette
tape operation, TAPE illuminates in the dis-
play.
FM-AM radio operation
FM-AM band select:
Push the FM-AM band select button to listen to
the radio and tune in the desired station.
Pushing the FM-AM band select button will
change the band FM1, FM2 or AM.
The FM stereo indicator, ST illuminates during
FM stereo reception. When the stereo broad-
cast signal is weak, the radio automatically
changes from stereo to monaural reception.
TUNE (Tuning):WARNING
The radio should not be tuned while
driving so full attention may be given to
vehicle operation.
Push either manual tuning button
or
.
SEEK/SCAN tuning:
Push the SEEK/SCAN tuning button
or
for less than 1.5 seconds. SEEK tuning
begins from high to low or low to high frequen-
cies and stops at the next broadcasting sta-
SAA0235
4-16
Heater, air conditioner and audio systems
Z
00.1.17/A33-D/V5.0
X
Page 118 of 247

tion. Pushing the button again continues the
SEEK function. Once the highest broadcasting
station is reached, the radio continues in the
SEEK mode at the lowest broadcast station.
Push the SEEK/SCAN tuning button
or
for more than 1.5 seconds. SCAN illu-
minates in the display window. SCAN tuning
begins from high to low or low to high frequen-
cies and stops at each broadcasting station for
5 seconds. Pushing the button again during
this 5 second period stops SCAN tuning and
the radio remains tuned to that station.Station memory operations:
Six stations can be set for the AM band. 12
stations can be set for the FM band (six for
FM1, six for FM2).
1. Push the FM-AM band select button to
select AM, FM1, or FM2. The selected band
illuminates in the display.
2. Tune to the desired station.
3. Push the desired select button for more
than 1.5 seconds. For example, in the
illustrations ch2 is to be memorized. The
radio mutes when the select button is
pushed.
4. When the sound resumes, memorizing is
complete.
5. Other station select buttons can be set in
the same manner.
If the battery cable is disconnected, or if the
radio fuse opens, the radio memory is can-
celled. In that case, reset the desired stations.
Cassette tape player operationTurn the ignition key to ACC or ON, then
carefully insert a cassette tape into the tape
door.
The cassette tape automatically pulls into the
player. The word TAPE and moving digital
SAA0264
Heater, air conditioner and audio systems
4-17
Z
00.1.17/A33-D/V5.0
X
Page 119 of 247

squares illuminate on the right side of the
display window.
CAUTION
Do not force the cassette tape into the
tape door. This could cause player dam-
age.
The cassette tape automatically changes di-
rections to play the other side when the first
side is complete. At this time, the moving
digital squares illuminate on the left side of the
display window.
PLAY/STOP:
Push the PLAY/STOP button while the cas-
sette tape is playing to stop the tape. Push the
button again to play the tape.
FF (fast forward), REW
(rewind):
Push either the FF or REW button for the
desired direction.
The FF or REW symbol illuminates in the
display.
To stop the FF or REW function, press the FFor REW button again, or the PLAY/STOP
button.
APS (automatic program
search) FF, APS REW:
Push either the APS FF or APS REW button
while the cassette tape is playing. The tape
runs quickly, stops, then plays the next selec-
tion. Either the FF or REW symbol flashes in
the display while searching for the selection.
This system searches at the blank intervals
between selections. If there is a blank interval
within one selection or there is no interval
between selections, the system may not stop
in the desired or expected location.
PROG (program):
Push the PROG button. The moving digital
squares illuminate on either the right or left
side of the display window to indicate the side
of program play.Dolby NR (Noise Reduction):
Push the Dolby NR
button for Dolby NR
encoded tapes to reduce high frequency tape
noise. The
indicator light comes on.
Dolby NR is manufactured under license from
Dolby Laboratories Licensing Corporation.
DOLBY NR and the double-D symbol
are trademarks of Dolby Laboratories
Licensing Corporation.
Metal or chrome tape usage:
The cassette player is automatically set to high
performance play when playing a metal or
chrome cassette tape.Ejecting the cassette tape:
Push the EJECT button. The cassette tape
automatically comes out.
4-18
Heater, air conditioner and audio systems
Z
00.1.17/A33-D/V5.0
X
Page 121 of 247

trol knob turns the system off.
To turn the radio off, press the ON×OFF/VOL
control knob.
Turn the ON×OFF/VOL control knob to adjust
the volume.
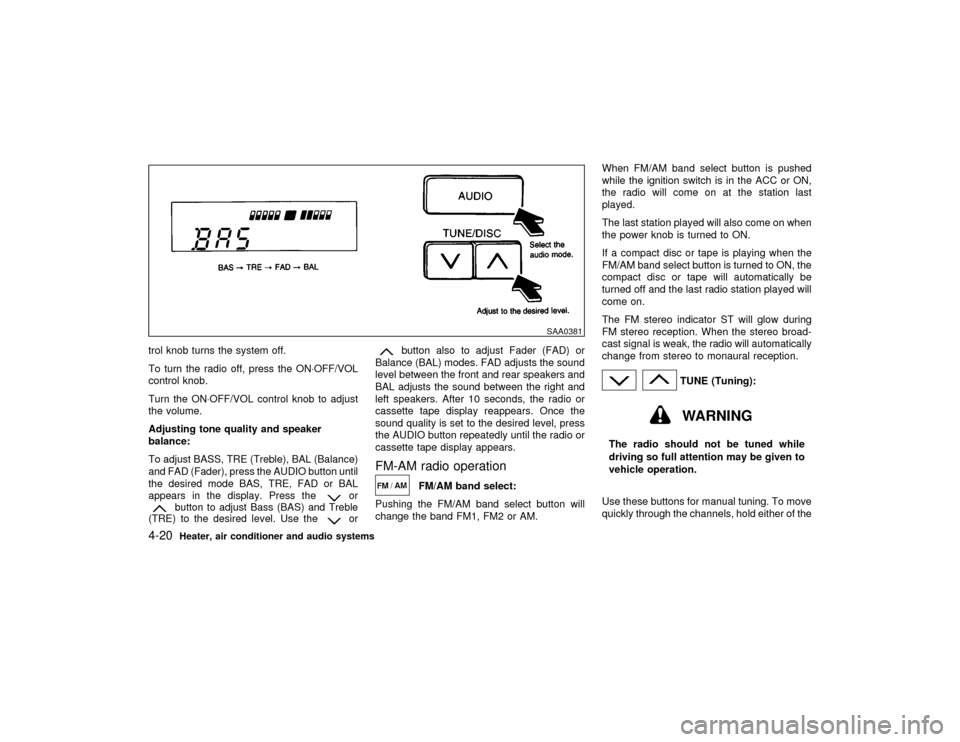
Adjusting tone quality and speaker
balance:
To adjust BASS, TRE (Treble), BAL (Balance)
and FAD (Fader), press the AUDIO button until
the desired mode BAS, TRE, FAD or BAL
appears in the display. Press the
or
button to adjust Bass (BAS) and Treble
(TRE) to the desired level. Use the
or
button also to adjust Fader (FAD) or
Balance (BAL) modes. FAD adjusts the sound
level between the front and rear speakers and
BAL adjusts the sound between the right and
left speakers. After 10 seconds, the radio or
cassette tape display reappears. Once the
sound quality is set to the desired level, press
the AUDIO button repeatedly until the radio or
cassette tape display appears.
FM-AM radio operation
FM/AM band select:
Pushing the FM/AM band select button will
change the band FM1, FM2 or AM.When FM/AM band select button is pushed
while the ignition switch is in the ACC or ON,
the radio will come on at the station last
played.
The last station played will also come on when
the power knob is turned to ON.
If a compact disc or tape is playing when the
FM/AM band select button is turned to ON, the
compact disc or tape will automatically be
turned off and the last radio station played will
come on.
The FM stereo indicator ST will glow during
FM stereo reception. When the stereo broad-
cast signal is weak, the radio will automatically
change from stereo to monaural reception.
TUNE (Tuning):WARNING
The radio should not be tuned while
driving so full attention may be given to
vehicle operation.
Use these buttons for manual tuning. To move
quickly through the channels, hold either of the
SAA0381
4-20
Heater, air conditioner and audio systems
Z
00.1.17/A33-D/V5.0
X