Page 91 of 290

Unlocking doors
1. Push the UNLOCK button on the multi-
remote controller. Only the driver's side
door unlocks.
2. Push the UNLOCK button on the multi-remote controller again within five sec-
onds. All doors unlock.
3. The interior light illuminates for 30 sec-
onds when the light switch is in the O or
DOOR position.The interior light can be turned off without
waiting 30 seconds by inserting the key into
the ignition and turning to the ON or START
position, locking the doors with the multi-
remote controller or pushing the interior light
switch to the OFF position.
Auto Relock
All doors will lock automatically within 5
minutes unless one of the following opera-
tions is performed:
cany door is opened
ca key is inserted into the ignition switch
and the key is turned from OFF to ON.
Using the panic alarm
If you are near your vehicle and feel threat-
ened, you may activate the panic alarm to
call attention as follows:
1. Push the PANIC button on the remote
controller forlonger than 0.5 seconds.
2. The theft warning alarm and headlights
will stay on for 30 seconds.
3. The panic alarm stops when:
cit has run for 30 seconds, or
cthe LOCK or UNLOCK button is pressed,
on the multi-remote controller.
WPD0038
Pre-driving checks and adjustments3-5
ZX
Page 94 of 290
device must accept any interference re-
ceived including interference that may
cause undesired operation of the device.
WARNING
cMake sure the hood is completely
closed and latched before driving.
Failure to do so could cause the
hood to fly open and result in an
accident.
cIf you see steam or smoke coming
from the engine compartment, to
avoid injury do not open the hood.
1. Pull the hood lock release handle located
below the driver side instrument panel;
the hood then springs up slightly.2. Lift the lever at the front of the hood with
your fingertips and raise the hood.
3. Insert the support rod into the slot in the
front edge of the hood.
4. When closing the hood, reset the support
rod to its original position, lower the hood
to approximately 12 inches (30.5 cm)
above the latch and release it. This al-
lows proper engagement of the hood
latch.
WPD0040
HOOD
3-8Pre-driving checks and adjustments
ZX
Page 99 of 290
VANITY MIRROR
(if so equipped)
A vanity mirror is located on the rear side of
the passenger sunvisor.
INSIDE MIRROR
The night position reduces glare from the
headlights of vehicles behind the vehicle.
WARNING
Use the night position only when nec-
essary because it reduces rear view
clarity.
OUTSIDE MIRRORS
The outside mirror can be moved in any
direction for a better rear view.
AIC0710AIC0703APD1090
SUN VISORS MIRRORS
Pre-driving checks and adjustments3-13
ZX
Page 150 of 290

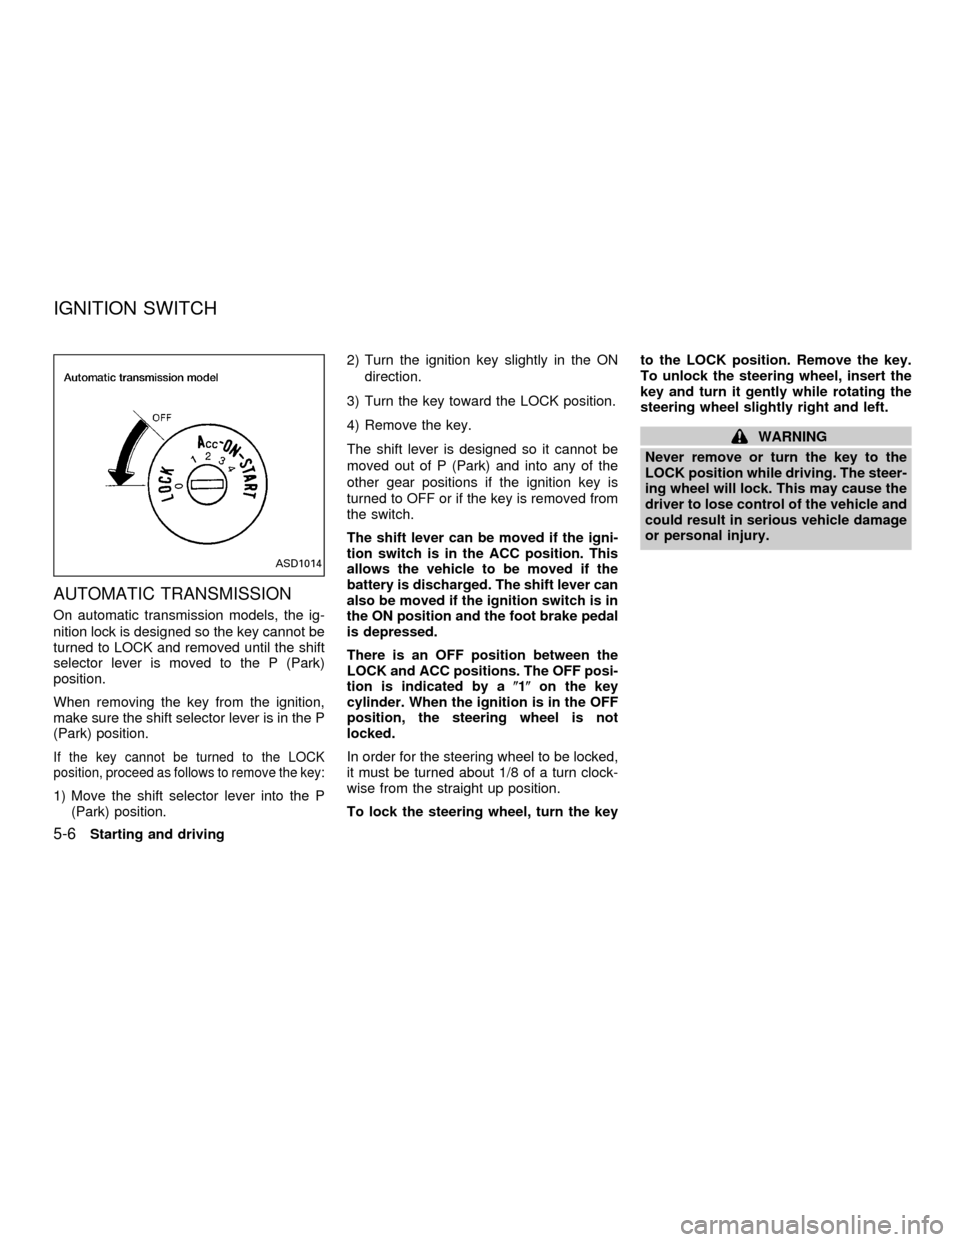
AUTOMATIC TRANSMISSION
On automatic transmission models, the ig-
nition lock is designed so the key cannot be
turned to LOCK and removed until the shift
selector lever is moved to the P (Park)
position.
When removing the key from the ignition,
make sure the shift selector lever is in the P
(Park) position.
If the key cannot be turned to the LOCK
position, proceed as follows to remove the key:
1) Move the shift selector lever into the P
(Park) position.2) Turn the ignition key slightly in the ON
direction.
3) Turn the key toward the LOCK position.
4) Remove the key.
The shift lever is designed so it cannot be
moved out of P (Park) and into any of the
other gear positions if the ignition key is
turned to OFF or if the key is removed from
the switch.
The shift lever can be moved if the igni-
tion switch is in the ACC position. This
allows the vehicle to be moved if the
battery is discharged. The shift lever can
also be moved if the ignition switch is in
the ON position and the foot brake pedal
is depressed.
There is an OFF position between the
LOCK and ACC positions. The OFF posi-
tion is indicated by a(1(on the key
cylinder. When the ignition is in the OFF
position, the steering wheel is not
locked.
In order for the steering wheel to be locked,
it must be turned about 1/8 of a turn clock-
wise from the straight up position.
To lock the steering wheel, turn the keyto the LOCK position. Remove the key.
To unlock the steering wheel, insert the
key and turn it gently while rotating the
steering wheel slightly right and left.
WARNING
Never remove or turn the key to the
LOCK position while driving. The steer-
ing wheel will lock. This may cause the
driver to lose control of the vehicle and
could result in serious vehicle damage
or personal injury.
ASD1014
IGNITION SWITCH
5-6Starting and driving
ZX
Page 151 of 290

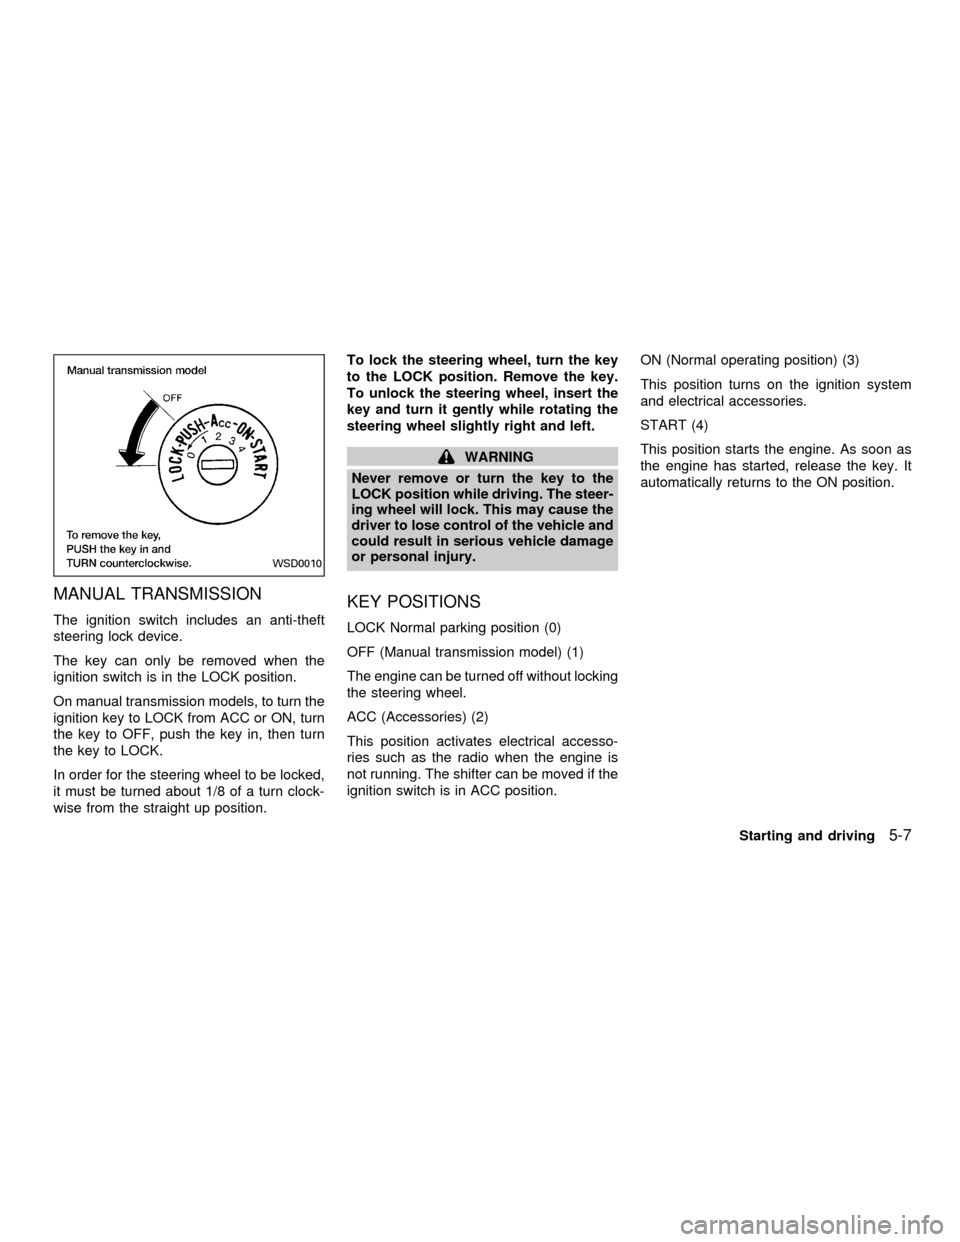
MANUAL TRANSMISSION
The ignition switch includes an anti-theft
steering lock device.
The key can only be removed when the
ignition switch is in the LOCK position.
On manual transmission models, to turn the
ignition key to LOCK from ACC or ON, turn
the key to OFF, push the key in, then turn
the key to LOCK.
In order for the steering wheel to be locked,
it must be turned about 1/8 of a turn clock-
wise from the straight up position.To lock the steering wheel, turn the key
to the LOCK position. Remove the key.
To unlock the steering wheel, insert the
key and turn it gently while rotating the
steering wheel slightly right and left.
WARNING
Never remove or turn the key to the
LOCK position while driving. The steer-
ing wheel will lock. This may cause the
driver to lose control of the vehicle and
could result in serious vehicle damage
or personal injury.
KEY POSITIONS
LOCK Normal parking position (0)
OFF (Manual transmission model) (1)
The engine can be turned off without locking
the steering wheel.
ACC (Accessories) (2)
This position activates electrical accesso-
ries such as the radio when the engine is
not running. The shifter can be moved if the
ignition switch is in ACC position.ON (Normal operating position) (3)
This position turns on the ignition system
and electrical accessories.
START (4)
This position starts the engine. As soon as
the engine has started, release the key. It
automatically returns to the ON position.
WSD0010
Starting and driving5-7
ZX
Page 152 of 290

cMake sure the area around the vehicle is
clear.
cCheck fluid levels such as engine oil,
coolant, brake and clutch fluid, and win-
dow washer fluid as frequently as pos-
sible, at least whenever you refuel.
cCheck that all windows and lights are
clean.
cVisually inspect tires for their appearance
and condition. Also check tires for proper
inflation.
cLock all doors.
cPosition seat and adjust head restraints.
cAdjust inside and outside mirrors.
cFasten seat belts and ask all passengers
to do likewise.
cCheck the operation of warning lights
when key is turned to the ON (3) position.
See9Warning/Indicator lights and
chimes9in the9Instruments and controls9
section.1. Apply the parking brake.
2.Automatic transmission:
Move the selector lever to P (Park) or N
(Neutral). P (Park) is preferred.
The selector lever cannot be moved
out of P (Park) and into any of the
other gear positions if the ignition key
is turned to OFF or if the key is re-
moved from the ignition switch.
The starter is designed not to operate
if the selector lever is in one of the
driving positions.
Manual transmission:
Move the shift lever to N (Neutral), and
fully depress the clutch pedal to the floor
while starting the engine.
The starter is designed not to operate
unless the clutch pedal is fully de-
pressed.
3.With your foot off the accelerator
pedal,turn the ignition key to START.
Release the key when the engine starts.
If the engine starts, but fails to run, repeat
the above procedure.cIf the engine is very hard to start in
extremely cold or hot weather, depress
the accelerator pedal fully and hold it
to help start the engine.
cIn the summer, when restarting the
engine within 30 minutes after it has
been stopped, keep the accelerator
pedal fully depressed while starting.
CAUTION
Do not operate the starter for more than
15 seconds at a time. If the engine does
not start, turn the key off and wait 10
seconds before cranking again, other-
wise the starter could be damaged.
4.Warm-up
Always allow the engine to idle for at
least 30 seconds after starting. Drive at a
moderate speed for a short distance first,
especially in cold weather.
BEFORE STARTING THE
ENGINESTARTING THE ENGINE
5-8Starting and driving
ZX
Page 159 of 290

instrument panel comes on at this
time.
When cruising at a low speed or
climbing a gentle slope, you may feel
uncomfortable shift shocks as the
transmission shifts between third gear
and overdrive repeatedly. In this case,
depress the OVERDRIVE switch to
turn the OVERDRIVE off. The O/D
OFF indicator light in the instrument
panel comes on at this time.
When driving conditions change, depress
the overdrive switch to turn the OVER-
DRIVE on.
Remember not to drive at high speeds for
extended periods of time with the OVER-
DRIVE off. This reduces fuel economy.
MANUAL TRANSMISSION
WARNING
cDo not downshift abruptly on slip-
pery roads. This may cause a loss of
control.cDo not over-rev the engine when
shifting to a lower gear. This may
cause a loss of control or engine
damage.
CAUTION
cDo not rest your foot on the clutch
pedal while driving. This may cause
clutch damage.
cStop your vehicle completely before
shifting into R (Reverse).
cWhen the vehicle is stopped with the
engine running (for example at a
stop light), shift to N (Neutral) and
release the clutch pedal with the foot
brake applied.
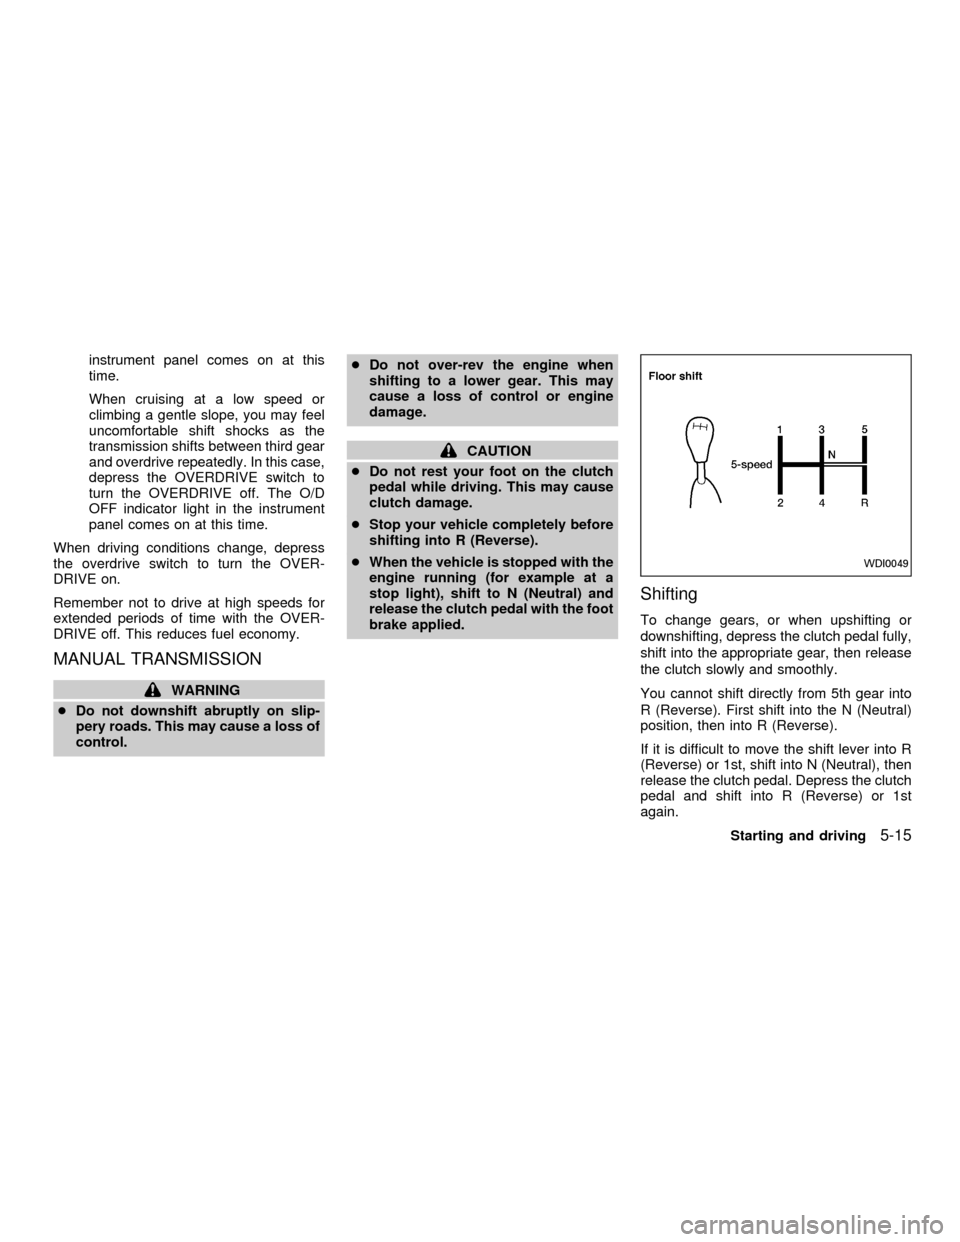
Shifting
To change gears, or when upshifting or
downshifting, depress the clutch pedal fully,
shift into the appropriate gear, then release
the clutch slowly and smoothly.
You cannot shift directly from 5th gear into
R (Reverse). First shift into the N (Neutral)
position, then into R (Reverse).
If it is difficult to move the shift lever into R
(Reverse) or 1st, shift into N (Neutral), then
release the clutch pedal. Depress the clutch
pedal and shift into R (Reverse) or 1st
again.
WDI0049
Starting and driving5-15
ZX
Page 161 of 290
To apply:pull the lever out.
To release:
1. Firmly apply foot brake.
2. Manual transmission models:
Place the shift lever in the N (Neutral)
position.
Automatic transmission models:
Move the selector lever to the P (Park)
position.
3. While pulling out on the parking brake
lever slightly, push and hold the releasebutton, turn the lever and push it in
completely.
4. Before driving, be sure the brake warning
light goes out.PRECAUTIONS ON CRUISE
CONTROL
cThe cruise control system cancels auto-
matically if it is not functioning properly.
The SET indicator light in the instrument
panel then blinks to warn the driver.
cIf the SET indicator light blinks, turn the
cruise control main switch off and have
the system checked by an authorized
NISSAN dealer.
cThe SET indicator light may blink when
the cruise control main switch is turned
ON while pushing the RES/ACCEL,
ASD1010WSD0013
CRUISE CONTROL (if so
equipped)
Starting and driving5-17
ZX