2001 NISSAN FRONTIER automatic transmission
[x] Cancel search: automatic transmissionPage 184 of 290
If your vehicle is overheating (indicated by
an extremely high temperature gauge read-
ing), or if you feel a lack of engine power, or
detect abnormal noise, etc., take the follow-
ing steps:
WARNING
cDo not continue to drive if your ve-
hicle overheats. Doing so could
cause a vehicle fire.
cTo avoid the danger of being
scalded, never remove the radiator
cap while the engine is still hot.
When the radiator cap is removed,
pressurized hot water will spurt out,
possibly causing serious injury.
cDo not open the hood if steam is
coming out.
1. Move the vehicle safely off the road,
apply the parking brake and move the
shift lever to N (Neutral). On automatic
transmission models, move the selector
lever to P (Park).
Do not stop the engine.
2.
Turn off the air conditioner (if so
equipped). Open all of the windows,move the heater or air conditioner tem-
perature control to maximum hot and fan
control to high speed.
3. If engine overheating is caused by climb-
ing a long hill on a hot day, run the engine
at a fast idle (approximately 1,500 r/min)
until the temperature gauge indicator re-
turns to normal.
4. Get out of the vehicle. Look and listen for
steam or coolant escaping from the ra-
diator before opening the hood. Wait until
no steam or coolant can be seen before
proceeding.
5. Open the hood.
WARNING
If steam or water is coming from the
engine, stand clear to prevent getting
burned.
6. Visually check drive belts for damage or
looseness. Also check if the cooling fan
is running. The radiator hoses and radia-
tor should not leak water. If coolant is
leaking, or the water pump belt is missing
or loose, or the cooling fan does not run,
stop the engine.
WARNING
Be careful not to allow your hands, hair,
jewelry or clothing to come into contact
with, or to get caught in, engine belts or
the engine cooling fan. The engine
cooling fan can start at any time when
the coolant temperature is high.
7. After the engine cools down, check the
coolant level in the reservoir tank with the
engine running. Add coolant to the res-
ervoir tank if necessary. Have your ve-
hicle repaired at an authorized NISSAN
dealer.
IF YOUR VEHICLE
OVERHEATS
6-10In case of emergency
ZX
Page 186 of 290
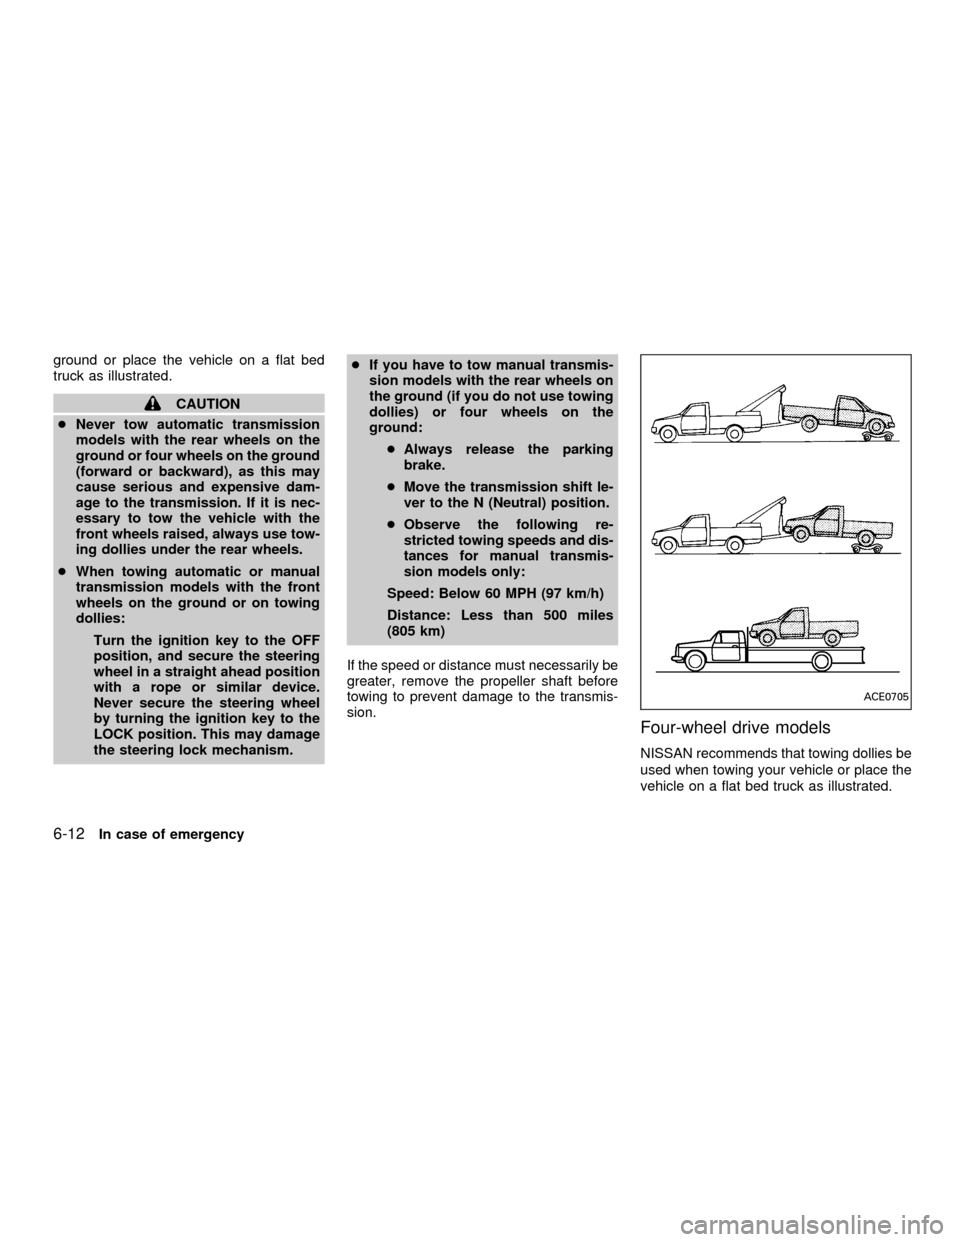
ground or place the vehicle on a flat bed
truck as illustrated.
CAUTION
cNever tow automatic transmission
models with the rear wheels on the
ground or four wheels on the ground
(forward or backward), as this may
cause serious and expensive dam-
age to the transmission. If it is nec-
essary to tow the vehicle with the
front wheels raised, always use tow-
ing dollies under the rear wheels.
cWhen towing automatic or manual
transmission models with the front
wheels on the ground or on towing
dollies:
Turn the ignition key to the OFF
position, and secure the steering
wheel in a straight ahead position
with a rope or similar device.
Never secure the steering wheel
by turning the ignition key to the
LOCK position. This may damage
the steering lock mechanism.cIf you have to tow manual transmis-
sion models with the rear wheels on
the ground (if you do not use towing
dollies) or four wheels on the
ground:
cAlways release the parking
brake.
cMove the transmission shift le-
ver to the N (Neutral) position.
cObserve the following re-
stricted towing speeds and dis-
tances for manual transmis-
sion models only:
Speed: Below 60 MPH (97 km/h)
Distance: Less than 500 miles
(805 km)
If the speed or distance must necessarily be
greater, remove the propeller shaft before
towing to prevent damage to the transmis-
sion.
Four-wheel drive models
NISSAN recommends that towing dollies be
used when towing your vehicle or place the
vehicle on a flat bed truck as illustrated.
ACE0705
6-12In case of emergency
ZX
Page 187 of 290
CAUTION
c
Never tow automatic transmission
models with the rear wheels on the
ground or four wheels on the ground,
as this may cause serious and expen-
sive damage to the transmission. If it
is necessary to tow the vehicle with
the front wheels raised, always use
towing dollies under the rear wheels.
cWhen towing automatic or manual
transmission models with the front
wheels on the ground or on towing
dollies:
cTo disengage auto-lock free-
running hubs see the ªStarting
and drivingº section for details.
cMove the transfer case shift le-
ver to the 2H position.
cTurn the ignition key to the OFF
position, and secure the steer-
ing wheel in a straight ahead
position with a rope or similar
device. Never secure the steer-
ing wheel by turning the igni-
tion key to the LOCK position.
This may damage the steeringlock mechanism.
cIf you have to tow manual transmis-
sion models with the rear wheels on
the ground (if you do not use towing
dollies) or four wheels on the
ground:
cTo disengage auto-lock free-
running hubs see the ªStarting
and drivingº section for details.
cMove the transfer case shift le-
ver to the 2H position.
cMove the transmission shift le-
ver to the N (Neutral) position.
cAlways release the parking
brake.
cObserve the following re-
stricted towing speeds and dis-
tances for manual transmis-
sion models only:
Speed: Below 60 MPH (97 km/h)
Distance: Less than 500 miles
(805 km)
If the speed or distance must necessarily be
greater, remove the front and rear propellershafts before towing to prevent damage to
the transmission.
VEHICLE RECOVERY (freeing a
stuck vehicle)
cTow chains or cables must be attached
only to the main structural members of
the vehicle.
cPulling devices should be routed so they
do not touch any part of the suspension,
steering, brake or cooling systems.
cAlways pull the cable straight out from
the front or rear of the vehicle. Never pull
the vehicle at an angle.
cPulling devices such as ropes or canvas
straps are not recommended for use in
vehicle towing or recovery.
cStand clear of a stuck vehicle.
WARNING
Do not spin your tires at high speed.
This could cause them to explode and
result in serious injury. Parts of your
vehicle could also overheat and be
damaged.
In case of emergency
6-13
ZX
Page 196 of 290

8 Do-it-yourself
Maintenance precautions .......................................8-2
Engine compartment check locations ....................8-3
Engine cooling system ...........................................8-6
Checking engine coolant level ..........................8-6
Changing engine coolant ..................................8-7
Engine oil .............................................................8-10
Checking engine oil level ................................8-10
Changing engine oil ........................................8-11
Changing engine oil filter.................................8-13
Automatic transmission fluid ................................8-14
Temperature conditions for checking ..............8-14
Power steering fluid..............................................8-15
Brake and clutch fluid...........................................8-16
Window washer fluid ............................................8-16
Window washer fluid reservoir ........................8-16
Battery ..................................................................8-17
Jump starting ...................................................8-18
Drive belts ............................................................8-19
Spark plugs ..........................................................8-20
Replacing spark plugs
(except supercharger) .....................................8-20Replacing spark plugs
(with supercharger)..........................................8-21
Air cleaner ............................................................8-21
Windshield wiper blades ......................................8-23
Cleaning ..........................................................8-23
Replacing .........................................................8-23
Parking brake and brake pedal ............................8-24
Checking parking brake...................................8-24
Checking brake pedal .....................................8-24
Brake booster ..................................................8-25
Clutch pedal .........................................................8-26
Checking clutch pedal .....................................8-26
Fuses ....................................................................8-27
Passenger compartment .................................8-27
Multi-remote controller battery replacement ........8-28
Lights ....................................................................8-29
Headlights ........................................................8-29
Fog lights (if so equipped)...............................8-32
Exterior and interior lights ...............................8-33
Wheels and tires ..................................................8-36
Tire pressure ...................................................8-36
ZX
Page 198 of 290
When performing any inspection or mainte-
nance work on your vehicle, always take
care to prevent serious accidental injury to
yourself or damage to the vehicle. The
following are general precautions which
should be closely observed.
WARNING
cPark the vehicle on a level surface,
apply the parking brake securely and
block the wheels to prevent the ve-
hicle from moving. For manual trans-
mission models, move the shift lever
to N (Neutral). For automatic trans-
mission models, move the selector
lever to P (Park).
cBe sure the ignition key is in the OFF
or LOCK position when performing
any parts replacement or repairs.
cNever leave the engine or automatic
transmission related component
harnesses disconnected while the
ignition switch is in the ON position.
cNever connect or disconnect the bat-
tery or any transistorized compo-
nent while the ignition switch is in
the ON position.cIf you must work with the engine
running, keep your hands, clothing,
hair and tools away from moving
fans, belts, and any other moving
parts.
cIt is advisable to secure or remove
any loose clothing and remove any
jewelry, such as rings, watches, etc.,
before working on your vehicle.
cAlways wear eye protection when-
ever you work on your vehicle.
cIf you must run the engine in an
enclosed space such as a garage, be
sure there is proper ventilation for
exhaust gases to escape.
cNever get under the vehicle while it
is supported only by a jack. If it is
necessary to work under the vehicle,
support it with safety stands.
cKeep smoking materials, flame and
sparks away from fuel tank and bat-
tery.
cOn gasoline engine models with the
multiport fuel injection (MFI) system,
the fuel filter or fuel lines should be
serviced by an authorized NISSANdealer because the fuellines are un-
der high pressure even when the
engine is off.
CAUTION
cDo not work under the hood while
the engine is hot. Turn the engine off
and wait until it cools down.
cNever connect or disconnect either
the battery or any transistorized
component connector while the igni-
tion is on.
cAvoid contact with used engine oil
and coolant. Improperly disposed
engine oil, engine coolant and/or
other vehicle fluids can damage the
environment. Always conform to lo-
cal regulations for disposal of ve-
hicle fluid.
This ``Do-it-yourself'' section gives instruc-
tions regarding only those items which are
relatively easy for an owner to perform.
You should be aware that incomplete or
improper servicing may result in operating
difficulties or excessive emissions, and
could affect your warranty coverage.If in
doubt about any servicing, have it done
by an authorized NISSAN dealer.
MAINTENANCE
PRECAUTIONS
8-2Do-it-yourself
ZX
Page 210 of 290
WARNING
cWhen the engine is running, keep
hands, jewelry and clothing away
from any moving parts such as the
cooling fan and drive belts.
cAutomatic transmission fluid is poi-
sonous and should be stored care-
fully in marked containers out of the
reach of children.
TEMPERATURE CONDITIONS
FOR CHECKING
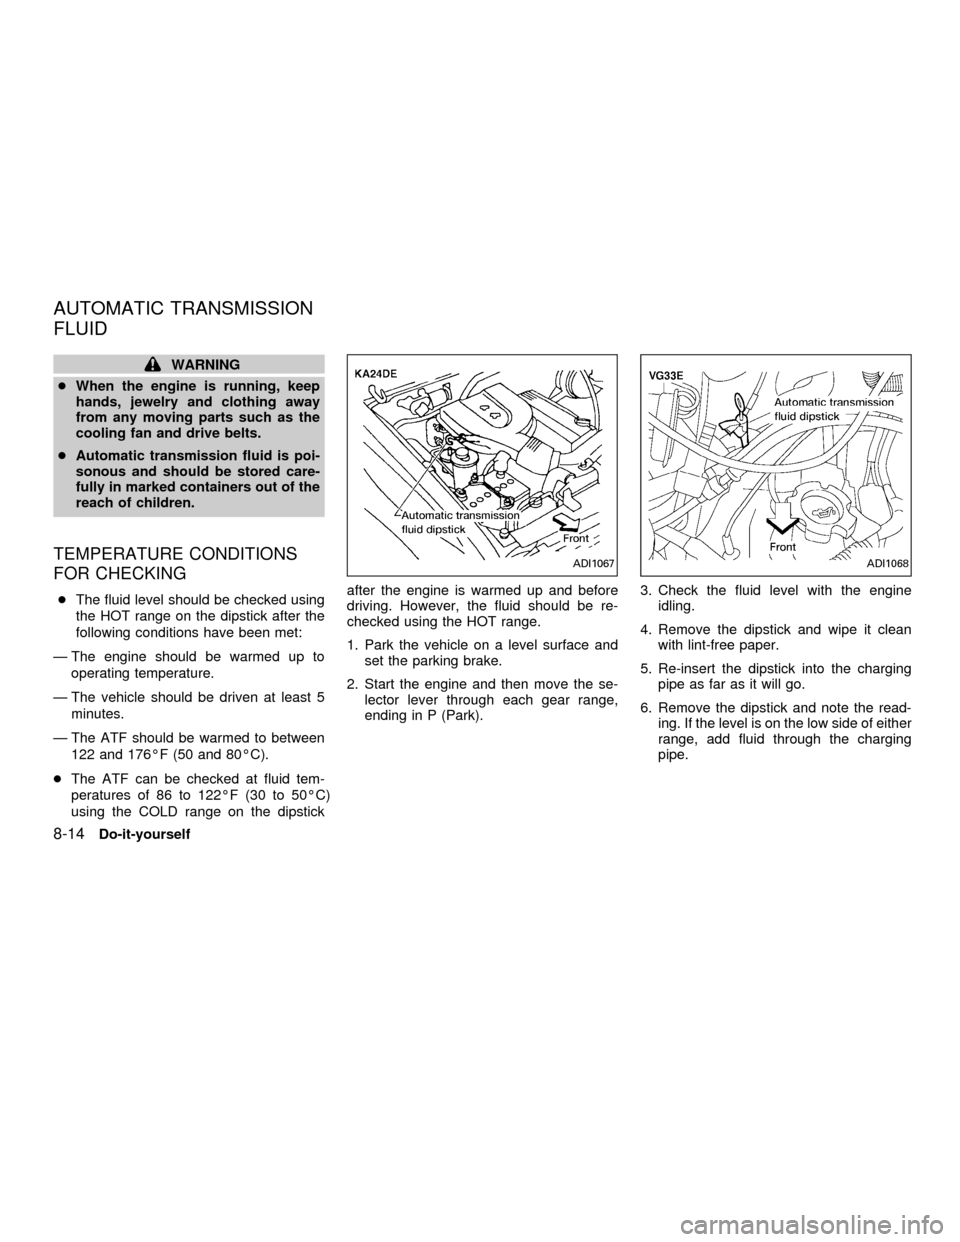
cThe fluid level should be checked using
the HOT range on the dipstick after the
following conditions have been met:
Ð The engine should be warmed up to
operating temperature.
Ð The vehicle should be driven at least 5
minutes.
Ð The ATF should be warmed to between
122 and 176ÉF (50 and 80ÉC).
cThe ATF can be checked at fluid tem-
peratures of 86 to 122ÉF (30 to 50ÉC)
using the COLD range on the dipstickafter the engine is warmed up and before
driving. However, the fluid should be re-
checked using the HOT range.
1. Park the vehicle on a level surface and
set the parking brake.
2. Start the engine and then move the se-
lector lever through each gear range,
ending in P (Park).3. Check the fluid level with the engine
idling.
4. Remove the dipstick and wipe it clean
with lint-free paper.
5. Re-insert the dipstick into the charging
pipe as far as it will go.
6. Remove the dipstick and note the read-
ing. If the level is on the low side of either
range, add fluid through the charging
pipe.
ADI1067ADI1068
AUTOMATIC TRANSMISSION
FLUID
8-14Do-it-yourself
ZX
Page 211 of 290
CAUTION
cDO NOT OVERFILL.
Use ONLY NIS-
SAN Matic `D' (Continental U.S. and
Alaska) or Canada NISSAN Automatic
Transmission Fluid. Dexron
TM
III/MerconTMor equivalent may also
be used. Outside the continental
United States and Alaska contact an
authorized NISSAN dealership for
more information regarding suitable
fluids, including recommended
brand(s) of Dexron
TMIII/MerconTMau-
tomatic transmission fluid.
NOTE:
If the vehicle has been driven for a long
time at high speeds, or in city traffic in
hot weather, or if it is being used to pull
a trailer, the fluid level cannot be read
accurately. You should wait until the
fluid has cooled down (about 30 min-
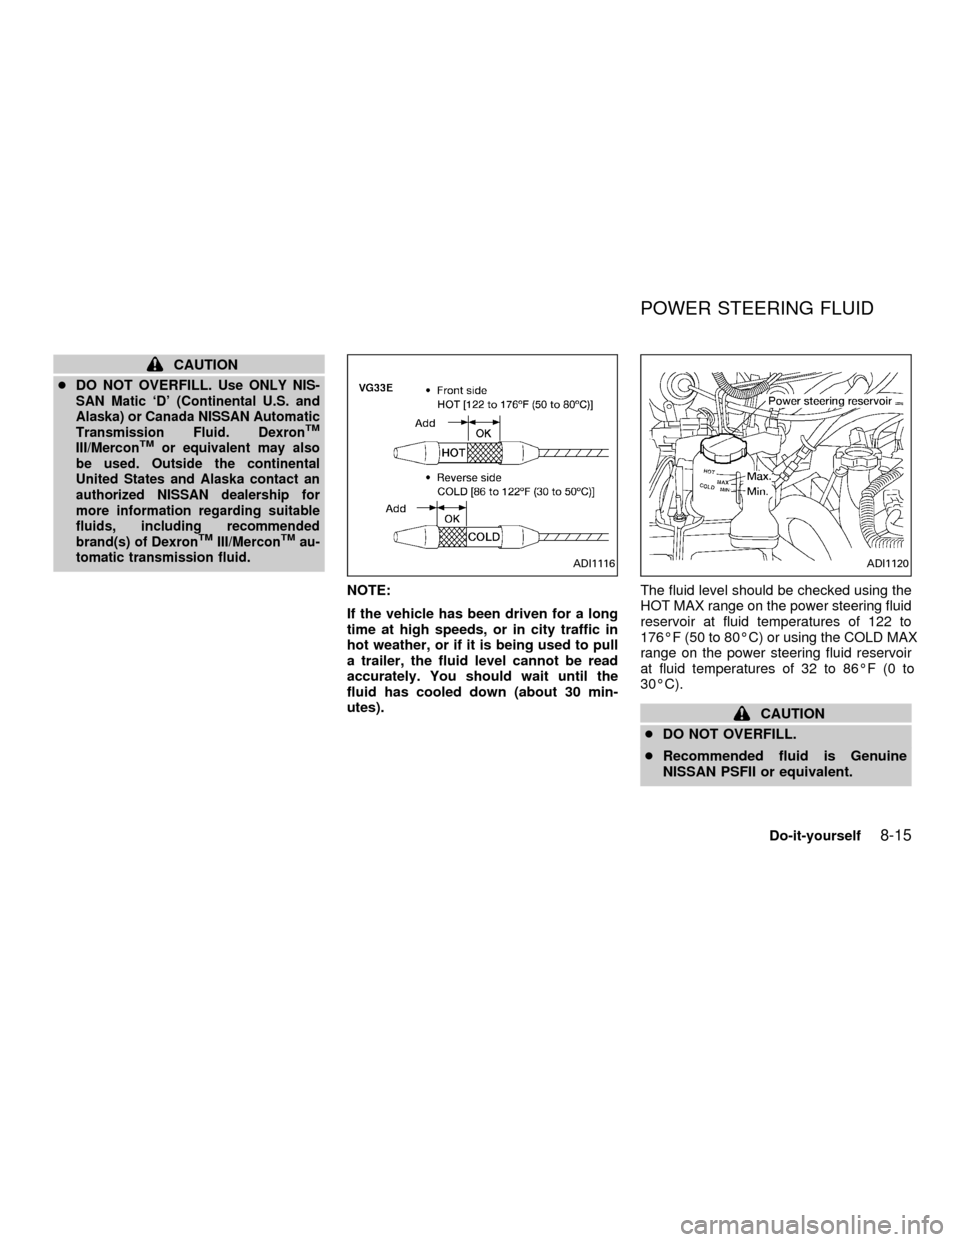
utes).The fluid level should be checked using the
HOT MAX range on the power steering fluid
reservoir at fluid temperatures of 122 to
176ÉF (50 to 80ÉC) or using the COLD MAX
range on the power steering fluid reservoir
at fluid temperatures of 32 to 86ÉF (0 to
30ÉC).
CAUTION
cDO NOT OVERFILL.
cRecommended fluid is Genuine
NISSAN PSFII or equivalent.
ADI1116ADI1120
POWER STEERING FLUID
Do-it-yourself8-15
ZX
Page 221 of 290
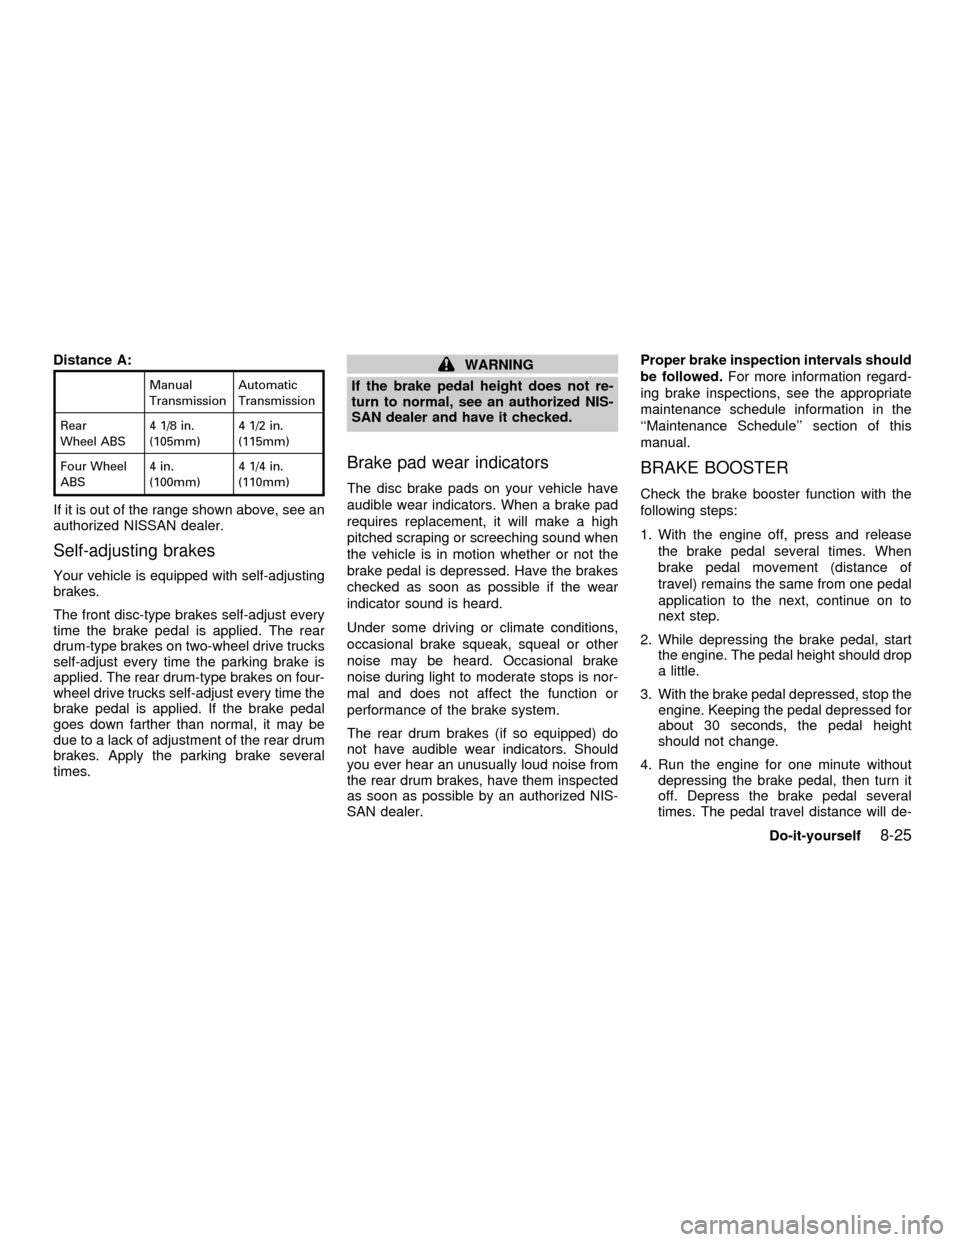
Distance A:
Manual
TransmissionAutomatic
Transmission
Rear
Wheel ABS4 1/8 in.
(105mm)4 1/2 in.
(115mm)
Four Wheel
ABS4 in.
(100mm)4 1/4 in.
(110mm)
If it is out of the range shown above, see an
authorized NISSAN dealer.
Self-adjusting brakes
Your vehicle is equipped with self-adjusting
brakes.
The front disc-type brakes self-adjust every
time the brake pedal is applied. The rear
drum-type brakes on two-wheel drive trucks
self-adjust every time the parking brake is
applied. The rear drum-type brakes on four-
wheel drive trucks self-adjust every time the
brake pedal is applied. If the brake pedal
goes down farther than normal, it may be
due to a lack of adjustment of the rear drum
brakes. Apply the parking brake several
times.
WARNING
If the brake pedal height does not re-
turn to normal, see an authorized NIS-
SAN dealer and have it checked.
Brake pad wear indicators
The disc brake pads on your vehicle have
audible wear indicators. When a brake pad
requires replacement, it will make a high
pitched scraping or screeching sound when
the vehicle is in motion whether or not the
brake pedal is depressed. Have the brakes
checked as soon as possible if the wear
indicator sound is heard.
Under some driving or climate conditions,
occasional brake squeak, squeal or other
noise may be heard. Occasional brake
noise during light to moderate stops is nor-
mal and does not affect the function or
performance of the brake system.
The rear drum brakes (if so equipped) do
not have audible wear indicators. Should
you ever hear an unusually loud noise from
the rear drum brakes, have them inspected
as soon as possible by an authorized NIS-
SAN dealer.Proper brake inspection intervals should
be followed.For more information regard-
ing brake inspections, see the appropriate
maintenance schedule information in the
``Maintenance Schedule'' section of this
manual.
BRAKE BOOSTER
Check the brake booster function with the
following steps:
1. With the engine off, press and release
the brake pedal several times. When
brake pedal movement (distance of
travel) remains the same from one pedal
application to the next, continue on to
next step.
2. While depressing the brake pedal, start
the engine. The pedal height should drop
a little.
3. With the brake pedal depressed, stop the
engine. Keeping the pedal depressed for
about 30 seconds, the pedal height
should not change.
4. Run the engine for one minute without
depressing the brake pedal, then turn it
off. Depress the brake pedal several
times. The pedal travel distance will de-
Do-it-yourself
8-25
ZX