2001 NISSAN FRONTIER fuse
[x] Cancel search: fusePage 76 of 290

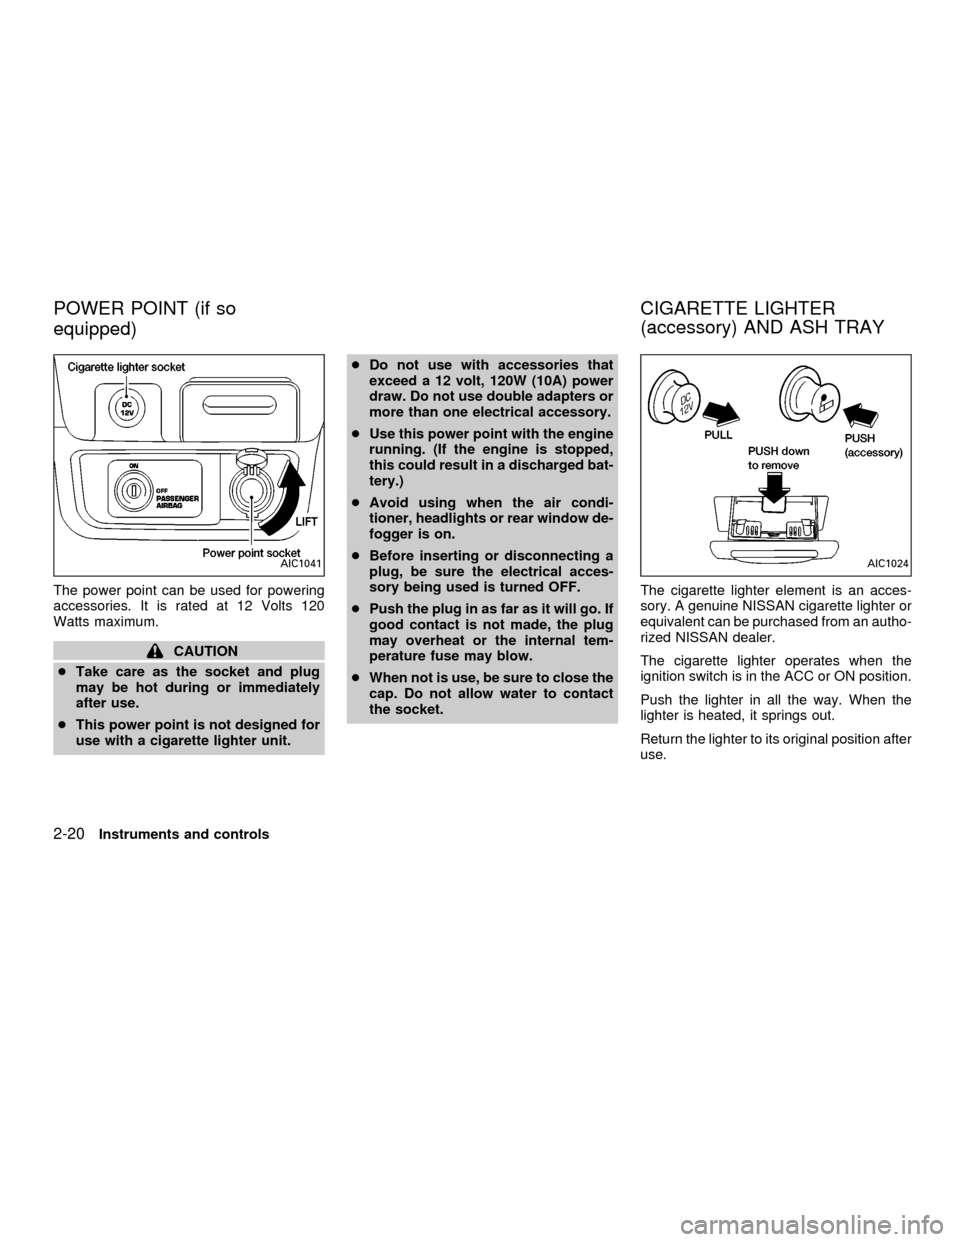
The power point can be used for powering
accessories. It is rated at 12 Volts 120
Watts maximum.
CAUTION
cTake care as the socket and plug
may be hot during or immediately
after use.
cThis power point is not designed for
use with a cigarette lighter unit.cDo not use with accessories that
exceed a 12 volt, 120W (10A) power
draw. Do not use double adapters or
more than one electrical accessory.
cUse this power point with the engine
running. (If the engine is stopped,
this could result in a discharged bat-
tery.)
cAvoid using when the air condi-
tioner, headlights or rear window de-
fogger is on.
cBefore inserting or disconnecting a
plug, be sure the electrical acces-
sory being used is turned OFF.
cPush the plug in as far as it will go. If
good contact is not made, the plug
may overheat or the internal tem-
perature fuse may blow.
cWhen not is use, be sure to close the
cap. Do not allow water to contact
the socket.The cigarette lighter element is an acces-
sory. A genuine NISSAN cigarette lighter or
equivalent can be purchased from an autho-
rized NISSAN dealer.
The cigarette lighter operates when the
ignition switch is in the ACC or ON position.
Push the lighter in all the way. When the
lighter is heated, it springs out.
Return the lighter to its original position after
use.
AIC1041AIC1024
POWER POINT (if so
equipped)CIGARETTE LIGHTER
(accessory) AND ASH TRAY
2-20Instruments and controls
ZX
Page 118 of 290

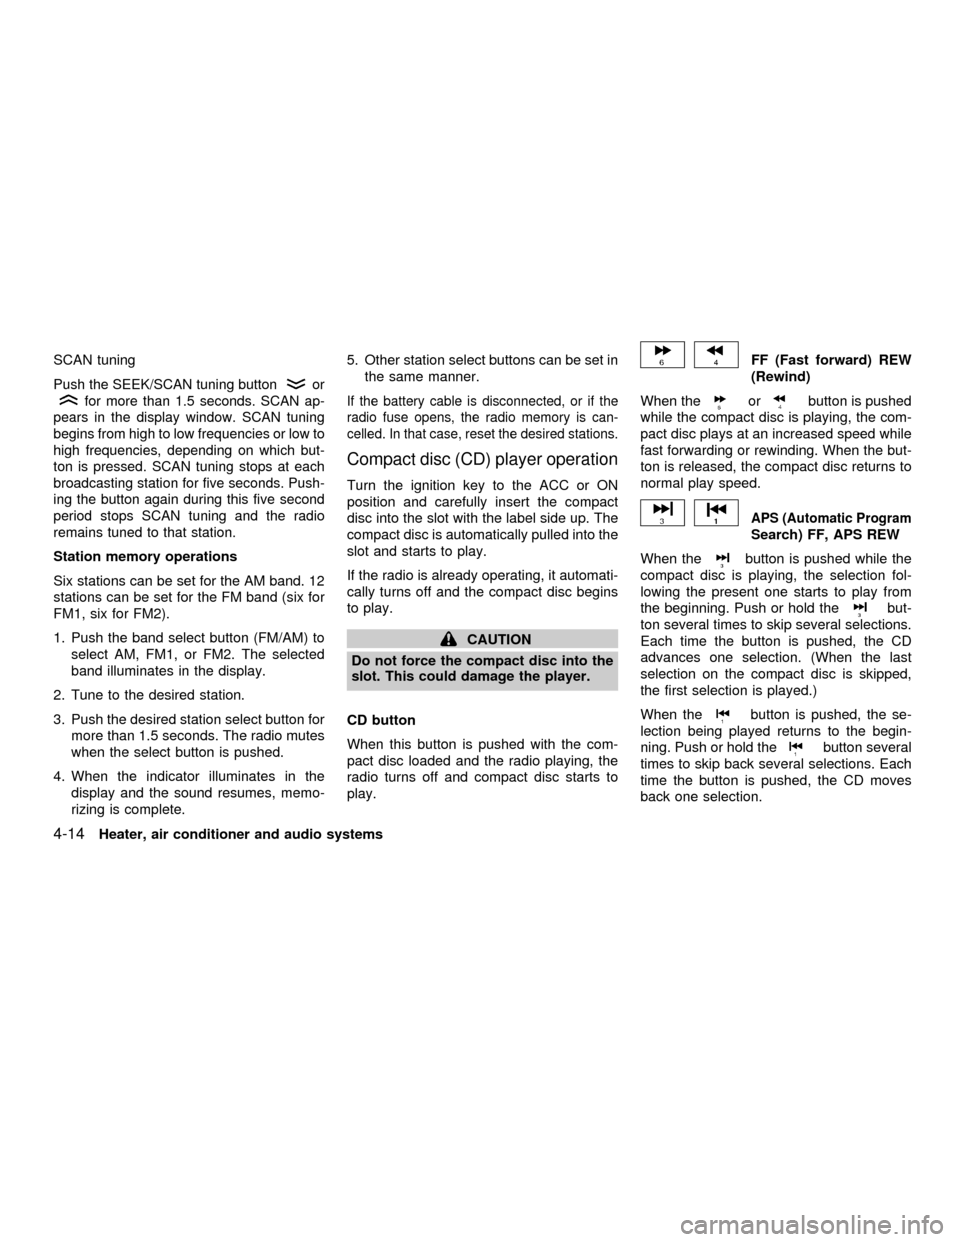
SCAN tuning
Push the SEEK/SCAN tuning buttonor
for more than 1.5 seconds. SCAN ap-
pears in the display window. SCAN tuning
begins from high to low frequencies or low to
high frequencies, depending on which but-
ton is pressed. SCAN tuning stops at each
broadcasting station for five seconds. Push-
ing the button again during this five second
period stops SCAN tuning and the radio
remains tuned to that station.
Station memory operations
Six stations can be set for the AM band. 12
stations can be set for the FM band (six for
FM1, six for FM2).
1. Push the band select button (FM/AM) to
select AM, FM1, or FM2. The selected
band illuminates in the display.
2. Tune to the desired station.
3. Push the desired station select button for
more than 1.5 seconds. The radio mutes
when the select button is pushed.
4. When the indicator illuminates in the
display and the sound resumes, memo-
rizing is complete.5. Other station select buttons can be set in
the same manner.
If the battery cable is disconnected, or if the
radio fuse opens, the radio memory is can-
celled. In that case, reset the desired stations.
Compact disc (CD) player operation
Turn the ignition key to the ACC or ON
position and carefully insert the compact
disc into the slot with the label side up. The
compact disc is automatically pulled into the
slot and starts to play.
If the radio is already operating, it automati-
cally turns off and the compact disc begins
to play.
CAUTION
Do not force the compact disc into the
slot. This could damage the player.
CD button
When this button is pushed with the com-
pact disc loaded and the radio playing, the
radio turns off and compact disc starts to
play.
FF (Fast forward) REW
(Rewind)
When the
orbutton is pushed
while the compact disc is playing, the com-
pact disc plays at an increased speed while
fast forwarding or rewinding. When the but-
ton is released, the compact disc returns to
normal play speed.
APS (Automatic Program
Search) FF, APS REW
When the
button is pushed while the
compact disc is playing, the selection fol-
lowing the present one starts to play from
the beginning. Push or hold the
but-
ton several times to skip several selections.
Each time the button is pushed, the CD
advances one selection. (When the last
selection on the compact disc is skipped,
the first selection is played.)
When the
button is pushed, the se-
lection being played returns to the begin-
ning. Push or hold the
button several
times to skip back several selections. Each
time the button is pushed, the CD moves
back one selection.
4-14Heater, air conditioner and audio systems
ZX
Page 124 of 290

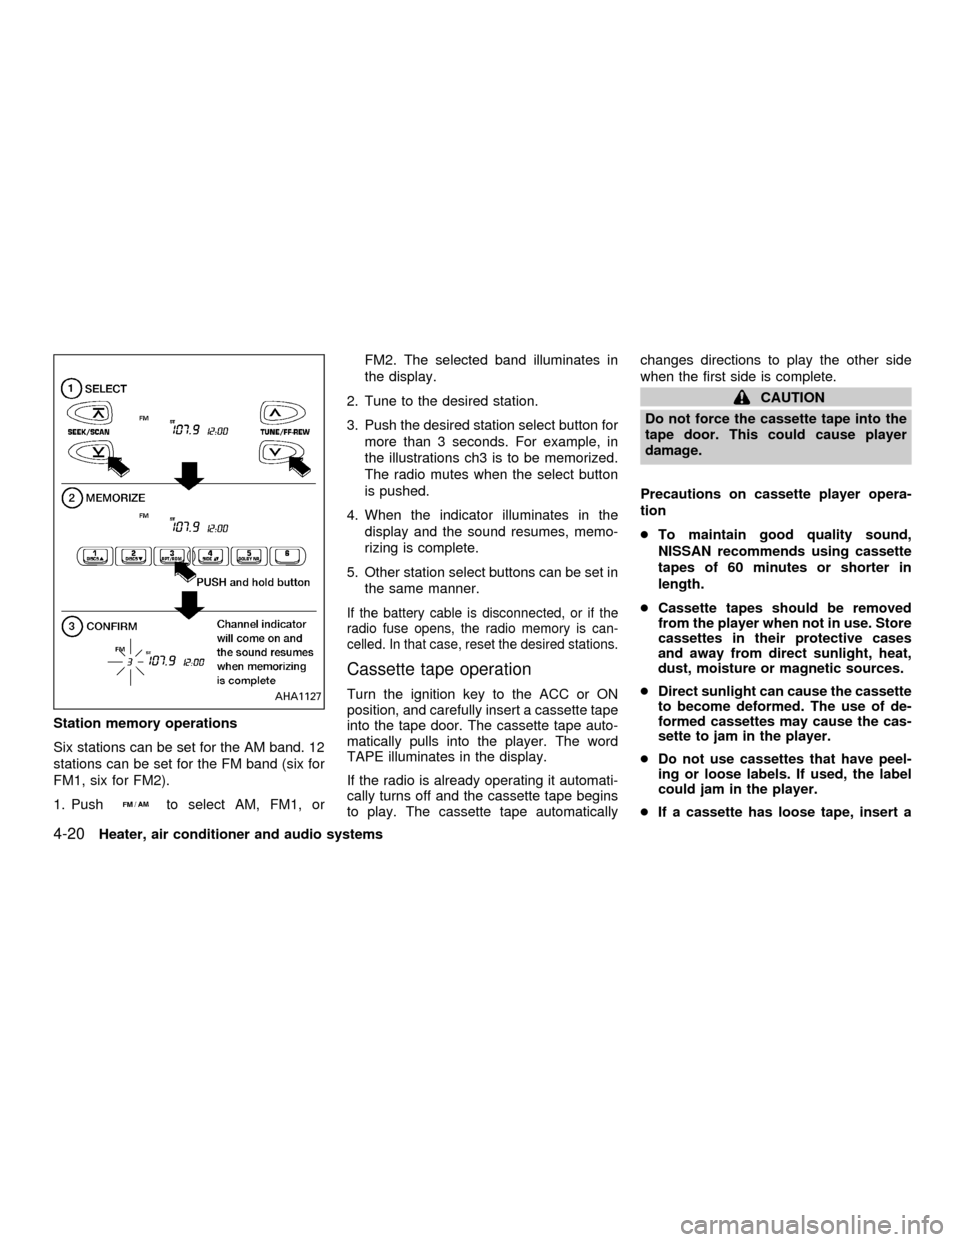
Station memory operations
Six stations can be set for the AM band. 12
stations can be set for the FM band (six for
FM1, six for FM2).
1. Push
to select AM, FM1, orFM2. The selected band illuminates in
the display.
2. Tune to the desired station.
3. Push the desired station select button for
more than 3 seconds. For example, in
the illustrations ch3 is to be memorized.
The radio mutes when the select button
is pushed.
4. When the indicator illuminates in the
display and the sound resumes, memo-
rizing is complete.
5. Other station select buttons can be set in
the same manner.
If the battery cable is disconnected, or if the
radio fuse opens, the radio memory is can-
celled. In that case, reset the desired stations.
Cassette tape operation
Turn the ignition key to the ACC or ON
position, and carefully insert a cassette tape
into the tape door. The cassette tape auto-
matically pulls into the player. The word
TAPE illuminates in the display.
If the radio is already operating it automati-
cally turns off and the cassette tape begins
to play. The cassette tape automaticallychanges directions to play the other side
when the first side is complete.
CAUTION
Do not force the cassette tape into the
tape door. This could cause player
damage.
Precautions on cassette player opera-
tion
cTo maintain good quality sound,
NISSAN recommends using cassette
tapes of 60 minutes or shorter in
length.
cCassette tapes should be removed
from the player when not in use. Store
cassettes in their protective cases
and away from direct sunlight, heat,
dust, moisture or magnetic sources.
cDirect sunlight can cause the cassette
to become deformed. The use of de-
formed cassettes may cause the cas-
sette to jam in the player.
cDo not use cassettes that have peel-
ing or loose labels. If used, the label
could jam in the player.
cIf a cassette has loose tape, insert a
AHA1127
4-20Heater, air conditioner and audio systems
ZX
Page 132 of 290

Station memory operation þ Travel Pre-
set is OFF
Each preset mode (A, B or C) has 6 presets,
capable of storing any combination of AM,
FM and FM RDS stations.
Press the PRESET ABC button to change
between the presets:
A!B!C
The radio displays icon A, B or C to indicate
which set of presets is active.To store a radio station in a preset:
1. Tune to the desired station.
2. Press the desired station select button
(>2 seconds). For example, in the illus-
trations ch3 is to be memorized.3. When the indicator illuminates in the
station selection button, a beep will
sound indicating memorization is com-
plete. For FM stations, the indicator will
turn green. For AM stations, the indicator
will turn amber.
4. Other station select buttons can be set in
the same manner.
If the battery cable is disconnected, or if the
radio fuse opens, the radio memory is can-
celled. In that case, reset the desired sta-
tions.
LHA0081
WHA0064
4-28Heater, air conditioner and audio systems
ZX
Page 196 of 290

8 Do-it-yourself
Maintenance precautions .......................................8-2
Engine compartment check locations ....................8-3
Engine cooling system ...........................................8-6
Checking engine coolant level ..........................8-6
Changing engine coolant ..................................8-7
Engine oil .............................................................8-10
Checking engine oil level ................................8-10
Changing engine oil ........................................8-11
Changing engine oil filter.................................8-13
Automatic transmission fluid ................................8-14
Temperature conditions for checking ..............8-14
Power steering fluid..............................................8-15
Brake and clutch fluid...........................................8-16
Window washer fluid ............................................8-16
Window washer fluid reservoir ........................8-16
Battery ..................................................................8-17
Jump starting ...................................................8-18
Drive belts ............................................................8-19
Spark plugs ..........................................................8-20
Replacing spark plugs
(except supercharger) .....................................8-20Replacing spark plugs
(with supercharger)..........................................8-21
Air cleaner ............................................................8-21
Windshield wiper blades ......................................8-23
Cleaning ..........................................................8-23
Replacing .........................................................8-23
Parking brake and brake pedal ............................8-24
Checking parking brake...................................8-24
Checking brake pedal .....................................8-24
Brake booster ..................................................8-25
Clutch pedal .........................................................8-26
Checking clutch pedal .....................................8-26
Fuses ....................................................................8-27
Passenger compartment .................................8-27
Multi-remote controller battery replacement ........8-28
Lights ....................................................................8-29
Headlights ........................................................8-29
Fog lights (if so equipped)...............................8-32
Exterior and interior lights ...............................8-33
Wheels and tires ..................................................8-36
Tire pressure ...................................................8-36
ZX
Page 223 of 290

PASSENGER COMPARTMENT
CAUTION
Never use a fuse of a higher amperage
rating than specified on the fuse box
cover. This could damage the electrical
system or cause a fire.
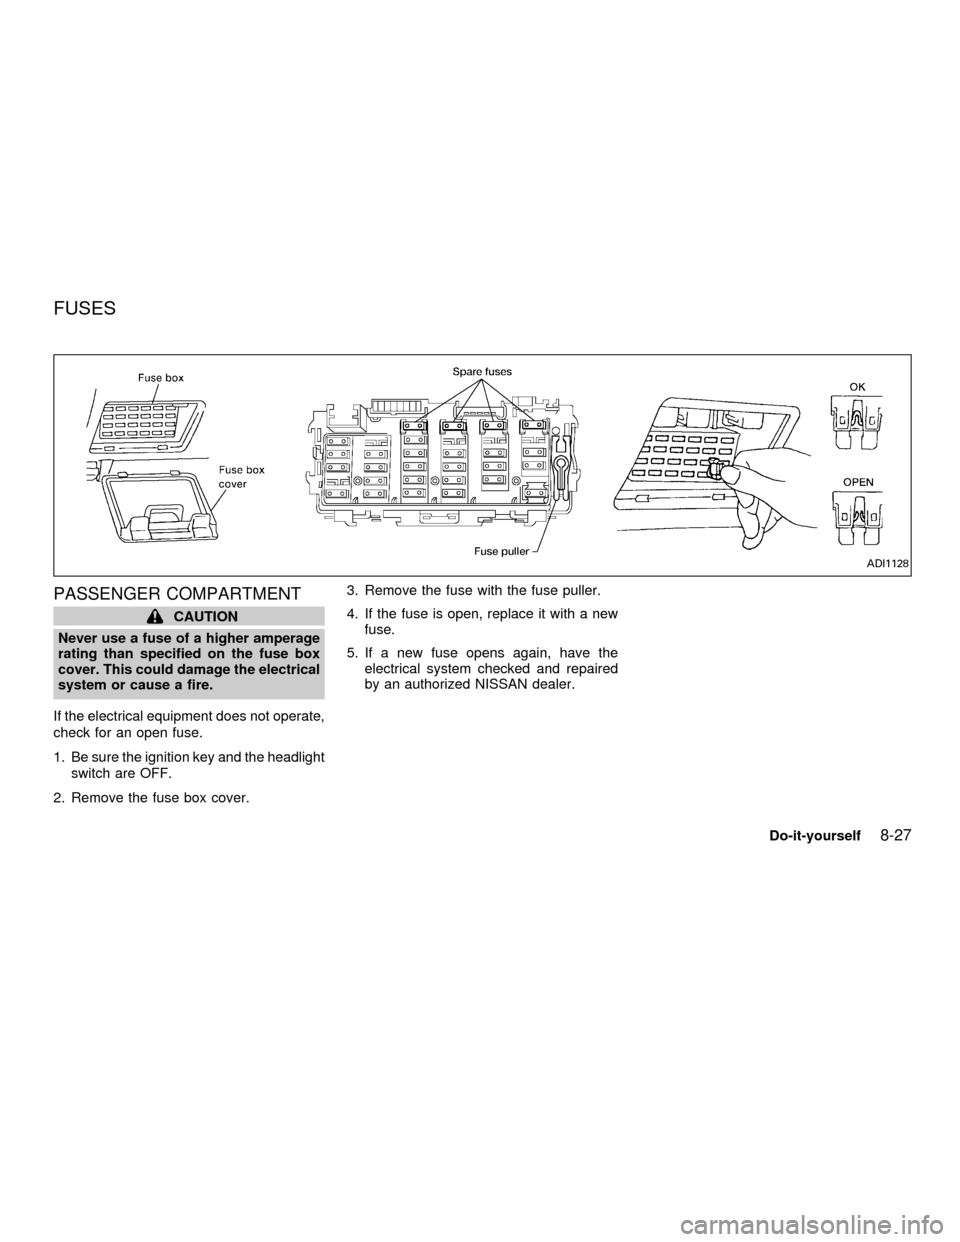
If the electrical equipment does not operate,
check for an open fuse.
1. Be sure the ignition key and the headlight
switch are OFF.
2. Remove the fuse box cover.3. Remove the fuse with the fuse puller.
4. If the fuse is open, replace it with a new
fuse.
5. If a new fuse opens again, have the
electrical system checked and repaired
by an authorized NISSAN dealer.
ADI1128
FUSES
Do-it-yourself8-27
ZX
Page 284 of 290

Checking engine coolant level ............... 8-6
Engine coolant temperature gauge ........ 2-5
Corrosion protection .................................... 7-5
Cruise control............................................. 5-17
Cup holders ............................................... 2-21
D
Daytime running light system
(Canada only) ............................................ 2-18
Defogger switch
Rear window defogger switch .............. 2-16
Dimensions and weights.......................... 10-11
Door locks .................................................... 3-2
Drive belts .................................................. 8-19
Driving
Auto-lock free-running hubs ................. 5-21
Cold weather driving............................. 5-27
Driving with automatic transmission ....... 5-9
Driving with manual transmission ......... 5-15
Precautions when starting and driving ... 5-2
E
Economy - fuel........................................... 5-20
Emission control information label........... 10-14
Emission control system warranty ........... 10-28
Engine
Before starting the engine ...................... 5-8
Capacities and recommended fuel/
lubricants .............................................. 10-2Changing engine coolant........................ 8-7
Changing engine oil.............................. 8-11
Changing engine oil filter...................... 8-13
Checking engine coolant level ............... 8-6
Checking engine oil level ..................... 8-10
Engine compartment check locations .... 8-3
Engine coolant temperature gauge ........ 2-5
Engine cooling system ........................... 8-6
Engine oil .............................................. 8-10
Engine oil and oil filter
recommendation ................................... 10-6
Engine oil pressure warning light ........... 2-9
Engine oil viscosity ............................... 10-7
Engine serial number ......................... 10-13
Engine specifications ............................ 10-9
Starting the engine ................................. 5-8
Exhaust gas (Carbon monoxide) ................. 5-2
F
Flashers (See hazard warning flasher
switch) ........................................................ 2-19
Flat tire ......................................................... 6-2
Floor mat positioning aid ............................. 7-4
Fluid
Automatic transmission fluid (ATF) ...... 8-14
Brake fluid ................................... 10-3, 8-16
Capacities and recommended fuel/
lubricants .............................................. 10-2
Clutch fluid ............................................ 8-16
Engine coolant ........................................ 8-6
Engine oil .............................................. 8-10Power steering fluid .............................. 8-15
Window washer fluid ............................ 8-16
F.M.V.S.S. certification label ................... 10-13
Front seats
Bench...................................................... 1-6
Separate ................................................. 1-2
Fuel
Capacities and recommended fuel/
lubricants .............................................. 10-2
Fuel economy ....................................... 5-20
Fuel filler cap ........................................ 3-11
Fuel gauge.............................................. 2-6
Fuel octane rating................................. 10-5
Fuel recommendation ........................... 10-4
Fuses ......................................................... 8-27
G
Gauge
Engine coolant temperature gauge ........ 2-5
Fuel gauge.............................................. 2-6
Odometer ................................................ 2-3
Speedometer .......................................... 2-3
Tachometer............................................. 2-5
General maintenance .................................. 9-2
H
Hazard warning flasher switch .................. 2-19
Headlight aiming adjustment ..................... 8-30
Headlight and turn signal switch ............... 2-17
11-2
ZX