2001 NISSAN FRONTIER door lock
[x] Cancel search: door lockPage 89 of 290

Power (if so equipped)
For vehicles equipped with the theft warning
system, the power door lock system allows
you to lock or unlock all doors simulta-
neously.
Turning the key to the front of the vehicle
locks all doors.
Turning the key one time to the rear of the
vehicle unlocks that door. From that posi-
tion, returning the key to neutral (where the
key can only be removed and inserted) and
turning it to the rear again within 5 seconds
unlocks all doors.
LOCKING WITH INSIDE LOCK
KNOB
To lock the door without the key, push the
inside lock knob to the lock position, then
close the door.
When locking the door this way, be certain
not to leave the key inside the vehicle.
LOCKING WITH POWER DOOR
LOCK SWITCH
To lock the doors without a key, push the
power door lock switch (driver or passenger
side), then close the door. When locking the
doors this way, be certain not to leave the
key inside the vehicle.
If the key is left in the ignition, all doors will
unlock automatically.
APD1041AIC1012APD1049
Pre-driving checks and adjustments3-3
ZX
Page 90 of 290
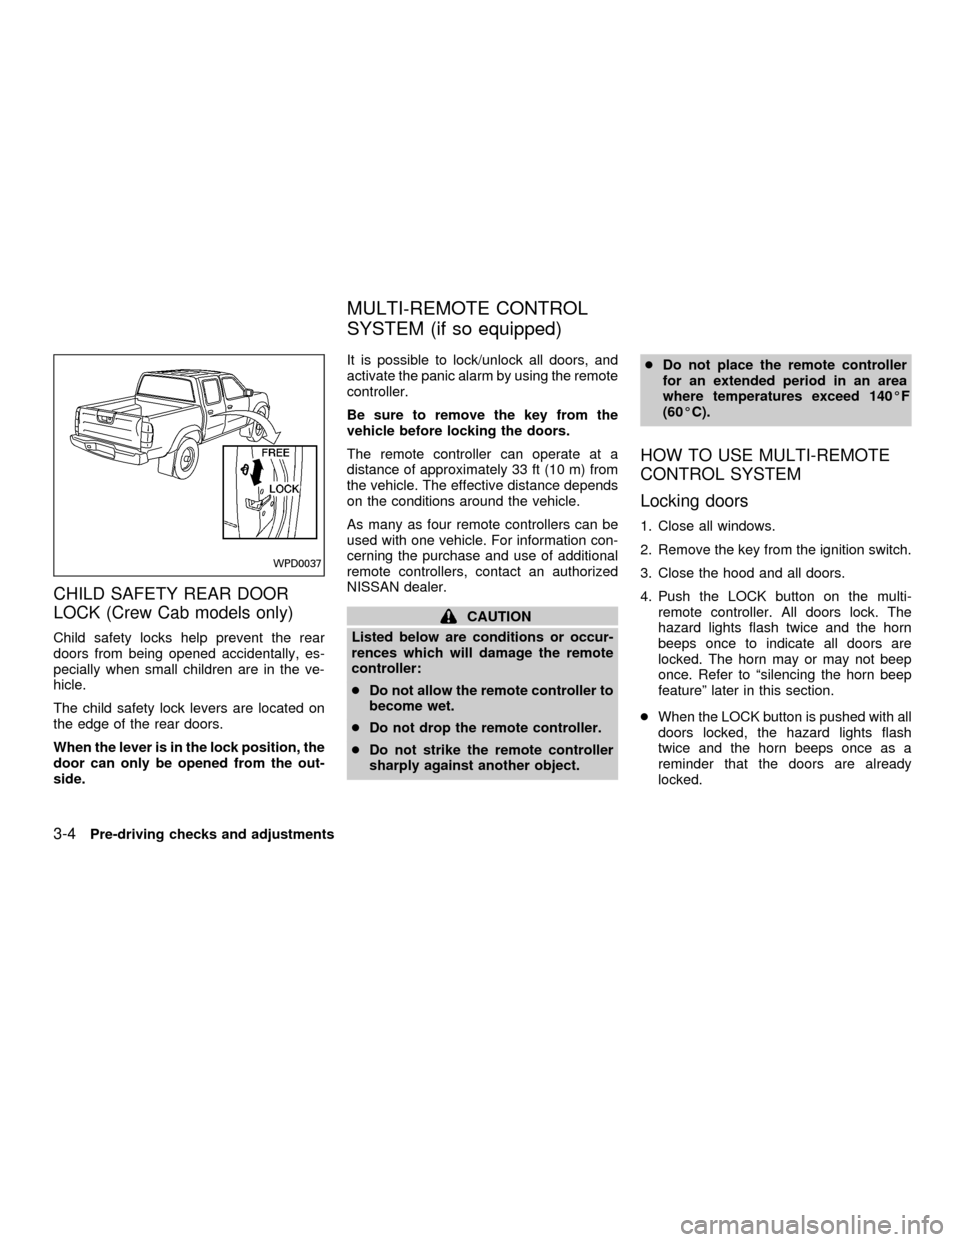
CHILD SAFETY REAR DOOR
LOCK (Crew Cab models only)
Child safety locks help prevent the rear
doors from being opened accidentally, es-
pecially when small children are in the ve-
hicle.
The child safety lock levers are located on
the edge of the rear doors.
When the lever is in the lock position, the
door can only be opened from the out-
side.It is possible to lock/unlock all doors, and
activate the panic alarm by using the remote
controller.
Be sure to remove the key from the
vehicle before locking the doors.
The remote controller can operate at a
distance of approximately 33 ft (10 m) from
the vehicle. The effective distance depends
on the conditions around the vehicle.
As many as four remote controllers can be
used with one vehicle. For information con-
cerning the purchase and use of additional
remote controllers, contact an authorized
NISSAN dealer.
CAUTION
Listed below are conditions or occur-
rences which will damage the remote
controller:
cDo not allow the remote controller to
become wet.
cDo not drop the remote controller.
cDo not strike the remote controller
sharply against another object.cDo not place the remote controller
for an extended period in an area
where temperatures exceed 140ÉF
(60ÉC).
HOW TO USE MULTI-REMOTE
CONTROL SYSTEM
Locking doors
1. Close all windows.
2. Remove the key from the ignition switch.
3. Close the hood and all doors.
4. Push the LOCK button on the multi-
remote controller. All doors lock. The
hazard lights flash twice and the horn
beeps once to indicate all doors are
locked. The horn may or may not beep
once. Refer to ªsilencing the horn beep
featureº later in this section.
cWhen the LOCK button is pushed with all
doors locked, the hazard lights flash
twice and the horn beeps once as a
reminder that the doors are already
locked.
WPD0037
MULTI-REMOTE CONTROL
SYSTEM (if so equipped)
3-4Pre-driving checks and adjustments
ZX
Page 91 of 290

Unlocking doors
1. Push the UNLOCK button on the multi-
remote controller. Only the driver's side
door unlocks.
2. Push the UNLOCK button on the multi-remote controller again within five sec-
onds. All doors unlock.
3. The interior light illuminates for 30 sec-
onds when the light switch is in the O or
DOOR position.The interior light can be turned off without
waiting 30 seconds by inserting the key into
the ignition and turning to the ON or START
position, locking the doors with the multi-
remote controller or pushing the interior light
switch to the OFF position.
Auto Relock
All doors will lock automatically within 5
minutes unless one of the following opera-
tions is performed:
cany door is opened
ca key is inserted into the ignition switch
and the key is turned from OFF to ON.
Using the panic alarm
If you are near your vehicle and feel threat-
ened, you may activate the panic alarm to
call attention as follows:
1. Push the PANIC button on the remote
controller forlonger than 0.5 seconds.
2. The theft warning alarm and headlights
will stay on for 30 seconds.
3. The panic alarm stops when:
cit has run for 30 seconds, or
cthe LOCK or UNLOCK button is pressed,
on the multi-remote controller.
WPD0038
Pre-driving checks and adjustments3-5
ZX
Page 145 of 290

5 Starting and driving
Precautions when starting and driving ...................5-2
Exhaust gas (carbon monoxide) .......................5-2
Three-way catalyst ............................................5-2
On-pavement and offroad driving
precautions ........................................................5-3
Avoiding collision and rollover ...........................5-3
Drinking alcohol/drugs and driving ....................5-4
Driving safety precautions .................................5-4
Ignition switch .........................................................5-6
Automatic transmission .....................................5-6
Manual transmission..........................................5-7
Key positions .....................................................5-7
Before starting the engine ......................................5-8
Starting the engine .................................................5-8
Driving the vehicle ..................................................5-9
Automatic transmission (if so equipped) ...........5-9
Manual transmission........................................5-15
Parking brake .......................................................5-16
Cruise control (if so equipped) .............................5-17
Precautions on cruise control ..........................5-17
Cruise control operations ................................5-18Break-in schedule ................................................5-19
Increasing fuel economy ......................................5-20
Using four-wheel drive .........................................5-20
Transfer case shifting procedures ...................5-21
Auto-lock free-running hubs ............................5-21
Parking/parking on hills ........................................5-24
Power steering .....................................................5-25
Brake system........................................................5-25
Braking precautions .........................................5-25
Anti-lock brake system (ABS) .........................5-26
Cold weather driving ............................................5-27
Freeing a frozen door lock ..............................5-27
Anti-freeze .......................................................5-27
Battery .............................................................5-27
Draining of coolant water ................................5-27
Tire equipment.................................................5-28
Special winter equipment ................................5-28
Driving on snow or ice.....................................5-28
Engine block heater (if so equippped) ............5-29
ZX
Page 152 of 290
cMake sure the area around the vehicle is
clear.
cCheck fluid levels such as engine oil,
coolant, brake and clutch fluid, and win-
dow washer fluid as frequently as pos-
sible, at least whenever you refuel.
cCheck that all windows and lights are
clean.
cVisually inspect tires for their appearance
and condition. Also check tires for proper
inflation.
cLock all doors.
cPosition seat and adjust head restraints.
cAdjust inside and outside mirrors.
cFasten seat belts and ask all passengers
to do likewise.
cCheck the operation of warning lights
when key is turned to the ON (3) position.
See9Warning/Indicator lights and
chimes9in the9Instruments and controls9
section.1. Apply the parking brake.
2.Automatic transmission:
Move the selector lever to P (Park) or N
(Neutral). P (Park) is preferred.
The selector lever cannot be moved
out of P (Park) and into any of the
other gear positions if the ignition key
is turned to OFF or if the key is re-
moved from the ignition switch.
The starter is designed not to operate
if the selector lever is in one of the
driving positions.
Manual transmission:
Move the shift lever to N (Neutral), and
fully depress the clutch pedal to the floor
while starting the engine.
The starter is designed not to operate
unless the clutch pedal is fully de-
pressed.
3.With your foot off the accelerator
pedal,turn the ignition key to START.
Release the key when the engine starts.
If the engine starts, but fails to run, repeat
the above procedure.cIf the engine is very hard to start in
extremely cold or hot weather, depress
the accelerator pedal fully and hold it
to help start the engine.
cIn the summer, when restarting the
engine within 30 minutes after it has
been stopped, keep the accelerator
pedal fully depressed while starting.
CAUTION
Do not operate the starter for more than
15 seconds at a time. If the engine does
not start, turn the key off and wait 10
seconds before cranking again, other-
wise the starter could be damaged.
4.Warm-up
Always allow the engine to idle for at
least 30 seconds after starting. Drive at a
moderate speed for a short distance first,
especially in cold weather.
BEFORE STARTING THE
ENGINESTARTING THE ENGINE
5-8Starting and driving
ZX
Page 171 of 290
If an abnormality occurs in the system, the
anti-lock function will cease but the ordinary
brakes will continue to operate normally. The
ABS brake warning light will then come on.
If the light comes on while you are driv-
ing, contact an authorized NISSAN
dealer for repair.
WARNING
cThe anti-lock brake system is a so-
phisticated device, but it cannot pre-
vent accidents resulting from care-
less or dangerous driving
techniques. It can help maintain ve-
hicle control during braking on slip-
pery surfaces, but remember that the
stopping distance on slippery sur-
faces will be longer than on normal
surfaces even with the anti-lock
brake system. Stopping distances
may also be longer on rough, gravel,
or snow covered roads, or if you are
using tire chains. Always maintain a
safe distance from the vehicle in
front of you. Ultimately, the respon-
sibility for safety of self and others
rests in the hands of the driver.Tire type and condition may also
affect braking effectiveness.
cWhen replacing tires, install the
specified size of tires on all four
wheels.
cWhen installing a spare tire, make
sure it is the proper size and type as
specified on the tire placard. For tire
placard location information, refer to
``Tire placard'' in the ``Technical and
consumer information'' section of
this manual.
For additional information, refer to9Wheels
and Tires9in the9Do-it-yourself9section of
this manual.
FREEING A FROZEN DOOR
LOCK
To prevent a door lock from freezing, apply
de-icer or glycerin through the key hole. If
the lock becomes frozen, heat the key be-
fore inserting it in the key hole.
ANTI-FREEZE
In the winter when it is anticipated that the
temperature will drop below 32ÉF (0ÉC),
check anti-freeze (ethylene glycol base) to
assure proper winter protection. For details,
see ``Engine cooling system'' in the ``Do-it-
yourself'' section of this manual.
BATTERY
If the battery is not fully charged during
extremely cold weather conditions, the bat-
tery fluid may freeze and damage the bat-
tery. To maintain maximum efficiency, the
battery should be checked regularly. For
details, see ``Battery'' in the ``Do-it-yourself''
section of this manual.
DRAINING OF COOLANT WATER
If the vehicle is to be left outside without
anti-freeze, drain the cooling system by
opening the drain valves located under the
COLD WEATHER DRIVING
Starting and driving5-27
ZX
Page 241 of 290

cluding the spare, and adjust to the speci-
fied pressure if necessary. Check carefully
for damage, cuts or excessive wear.
Wheel nuts*When checking the tires, make
sure no wheel nuts are missing, and check for
any loose wheel nuts. Tighten if necessary.
Tire rotation*Tires should be rotated every
7,500 miles (12,000 km).
Wheel alignment and balanceIf the ve-
hicle should pull to either side while driving
on a straight and level road, or if you detect
uneven or abnormal tire wear, there may be
a need for wheel alignment.
If the steering wheel or seat vibrates at
normal highway speeds, wheel balancing
may be needed.
Windshield wiper blades*Check for
cracks or wear if they do not wipe properly.
Doors, hood and tailgateCheck that the
doors, hood and tailgate operate properly.
Also ensure that all latches lock securely.
Lubricate hinges, latches, latch pins, rollers
and links as necessary. Make sure that the
secondary latch keeps the hood from open-
ing when the primary latch is released.
When driving in areas using road salt orother corrosive materials, check lubrication
frequently.
Lights*Make sure that the headlights, stop
lights, tail lights, turn signal lights, and other
lights are all operating properly and installed
securely. Also check headlight aim.INTERIOR MAINTENANCE
The maintenance items listed here should
be checked on a regular basis, such as
when performing periodic maintenance,
cleaning the vehicle, etc.
Additional information on the following
items with an ``*'' is found in the ``Do-it-
yourself'' section of this manual.
Warning lights and chimesMake sure all
warning lights and chimes are operating
properly.
Windshield wiper and washer*Check that
the wipers and washer operate properly and
that the wipers do not streak.
Windshield defrosterCheck that the air
comes out of the defroster outlets properly
and in sufficient quantity when operating the
heater or air conditioner.
Steering wheelCheck for changes in thesteering conditions, such as excessive free-
play, hard steering or strange noises.
SeatsCheck seat position controls such as
seat adjusters, seatback recliner, etc. to
ensure they operate smoothly and all
latches lock securely in every position.
Check that the head restraints move up and
down smoothly and the locks (if so
equipped) hold securely in all latched posi-
tions.
Seat beltsCheck that all parts of the seat
belt system (e.g., buckles, anchors, adjust-
ers and retractors) operate properly and
smoothly, and are installed securely. Check
the belt webbing for cuts, fraying, wear or
damage.
Accelerator pedalCheck the pedal for
smooth operation and make sure the pedal
does not catch or require uneven effort.
Keep the floor mat away from the pedal.
Clutch pedal*Make sure the pedal oper-
ates smoothly and check that it has the
proper free travel.
BrakesCheck that the brakes do not pull
the vehicle to one side when applied.
Brake pedal and booster*Check the pedal
Maintenance
9-3
ZX
Page 272 of 290

MEASUREMENT OF WEIGHTS
Secure loose items to prevent weight shifts
that could affect the balance of your vehicle.
When the truck camper is loaded, drive to a
scale and weigh the front and the rear
wheels separately to determine axle loads.
Individual axle loads should not exceed
either of the gross axle weight ratings
(GAWR). The total of the axle loads should
not exceed the gross vehicle weight rating
(GVWR). These ratings are given on the
vehicle certification label that is located on
the driver's door lock pillar. If weight ratings
are exceeded, move or remove items to
bring all weights below the ratings.
Your new vehicle was designed to be used
primarily to carry passengers and cargo.
Remember that towing a trailer will place
additional loads on your vehicle's engine,
drive train, steering, braking and other sys-
tems.
ANissan Trailer Towing Guideis avail-
able from an authorized NISSAN dealer.
This guide includes information on trailer
towing ability and the special equipment
required for proper towing.
MAXIMUM LOAD LIMITS
Maximum trailer loads
Never allow the total trailer load to exceed
the value specified in the following Towing
Load/Specification Chart. The total trailer
load equals trailer weight plus its cargo
weight.
cWhen towing a trailer load of 1,000 lbs.
(454 kg) or more, trailers with a brake
system MUST be used.
The maximum GCWR (Gross Combined
Weight Rating) should not exceed the value
specified in the following Towing Load/
Specification Chart.
The GCWR equals the combined weight of
the towing vehicle (including passengers
and cargo) plus the total trailer load. Towing
loads greater than these or using improper
towing equipment could adversely affect
vehicle handling, braking and performance.
The ability of your vehicle to tow a trailer is
not only related to the maximum trailer
loads, but also the places you plan to tow.
Tow weights appropriate for level highway
driving may have to be reduced on very
steep grades or in low traction situations (for
CA0009
TOWING A TRAILER
10-22Technical and consumer information
ZX