2001 NISSAN FRONTIER change time
[x] Cancel search: change timePage 2 of 290
MODIFICATION OF YOUR VEHICLE
This vehicle should not be modified.
Modification could affect its perfor-
mance, safety or durability, and may
even violate governmental regulations.
In addition, damage or performance
problems resulting from modification
may not be covered under NISSAN war-
ranties.
All information, specifications and illustra-
tions in this manual are those in effect at the
time of printing. NISSAN reserves the right to
change specifications or design without no-
tice and without obligation.
You will see various symbols in this manual.
They are used in the following ways:
WARNING
This is used to indicate the presence of
a hazard that could cause death or
serious personal injury. To avoid or
reduce the risk, the procedures must
be followed precisely.
CAUTION
This is used to indicate the presence of
a hazard that could cause minor or
moderate personal injury or damage to
your vehicle. To avoid or reduce the
risk, the procedures must be followed
carefully.If you see this symbol, it means ``Do not do
this'' or ``Do not let this happen.''
CALIFORNIA PROPOSITION 65
WARNING
WARNING
Engine Exhaust, some of its constitu-
ents, and certain vehicle components
contain or emit chemicals known to
State of California to cause cancer and
birth defects or other reproductive
harm.
The inside pages of this manual contain
a minimum of 50% recycled fibers,
including 10% post-consumer fibers.
APD1005
IMPORTANT INFORMATION
ABOUT THIS MANUAL
ZX
Page 74 of 290
Daytime Running Light System
(Canada only)
The headlights automatically illuminate at a
reduced intensity when the engine is started
with the parking brake released. The day-
time running lights operate with the head-
light switch in the OFF position or in the
position. Turn the headlight switch
to the
position for full illumination
when driving at night. If the parking brake is
applied before the engine is started, the
daytime running lights do not illuminate. The
daytime running lights illuminate once the
parking brake is released. The daytime run-
ning lights will remain on until the ignition
switch is turned off.
WARNING
When the daytime running light system
is active, tail lights on your vehicle are
not on. It is necessary at dusk to turn
on your headlights. Failure to do so
could cause an accident injuring your-
self and others.
TURN SIGNAL SWITCH
Turn signal
Move the lever up or down to signal the
turning direction. When the turn is com-
pleted, the turn signal cancels automati-
cally.
Lane change signal
To indicate a lane change, move the lever
up or down to the point where the indicator
light begins to flash, but the lever does not
latch.
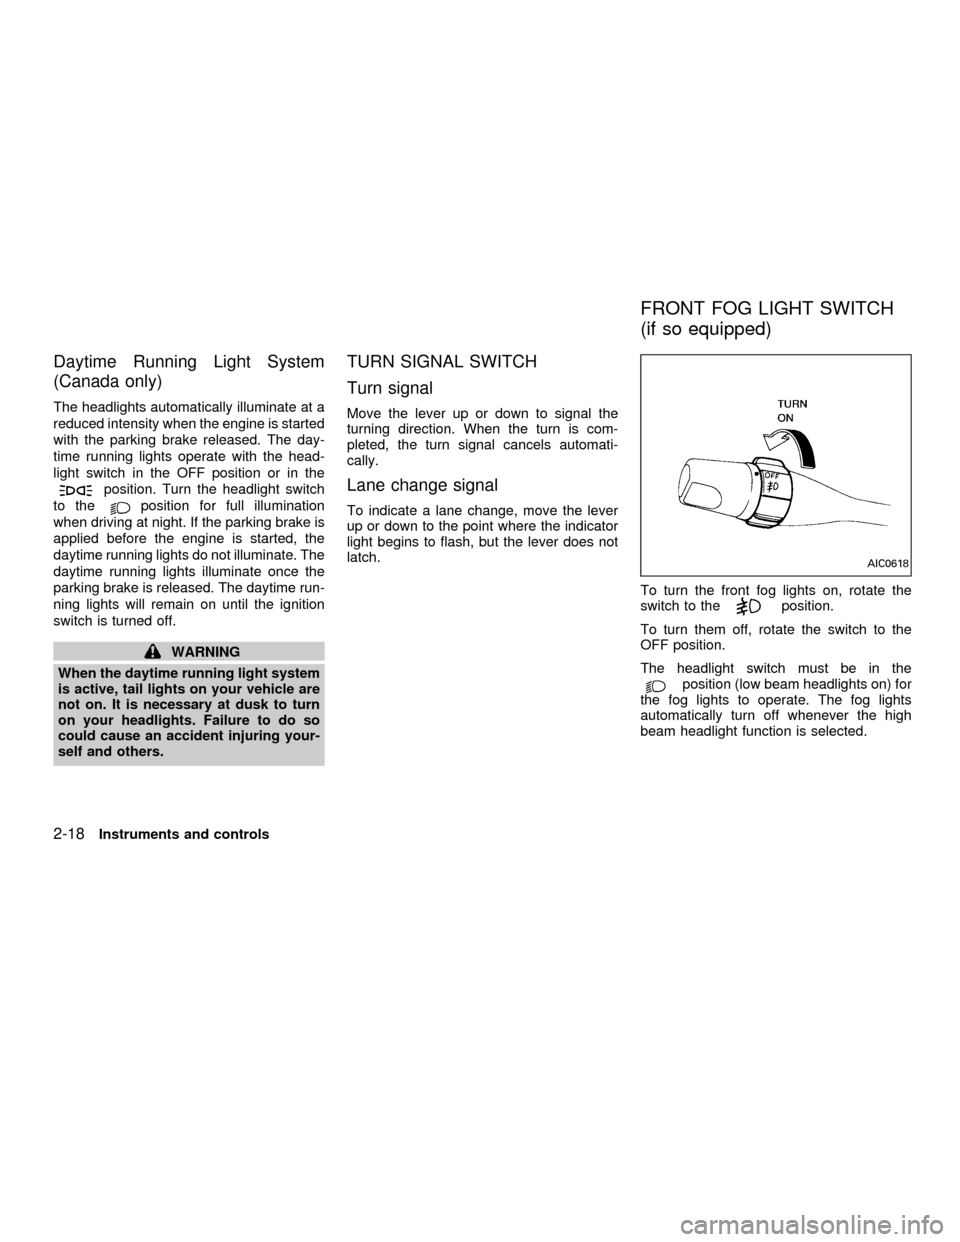
To turn the front fog lights on, rotate the
switch to the
position.
To turn them off, rotate the switch to the
OFF position.
The headlight switch must be in the
position (low beam headlights on) for
the fog lights to operate. The fog lights
automatically turn off whenever the high
beam headlight function is selected.
AIC0618
FRONT FOG LIGHT SWITCH
(if so equipped)
2-18Instruments and controls
ZX
Page 93 of 290
BATTERY REPLACEMENT
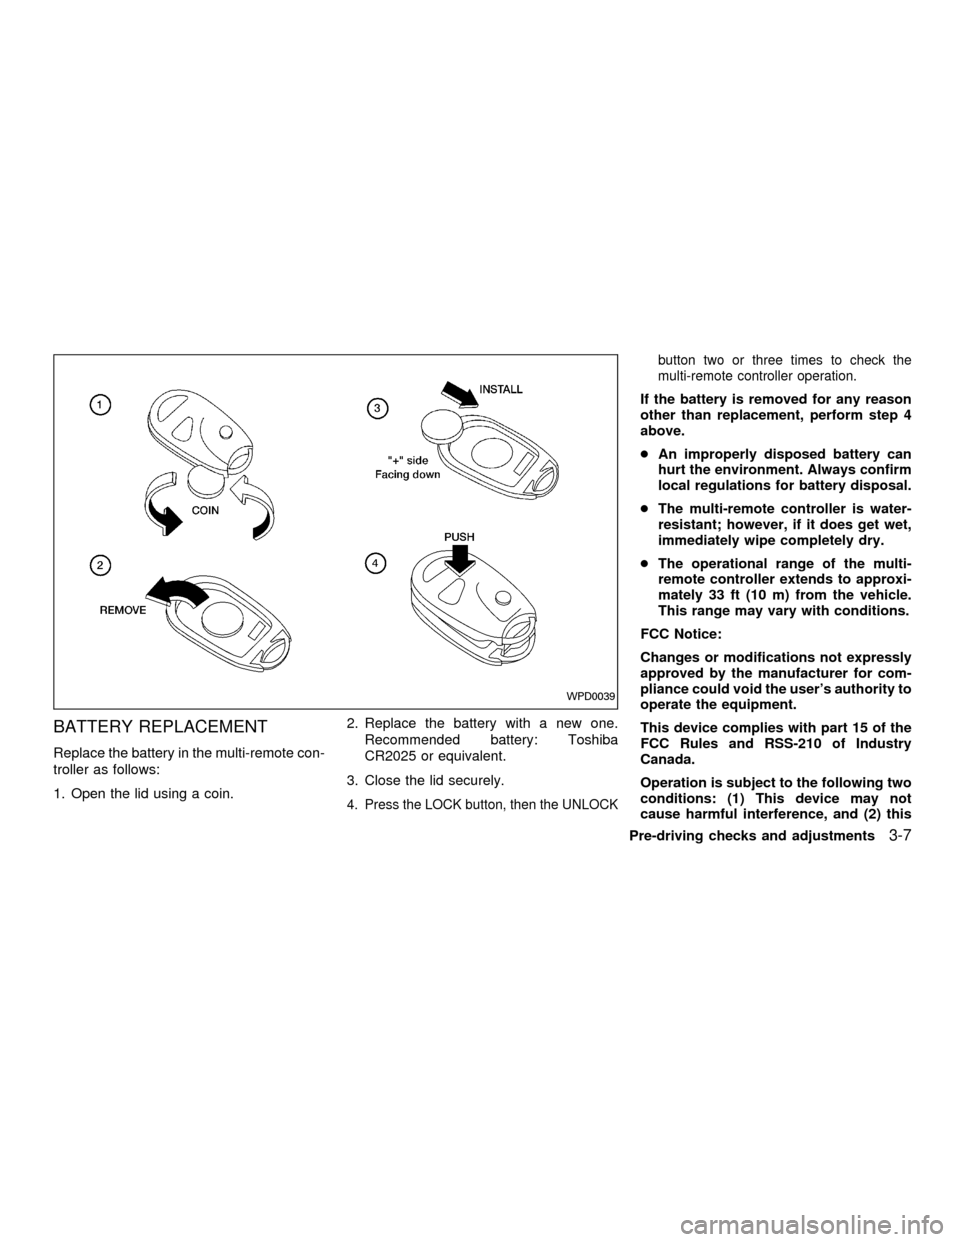
Replace the battery in the multi-remote con-
troller as follows:
1. Open the lid using a coin.2. Replace the battery with a new one.
Recommended battery: Toshiba
CR2025 or equivalent.
3. Close the lid securely.
4. Press the LOCK button, then the UNLOCKbutton two or three times to check the
multi-remote controller operation.
If the battery is removed for any reason
other than replacement, perform step 4
above.
cAn improperly disposed battery can
hurt the environment. Always confirm
local regulations for battery disposal.
cThe multi-remote controller is water-
resistant; however, if it does get wet,
immediately wipe completely dry.
cThe operational range of the multi-
remote controller extends to approxi-
mately 33 ft (10 m) from the vehicle.
This range may vary with conditions.
FCC Notice:
Changes or modifications not expressly
approved by the manufacturer for com-
pliance could void the user's authority to
operate the equipment.
This device complies with part 15 of the
FCC Rules and RSS-210 of Industry
Canada.
Operation is subject to the following two
conditions: (1) This device may not
cause harmful interference, and (2) this
WPD0039
Pre-driving checks and adjustments3-7
ZX
Page 125 of 290
pencil through one of the cassette
hubs and rewind the tape firmly.
Loose tape may cause jamming and
wavering sound quality.
cOver a period of time, the playback
head, capstan and pinch roller may
gather a tape coating residue as the
tape is played. This residue accumu-
lation can cause a weak or wavering
sound and should be removed peri-
odically with a head cleaning tape. If
the residue is not removed periodi-
cally, the player may need to be dis-
assembled for cleaning.
PLAY/STOP
When the system is off and a tape is loaded,
the system comes on and the tape starts to
play. The word TAPE illuminates on the
display.
When the
button is pushed with either
the radio or compact disc turned on and a
tape loaded, the compact disc or the radio
turns off and the tape plays.
While the tape is playing, pushing the
button stops tape play. Pushing the
button again resumes tape play.
FF (fast forward), REW
(rewind)
Push the
button to fast forward the
tape. Push the
button to rewind the
tape. Either REW or FF illuminates in the
display. To stop the FF or REW function,
press the
,,orbuttons.
APS (Automatic Program
Search) FF, APS REW
When the
button is pushed while the
tape is being played, the tape runs quickly,
stops, then plays the next selection from the
beginning. Push the
button several
times to skip several selections. Each time
the button is pushed, the tape fast forwards
one additional selection. This number ap-
pears in the display window. The tape can
be fast forwarded through up to nine selec-
tions. (for example: 7 in the display indi-
cates that the
button has been pushed
seven times to skip forward through seven
selections).
When the
button is pushed, the selec-
tion being played starts again from the
beginning. Push the
button several
times to rewind several selections. Each
time the
button is pushed, the taperewinds back one additional selection. The
number of selections skipped appears in the
display window as a negative number (for
example: -7 in the display indicates that the
button has been pushed seven times to
rewind back through seven selections). To
stop APS
or, press thebut-
ton.
Either the FF or REW illuminates in the
display when the
(REW) or(FF) but-
ton is pushed.
The system searches for the blank intervals
between selections. If there is a blank inter-
val within one selection or there is no inter-
val between selections, the system may not
stop in the desired or expected location.
SIDE button
Push the
button to change the tape
side while the tape is being played.
The cassette tape automatically changes
directions to play the other side when the
first side is complete.
Dolby NR (noise reduction)
Push the
button for Dolby NR en-
coded tapes to reduce high frequency tape
Heater, air conditioner and audio systems
4-21
ZX
Page 126 of 290
noise. Theindicator illuminates in the
display.
Dolby NR is manufactured under license
from Dolby Laboratories Licensing Corpora-
tion. DOLBY NR and the double-D symbol
are trademarks of Dolby Laboratories Li-
censing Corporation.
Metal or chrome tape usage
The cassette player is automatically set to
high performance play when playing a metal
or chrome cassette tape.
TAPE EJECT
Push the
button to eject an inserted
cassette tape.
Compact disc (CD) player operation
Turn the ignition key to the ACC or ON
position and carefully insert the compact
disc into the slot with the label side up. The
compact disc is automatically pulled into the
slot and starts to play.
If the radio or cassette tape is already
operating, it automatically turns off and the
compact disc begins to play.
CAUTION
Do not force the compact disc into the
slot. This could damage the player.
CD/CHG
When the
button is pushed with the
compact disc loaded and the tape or the
radio playing, the tape or radio turns off and
compact disc starts to play.
FF (fast forward), REW
(rewind)
When the
orbutton is pushed
while the compact disc is playing, the com-
pact disc plays at an increased speed while
fast forwarding or rewinding. When the but-
ton is released, the compact disc returns to
normal play speed.
APS (Automatic ProgramSearch) APS FF, APS REW
When thebutton is pushed while the
compact disc is playing, the selection fol-
lowing the present one starts to play from
the beginning. Push the
button several
times to skip several selections. Each time
the button is pushed, the CD advances one
additional selection. The number appears inthe display window. (When the last selec-
tion on the compact disc is skipped, the first
selection is played.)
When the
button is pushed, the selec-
tion being played returns to the beginning.
Push the
button several times to skip
back several selections. Each time the but-
ton is pushed, the CD moves back one
selection. If the play pattern is in RANDOM
mode when the
orbuttons are
pushed, the previous or next random selec-
tion will be played.
RPT/RDM (Repeat/Random)
When the
button is pushed while the
compact disc is playing, the play pattern
changes as follows.
1:The current selection is repeated.
RANDOM:Selections are played at ran-
dom, not following the sequence on the
compact disc. The same program may be
repeated twice. If the
button is pushed
in the RANDOM mode, the next selection
will be chosen at random.
Blank(no symbol): All selections are played
repeatedly in sequence.
When a new compact disc is inserted,
4-22Heater, air conditioner and audio systems
ZX
Page 127 of 290
the play pattern automatically changes
to ALL.
CD eject
When the
button is pushed with a com-
pact disc loaded, the compact disc ejects.
When the
button is pushed while the
compact disc is playing, the compact disc
ejects and the system turns off.
If the compact disc ejects and is not
removed within 10 seconds, it is pulled
back into the slot.
DISC indicator light
This light comes on when a compact disc is
loaded into the player.
CD care and cleaning:
cHandle a CD by its edges. Never touch
the surface of the disc. Do not bend the
disc.
cAlways place the discs in the storage
case when they are not in use.
cTo clean a disc, wipe the surface from
the center to the outer edge using a
clean, soft cloth. Do not wipe the disc
using a circular motion.
Do not use a conventional record cleaner
or alcohol intended for industrial use.
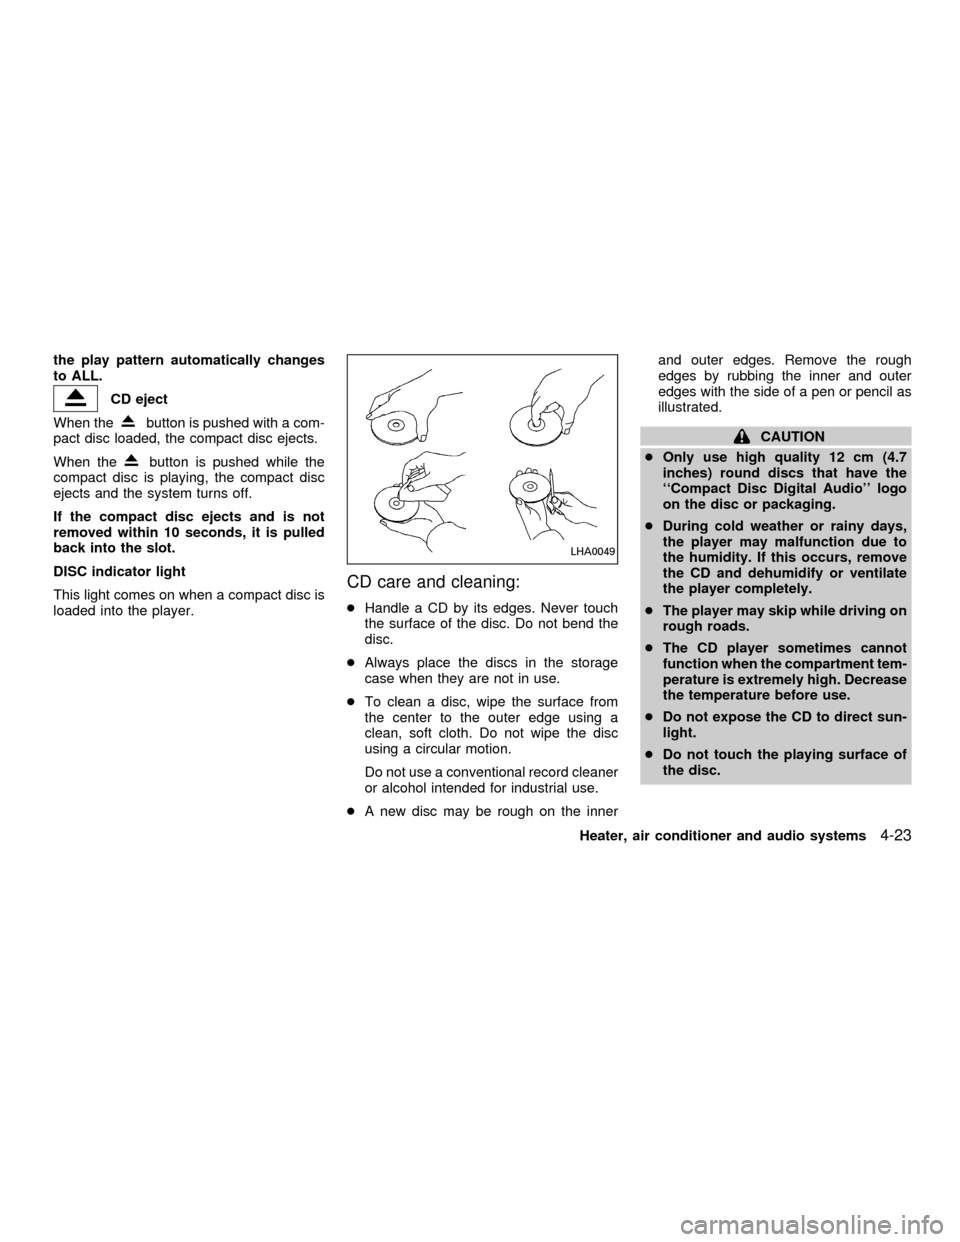
cA new disc may be rough on the innerand outer edges. Remove the rough
edges by rubbing the inner and outer
edges with the side of a pen or pencil as
illustrated.
CAUTION
cOnly use high quality 12 cm (4.7
inches) round discs that have the
``Compact Disc Digital Audio'' logo
on the disc or packaging.
cDuring cold weather or rainy days,
the player may malfunction due to
the humidity. If this occurs, remove
the CD and dehumidify or ventilate
the player completely.
cThe player may skip while driving on
rough roads.
cThe CD player sometimes cannot
function when the compartment tem-
perature is extremely high. Decrease
the temperature before use.
cDo not expose the CD to direct sun-
light.
cDo not touch the playing surface of
the disc.
LHA0049
Heater, air conditioner and audio systems4-23
ZX
Page 137 of 290

3. During the 15 second interval, insert the
disc. The display changes toªLoading
Discº.
4. The CD will play after the disc is set to a
play position.
5. The indicator changes fromblinking
greentosolid greenand the display
changes to show the Disc number icon,
Disc number, Track number and Elapsed
time.
All disc loading
1. Press and hold the LOAD button until the
radio beeps (>1.5 seconds).
2. Thegreenindicator on the lowest avail-
able disc select button will start blinking.
(Same as preset memory button). The
display showsªPlease Waitº.
3. The display changes toªInsert Discºfor
a maximum of 15 seconds.
4. During the 15 second interval, insert the
disc. The display changes toªLoading
Discº.
5. The indicator changes fromblinking
greentosolid green.
6. The disc number icon is turned on.7. Steps 2-5 are repeated until all discs are
loaded, then the last loaded disc will
begin to play. The display shows the Disc
number, Track number and Elapsed
Time.
Selected disc loading
1. Press a disc select button whose indica-
tor is off. The display showsªPlease
Waitº.
2. Thegreenindicator starts blinking and
the display showsªInsert Discºfor 15
seconds.
3. Insert the CD. The display showsªLoad-
ing Discº.
4. The CD will play after the disc is set to a
play position.
5. The indicator color changes fromblink-
ing greentosolid greenand the display
shows the Disc icon, Disc number, Track
number and Elapsed Time.
If a disc is not inserted within 15 seconds or
if the load button is pressed during load
sequence, the entire disc load sequence will
be canceled.Disc Play
Press the CD button. If a CD is loaded and
the radio is playing, the radio turns off and
the last loaded disc starts to play.
Heater, air conditioner and audio systems
4-33
ZX
Page 138 of 290
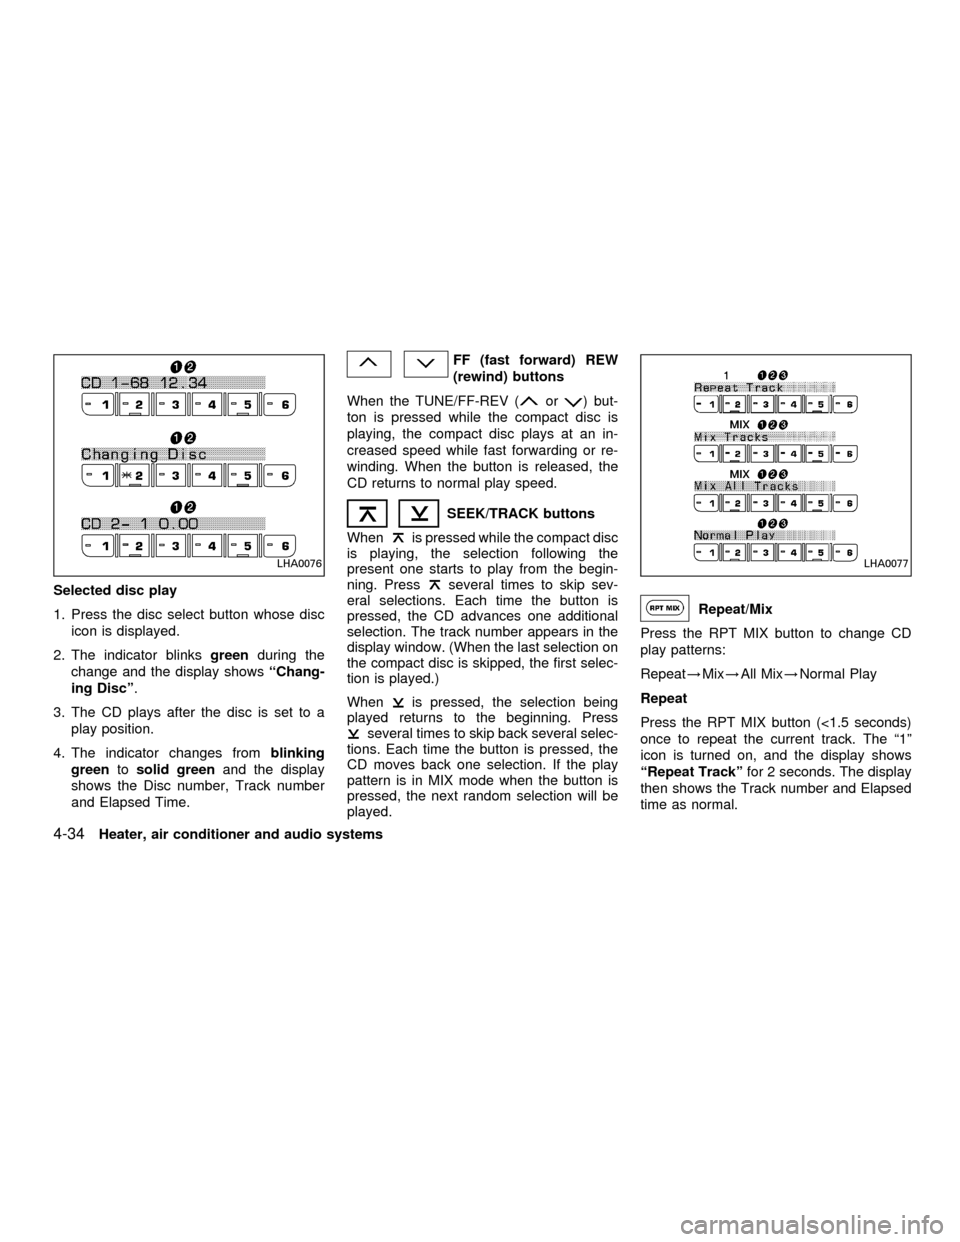
Selected disc play
1. Press the disc select button whose disc
icon is displayed.
2. The indicator blinksgreenduring the
change and the display showsªChang-
ing Discº.
3. The CD plays after the disc is set to a
play position.
4. The indicator changes fromblinking
greentosolid greenand the display
shows the Disc number, Track number
and Elapsed Time.
FF (fast forward) REW
(rewind) buttons
When the TUNE/FF-REV (
or) but-
ton is pressed while the compact disc is
playing, the compact disc plays at an in-
creased speed while fast forwarding or re-
winding. When the button is released, the
CD returns to normal play speed.
SEEK/TRACK buttons
When
is pressed while the compact disc
is playing, the selection following the
present one starts to play from the begin-
ning. Press
several times to skip sev-
eral selections. Each time the button is
pressed, the CD advances one additional
selection. The track number appears in the
display window. (When the last selection on
the compact disc is skipped, the first selec-
tion is played.)
When
is pressed, the selection being
played returns to the beginning. Press
several times to skip back several selec-
tions. Each time the button is pressed, the
CD moves back one selection. If the play
pattern is in MIX mode when the button is
pressed, the next random selection will be
played.
Repeat/Mix
Press the RPT MIX button to change CD
play patterns:
Repeat!Mix!All Mix!Normal Play
Repeat
Press the RPT MIX button (<1.5 seconds)
once to repeat the current track. The ª1º
icon is turned on, and the display shows
ªRepeat Trackºfor 2 seconds. The display
then shows the Track number and Elapsed
time as normal.
LHA0076LHA0077
4-34Heater, air conditioner and audio systems
ZX