2001 NISSAN ALMERA N16 Front door
[x] Cancel search: Front doorPage 46 of 2493

NJGI0009
PreparationNJGI0009S01SPECIAL SERVICE TOOLSNJGI0009S0101
Tool number
Tool nameDescription
LM4086-0200
Board on attachment
NT001
LM4519-0000
Safety stand attachment
NT002
AGI016
Board-on LiftNJGI0009S02CAUTION:
Make sure vehicle is empty when lifting.
+The board-on lift attachment (LM4086-0200) set at front
end of vehicle should be set on the front of the sill under
the front door opening.
+Position attachments at front and rear ends of board-on
lift.
LIFTING POINTS AND TOW TRUCK TOWING
Preparation
GI-44
Page 58 of 2493

NJMA0036
Shown below are Pre-delivery Inspection Items required for the new vehicle. It is recommended that
necessary items other than those listed here be added, paying due regard to the conditions in each
country.
Perform applicable items on each model. Consult text of this section for specifications.
UNDER HOOD Ð engine off
Radiator coolant level and coolant hose connections for leaks
Battery fluid level, specific gravity and conditions of battery terminals
Drive belts tension
Fuel filter for water or dusts (Diesel only), and fuel lines and connections for leaks
Engine oil level and oil leaks
Clutch and brake reservoir fluid level and fluid lines for leaks
Windshield and rear window washer and headlamp cleaner reservoir fluid level
Power steering reservoir fluid level and hose connections for leaks
ON INSIDE AND OUTSIDE
Remove front spring/strut spacer (If applicable)
Operation of all instruments, gauges, lights and accessories
Operation of horn(s), wiper and washer
Steering lock for operation
Check air conditioner for gas leaks
Front and rear seats, and seat belts for operation
All moldings, trims and fittings for fit and alignment
All windows for operation and alignment
Hood, trunk lid, door panels for fit and alignment
Latches, keys and locks for operation
Weatherstrips for adhesion and fit
Headlamp aiming
Tighten wheel nuts (Inc. inner nuts if applicable)
Tire pressure (Inc. spare tire)
Check front wheels for toe-in
Install clock/voltmeter/room lamp fuse (If applicable)
Install deodorizing filter to air conditioner (If applicable)
Remove wiper blade protectors (If applicable)
UNDER BODY
Manual transmission/transaxle, transfer and differential gear oil level
Brake and fuel lines and oil/fluid reservoirs for leaks
Tighten bolts and nuts of steering linkage and gear box, suspension, propeller shafts and drive shafts
Tighten rear body bolts and nuts (Models with wooden bed only)
ROAD TEST
Clutch operation
Parking brake operation
Service brake operation
Automatic transmission/transaxle shift timing and kickdown
Steering control and returnability
Engine performance
Squeaks and rattles
ENGINE OPERATING AND HOT
Adjust idle speed
Automatic transmission/transaxle fluid level
Engine idling and stop knob operation (Diesel only)
FINAL INSPECTION
Install necessary parts (outside mirror, wheel covers, seat belts, mat, carpet or mud flaps)
Inspect for interior and exterior metal and paint damage
Check for spare tire, jack, tools (wheel chock), and literature
Wash, clean interior and exterior
: Not applicable to this model
PRE-DELIVERY INSPECTION ITEMS
MA-2
Page 1821 of 2493
RESTRAINT SYSTEM
SECTION
RS
CONTENTS
SEAT BELTS...................................................................3
Precautions ..................................................................3
SUPPLEMENTAL RESTRAINT SYSTEM (SRS)
²AIR BAG²AND²SEAT BELT PRE-TENSIONER²
........3
PRECAUTION FOR SEAT BELT SERVICE..................3
Maintenance ................................................................4
Front Seat Belt.............................................................5
REMOVAL AND INSTALLATION/4-DOOR SEDAN.......5
REMOVAL AND INSTALLATION/5-DOOR
HATCHBACK
.............................................................7
REMOVAL AND INSTALLATION/3-DOOR
HATCHBACK
.............................................................9
Rear Seat Belt ........................................................... 11
REMOVAL AND INSTALLATION/4-DOOR SEDAN
WITH 2-POINT TYPE REAR CENTER SEAT BELT
.... 11
REMOVAL AND INSTALLATION/4-DOOR SEDAN
WITH 3-POINT TYPE REAR CENTER SEAT BELT
....13
REMOVAL AND INSTALLATION/HATCHBACK
WITH 3-POINT TYPE REAR CENTER SEAT
.............15
ISO Fix Child Restraint Anchor .................................18
REMOVAL AND INSTALLATION...............................18
Tether Anchor Plate ...................................................19
REMOVAL AND INSTALLATION...............................19
SUPPLEMENTAL RESTRAINT SYSTEM (SRS).........20
Precautions ................................................................20
SUPPLEMENTAL RESTRAINT SYSTEM (SRS)
²AIR BAG²AND²SEAT BELT PRE-TENSIONER²
......20
PRECAUTIONS FOR SRS²AIR BAG²AND²SEAT
BELT PRE-TENSIONER²SERVICE
...........................20
WIRING DIAGRAMS AND TROUBLE DIAGNOSIS.....20
Preparation ................................................................21
SPECIAL SERVICE TOOLS......................................21
COMMERCIAL SERVICE TOOL................................22
SRS Configuration .....................................................22
Seat Belt Pre-tensioner with Load Limiter.................23
Built-in Type Side Air Bag..........................................23
SRS Component Parts Location ...............................24
Maintenance Items ....................................................25
Diagnosis Sensor Unit ...............................................26
REMOVAL AND INSTALLATION...............................26
Front Seat Belt Pre-tensioner ....................................27
REMOVAL AND INSTALLATION...............................27
Side Air Bag (Satellite) Sensor ..................................27
REMOVAL AND INSTALLATION...............................27
Driver Air Bag Module and Spiral Cable ...................29
REMOVAL AND INSTALLATION/WITH 4-SPOKE
STEERING WHEEL
.................................................29
REMOVAL...............................................................29
INSTALLATION........................................................31
Front Passenger Air Bag Module ..............................32
REMOVAL...............................................................32
INSTALLATION........................................................33
Front Side Air Bag Module ........................................33
REMOVAL...............................................................33
INSTALLATION........................................................34
Disposal of Air Bag Module and Seat Belt Pre-
tensioner ....................................................................35
CHECKING DEPLOYMENT TOOL.............................35
DEPLOYMENT PROCEDURES FOR AIR BAG
MODULE (OUTSIDE OF VEHICLE)
...........................36
DEPLOYMENT PROCEDURES FOR SEAT BELT
PRE-TENSIONER (OUTSIDE OF VEHICLE)
..............39
DEPLOYMENT OF AIR BAG MODULE AND SEAT
BELT PRE-TENSIONER WHILE MOUNTED IN
VEHICLE
.................................................................39
DISPOSING OF AIR BAG MODULE AND SEAT
BELT PRE-TENSIONER
...........................................40
Trouble Diagnoses Introduction.................................41
DIAGNOSIS FUNCTION...........................................41
DIAGNOSIS MODE FOR CONSULT-II.......................41
HOW TO CHANGE SELF-DIAGNOSIS MODE
WITH CONSULT-II
...................................................42
HOW TO CHANGE SELF-DIAGNOSIS MODE
WITHOUT CONSULT-II
............................................42
HOW TO ERASE SELF-DIAGNOSIS RESULTS.........43
How to Perform Trouble Diagnoses for Quick
and Accurate Repair ..................................................44
INFORMATION FROM CUSTOMER..........................44
PRELIMINARY CHECK............................................44
WORK FLOW..........................................................45
Wiring Diagram - SRS -.............................................46
SEDAN MODELS.....................................................47
Page 1825 of 2493
Front Seat Belt
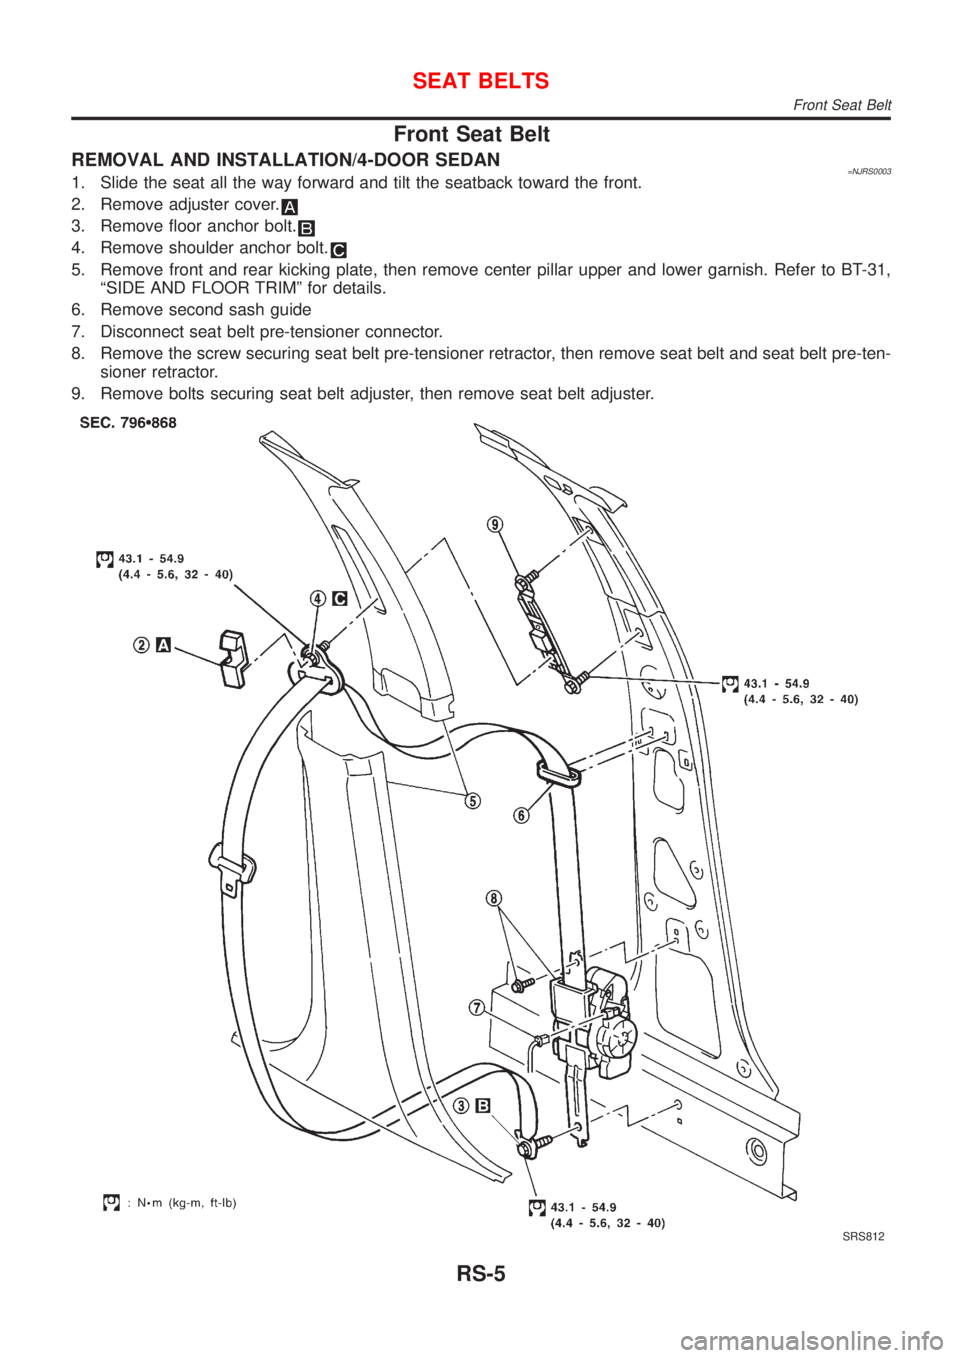
REMOVAL AND INSTALLATION/4-DOOR SEDAN=NJRS00031. Slide the seat all the way forward and tilt the seatback toward the front.
2. Remove adjuster cover.
3. Remove floor anchor bolt.
4. Remove shoulder anchor bolt.
5. Remove front and rear kicking plate, then remove center pillar upper and lower garnish. Refer to BT-31,
ªSIDE AND FLOOR TRIMº for details.
6. Remove second sash guide
7. Disconnect seat belt pre-tensioner connector.
8. Remove the screw securing seat belt pre-tensioner retractor, then remove seat belt and seat belt pre-ten-
sioner retractor.
9. Remove bolts securing seat belt adjuster, then remove seat belt adjuster.
SRS812
SEAT BELTS
Front Seat Belt
RS-5
Page 1827 of 2493
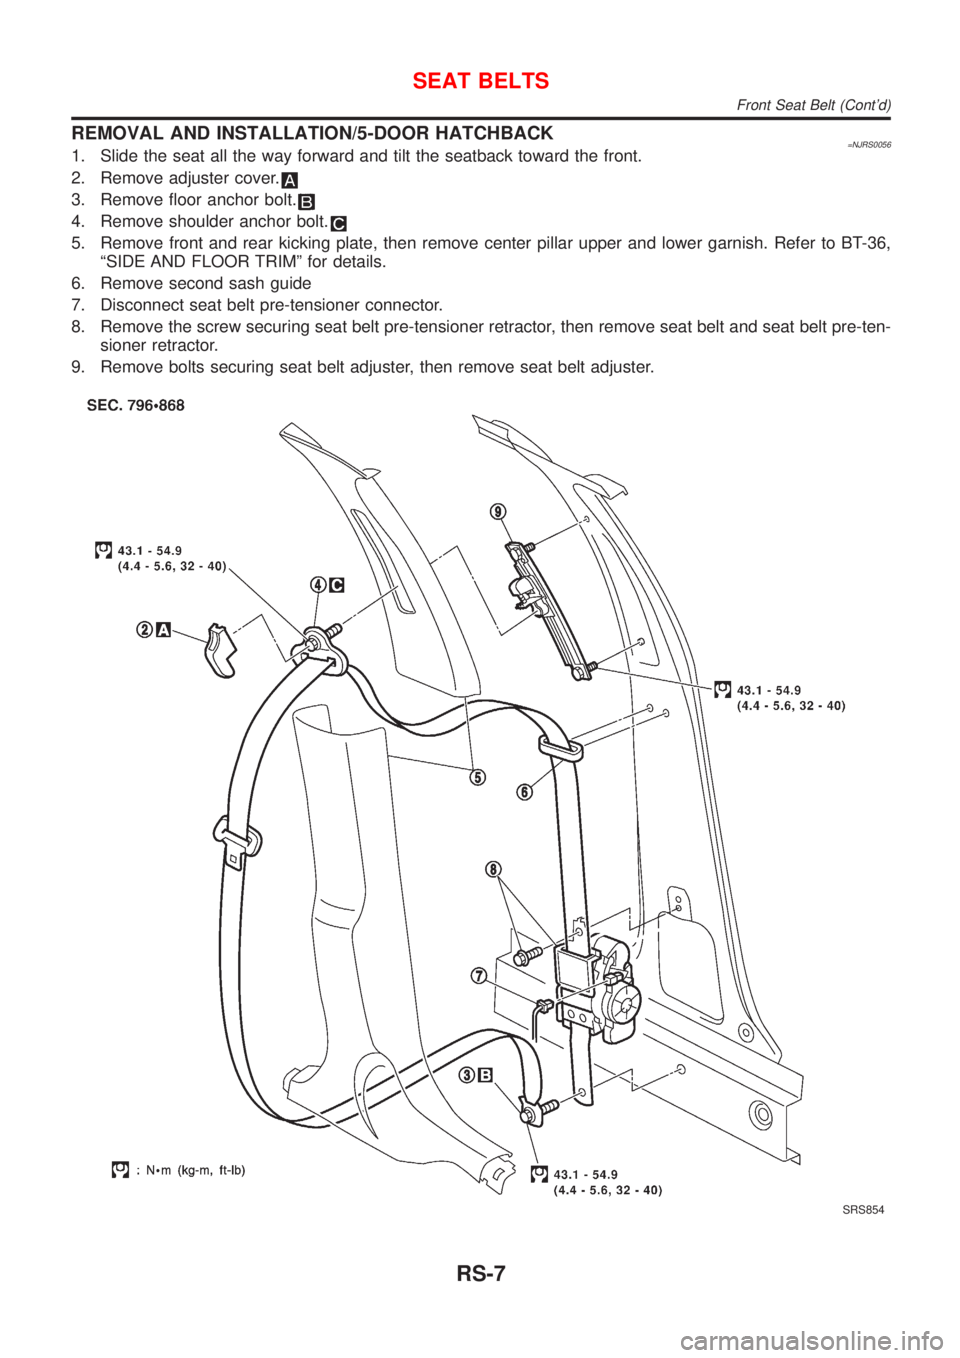
REMOVAL AND INSTALLATION/5-DOOR HATCHBACK=NJRS00561. Slide the seat all the way forward and tilt the seatback toward the front.
2. Remove adjuster cover.
3. Remove floor anchor bolt.
4. Remove shoulder anchor bolt.
5. Remove front and rear kicking plate, then remove center pillar upper and lower garnish. Refer to BT-36,
ªSIDE AND FLOOR TRIMº for details.
6. Remove second sash guide
7. Disconnect seat belt pre-tensioner connector.
8. Remove the screw securing seat belt pre-tensioner retractor, then remove seat belt and seat belt pre-ten-
sioner retractor.
9. Remove bolts securing seat belt adjuster, then remove seat belt adjuster.
SRS854
SEAT BELTS
Front Seat Belt (Cont'd)
RS-7
Page 1829 of 2493
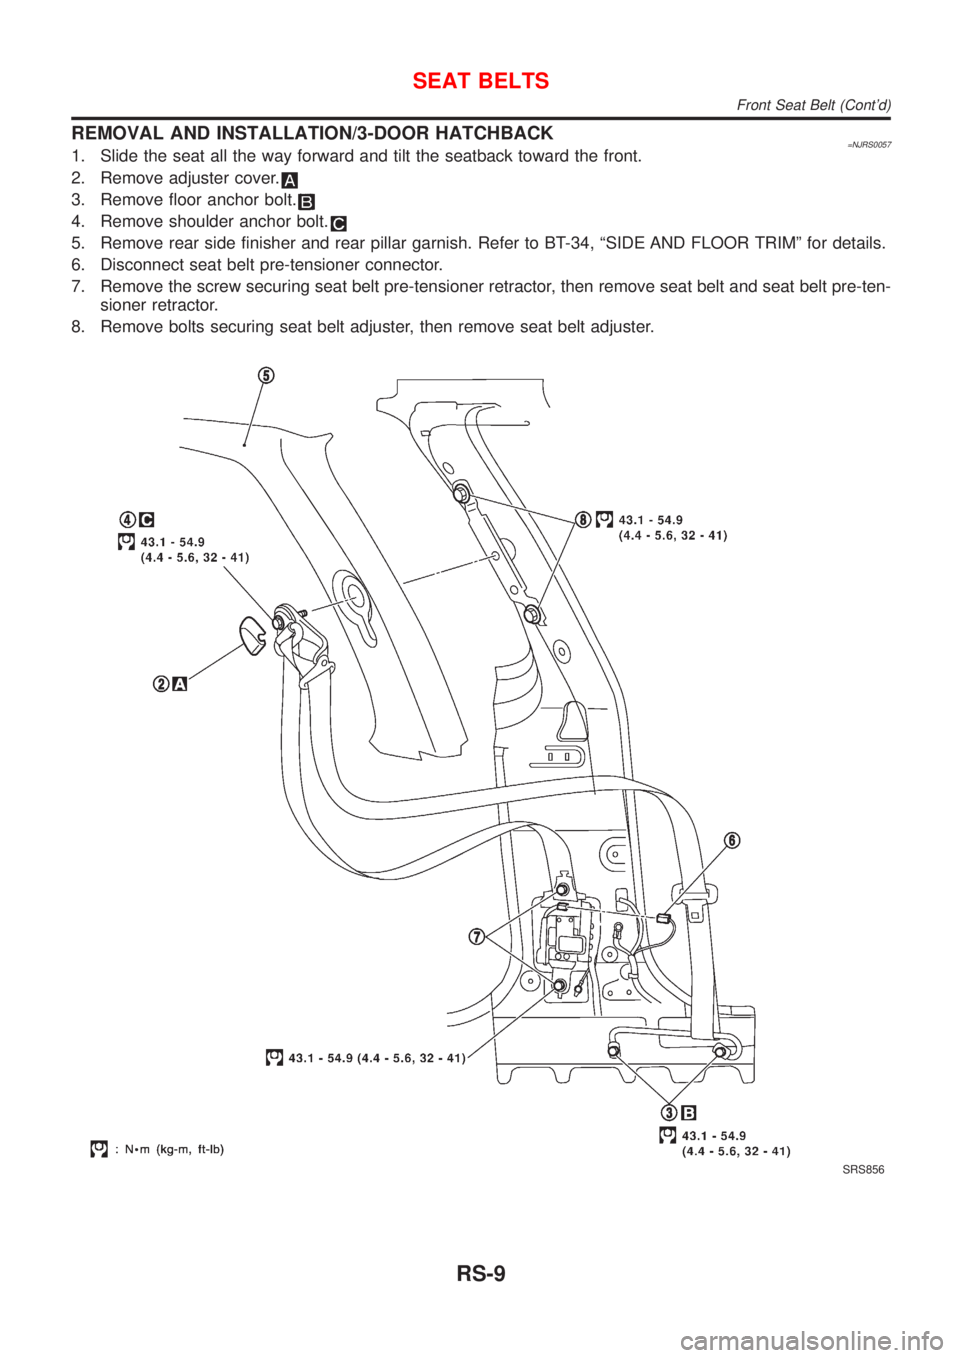
REMOVAL AND INSTALLATION/3-DOOR HATCHBACK=NJRS00571. Slide the seat all the way forward and tilt the seatback toward the front.
2. Remove adjuster cover.
3. Remove floor anchor bolt.
4. Remove shoulder anchor bolt.
5. Remove rear side finisher and rear pillar garnish. Refer to BT-34, ªSIDE AND FLOOR TRIMº for details.
6. Disconnect seat belt pre-tensioner connector.
7. Remove the screw securing seat belt pre-tensioner retractor, then remove seat belt and seat belt pre-ten-
sioner retractor.
8. Remove bolts securing seat belt adjuster, then remove seat belt adjuster.
SRS856
SEAT BELTS
Front Seat Belt (Cont'd)
RS-9
Page 1841 of 2493
Preparation
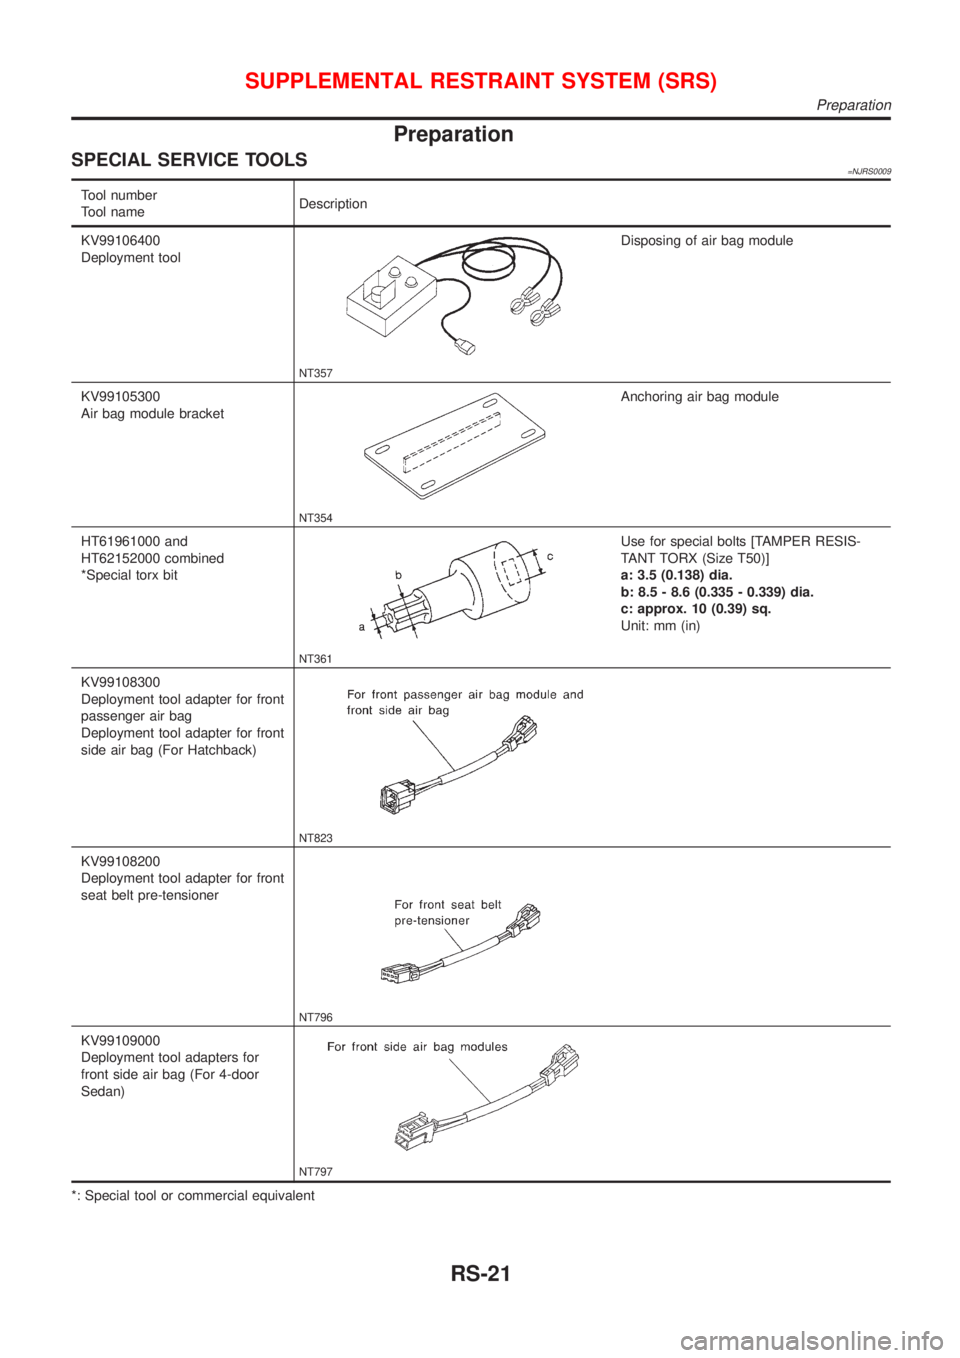
SPECIAL SERVICE TOOLS=NJRS0009
Tool number
Tool nameDescription
KV99106400
Deployment tool
NT357
Disposing of air bag module
KV99105300
Air bag module bracket
NT354
Anchoring air bag module
HT61961000 and
HT62152000 combined
*Special torx bit
NT361
Use for special bolts [TAMPER RESIS-
TANT TORX (Size T50)]
a: 3.5 (0.138) dia.
b: 8.5 - 8.6 (0.335 - 0.339) dia.
c: approx. 10 (0.39) sq.
Unit: mm (in)
KV99108300
Deployment tool adapter for front
passenger air bag
Deployment tool adapter for front
side air bag (For Hatchback)
NT823
KV99108200
Deployment tool adapter for front
seat belt pre-tensioner
NT796
KV99109000
Deployment tool adapters for
front side air bag (For 4-door
Sedan)
NT797
*: Special tool or commercial equivalent
SUPPLEMENTAL RESTRAINT SYSTEM (SRS)
Preparation
RS-21
Page 1860 of 2493
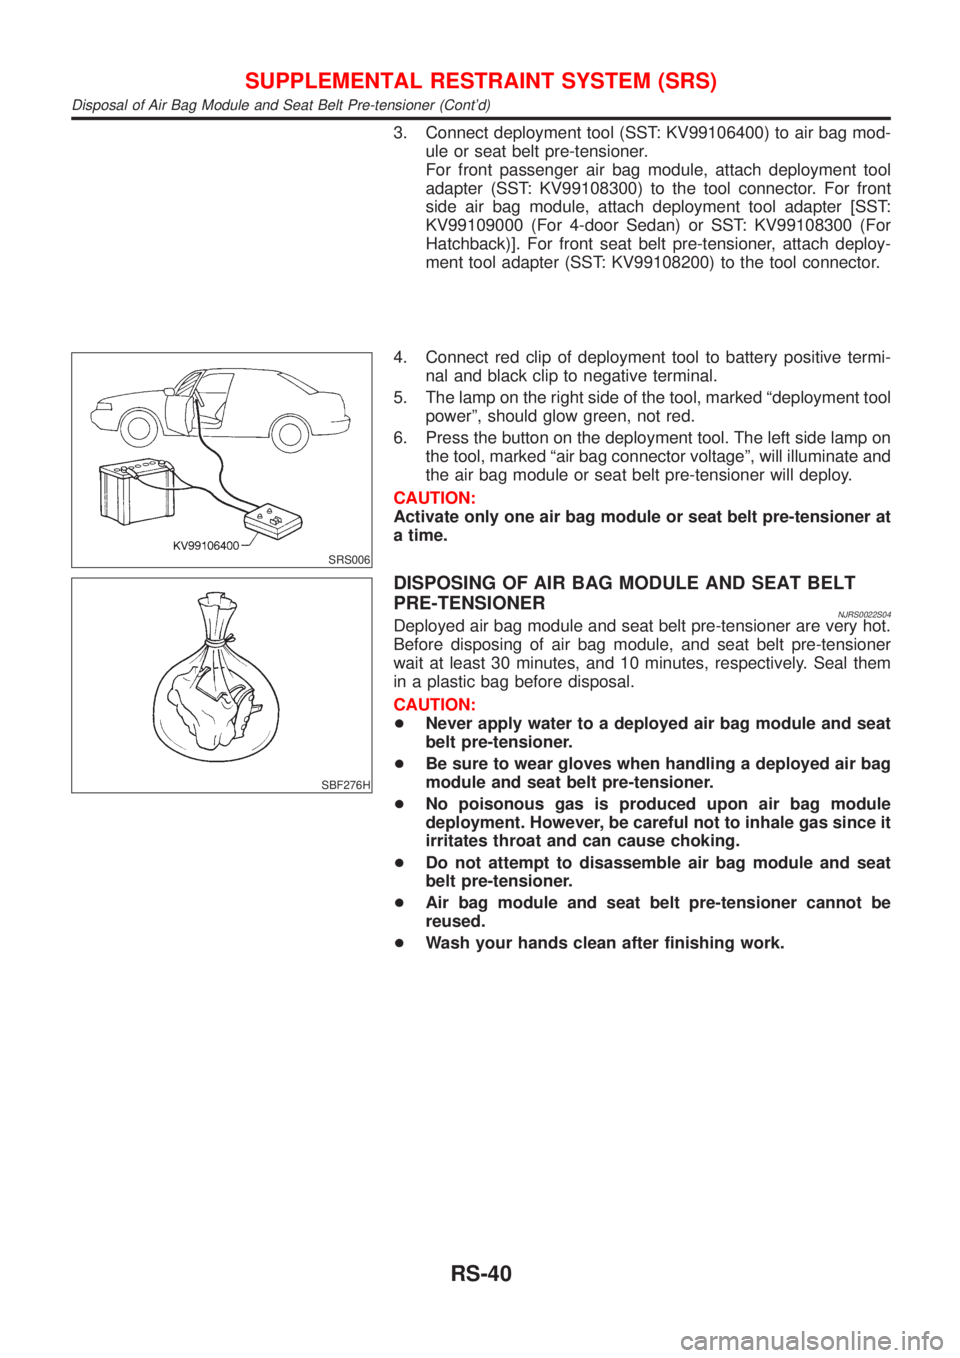
3. Connect deployment tool (SST: KV99106400) to air bag mod-
ule or seat belt pre-tensioner.
For front passenger air bag module, attach deployment tool
adapter (SST: KV99108300) to the tool connector. For front
side air bag module, attach deployment tool adapter [SST:
KV99109000 (For 4-door Sedan) or SST: KV99108300 (For
Hatchback)]. For front seat belt pre-tensioner, attach deploy-
ment tool adapter (SST: KV99108200) to the tool connector.
SRS006
4. Connect red clip of deployment tool to battery positive termi-
nal and black clip to negative terminal.
5. The lamp on the right side of the tool, marked ªdeployment tool
powerº, should glow green, not red.
6. Press the button on the deployment tool. The left side lamp on
the tool, marked ªair bag connector voltageº, will illuminate and
the air bag module or seat belt pre-tensioner will deploy.
CAUTION:
Activate only one air bag module or seat belt pre-tensioner at
a time.
SBF276H
DISPOSING OF AIR BAG MODULE AND SEAT BELT
PRE-TENSIONER
NJRS0022S04Deployed air bag module and seat belt pre-tensioner are very hot.
Before disposing of air bag module, and seat belt pre-tensioner
wait at least 30 minutes, and 10 minutes, respectively. Seal them
in a plastic bag before disposal.
CAUTION:
+Never apply water to a deployed air bag module and seat
belt pre-tensioner.
+Be sure to wear gloves when handling a deployed air bag
module and seat belt pre-tensioner.
+No poisonous gas is produced upon air bag module
deployment. However, be careful not to inhale gas since it
irritates throat and can cause choking.
+Do not attempt to disassemble air bag module and seat
belt pre-tensioner.
+Air bag module and seat belt pre-tensioner cannot be
reused.
+Wash your hands clean after finishing work.
SUPPLEMENTAL RESTRAINT SYSTEM (SRS)
Disposal of Air Bag Module and Seat Belt Pre-tensioner (Cont'd)
RS-40