2001 NISSAN ALMERA N16 ECU
[x] Cancel search: ECUPage 1042 of 2493
SCL729
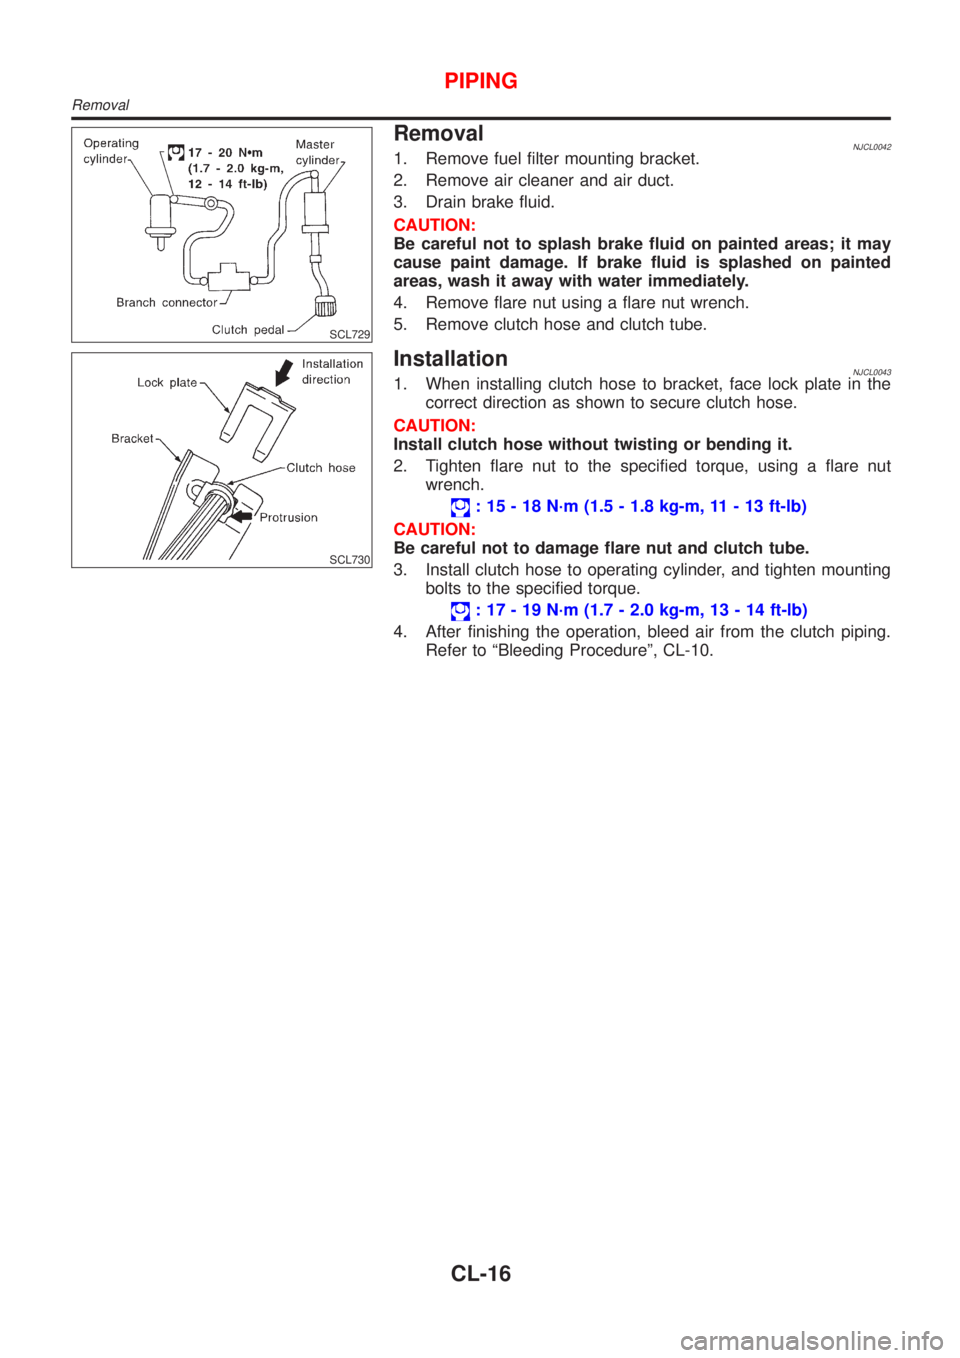
RemovalNJCL00421. Remove fuel filter mounting bracket.
2. Remove air cleaner and air duct.
3. Drain brake fluid.
CAUTION:
Be careful not to splash brake fluid on painted areas; it may
cause paint damage. If brake fluid is splashed on painted
areas, wash it away with water immediately.
4. Remove flare nut using a flare nut wrench.
5. Remove clutch hose and clutch tube.
SCL730
InstallationNJCL00431. When installing clutch hose to bracket, face lock plate in the
correct direction as shown to secure clutch hose.
CAUTION:
Install clutch hose without twisting or bending it.
2. Tighten flare nut to the specified torque, using a flare nut
wrench.
: 15 - 18 N´m (1.5 - 1.8 kg-m, 11 - 13 ft-lb)
CAUTION:
Be careful not to damage flare nut and clutch tube.
3. Install clutch hose to operating cylinder, and tighten mounting
bolts to the specified torque.
: 17 - 19 N´m (1.7 - 2.0 kg-m, 13 - 14 ft-lb)
4. After finishing the operation, bleed air from the clutch piping.
Refer to ªBleeding Procedureº, CL-10.
PIPING
Removal
CL-16
Page 1044 of 2493
YCL004
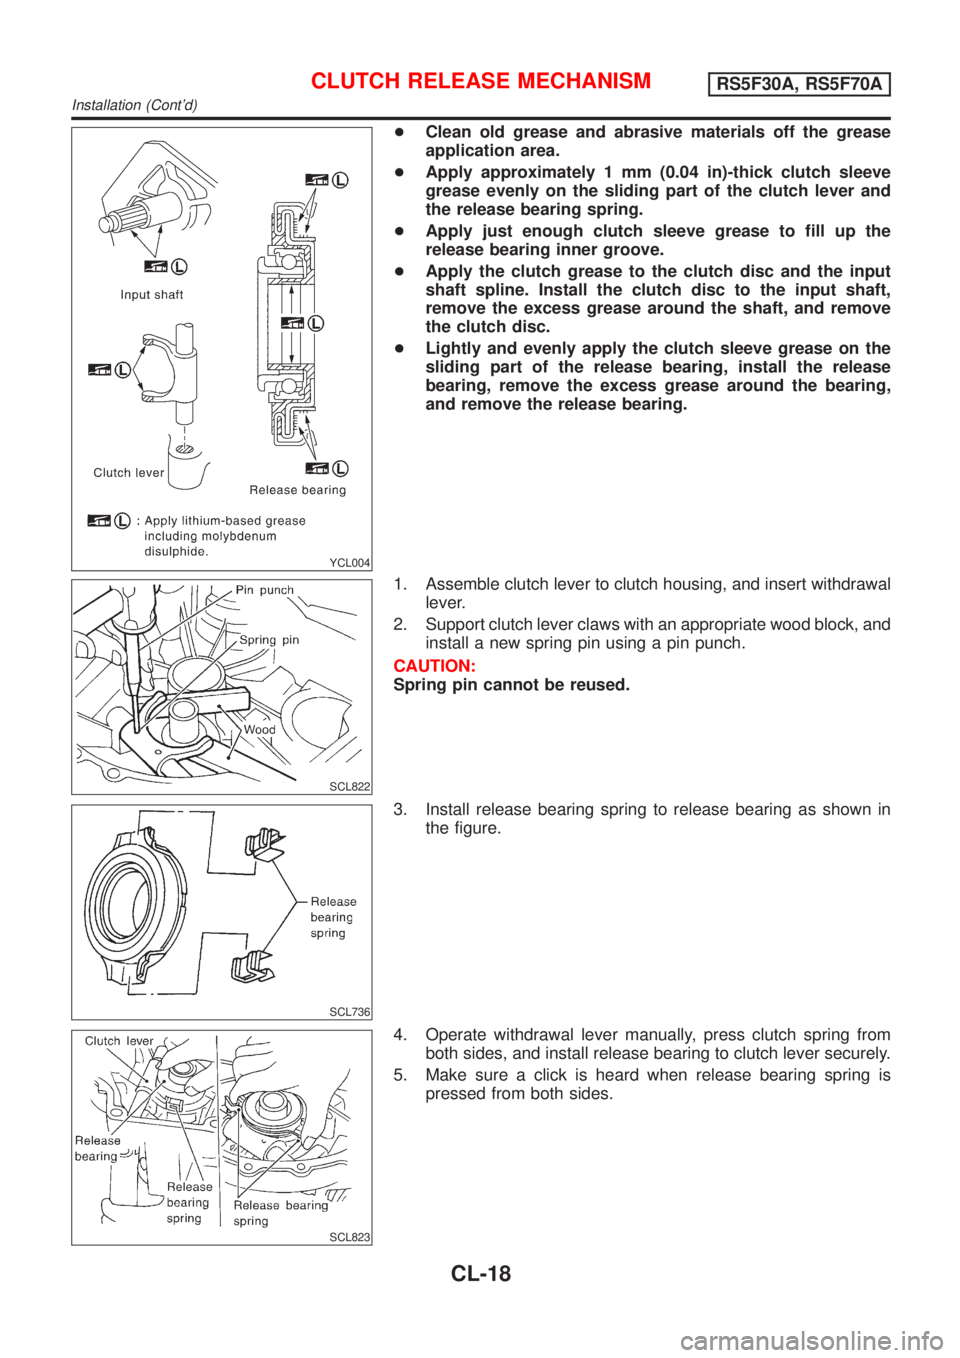
+Clean old grease and abrasive materials off the grease
application area.
+Apply approximately 1 mm (0.04 in)-thick clutch sleeve
grease evenly on the sliding part of the clutch lever and
the release bearing spring.
+Apply just enough clutch sleeve grease to fill up the
release bearing inner groove.
+Apply the clutch grease to the clutch disc and the input
shaft spline. Install the clutch disc to the input shaft,
remove the excess grease around the shaft, and remove
the clutch disc.
+Lightly and evenly apply the clutch sleeve grease on the
sliding part of the release bearing, install the release
bearing, remove the excess grease around the bearing,
and remove the release bearing.
SCL822
1. Assemble clutch lever to clutch housing, and insert withdrawal
lever.
2. Support clutch lever claws with an appropriate wood block, and
install a new spring pin using a pin punch.
CAUTION:
Spring pin cannot be reused.
SCL736
3. Install release bearing spring to release bearing as shown in
the figure.
SCL823
4. Operate withdrawal lever manually, press clutch spring from
both sides, and install release bearing to clutch lever securely.
5. Make sure a click is heard when release bearing spring is
pressed from both sides.
CLUTCH RELEASE MECHANISMRS5F30A, RS5F70A
Installation (Cont'd)
CL-18
Page 1073 of 2493
NJMT0008
SMT928D
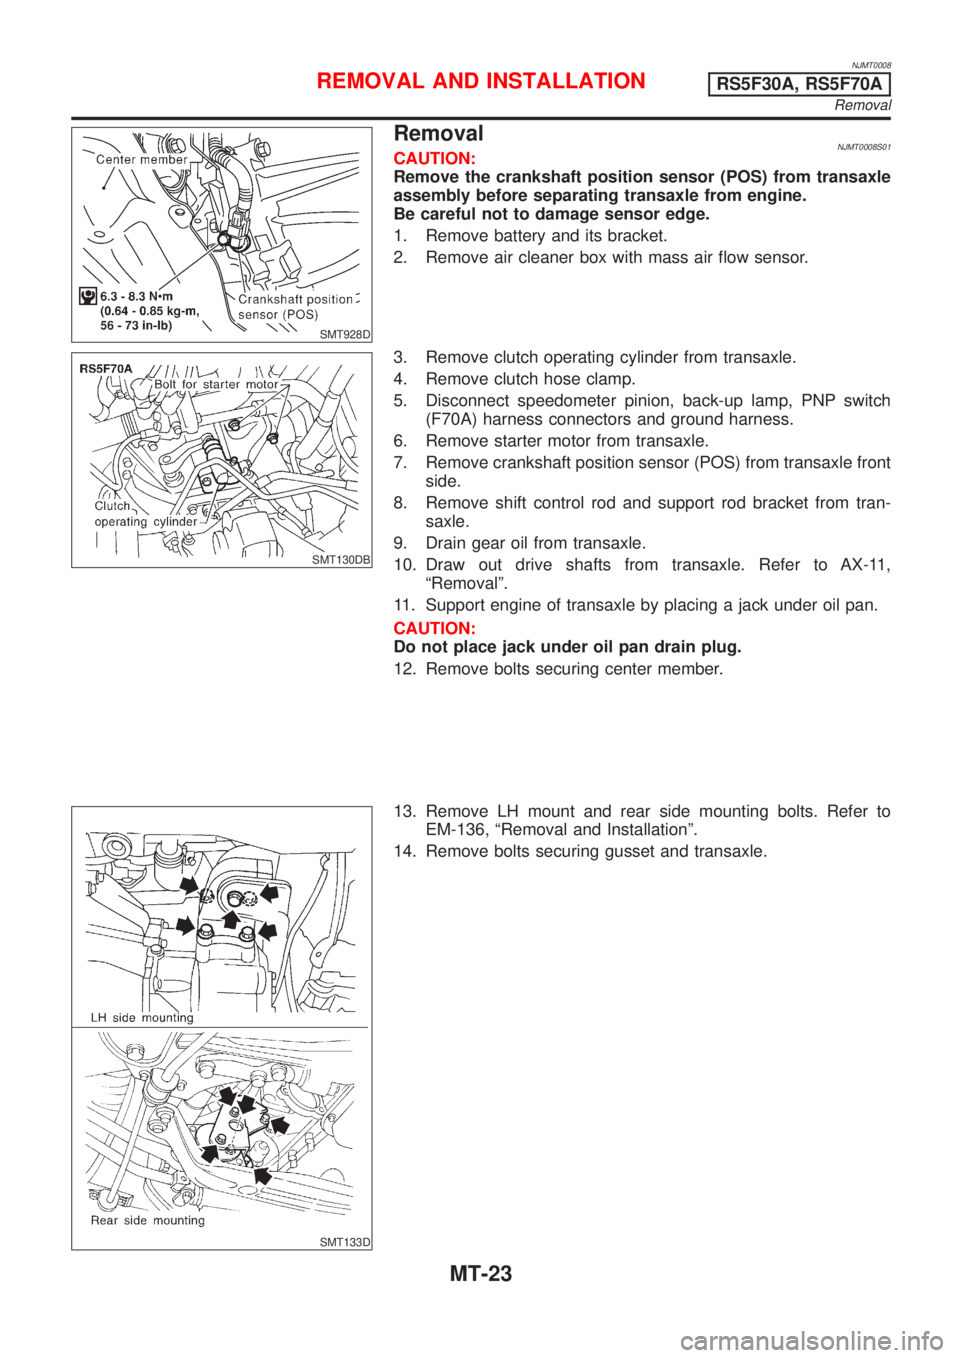
RemovalNJMT0008S01CAUTION:
Remove the crankshaft position sensor (POS) from transaxle
assembly before separating transaxle from engine.
Be careful not to damage sensor edge.
1. Remove battery and its bracket.
2. Remove air cleaner box with mass air flow sensor.
SMT130DB
3. Remove clutch operating cylinder from transaxle.
4. Remove clutch hose clamp.
5. Disconnect speedometer pinion, back-up lamp, PNP switch
(F70A) harness connectors and ground harness.
6. Remove starter motor from transaxle.
7. Remove crankshaft position sensor (POS) from transaxle front
side.
8. Remove shift control rod and support rod bracket from tran-
saxle.
9. Drain gear oil from transaxle.
10. Draw out drive shafts from transaxle. Refer to AX-11,
ªRemovalº.
11. Support engine of transaxle by placing a jack under oil pan.
CAUTION:
Do not place jack under oil pan drain plug.
12. Remove bolts securing center member.
SMT133D
13. Remove LH mount and rear side mounting bolts. Refer to
EM-136, ªRemoval and Installationº.
14. Remove bolts securing gusset and transaxle.
REMOVAL AND INSTALLATIONRS5F30A, RS5F70A
Removal
MT-23
Page 1076 of 2493
NJMT0090
SMT928D
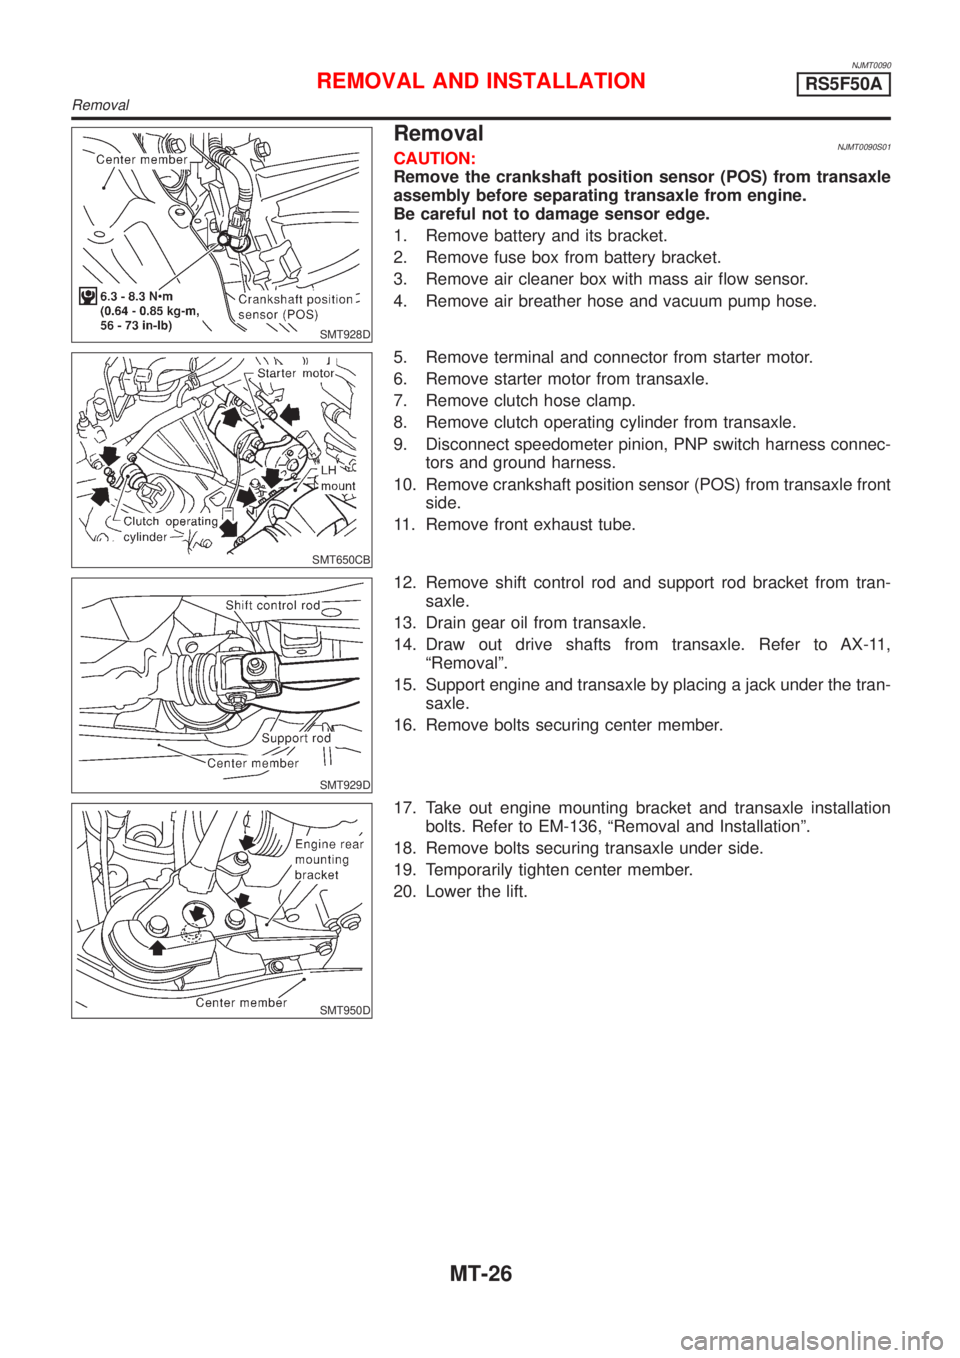
RemovalNJMT0090S01CAUTION:
Remove the crankshaft position sensor (POS) from transaxle
assembly before separating transaxle from engine.
Be careful not to damage sensor edge.
1. Remove battery and its bracket.
2. Remove fuse box from battery bracket.
3. Remove air cleaner box with mass air flow sensor.
4. Remove air breather hose and vacuum pump hose.
SMT650CB
5. Remove terminal and connector from starter motor.
6. Remove starter motor from transaxle.
7. Remove clutch hose clamp.
8. Remove clutch operating cylinder from transaxle.
9. Disconnect speedometer pinion, PNP switch harness connec-
tors and ground harness.
10. Remove crankshaft position sensor (POS) from transaxle front
side.
11. Remove front exhaust tube.
SMT929D
12. Remove shift control rod and support rod bracket from tran-
saxle.
13. Drain gear oil from transaxle.
14. Draw out drive shafts from transaxle. Refer to AX-11,
ªRemovalº.
15. Support engine and transaxle by placing a jack under the tran-
saxle.
16. Remove bolts securing center member.
SMT950D
17. Take out engine mounting bracket and transaxle installation
bolts. Refer to EM-136, ªRemoval and Installationº.
18. Remove bolts securing transaxle under side.
19. Temporarily tighten center member.
20. Lower the lift.
REMOVAL AND INSTALLATIONRS5F50A
Removal
MT-26
Page 1077 of 2493
SMT940D
SMT951D
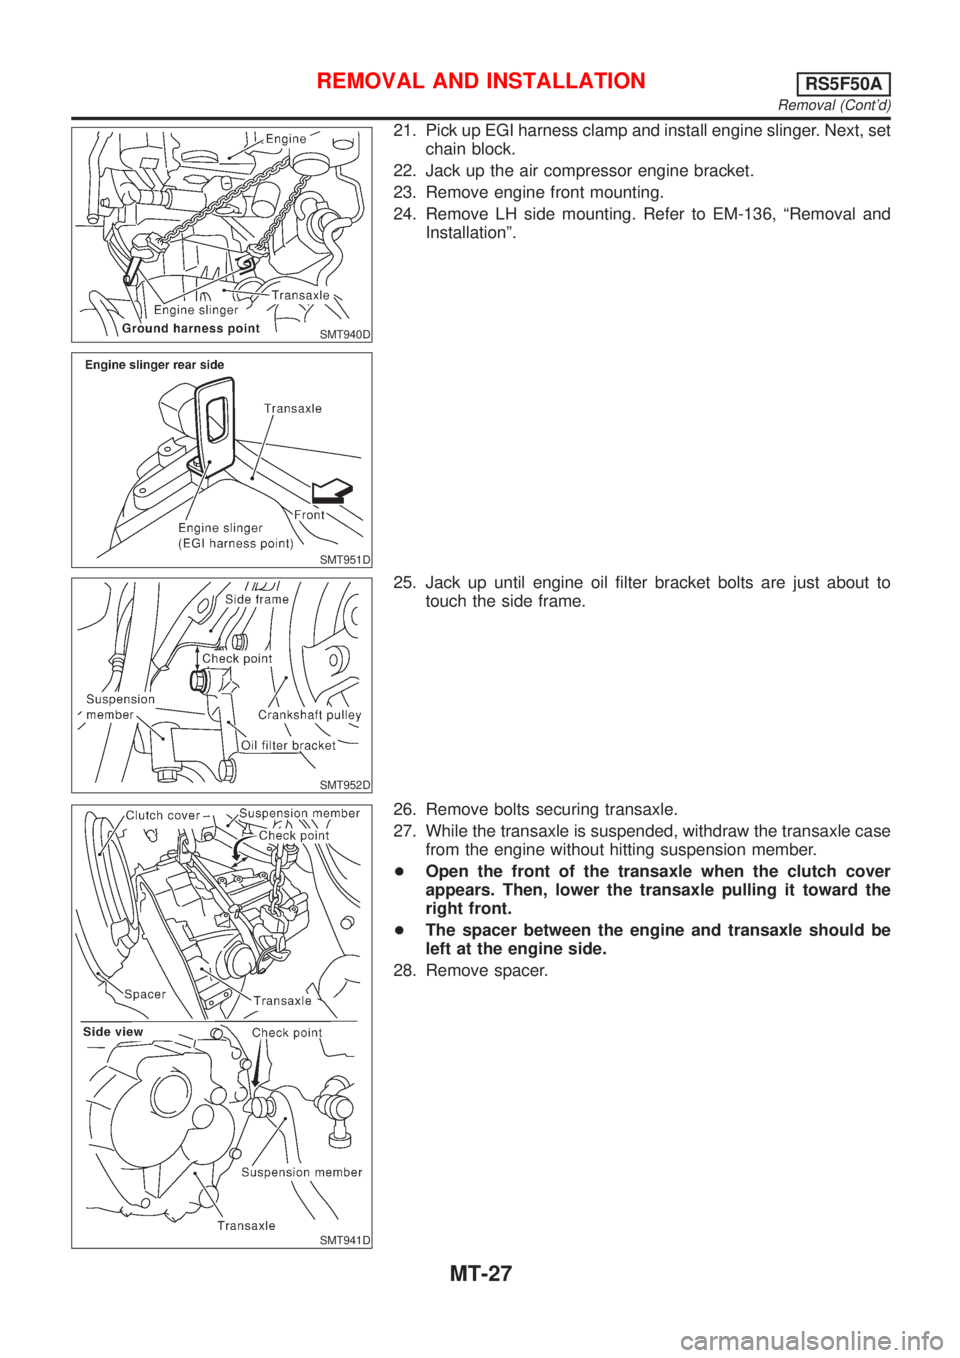
21. Pick up EGI harness clamp and install engine slinger. Next, set
chain block.
22. Jack up the air compressor engine bracket.
23. Remove engine front mounting.
24. Remove LH side mounting. Refer to EM-136, ªRemoval and
Installationº.
SMT952D
25. Jack up until engine oil filter bracket bolts are just about to
touch the side frame.
SMT941D
26. Remove bolts securing transaxle.
27. While the transaxle is suspended, withdraw the transaxle case
from the engine without hitting suspension member.
+Open the front of the transaxle when the clutch cover
appears. Then, lower the transaxle pulling it toward the
right front.
+The spacer between the engine and transaxle should be
left at the engine side.
28. Remove spacer.
REMOVAL AND INSTALLATIONRS5F50A
Removal (Cont'd)
MT-27
Page 1193 of 2493
Supplemental Restraint System (SRS) ªAIR
BAGº and ªSEAT BELT PRE-TENSIONERº
NJAT0249The Supplemental Restraint System such as ªAIR BAGº and ªSEAT BELT PRE-TENSIONERº used along with
a seat belt, helps to reduce the risk or severity of injury to the driver and front passenger for certain types of
collision. The SRS system composition which is available to NISSAN MODEL N16 is as follows (The compo-
sition varies according to the destination and optional equipment.):
+For a frontal collision
The Supplemental Restraint System consists of driver air bag module (located in the center of the steer-
ing wheel), front passenger air bag module (located on the instrument panel on passenger side), front seat
belt pre-tensioners, a diagnosis sensor unit, warning lamp, wiring harness and spiral cable.
+For a side collision
The Supplemental Restraint System consists of front side air bag module (located in the outer side of front
seat), side air bag (satellite) sensor, diagnosis sensor unit (one of components of air bags for a frontal
collision), wiring harness, warning lamp (one of components of air bags for a frontal collision).
Information necessary to service the system safely is included in theRS sectionof this Service Manual.
WARNING:
+To avoid rendering the SRS inoperative, which could increase the risk of personal injury or death
in the event of a collision which would result in air bag inflation, all maintenance should be per-
formed by an authorized NISSAN dealer.
+Improper maintenance, including incorrect removal and installation of the SRS, can lead to per-
sonal injury caused by unintentional activation of the system. For removal of Spiral Cable and Air
Bag Module, see the RS section.
+Do not use electrical test equipment on any circuit related to the SRS unless instructed to in this
Service Manual. Spiral cable and wiring harnesses covered with yellow insulation tape either just
before the harness connectors or for the complete harness are related to the SRS.
Precautions for On Board Diagnostic (EURO-
OBD) System of A/T and Engine Ð Euro-OBD
Ð
NJAT0245The ECM has an on board diagnostic system. It will light up the malfunction indicator lamp (MIL) to warn the
driver of a malfunction causing emission deterioration.
CAUTION:
+Be sure to turn the ignition switch ªOFFº and disconnect the negative battery terminal before any
repair or inspection work. The open/short circuit of related switches, sensors, solenoid valves, etc.
will cause the MIL to light up.
+Be sure to connect and lock the connectors securely after work. A loose (unlocked) connector will
cause the MIL to light up due to an open circuit. (Be sure the connector is free from water, grease,
dirt, bent terminals, etc.)
+Be sure to route and secure the harnesses properly after work. Interference of the harness with a
bracket, etc. may cause the MIL to light up due to a short circuit.
+Be sure to connect rubber tubes properly after work. A misconnected or disconnected rubber tube
may cause the MIL to light up due to a malfunction of the EGR system or fuel injection system,
etc.
+Be sure to erase the unnecessary malfunction information (repairs completed) from the TCM and
ECM before returning the vehicle to the customer.
SEF289H
PrecautionsNJAT0246+Before connecting or disconnecting the TCM harness
connector, turn ignition switch OFF and disconnect nega-
tive battery terminal. Failure to do so may damage the
TCM. Because battery voltage is applied to TCM even if
ignition switch is turned off.
PRECAUTIONS
Supplemental Restraint System (SRS) ªAIR BAGº and ªSEAT BELT PRE-TENSIONERº
AT-7
Page 1224 of 2493
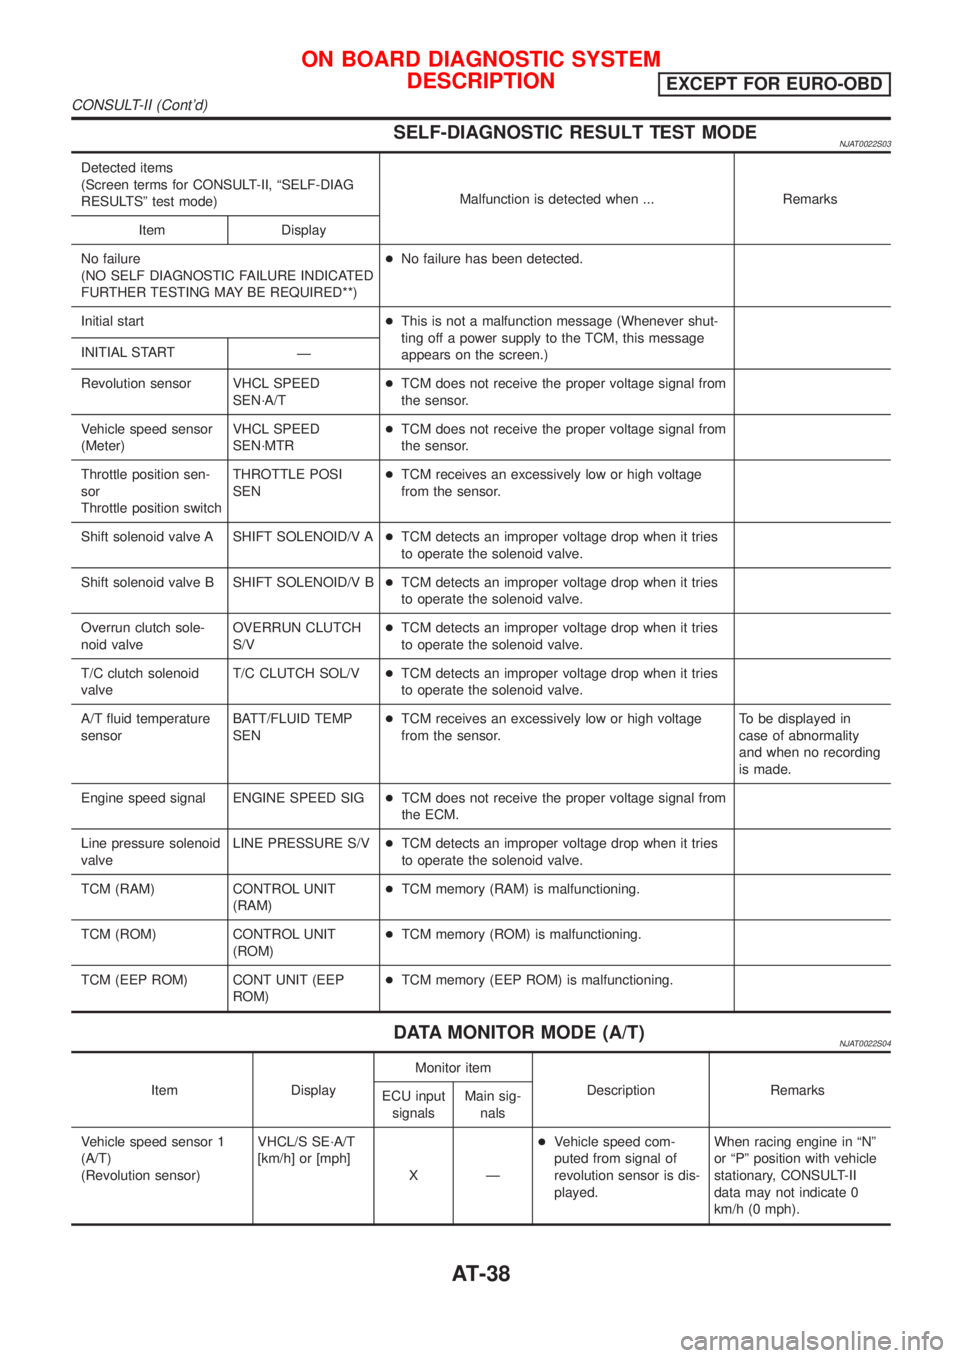
SELF-DIAGNOSTIC RESULT TEST MODENJAT0022S03
Detected items
(Screen terms for CONSULT-II, ªSELF-DIAG
RESULTSº test mode)Malfunction is detected when ... Remarks
Item Display
No failure
(NO SELF DIAGNOSTIC FAILURE INDICATED
FURTHER TESTING MAY BE REQUIRED**)+No failure has been detected.
Initial start+This is not a malfunction message (Whenever shut-
ting off a power supply to the TCM, this message
appears on the screen.) INITIAL START
Ð
Revolution sensor VHCL SPEED
SEN´A/T+TCM does not receive the proper voltage signal from
the sensor.
Vehicle speed sensor
(Meter)VHCL SPEED
SEN´MTR+TCM does not receive the proper voltage signal from
the sensor.
Throttle position sen-
sor
Throttle position switchTHROTTLE POSI
SEN+TCM receives an excessively low or high voltage
from the sensor.
Shift solenoid valve A SHIFT SOLENOID/V A+TCM detects an improper voltage drop when it tries
to operate the solenoid valve.
Shift solenoid valve B SHIFT SOLENOID/V B+TCM detects an improper voltage drop when it tries
to operate the solenoid valve.
Overrun clutch sole-
noid valveOVERRUN CLUTCH
S/V+TCM detects an improper voltage drop when it tries
to operate the solenoid valve.
T/C clutch solenoid
valveT/C CLUTCH SOL/V+TCM detects an improper voltage drop when it tries
to operate the solenoid valve.
A/T fluid temperature
sensorBATT/FLUID TEMP
SEN+TCM receives an excessively low or high voltage
from the sensor.To be displayed in
case of abnormality
and when no recording
is made.
Engine speed signal ENGINE SPEED SIG+TCM does not receive the proper voltage signal from
the ECM.
Line pressure solenoid
valveLINE PRESSURE S/V+TCM detects an improper voltage drop when it tries
to operate the solenoid valve.
TCM (RAM) CONTROL UNIT
(RAM)+TCM memory (RAM) is malfunctioning.
TCM (ROM) CONTROL UNIT
(ROM)+TCM memory (ROM) is malfunctioning.
TCM (EEP ROM) CONT UNIT (EEP
ROM)+TCM memory (EEP ROM) is malfunctioning.
DATA MONITOR MODE (A/T)NJAT0022S04
Item DisplayMonitor item
Description Remarks
ECU input
signalsMain sig-
nals
Vehicle speed sensor 1
(A/T)
(Revolution sensor)VHCL/S SE´A/T
[km/h] or [mph]
XÐ+Vehicle speed com-
puted from signal of
revolution sensor is dis-
played.When racing engine in ªNº
or ªPº position with vehicle
stationary, CONSULT-II
data may not indicate 0
km/h (0 mph).
ON BOARD DIAGNOSTIC SYSTEM
DESCRIPTION
EXCEPT FOR EURO-OBD
CONSULT-II (Cont'd)
AT-38
Page 1225 of 2493
![NISSAN ALMERA N16 2001 Electronic Repair Manual Item DisplayMonitor item
Description Remarks
ECU input
signalsMain sig-
nals
Vehicle speed sensor 2
(Meter)VHCL/S SE´MTR
[km/h] or [mph]
XÐ+Vehicle speed com-
puted from signal of
vehicle speed sens NISSAN ALMERA N16 2001 Electronic Repair Manual Item DisplayMonitor item
Description Remarks
ECU input
signalsMain sig-
nals
Vehicle speed sensor 2
(Meter)VHCL/S SE´MTR
[km/h] or [mph]
XÐ+Vehicle speed com-
puted from signal of
vehicle speed sens](/manual-img/5/57351/w960_57351-1224.png)
Item DisplayMonitor item
Description Remarks
ECU input
signalsMain sig-
nals
Vehicle speed sensor 2
(Meter)VHCL/S SE´MTR
[km/h] or [mph]
XÐ+Vehicle speed com-
puted from signal of
vehicle speed sensor is
displayed.Vehicle speed display may
not be accurate under
approx. 10 km/h (6 mph).
It may not indicate 0 km/h
(0 mph) when vehicle is
stationary.
Throttle position sensor THRTL POS SEN
[V] X Ð+Throttle position sensor
signal voltage is dis-
played.
A/T fluid temperature sen-
sorFLUID TEMP SE
[V]
XÐ+A/T fluid temperature
sensor signal voltage is
displayed.
+Signal voltage lowers as
fluid temperature rises.
Battery voltage BATTERY VOLT
[V]XÐ+Source voltage of TCM
is displayed.
Engine speed ENGINE SPEED
[rpm]
XX+Engine speed, com-
puted from engine
speed signal, is dis-
played.Engine speed display may
not be accurate under
approx. 800 rpm. It may
not indicate 0 rpm even
when engine is not run-
ning.
Overdrive control switch OVERDRIVE SW
[ON/OFF]
XÐ+ON/OFF state com-
puted from signal of
overdrive control SW is
displayed.
P/N position switch PN POSI SW
[ON/OFF]
XÐ+ON/OFF state com-
puted from signal of P/N
position SW is dis-
played.
R position switch R POSITION SW
[ON/OFF]
XÐ+ON/OFF state com-
puted from signal of R
position SW is dis-
played.
D position switch D POSITION SW
[ON/OFF]
XÐ+ON/OFF state com-
puted from signal of D
position SW is dis-
played.
2 position switch 2 POSITION SW
[ON/OFF]
XÐ+ON/OFF status, com-
puted from signal of 2
position SW, is dis-
played.
1 position switch 1 POSITION SW
[ON/OFF]
XÐ+ON/OFF status, com-
puted from signal of 1
position SW, is dis-
played.
ASCD cruise signal ASCD-CRUISE
[ON/OFF]
XÐ+Status of ASCD cruise
signal is displayed.
ON ... Cruising state
OFF ... Normal running
state+This is displayed even
when no ASCD is
mounted.
ON BOARD DIAGNOSTIC SYSTEM
DESCRIPTION
EXCEPT FOR EURO-OBD
CONSULT-II (Cont'd)
AT-39