Page 109 of 317
106 Interior equipment
Te ch n ica l
data Instruments
and controlsOperationDrivingInstrument
cluster displayPractical hints Car care Index
Rear quarter windows (optional on ML 320 and 430)
Switches located on front center console
The rear quarter windows can be operated with key in
steering lock position 1 or 2.
1Push to open.
2Push to close.Note:
After turning off the engine the rear quarter windows
can be operated for approximately 30 minutes or until a
front door is opened.
12
Wa r n i n g !
When closing the windows, be sure that there is no
danger of anyone being harmed by the closing
procedure.When leaving the vehicle, always remove the key
from the steering lock, and lock the vehicle. Do not
leave children unattended in the vehicle, or with
access to an unlocked vehicle. Unsupervised use of
vehicle equipment can cause serious personal
injury.
Page 110 of 317

107 Interior equipment
Te ch n ica l
data Instruments
and controlsOperationDrivingInstrument
cluster displayPractical hints Car care Index Sliding /pop-up roof (optional)
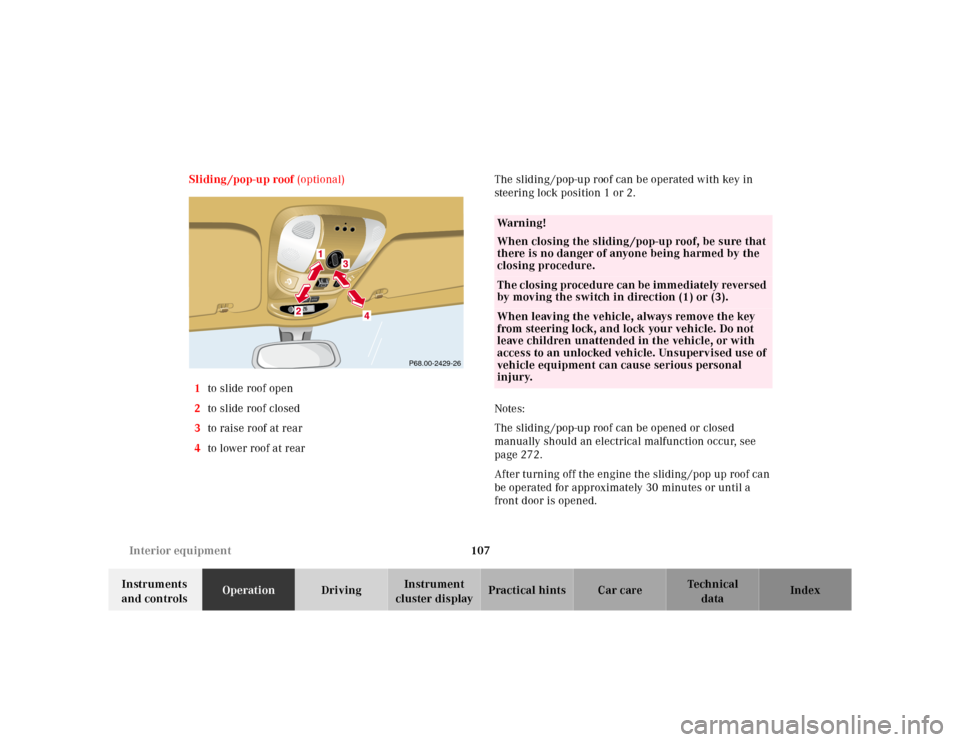
1to slide roof open
2to slide roof closed
3to raise roof at rear
4to lower roof at rearThe sliding /pop-up roof can be operated with key in
steering lock position 1 or 2.
Notes:
The sliding /pop-up roof can be opened or closed
manually should an electrical malfunction occur, see
page 272.
After turning off the engine the sliding /pop up roof can
be operated for approximately 30 minutes or until a
front door is opened.
RESETMODE
P68.00-2429-26
Wa r n i n g !
When closing the sliding /pop-up roof, be sure that
there is no danger of anyone being harmed by the
closing procedure.The closing procedure can be immediately reversed
by moving the switch in direction (1) or (3).When leaving the vehicle, always remove the key
from steering lock, and lock your vehicle. Do not
leave children unattended in the vehicle, or with
access to an unlocked vehicle. Unsupervised use of
vehicle equipment can cause serious personal
injury.
Page 112 of 317

109 Interior equipment
Te ch n ica l
data Instruments
and controlsOperationDrivingInstrument
cluster displayPractical hints Car care Index Skyview Top (optional)
The Skyview Top can be operated with key in steering
lock position 1 or 2.
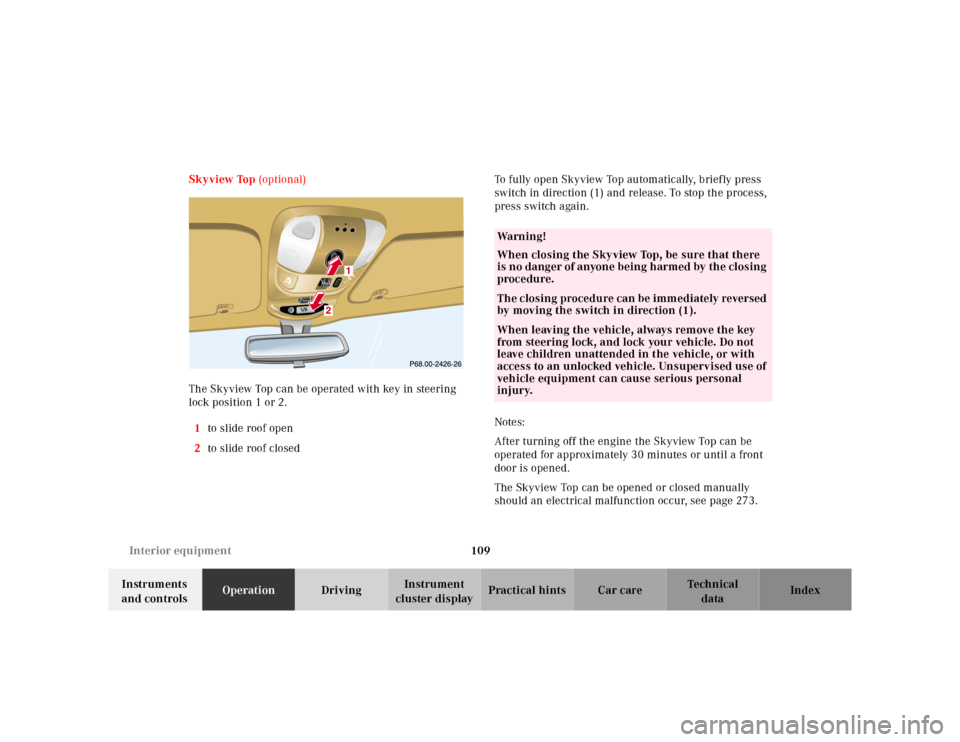
1to slide roof open
2to slide roof closedTo fully open Skyview Top automatically, brief ly press
switch in direction (1) and release. To stop the process,
press switch again.
Notes:
After turning off the engine the Skyview Top can be
operated for approximately 30 minutes or until a front
door is opened.
The Skyview Top can be opened or closed manually
should an electrical malfunction occur, see page 273.
RESETMODE
Wa r n i n g !
When closing the Skyview Top, be sure that there
is no danger of anyone being h armed by th e closing
procedure.The closing procedure can be immediately reversed
by moving the switch in direction (1).When leaving the vehicle, always remove the key
from steering lock, and lock your vehicle. Do not
leave children unattended in the vehicle, or with
access to an unlocked vehicle. Unsupervised use of
vehicle equipment can cause serious personal
injury.
Page 116 of 317
113 Interior equipment
Te ch n ica l
data Instruments
and controlsOperationDrivingInstrument
cluster displayPractical hints Car care Index Sun visors
Swing sun visors down to protect against sun glare.
If sunlight enters through a side window, disengage
visor from inner mounting, pivot it to the side, and slide
it to the desired position.Illuminated vanity mirrors
With the visor engaged in its inner mounting and with
key in steering lock position 1 or 2, the lamp is switched
on by opening the cover.
Wa r n i n g !
Do not use the vanity mirror while driving.
Page 118 of 317
115 Interior equipment
Te ch n ica l
data Instruments
and controlsOperationDrivingInstrument
cluster displayPractical hints Car care Index Glove box
Pull handle (1) to open.
The glove box is illuminated with key in steering lock
position 1 or 2 when opening the lid.Storage compartment below center armrest
To open compartment:
Press button and lift lid.
To c l o s e :
Lower lid until it engages in lock.
Page 122 of 317
119 Interior equipment
Te ch n ica l
data Instruments
and controlsOperationDrivingInstrument
cluster displayPractical hints Car care Index Lighter
Turn key in steering lock to position 1 or 2. Push in
lighter (1); it will pop out automatically when hot.The lighter socket can be used to accommodate
electrical accessories up to maximum 50 W.
Wa r n i n g !
Never touch the heating element or sides of the
lighter, they are extremely hot, hold at knob only.When leaving the vehicle always remove the key
from the steering lock. Do not leave children
unattended in the vehicle, or with access to an
unlocked vehicle. Unsupervised use of vehicle
equipment may cause serious personal injury.
Page 144 of 317

141 Garage door opener
Te ch n ica l
data Instruments
and controlsOperationDrivingInstrument
cluster displayPractical hints Car care Index For operation in the USA only: This device complies
with Part 15, Subpart C, Section 209 of the FCC Rules.
Operation is subject to the following two conditions:
(1) This device may not cause harmful interference, and
(2) this device must accept any interference received,
including interference that may cause undesired
operation.
WARNING: Changes or modification not expressly
approved by party responsible for compliance could void
the user’s authority to operate the equipment.
Programming or reprogramming the integrated
remote control:
1. Turn key in steering lock to position 1 or 2.
2. Hold the end of the hand-held transmitter of the
device you wish to train approximately 2 to 5 inches
(5 cm to 12 cm) away from the surface of the
integrated remote control located on the overhead
console, keeping the indicator lamp in view.3. Using both hands, simultaneously push the hand-
held transmitter button and the desired integrated
remote control button. Do not release the buttons
until completing step 4.
4. The indicator lamp on the integrated remote control
will flash, first slowly and then rapidly. When the
indicator lamp flashes rapidly, both buttons may be
released (the rapid flashing lamp indicates
successful programming of the new frequency
signal). To program the remaining two buttons,
follow ste ps 1 through 4.
Note:
If after repeated attempts, you do not successfully
program the integrated remote control device to learn
the signal of the hand-held transmitter, the garage door
opener could be equipped with the “rolling code
feature”.
Page 146 of 317
143 Garage door opener
Te ch n ica l
data Instruments
and controlsOperationDrivingInstrument
cluster displayPractical hints Car care Index Operation of remote control:
1. Turn key in steering lock to position 1 or 2.
2. Select and press the appropriate button to activate
the remote controlled device. The integrated remote
control transmitter continues to send the signal as
long as the button is pressed – up to 20 seconds.Erasing the remote control memory:
1. Turn key in steering lock to position 1 or 2.
2. Simultaneously holding down the left and right side
buttons for approximately 20 seconds, or until the
control lamp blinks rapidly, will erase the codes of
all three channels.