2001 MERCEDES-BENZ E-Class WAGON fuel
[x] Cancel search: fuelPage 109 of 345

106 Multifunction steering wheel, multifunction display
Te ch n ica l
data Instruments
and controlsOperationDrivingInstrument
cluster displayPractical hints Car care Index
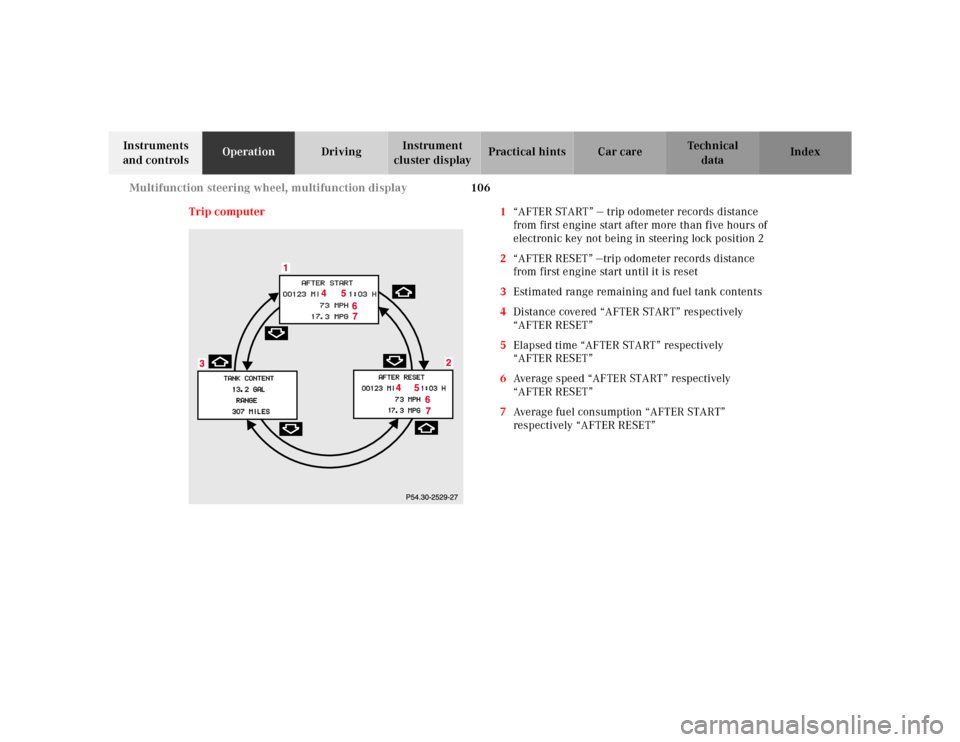
Trip computer 1“AFTER START” — trip odometer records distance
from first engine start after more than five hours of
electronic key not being in steering lock position 2
2“AFTER RESET” —trip odometer records distance
from first engine start until it is reset
3Estimated range remaining and fuel tank contents
4Distance covered “AFTER START” respectively
“AFTER RESET”
5Elapsed time “AFTER START” respectively
“AFTER RESET”
6Average speed “AFTER START” respectively
“AFTER RESET”
7Average fuel consumption “AFTER START”
respectively “AFTER RESET”
Page 110 of 345

107 Multifunction steering wheel, multifunction display
Te ch n ica l
data Instruments
and controlsOperationDrivingInstrument
cluster displayPractical hints Car care Index Press the button è or ÿ repeatedly until the
display (1) appears.
Press the j or k button until the display for trip
odometer memory “AFTER START” (1) and
“AFTER RESET” (2), or the display (3) for estimated
driving range remaining and fuel tank contents
appears.
Important!
The reading in the display “TANK CONTENT” might be
off by approximately +/– 2.2 US qt (2 l). Please refuel in
time.
Pressing the è or ÿ button displays the next or
previous system.
Note:
The “AFTER START” display (1) always appears when
the trip computer is called up.To reset the “AFTER START” (1) or “AFTER RESET” (2)
odometer memory at any time:
Call up the relevant display (1 or 2) using the j or
k button and press theJbutton in the instrument
cluster until the values are reset.
The “AFTER START” trip odometer reading is
automatically reset after four hours of electronic key not
being in steering lock position 2.
Page 132 of 345

129 Automatic climate control
Te ch n ica l
data Instruments
and controlsOperationDrivingInstrument
cluster displayPractical hints Car care Index Basic setting - Automatic mode
Press left and right U button for automatic mode.
Simultaneously press both f and g buttons for
temperature setting of 72°F.
QAir volume and distribution are controlled
automatically.
This setting can be used all year around.
Economy
The function of this setting corresponds to the
automatic mode. However, because the air conditioning
compressor will not engage (fuel savings), it is not
possible to air condition in this setting.
Press S button to activate.
Press S button once again to return to previous
setting.Special settings
(use only for short duration)
Defogging windows
Switch off O button.
Press left and right U buttons.
Press b button repeatedly until air is directed
upward.
STurn wheels (2) to position to open left and right
defroster outlets (5).
Defrosting
Turn wheels (2) to position l to open left and right
defroster outlets (5).
Press P button. Maximum heated and automatically
controlled amount of air is directed to the windshield
and side windows.PPress P button once again to return to previous
setting.
Page 186 of 345

183 Contents - Driving
Te ch n ica l
data Instruments
and controlsOperationDrivingInstrument
cluster displayPractical hints Car care Index
DrivingControl and operation of radio
transmitters ............................... 184
The first 1 000 miles
(1 500 km) ................................. 185
Maintenance ................................... 185
Tele Aid............................................ 186
Catalytic converter......................... 196
Emission control ............................ 197
Steering lock ................................... 198
Starting and turning off
the engine .................................. 200
Automatic transmission................ 201
Parking brake ................................. 210Driving instructions....................... 211
Drive sensibly -
Save Fuel ...................................... 211
Drinking and Driving ................ 211
Pedals ........................................... 211
Power assistance .........................212
Brakes ...........................................212
Driving off ....................................213
Parking .........................................213
Tires ..............................................214
Snow chains ................................ 216
Winter driving instructions ......217
Block heater .................................218
Deep water ...................................219
Passenger compartment ............219
Traveling abroad ......................... 219Cruise control ................................. 220
Brake assist system
(BAS) ........................................... 223
Antilock brake system
(ABS) ........................................... 225
Four wheel electronic
traction system
(4MATIC) .................................... 227
Electronic stability
program
(ESP) ........................................... 228
Parking assist (Parktronic) .......... 232
What you should know
at the gas station ....................... 237
Check regularly and
before a long trip....................... 239
Page 193 of 345

190 Tele Aid
Te ch n ica l
data Instruments
and controlsOperationDrivingInstrument
cluster displayPractical hints Car care Index
Roadside Assistance button •
Located below the center armrest cover is the Roadside
Assistance button•. Pressing and holding the
button (for longer than 2 seconds) will initiate a call to a
Mercedes-Benz Roadside Assistance dispatcher. The
button will flash while the call is in progress. The
message “ROADSIDE ASSISTANCE – CONNECTING
CALL” will appear in the multifunction display. When
the connection is established, the message “ROADSIDE
ASSISTANCE – CALL CONNECTED” appears in the
multifunction display. The Tele Aid system will transmit
data generating the vehicle identification number,
model, color and location (subject to availability of
cellular and GPS signals).
A voice connection between the Roadside Assistance
dispatcher and the occupants of the vehicle will be
established. When a voice connection is established the
audio system mutes and the message “TELE AID –
ROADSIDE ASSISTANCE CALL ACTIVE” appears in the
multifunction display. The nature of the need for
assistance can then be described. The Mercedes-Benz
Roadside assistance dispatcher will either dispatch a
qualified Mercedes-Benz technician or arrange to tow
your vehicle to the nearest Mercedes-Benz Center. For services such as labor and/or towing charges may
apply. Refer to the Roadside Assistance manual for more
information.
These programs are only available in the USA:
•Sign and Drive services: Services such as jump start,
a few gallons of fuel or the replacement of a f lat tire
with the vehicle spare tire are obtainable,
•Remote Vehicle Diagnostics: This function permits
the Mercedes-Benz Roadside Assistance dispatcher
to download malfunction codes and actual vehicle
data.
Notes:
The indicator lamp in the Roadside Assistance
button• remains illuminated in red for approx.
10 seconds during the system self-check after turning
electronic key in starter switch to position 2 (together
with the “SOS” button and the Information
button¡).
See system self-check on page 186 when the indicator
lamp does not light up in red or stays on longer than
approximately 10 seconds.
Page 199 of 345

196 Catalytic converter
Te ch n ica l
data Instruments
and controlsOperationDrivingInstrument
cluster displayPractical hints Car care Index
Catalytic converter
Your Mercedes-Benz is equipped with monolithic type
catalytic converters, an important element in
conjunction with the oxygen sensors to achieve
substantial control of the pollutants in the exhaust
emissions. Keep your vehicle in proper operating
condition by following our recommended maintenance
instructions as outlined in your Service Booklet.
Caution!
To prevent damage to the catalytic converters, use only
premium unleaded gasoline in this vehicle.
Any noticeable irregularities in engine operation should
be repaired promptly. Otherwise, excessive unburned
fuel may reach the catalytic converter causing it to
overheat, which could start a fire.
Wa r n i n g !
As with any vehicle, do not idle, park or operate
this vehicle in areas where combustible materials
such as grass, hay or leaves can come into contact
with the hot exhaust system, as these materials
could be ignited and cause a vehicle fire.
Page 214 of 345

211 Driving instructions
Te ch n ica l
data Instruments
and controlsOperationDrivingInstrument
cluster displayPractical hints Car care Index Driving instructions
Drive sensibly - Save Fuel
Fuel consumption, to a great extent, depends on driving
habits and operating conditions.
To save fuel you should:
•keep tires at the recommended inflation pressures,
•remove unnecessary loads,
•remove roof rack when not in use,
•allow engine to warm up under low load use,
•avoid frequent acceleration and deceleration,
•have all maintenance work performed at regular
intervals by an authorized Mercedes-Benz Center.
Fuel consumption is also increased by driving in cold
weather, in stop-and-go traffic, on short trips and in hilly
country.Drinking and Driving
Pedals
Wa r n i n g !
Drinking or taking drugs and driving can be a very
dangerous combination. Even a small amount of
alcohol or drugs can affect your reflexes,
perceptions and judgement.The possibility of a serious or even fatal accident is
sharply increased when you drink or take drugs
and drive.Please don‘t drink and driver take drugs or allow
anyone to drive after drinking or taking drugs.Wa r n i n g !
Keep driver‘s foot area clear at all times. Objects
stored in this area may impair pedal movement.
Page 240 of 345

237 What you should know at the gas station
Te ch n ica l
data Instruments
and controlsOperationDrivingInstrument
cluster displayPractical hints Car care Index What you should know at the gas station
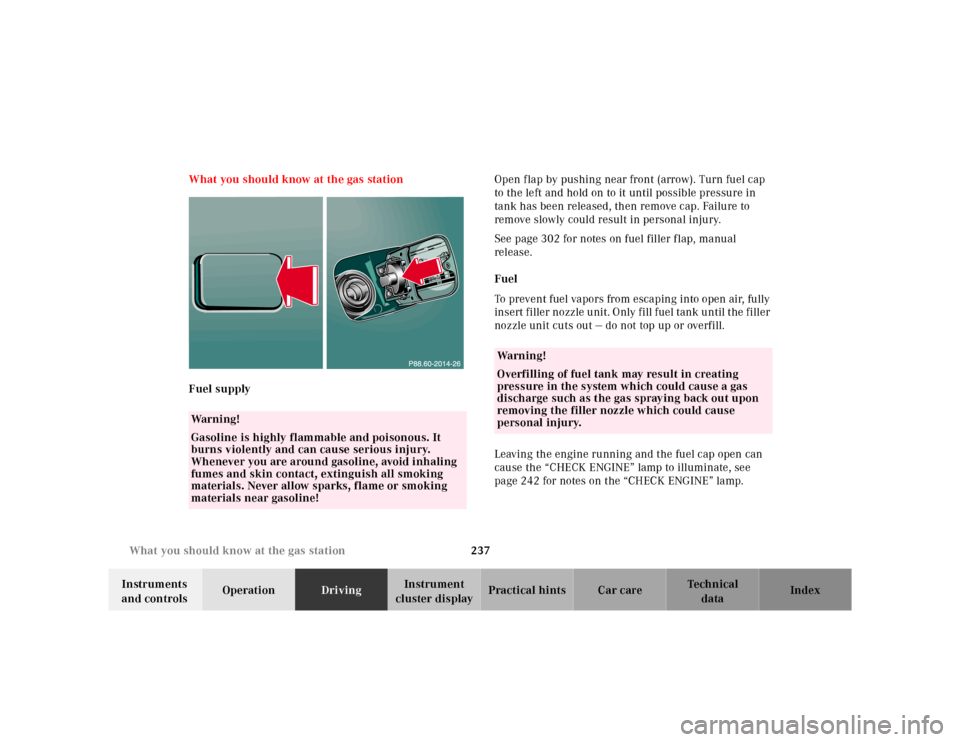
Fuel supplyOpen flap by pushing near front (arrow). Turn fuel cap
to the left and hold on to it until possible pressure in
tank has been released, then remove cap. Failure to
remove slowly could result in personal injury.
See page 302 for notes on fuel filler flap, manual
release.
Fuel
To prevent fuel vapors from escaping into open air, fully
insert filler nozzle unit. Only fill fuel tank until the filler
nozzle unit cuts out — do not top up or overfill.
Leaving the engine running and the fuel cap open can
cause the “CHECK ENGINE” lamp to illuminate, see
page 242 for notes on the “CHECK ENGINE” lamp.
Wa r n i n g !
Gasoline is highly flammable and poisonous. It
burns violently and can cause serious injury.
Whenever you are around gasoline, avoid inhaling
fumes and skin contact, extinguish all smoking
materials. Never allow sparks, flame or smoking
materials near gasoline!
Wa r n i n g !
Overfilling of fuel tank may result in creating
pressure in the system which could cause a gas
discharge such as the gas spraying back out upon
removing the filler nozzle which could cause
personal injury.