Page 196 of 381
187 Interior equipment
Te ch n i c a l
data Instruments
and controlsOperationDrivingInstrument
cluster displayPractical hints Car care Index Sliding/pop-up roof
1to slide roof open
2to slide roof closed
3to raise roof at rear
4to lower roof at rearTurn the electronic key in starter switch to position 1
or 2.
To open, close, raise or lower the sliding/pop-up roof:
Move the switch to resistance point in the required
direction.
Release the switch when the roof has reached the
required position.
Wa r n i n g !
When closing the sliding / pop-up roof, be sure that
there is no danger of anyone being harmed by the
closing procedure.When leaving the vehicle, always remove the
electronic key from starter switch, and lock your
vehicle. Do not leave children unattended in the
vehicle, or with access to an unlocked vehicle.
Unsupervised use of vehicle equipment can cause
serious personal injury.
Page 197 of 381

188 Interior equipment
Te ch n i c a l
data Instruments
and controlsOperationDrivingInstrument
cluster displayPractical hints Car care Index
Opening or closing the sliding / pop-up roof
automatically
Move the switch past resistance point in the direction
required and release.
The sliding / pop-up roof opens or closes completely.
Stopping the sliding / pop-up roof:
Move the switch in any direction.
If the movement of the sliding / pop-up roof is blocked
during the closing procedure, the roof will stop and
reopen slightly.With the roof closed or tilted open, a screen can be slid
into the roof opening to guard against sun rays. When
sliding the roof open, the screen will also retract.
Notes:
The sliding / pop-up roof can also be opened and closed
using the summer opening / convenience feature, see
page 29.
To avoid damaging the seals, do not transport any
objects with sharp edges which can stick out of the
sliding / pop-up roof.
The sliding/pop-up roof can be opened or closed
manually should an electrical malfunction occur, see
page 335.
Synchronizing the sliding / pop-up roof
The sliding / pop-up roof must be resynchronized if the
power supply has been interrupted (battery
disconnected or low), the sliding / pop-up roof has been
closed manually or the sliding / pop-up roof does not
open smoothly or malfunctions.
•Press the switch in the “raise” (3) direction, wait
until the sliding / pop-up roof is fully raised at rear
and hold the switch for approximately 1 second.
Wa r n i n g !
When closing the sliding / pop-up roof, be sure that
there is no danger of anyone being harmed by the
closing procedure.When leaving the vehicle, always remove the
electronic key from starter switch, and lock your
vehicle. Do not leave children unattended in the
vehicle, or with access to an unlocked vehicle.
Unsupervised use of vehicle equipment can cause
serious personal injury.
Page 198 of 381

189 Interior equipment
Te ch n i c a l
data Instruments
and controlsOperationDrivingInstrument
cluster displayPractical hints Car care Index Interior lighting
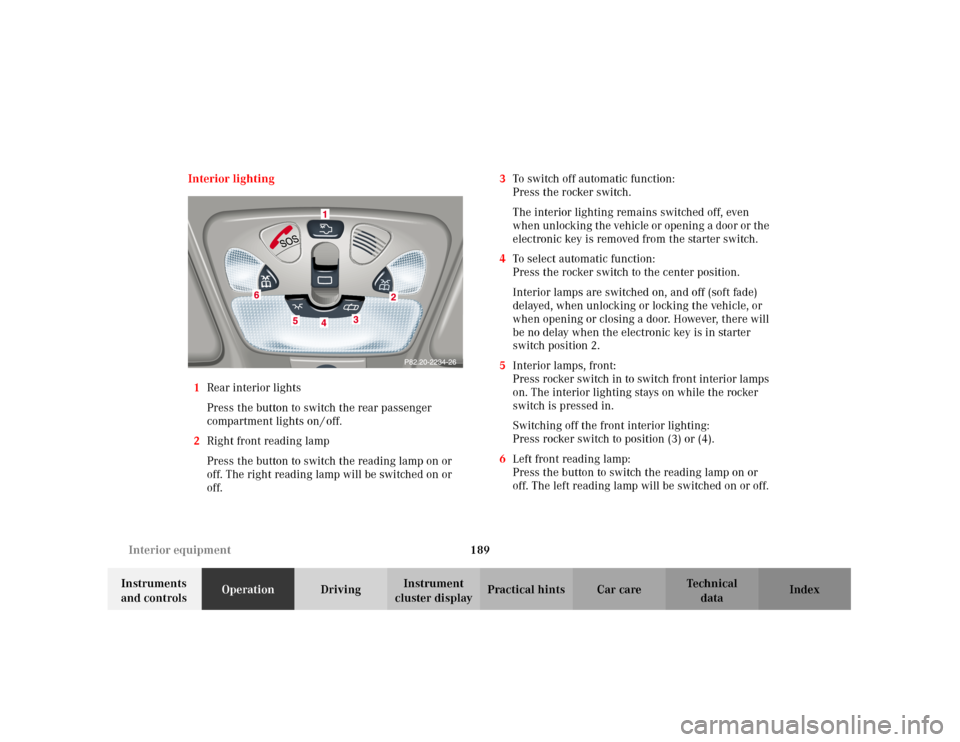
1Rear interior lights
Press the button to switch the rear passenger
compartment lights on / off.
2Right front reading lamp
Press the button to switch the reading lamp on or
off. The right reading lamp will be switched on or
off.3To switch off automatic function:
Press the rocker switch.
The interior lighting remains switched off, even
when unlocking the vehicle or opening a door or the
electronic key is removed from the starter switch.
4To select automatic function:
Press the rocker switch to the center position.
Interior lamps are switched on, and off (soft fade)
delayed, when unlocking or locking the vehicle, or
when opening or closing a door. However, there will
be no delay when the electronic key is in starter
switch position 2.
5Interior lamps, front:
Press rocker switch in to switch front interior lamps
on. The interior lighting stays on while the rocker
switch is pressed in.
Switching off the front interior lighting:
Press rocker switch to position (3) or (4).
6Left front reading lamp:
Press the button to switch the reading lamp on or
off. The left reading lamp will be switched on or off.
Page 200 of 381

191 Interior equipment
Te ch n i c a l
data Instruments
and controlsOperationDrivingInstrument
cluster displayPractical hints Car care Index Rear window sunshade (optional)
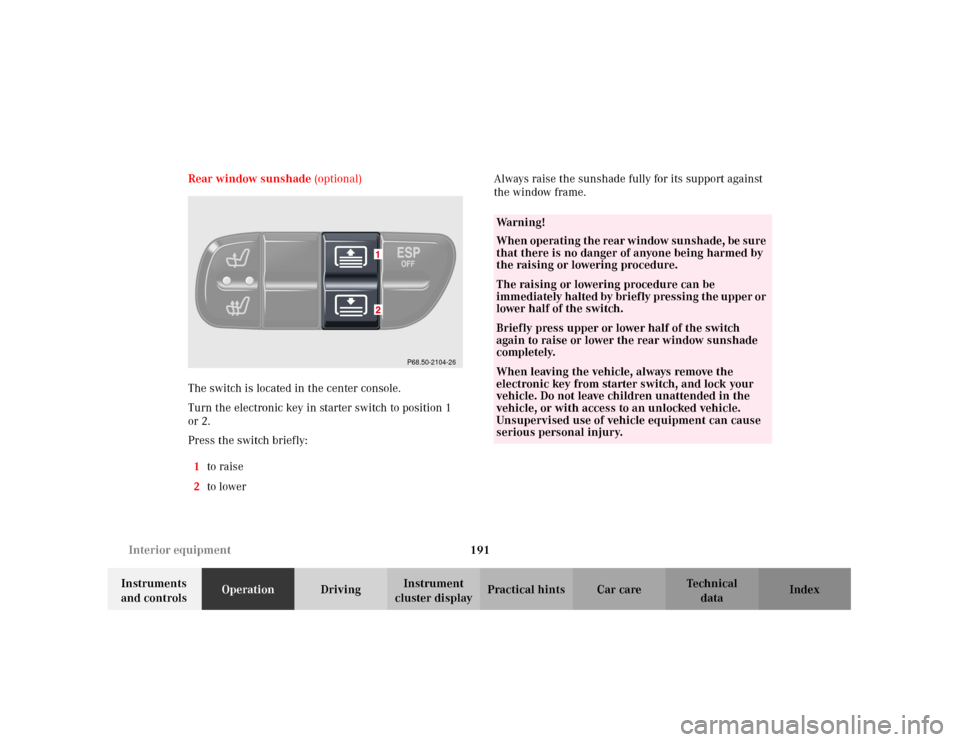
The switch is located in the center console.
Turn the electronic key in starter switch to position 1
or 2.
Press the switch briefly:
1to raise
2to lowerAlways raise the sunshade fully for its support against
the window frame.
P68.50-2104-26
Wa r n i n g !
W hen opera tin g t he rea r w in dow sun sha de, be sure
that there is no danger of anyone being harmed by
the raising or lowering procedure.The raising or lowering procedure can be
immediately halted by briefly pressing the upper or
lower half of the switch.Briefly press upper or lower half of the switch
again to raise or lower the rear window sunshade
completely.When leaving the vehicle, always remove the
electronic key from starter switch, and lock your
vehicle. Do not leave children unattended in the
vehicle, or with access to an unlocked vehicle.
Unsupervised use of vehicle equipment can cause
serious personal injury.
Page 203 of 381
194 Interior equipment
Te ch n i c a l
data Instruments
and controlsOperationDrivingInstrument
cluster displayPractical hints Car care Index
Glove box
1Unlocked positio n
2Locked position
3Glove box
4Glove box lid release
Pull to openNotes:
Prior to closing t he glove box, close t he compartment for
glasses first.
The glove box can be locked and unlocked with the
mechanical key. See page 23 for instructions on how to
remove the mechanical key from the electronic main
key (e.g. for valet parking service).
Page 205 of 381
196 Interior equipment
Te ch n i c a l
data Instruments
and controlsOperationDrivingInstrument
cluster displayPractical hints Car care Index
Storage compartment below the front armrest
To open compartment in armrest:
Lift armrest by handle (6).
To open compartment under armrest:
Lift armrest by handle (7).
To c lo se:
Lower armrest until it engages in lock.To change inclination of armrest:
Pull up on armrest.
To lower armrest:
Pull handle (7).
Notes:
The storage compartment can be heated or cooled, see
page 158.
The compartment can get very warm due to its confined
space. When storing heat sensitive objects in the
compartment, close the air outlet while heating the
passenger compartment.
Do not obstruct the air outlet in the storage
compartment.
Page 216 of 381
207 Interior equipment
Te ch n i c a l
data Instruments
and controlsOperationDrivingInstrument
cluster displayPractical hints Car care Index Enlarged cargo area (optional)
1. Pull handle (1) located in trunk to unlock backrest.
O n vehicles wi t h op ti onal sp li t fold in g rear seat back rest
you can fold down the two sections separately to enlarge
the cargo area.Split folding rear seat bench
2. Pull handle (2) and fold seat cushion (3) forward.
3. Fully retract and fold down head restraints, see
page 52.
4. Fold backrest (4) forward.
Page 217 of 381
208 Interior equipment
Te ch n i c a l
data Instruments
and controlsOperationDrivingInstrument
cluster displayPractical hints Car care Index
Setting up rear seat bench
1. Pull backrest (4) up until it locks in its upright
position. Check for secure locking by pushing and
pulling on the backrest.
The pop-up indicators (5) (left and right backrest
section) are visible in unlocked position. With
backrest sections in upright and locked position, the
indicators (5) are fully lowered.
2. Fold seat cushion (3) back until it locks in place.
Check for secure locking by pressing on the seat
cushion.Note:
To prevent unauthorized persons from access to the
trunk, always lock backrest in its upright position.
Wa r n i n g !
Always lock backrest in its upright position when
rear seat bench is occupied by passengers, cargo is
being carried in the trunk, or the extended cargo
area is not in use.