Page 315 of 381

306 Tires, Wheels
Te ch n i c a l
data Instruments
and controlsOperation DrivingInstrument
cluster displayPractical hintsCar care Index
Wheels
Replace rims or tires with the same designation,
manufacturer and type as shown on the original part.
See your authorized Mercedes-Benz Center for further
information.
See your authorized Mercedes-Benz Center for
information on tested and recommended rims and tires
for summer and winter operation. They can also offer
advice concerning tire service and purchase.
Tire replacement
Front and rear tires should be replaced in sets. Rims
and tires must be of the correct size and type. For
dimensions, see “Technical Data”.
We recommend that you break in new tires for
approximately 60 miles (100 km) at moderate speed.
Wa r n i n g !
The jack is designed exclusively for jacking up the
vehi c le a t the j ack take-up b ra ckets b ui lt i nto eit her
side of the vehicle. To help avoid personal injury,
use the jack only to lift the vehicle during a wheel
change. Never get beneath the vehicle while it is
supported by the jack. Keep hands and feet away
from the area under the lifted vehicle. Always
firmly set parking brake and block wheels before
raising vehicle with jack.Do n ot d is engage parki n g brake w hil e t he vehi c le i s
raised. Be certain that the jack is always vertical
when in use, especially on hills. Always try to use
the jack on level surface. Be sure that the jack arm
is fully seated in the jack take-up bracket. Always
lower the vehicle onto sufficient capacity
jackstands before working under the vehicle.
Page 318 of 381

309 Tires, Wheels
Te ch n i c a l
data Instruments
and controlsOperation DrivingInstrument
cluster displayPractical hintsCar care Index Changing wheels
Wa r n i n g !
The spare wheel rim is for temporary use only. Use
for over a total of 12 000 miles (20 000 km) may
cause wheel rim failure leading to an accident and
possible injuries. The dimensions of the spare wheel are different
from those of road wheels. As a result, the vehicle
handling characteristics change when driving with
a mounted spare wheel.The spare wheel should only be used temporarily,
and replaced with a regular road wheel as quickly
as possible.
Wa r n i n g !
The jack is designed exclusively for jacking up the
vehic l e at t he j a ck ta ke-up brackets bui l t in to ei ther
side of the vehicle. To help avoid personal injury,
use the jack only to lift the vehicle during a wheel
change. Never get beneath the vehicle while it is
supported by the jack. Keep hands and feet away
from the area under the lifted vehicle. Always
firmly set parking brake and block wheels before
raising vehicle with jack.Do not d i sen ga ge park in g b ra ke whi l e the vehic l e is
raised. Be certain that the jack is always vertical
when in use, especially on hills. Always try to use
the jack on level surface. Be sure that the jack arm
is fully seated in the jack take-up bracket. Always
lower the vehicle onto sufficient capacity
jackstands before working under the vehicle.
Page 319 of 381
310 Tires, Wheels
Te ch n i c a l
data Instruments
and controlsOperation DrivingInstrument
cluster displayPractical hintsCar care Index
Move vehicle to a level area which is a safe distance
from the roadway.
1. Set parking brake and turn on hazard warning
flasher.
2. Move selector lever to position “P” and turn off
engine (manual transmission to 1st or reverse gear).
3. Prevent vehicle from rolling away by blocking
wheels with wheel chocks (not supplied with
vehicle) or sizable wood block or stone. When
changing a wheel on a hill, place chocks on the
downhill side blocking both wheels of the other
axle. On an level road, place one chock in front of
and one behind the wheel that is diagonally
opposite to the wheel being changed.4. Vehicles with steel rims
Removal of wheel cover:
Reach into two opening of the wheel cover and pull.
P40.10-2356-26
Page 327 of 381

318 Jump starting
Te ch n i c a l
data Instruments
and controlsOperation DrivingInstrument
cluster displayPractical hintsCar care Index
Note:
After reconnecting the battery also set the clock
(vehicles with COMAND: see COMAND operator’s
manual) resynchronize the front seat head restraints,
the express feature of the power windows, the sliding /
pop-up roof, and the electronic stability program (see
individual settings on page 111, head restraints on
p a ge 4 7 , p owe r w i n d ows o n p a ge 18 4 , s y n ch r o n i z i n g t h e
sliding / pop-up roof on page 188 and electronic
stability program on page 260).
Battery recycling
Batteries contain materials that can harm the
environment with improper disposal.
Large 12 Volt storage batteries contain lead.
Recycling of batteries is the preferred method of
disposal.
Many states require sellers of batteries to accept old
batteries for recycling.Jump starting
Wa r n i n g !
Failure to follow these directions will cause
damage to the electronic components, and can lead
to a battery explosion and severe injury or death.Never lean over batteries while connecting or jump
starting, you might get injured.Battery fluid contains sulfuric acid. Do not allow
this fluid to come in contact with eyes, skin or
clot hin g. In cas e i t d oes , i mm ed ia tely f lus h a f fected
area with water, and seek medical help if
necessary.A battery will also produce hydrogen gas, which is
flammable and very explosive. Keep flames or
sparks away from battery, avoid improper
connection of jumper cables, smoking etc.Read all instructions before proceeding.
Page 330 of 381
321 Towing the vehicle
Te ch n i c a l
data Instruments
and controlsOperation DrivingInstrument
cluster displayPractical hintsCar care Index Note:
If engine does not run after several unsuccessful
starting attempts, have it checked at the nearest
authorized Mercedes-Benz Center.
Excessive unburned fuel may damage the catalytic
converter.Towing the vehicle
Wa r n i n g !
Prior to towing the vehicle with all wheels on the
ground, make certain that the electronic key is in
starter switch position 2.If the electronic key is left in the starter switch
position 0 for an extended period of time, it can no
longer be turned in the switch. In this case, the
steering is locked. To unlock, remove electronic key
from starter switch and reinsert.
Page 331 of 381

322 Towing the vehicle
Te ch n i c a l
data Instruments
and controlsOperation DrivingInstrument
cluster displayPractical hintsCar care Index
Important!
When towing the vehicle, please, note the following:
With the automatic central locking activated and the
electronic key in starter switch position 2, the vehicle
doors lock if the left front wheel as well as the right rear
wheel are turning at vehicle speeds of approximately
9 mph (15 km / h) or more.
To prevent the vehicle door locks from locking,
deactivate the automatic central locking. See
“VEHICLE” under “Individual settings” on page 119.
Towing of the vehicle should only be done using the
properly installed towing eye bolt. Never attach tow
cable, tow rope or tow rod to vehicle chassis, frame
or suspension parts.
Notes:
The selector lever will remain locked in position “P” and
the electronic key cannot be turned in the starter switch
if the battery is disconnected or discharged. See battery
on page 316 or jump starting on page 318.
Transmission selector lever, manually unlocking, see
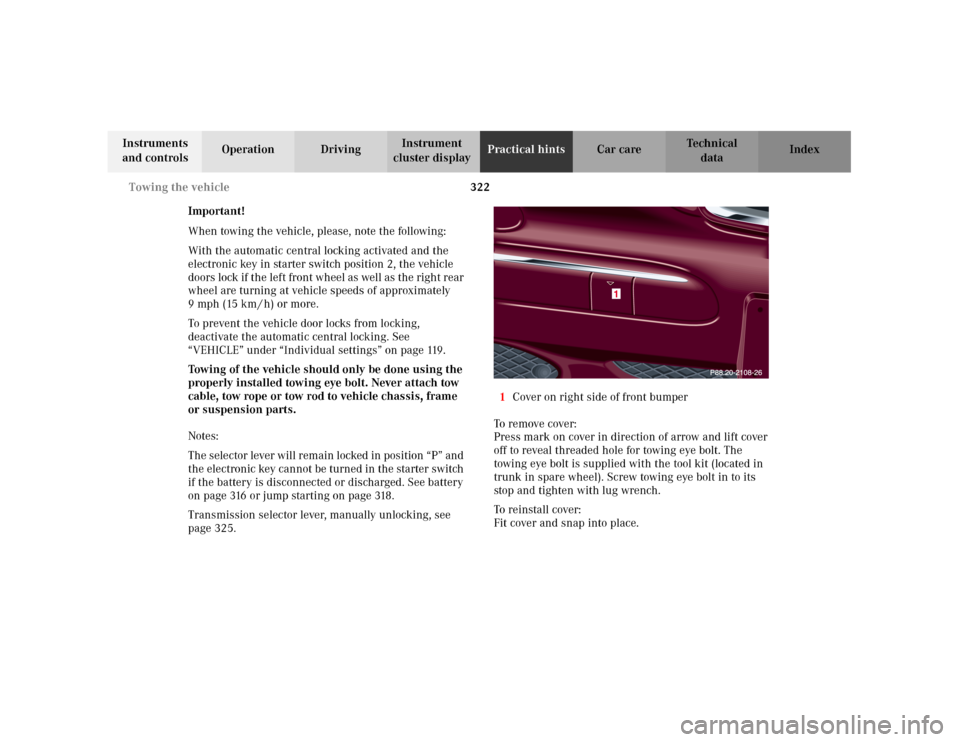
page 325.1Cover on right side of front bumper
To r e m ove c ove r :
Press mark on cover in direction of arrow and lift cover
off to reveal threaded hole for towing eye bolt. The
towing eye bolt is supplied with the tool kit (located in
trunk in spare wheel). Screw towing eye bolt in to its
stop and tighten with lug wrench.
To reinstall cover:
Fit cover and snap into place.
Page 334 of 381
325 Towing the vehicle
Te ch n i c a l
data Instruments
and controlsOperation DrivingInstrument
cluster displayPractical hintsCar care Index Transmission selector lever, manually unlocking
In the case of power failure the transmission selector
lever can be manually unlocked, e.g. to tow the vehicle.To do so, open storage compartment in front of center
armrest.
Using a small coin, release the coin holder (1) and
swing it aside.
Insert a tool (2), e.g. the screw driver, into the opening
below the coin holder. While pushing the tool down,
move selector lever from position “P”.
After removal of the tool from the opening, reinstall the
coin holder.
The selector lever is locked again when moving it to
position “P”.
Page 337 of 381

328 Exterior lamps
Te ch n i c a l
data Instruments
and controlsOperation DrivingInstrument
cluster displayPractical hintsCar care Index
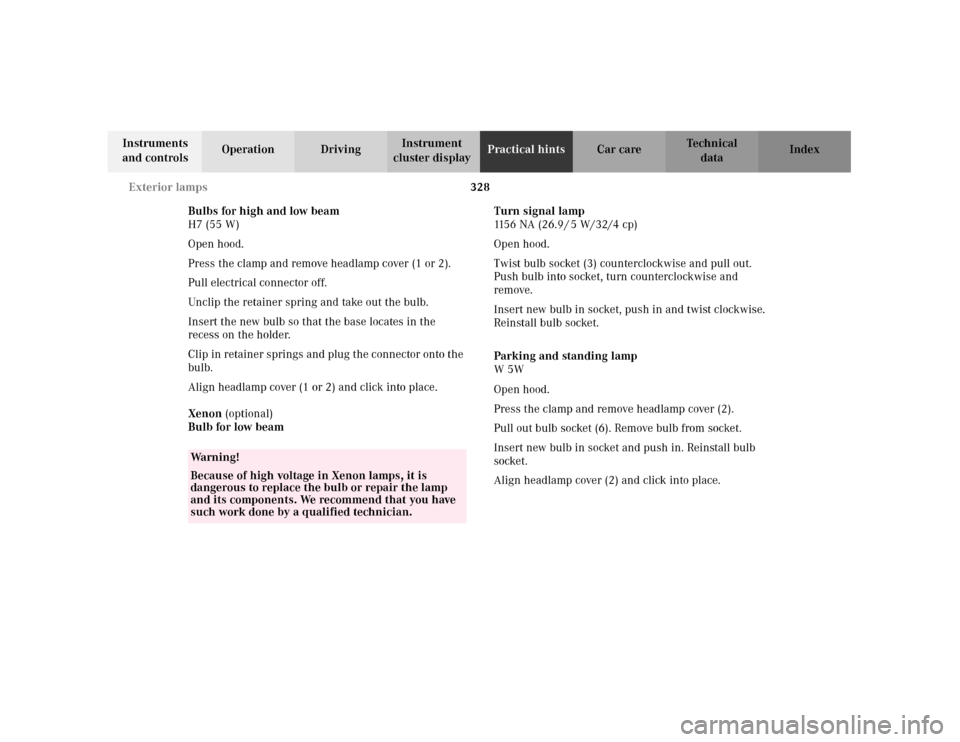
Bulbs for high and low beam
H7 (55 W)
Open hood.
Press the clamp and remove headlamp cover (1 or 2).
Pull electrical connector off.
Unclip the retainer spring and take out the bulb.
Insert the new bulb so that the base locates in the
recess on the holder.
Clip in retainer springs and plug the connector onto the
bulb.
Align headlamp cover (1 or 2) and click into place.
Xenon (optional)
Bulb for low beamTurn signal lamp
1156 NA (26.9 / 5 W/32/4 cp)
Open hood.
Twist bulb socket (3) counterclockwise and pull out.
Push bulb into socket, turn counterclockwise and
remove.
Insert new bulb in socket, push in and twist clockwise.
Reinstall bulb socket.
Parking and standing lamp
W 5W
Open hood.
Press the clamp and remove headlamp cover (2).
Pull out bulb socket (6). Remove bulb from socket.
Insert new bulb in socket and push in. Reinstall bulb
socket.
Align headlamp cover (2) and click into place.
Wa r n i n g !
Because of high voltage in Xenon lamps, it is
dangerous to replace the bulb or repair the lamp
and its components. We recommend that you have
such work done by a qualified technician.