Page 871 of 2395
SEF058Y
DTC Confirmation ProcedureNBEC0194NOTE:
If ªDTC Confirmation Procedureº has been previously conducted,
always turn ignition switch ªOFFº and wait at least 10 seconds
before conducting the next test.
TESTING CONDITION:
Before performing the following procedure, confirm that bat-
tery voltage is more than 10.5V.
WITH CONSULT-IINBEC0194S011) Turn ignition switch ªONº and select ªDATA MONITORº mode
with CONSULT-II.
2) Crank engine for at least two seconds.
3) If 1st trip DTC is detected, go to ªDiagnostic Procedureº,
EC-338.
WITH GSTNBEC0194S02Follow the procedure ªWith CONSULT-IIº above.
DTC P0335 CRANKSHAFT POSITION SENSOR (CKPS) (POS)
DTC Confirmation Procedure
EC-336
Page 872 of 2395
Wiring DiagramNBEC0195
MEC959C
GI
MA
EM
LC
FE
AT
TF
PD
AX
SU
BR
ST
RS
BT
HA
SC
EL
IDX
DTC P0335 CRANKSHAFT POSITION SENSOR (CKPS) (POS)
Wiring Diagram
EC-337
Page 873 of 2395
Diagnostic ProcedureNBEC0196
1 RETIGHTEN GROUND SCREWS
1. Turn ignition switch ªOFFº.
2. Loosen and retighten engine ground screws.
SEF959Y
©GO TO 2.
2 CHECK CKPS (POS) POWER SUPPLY CIRCUIT
1. Disconnect harness connectors E132, E135.
SEF978Y
2. Check voltage between harness connector E135 terminal 6 and ground with CONSULT-II or tester.
SEF979Y
3. Also check harness for short to ground and short to power.
OK or NG
OK©GO TO 4.
NG©GO TO 3.
DTC P0335 CRANKSHAFT POSITION SENSOR (CKPS) (POS)
Diagnostic Procedure
EC-338
Page 874 of 2395

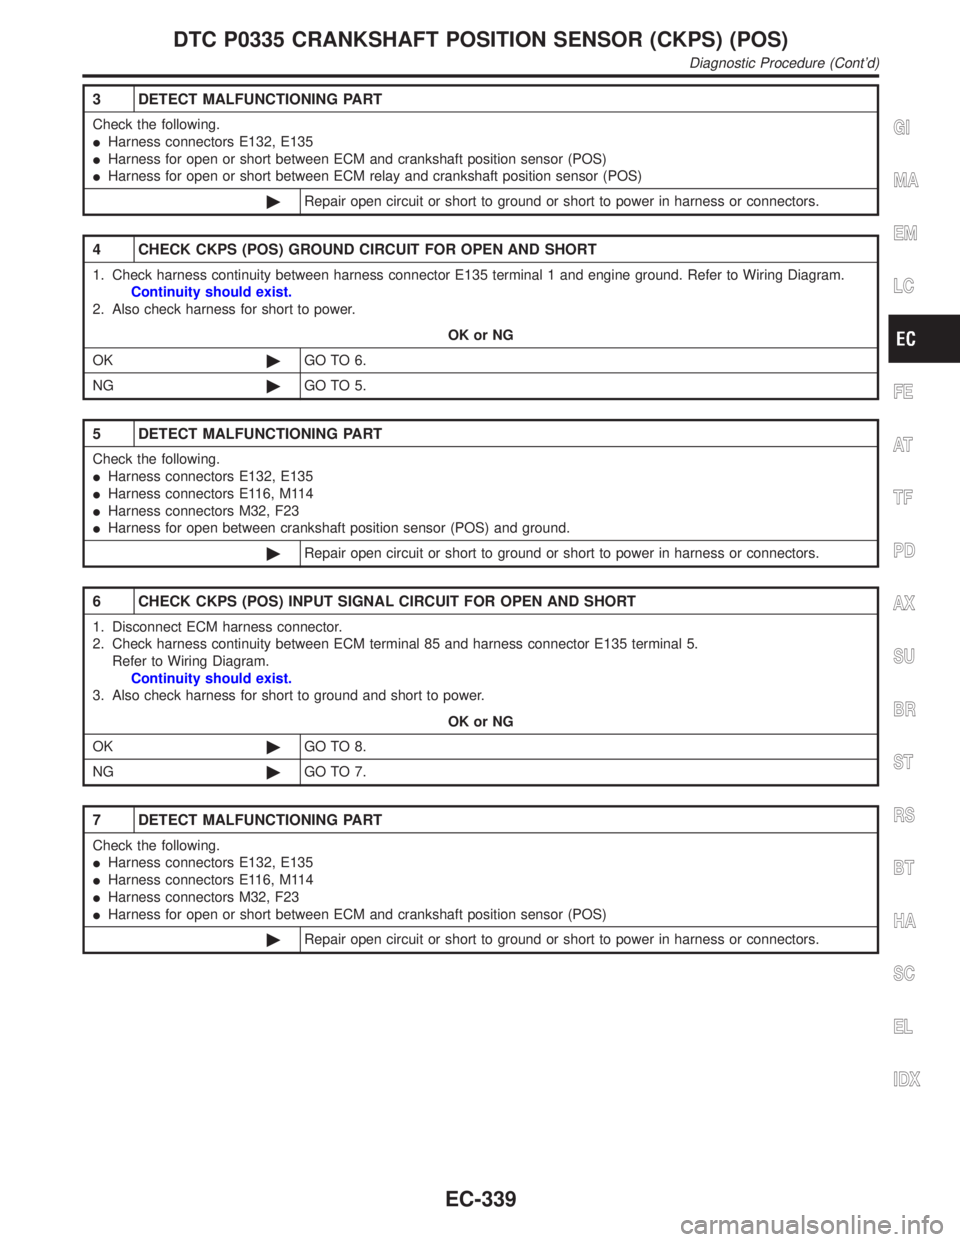
3 DETECT MALFUNCTIONING PART
Check the following.
IHarness connectors E132, E135
IHarness for open or short between ECM and crankshaft position sensor (POS)
IHarness for open or short between ECM relay and crankshaft position sensor (POS)
©Repair open circuit or short to ground or short to power in harness or connectors.
4 CHECK CKPS (POS) GROUND CIRCUIT FOR OPEN AND SHORT
1. Check harness continuity between harness connector E135 terminal 1 and engine ground. Refer to Wiring Diagram.
Continuity should exist.
2. Also check harness for short to power.
OK or NG
OK©GO TO 6.
NG©GO TO 5.
5 DETECT MALFUNCTIONING PART
Check the following.
IHarness connectors E132, E135
IHarness connectors E116, M114
IHarness connectors M32, F23
IHarness for open between crankshaft position sensor (POS) and ground.
©Repair open circuit or short to ground or short to power in harness or connectors.
6 CHECK CKPS (POS) INPUT SIGNAL CIRCUIT FOR OPEN AND SHORT
1. Disconnect ECM harness connector.
2. Check harness continuity between ECM terminal 85 and harness connector E135 terminal 5.
Refer to Wiring Diagram.
Continuity should exist.
3. Also check harness for short to ground and short to power.
OK or NG
OK©GO TO 8.
NG©GO TO 7.
7 DETECT MALFUNCTIONING PART
Check the following.
IHarness connectors E132, E135
IHarness connectors E116, M114
IHarness connectors M32, F23
IHarness for open or short between ECM and crankshaft position sensor (POS)
©Repair open circuit or short to ground or short to power in harness or connectors.
GI
MA
EM
LC
FE
AT
TF
PD
AX
SU
BR
ST
RS
BT
HA
SC
EL
IDX
DTC P0335 CRANKSHAFT POSITION SENSOR (CKPS) (POS)
Diagnostic Procedure (Cont'd)
EC-339
Page 875 of 2395
8 CHECK CKPS (POS) SUB-HARNESS CIRCUIT FOR OPEN AND SHORT
1. Disconnect CKPS (POS) harness connector.
SEF980Y
2. Check harness continuity between CKPS (POS) terminals and harness connector E132 terminals as follows.
MTBL0618
Continuity should exist.
3. Also check harness for short to ground and short to power.
OK or NG
OK©GO TO 9.
NG©Repair open circuit or short to ground or short to power in harness or connectors.
9 CHECK CRANKSHAFT POSITION SENSOR (POS)-I
1. Disconnect crankshaft position sensor (POS) harness connector.
2. Loosen the fixing bolt of the sensor.
3. Remove the sensor.
4. Visually check the sensor for chipping.
SEF981Y
OK or NG
OK©GO TO 10.
NG©Replace crankshaft position sensor (POS).
DTC P0335 CRANKSHAFT POSITION SENSOR (CKPS) (POS)
Diagnostic Procedure (Cont'd)
EC-340
Page 876 of 2395

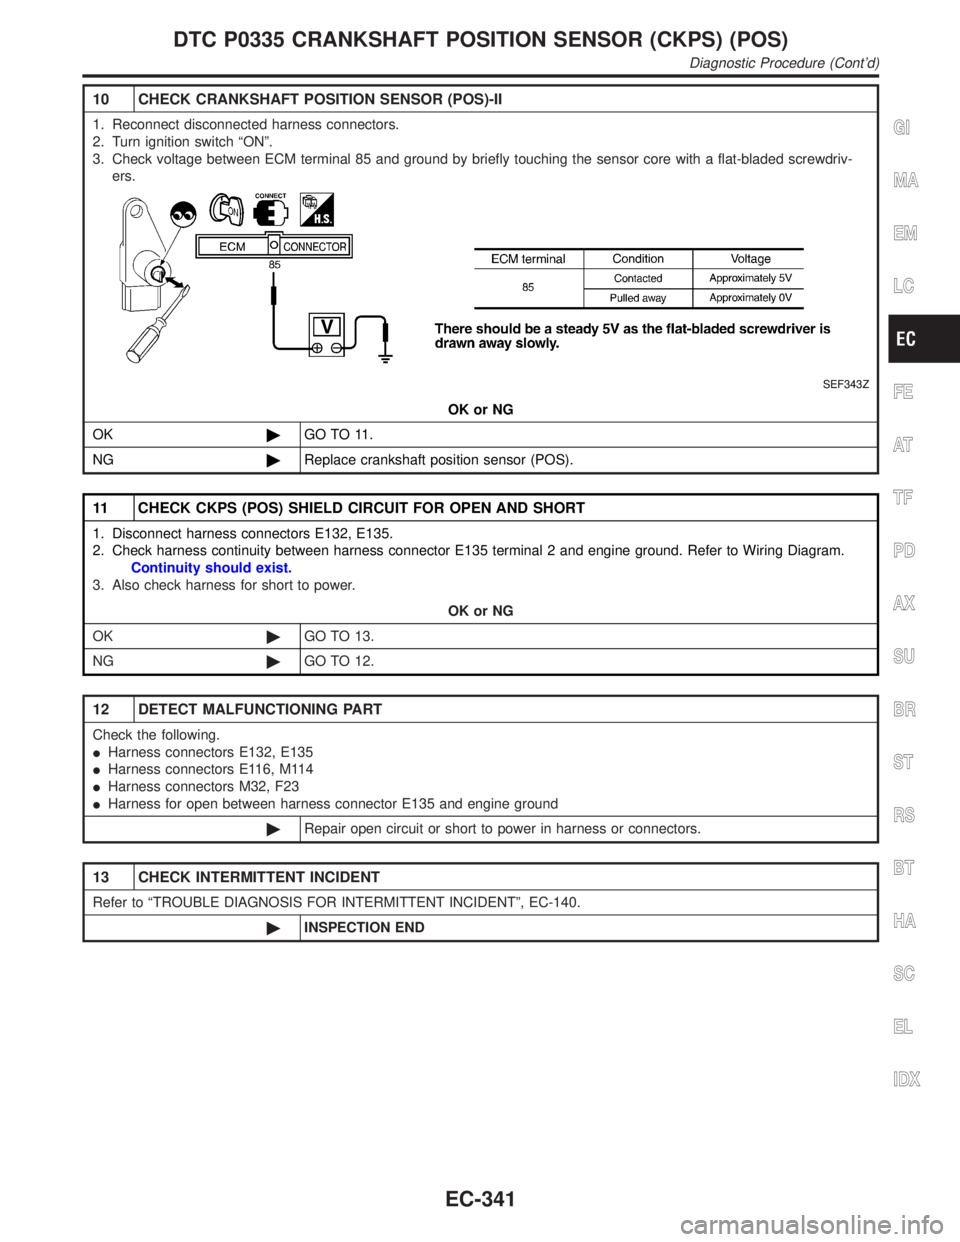
10 CHECK CRANKSHAFT POSITION SENSOR (POS)-II
1. Reconnect disconnected harness connectors.
2. Turn ignition switch ªONº.
3. Check voltage between ECM terminal 85 and ground by briefly touching the sensor core with a flat-bladed screwdriv-
ers.
SEF343Z
OK or NG
OK©GO TO 11.
NG©Replace crankshaft position sensor (POS).
11 CHECK CKPS (POS) SHIELD CIRCUIT FOR OPEN AND SHORT
1. Disconnect harness connectors E132, E135.
2. Check harness continuity between harness connector E135 terminal 2 and engine ground. Refer to Wiring Diagram.
Continuity should exist.
3. Also check harness for short to power.
OK or NG
OK©GO TO 13.
NG©GO TO 12.
12 DETECT MALFUNCTIONING PART
Check the following.
IHarness connectors E132, E135
IHarness connectors E116, M114
IHarness connectors M32, F23
IHarness for open between harness connector E135 and engine ground
©Repair open circuit or short to power in harness or connectors.
13 CHECK INTERMITTENT INCIDENT
Refer to ªTROUBLE DIAGNOSIS FOR INTERMITTENT INCIDENTº, EC-140.
©INSPECTION END
GI
MA
EM
LC
FE
AT
TF
PD
AX
SU
BR
ST
RS
BT
HA
SC
EL
IDX
DTC P0335 CRANKSHAFT POSITION SENSOR (CKPS) (POS)
Diagnostic Procedure (Cont'd)
EC-341
Page 902 of 2395

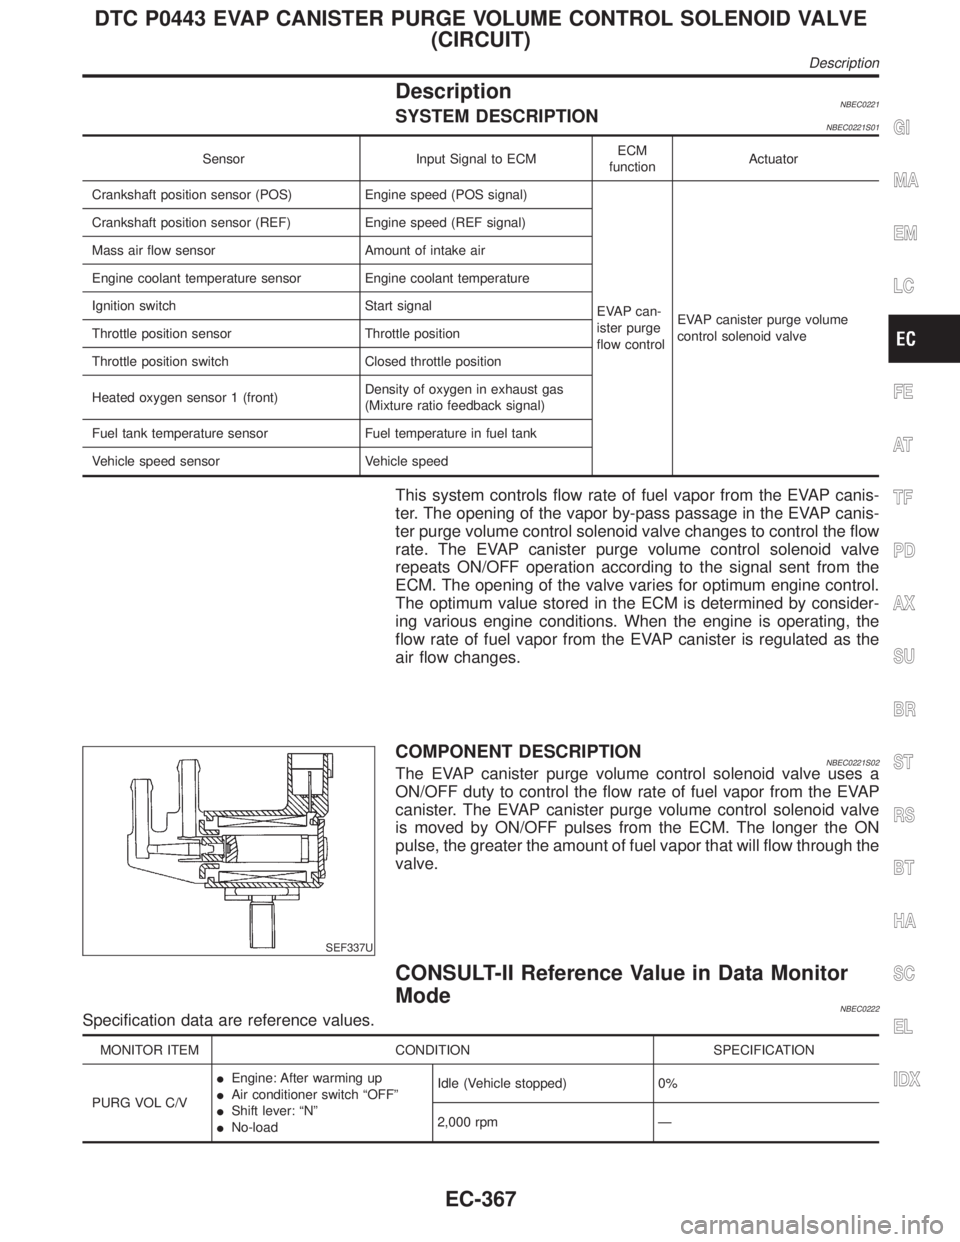
DescriptionNBEC0221SYSTEM DESCRIPTIONNBEC0221S01
Sensor Input Signal to ECMECM
functionActuator
Crankshaft position sensor (POS) Engine speed (POS signal)
EVAP can-
ister purge
flow controlEVAP canister purge volume
control solenoid valve Crankshaft position sensor (REF) Engine speed (REF signal)
Mass air flow sensor Amount of intake air
Engine coolant temperature sensor Engine coolant temperature
Ignition switch Start signal
Throttle position sensor Throttle position
Throttle position switch Closed throttle position
Heated oxygen sensor 1 (front)Density of oxygen in exhaust gas
(Mixture ratio feedback signal)
Fuel tank temperature sensor Fuel temperature in fuel tank
Vehicle speed sensor Vehicle speed
This system controls flow rate of fuel vapor from the EVAP canis-
ter. The opening of the vapor by-pass passage in the EVAP canis-
ter purge volume control solenoid valve changes to control the flow
rate. The EVAP canister purge volume control solenoid valve
repeats ON/OFF operation according to the signal sent from the
ECM. The opening of the valve varies for optimum engine control.
The optimum value stored in the ECM is determined by consider-
ing various engine conditions. When the engine is operating, the
flow rate of fuel vapor from the EVAP canister is regulated as the
air flow changes.
SEF337U
COMPONENT DESCRIPTIONNBEC0221S02The EVAP canister purge volume control solenoid valve uses a
ON/OFF duty to control the flow rate of fuel vapor from the EVAP
canister. The EVAP canister purge volume control solenoid valve
is moved by ON/OFF pulses from the ECM. The longer the ON
pulse, the greater the amount of fuel vapor that will flow through the
valve.
CONSULT-II Reference Value in Data Monitor
Mode
NBEC0222Specification data are reference values.
MONITOR ITEM CONDITION SPECIFICATION
PURG VOL C/VIEngine: After warming up
IAir conditioner switch ªOFFº
IShift lever: ªNº
INo-loadIdle (Vehicle stopped) 0%
2,000 rpm Ð
GI
MA
EM
LC
FE
AT
TF
PD
AX
SU
BR
ST
RS
BT
HA
SC
EL
IDX
DTC P0443 EVAP CANISTER PURGE VOLUME CONTROL SOLENOID VALVE
(CIRCUIT)
Description
EC-367
Page 957 of 2395

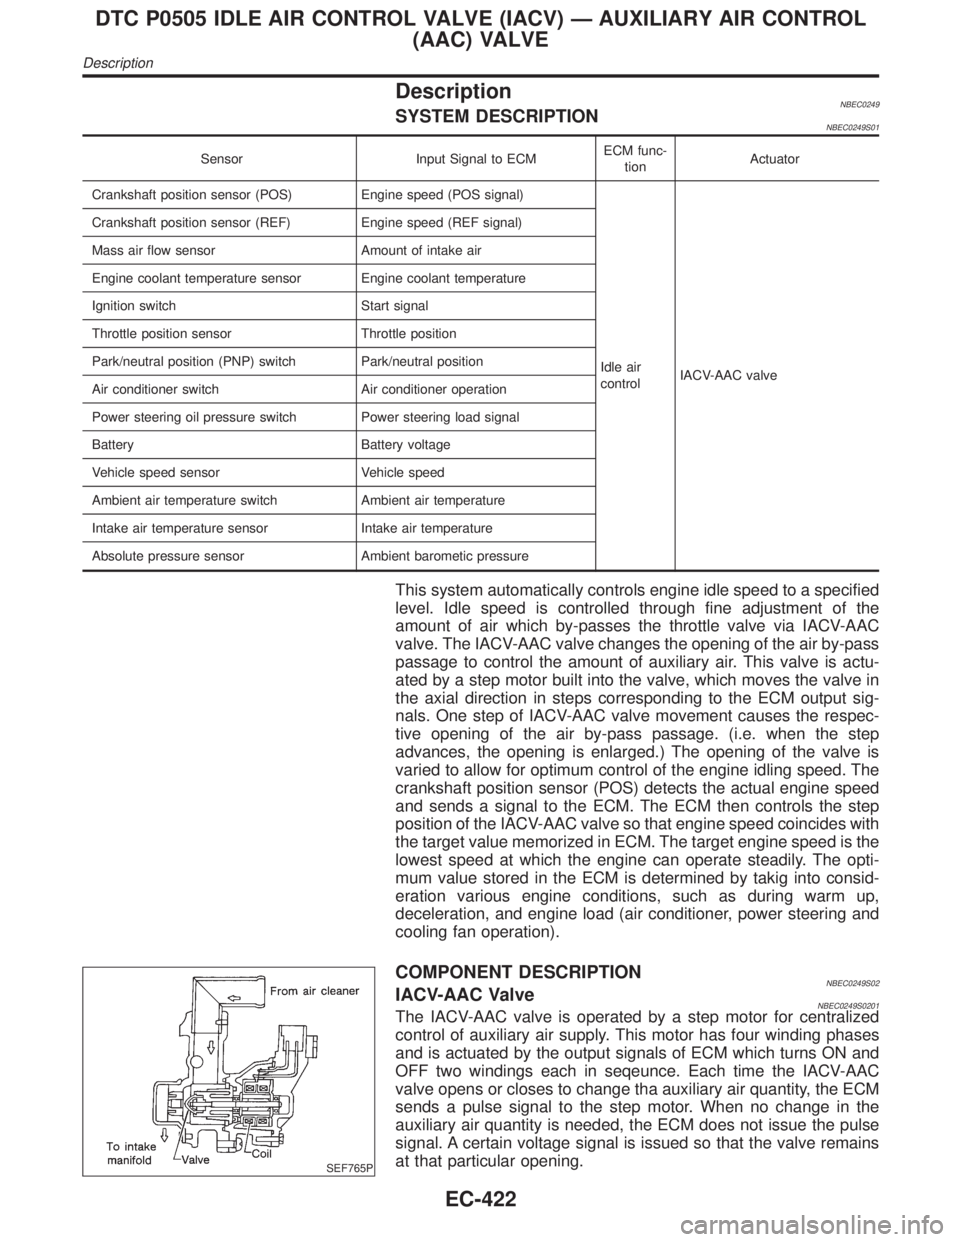
DescriptionNBEC0249SYSTEM DESCRIPTIONNBEC0249S01
Sensor Input Signal to ECMECM func-
tionActuator
Crankshaft position sensor (POS) Engine speed (POS signal)
Idle air
controlIACV-AAC valve Crankshaft position sensor (REF) Engine speed (REF signal)
Mass air flow sensor Amount of intake air
Engine coolant temperature sensor Engine coolant temperature
Ignition switch Start signal
Throttle position sensor Throttle position
Park/neutral position (PNP) switch Park/neutral position
Air conditioner switch Air conditioner operation
Power steering oil pressure switch Power steering load signal
Battery Battery voltage
Vehicle speed sensor Vehicle speed
Ambient air temperature switch Ambient air temperature
Intake air temperature sensor Intake air temperature
Absolute pressure sensor Ambient barometic pressure
This system automatically controls engine idle speed to a specified
level. Idle speed is controlled through fine adjustment of the
amount of air which by-passes the throttle valve via IACV-AAC
valve. The IACV-AAC valve changes the opening of the air by-pass
passage to control the amount of auxiliary air. This valve is actu-
ated by a step motor built into the valve, which moves the valve in
the axial direction in steps corresponding to the ECM output sig-
nals. One step of IACV-AAC valve movement causes the respec-
tive opening of the air by-pass passage. (i.e. when the step
advances, the opening is enlarged.) The opening of the valve is
varied to allow for optimum control of the engine idling speed. The
crankshaft position sensor (POS) detects the actual engine speed
and sends a signal to the ECM. The ECM then controls the step
position of the IACV-AAC valve so that engine speed coincides with
the target value memorized in ECM. The target engine speed is the
lowest speed at which the engine can operate steadily. The opti-
mum value stored in the ECM is determined by takig into consid-
eration various engine conditions, such as during warm up,
deceleration, and engine load (air conditioner, power steering and
cooling fan operation).
SEF765P
COMPONENT DESCRIPTIONNBEC0249S02IACV-AAC ValveNBEC0249S0201The IACV-AAC valve is operated by a step motor for centralized
control of auxiliary air supply. This motor has four winding phases
and is actuated by the output signals of ECM which turns ON and
OFF two windings each in seqeunce. Each time the IACV-AAC
valve opens or closes to change tha auxiliary air quantity, the ECM
sends a pulse signal to the step motor. When no change in the
auxiliary air quantity is needed, the ECM does not issue the pulse
signal. A certain voltage signal is issued so that the valve remains
at that particular opening.
DTC P0505 IDLE AIR CONTROL VALVE (IACV) Ð AUXILIARY AIR CONTROL
(AAC) VALVE
Description
EC-422