Page 265 of 2395

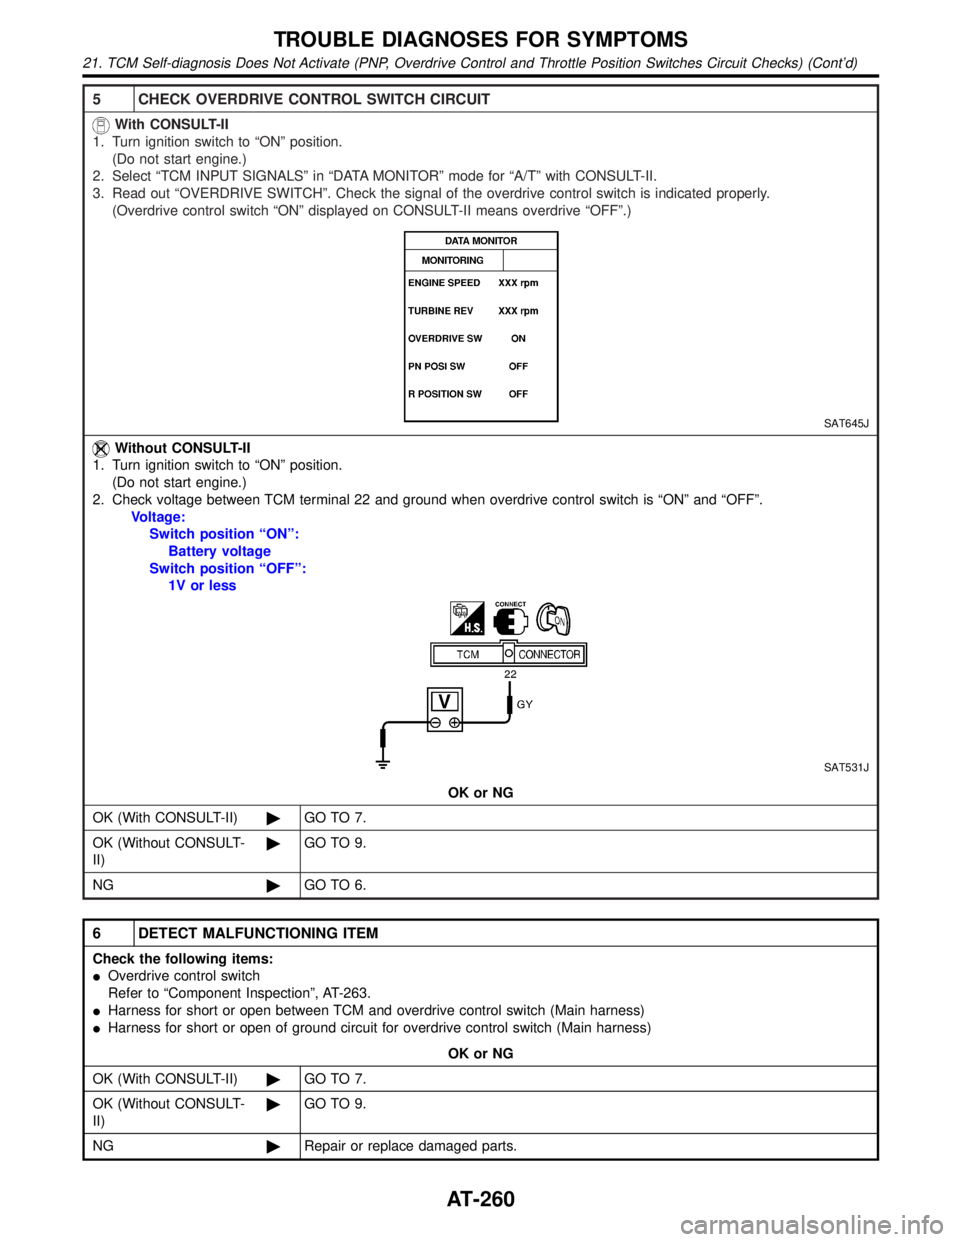
5 CHECK OVERDRIVE CONTROL SWITCH CIRCUIT
With CONSULT-II
1. Turn ignition switch to ªONº position.
(Do not start engine.)
2. Select ªTCM INPUT SIGNALSº in ªDATA MONITORº mode for ªA/Tº with CONSULT-II.
3. Read out ªOVERDRIVE SWITCHº. Check the signal of the overdrive control switch is indicated properly.
(Overdrive control switch ªONº displayed on CONSULT-II means overdrive ªOFFº.)
SAT645J
Without CONSULT-II
1. Turn ignition switch to ªONº position.
(Do not start engine.)
2. Check voltage between TCM terminal 22 and ground when overdrive control switch is ªONº and ªOFFº.
Voltage:
Switch position ªONº:
Battery voltage
Switch position ªOFFº:
1V or less
SAT531J
OK or NG
OK (With CONSULT-II)©GO TO 7.
OK (Without CONSULT-
II)©GO TO 9.
NG©GO TO 6.
6 DETECT MALFUNCTIONING ITEM
Check the following items:
IOverdrive control switch
Refer to ªComponent Inspectionº, AT-263.
IHarness for short or open between TCM and overdrive control switch (Main harness)
IHarness for short or open of ground circuit for overdrive control switch (Main harness)
OK or NG
OK (With CONSULT-II)©GO TO 7.
OK (Without CONSULT-
II)©GO TO 9.
NG©Repair or replace damaged parts.
TROUBLE DIAGNOSES FOR SYMPTOMS
21. TCM Self-diagnosis Does Not Activate (PNP, Overdrive Control and Throttle Position Switches Circuit Checks) (Cont'd)
AT-260
Page 266 of 2395

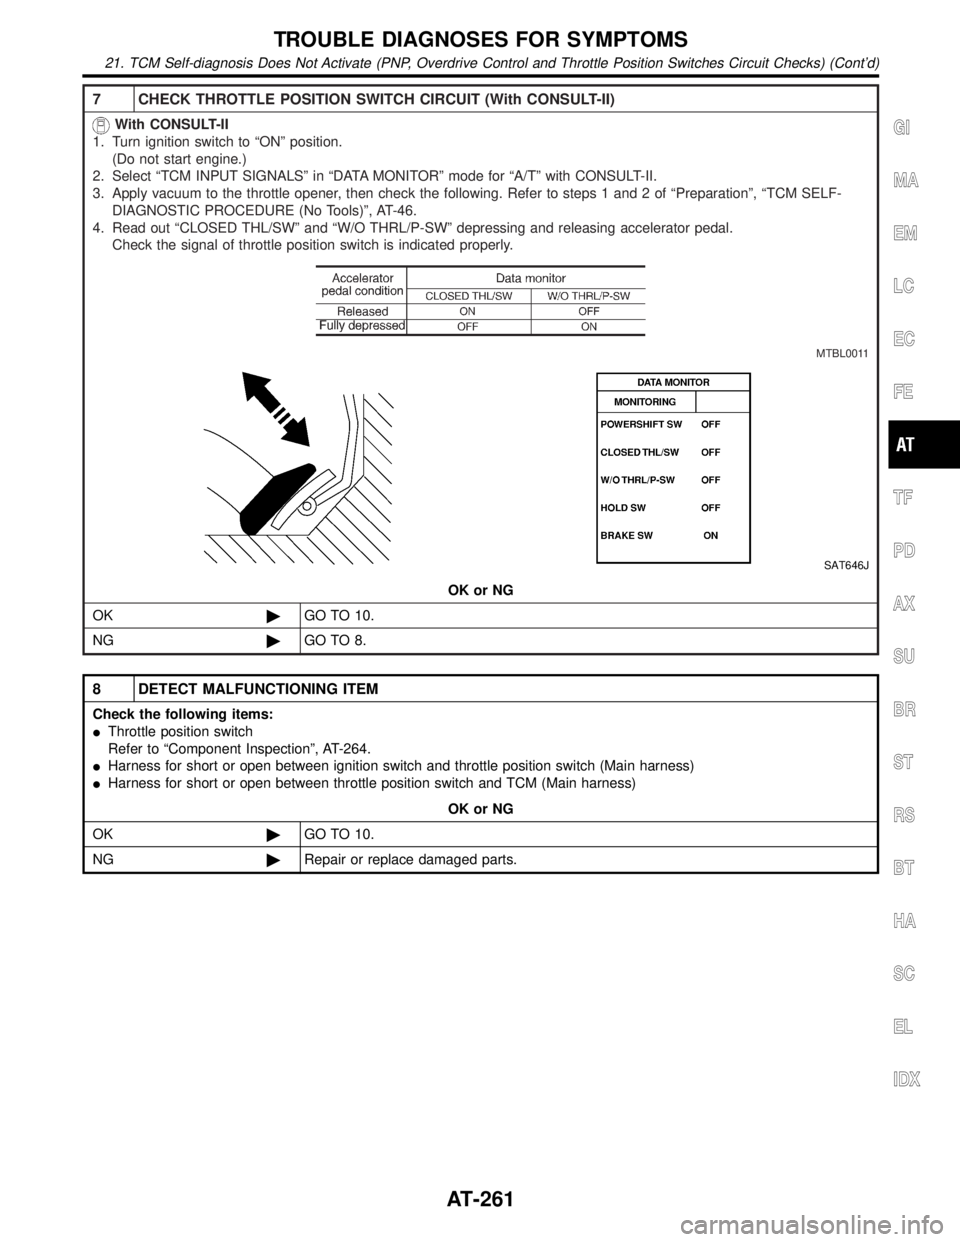
7 CHECK THROTTLE POSITION SWITCH CIRCUIT (With CONSULT-II)
With CONSULT-II
1. Turn ignition switch to ªONº position.
(Do not start engine.)
2. Select ªTCM INPUT SIGNALSº in ªDATA MONITORº mode for ªA/Tº with CONSULT-II.
3. Apply vacuum to the throttle opener, then check the following. Refer to steps 1 and 2 of ªPreparationº, ªTCM SELF-
DIAGNOSTIC PROCEDURE (No Tools)º, AT-46.
4. Read out ªCLOSED THL/SWº and ªW/O THRL/P-SWº depressing and releasing accelerator pedal.
Check the signal of throttle position switch is indicated properly.
MTBL0011
SAT646J
OK or NG
OK©GO TO 10.
NG©GO TO 8.
8 DETECT MALFUNCTIONING ITEM
Check the following items:
IThrottle position switch
Refer to ªComponent Inspectionº, AT-264.
IHarness for short or open between ignition switch and throttle position switch (Main harness)
IHarness for short or open between throttle position switch and TCM (Main harness)
OK or NG
OK©GO TO 10.
NG©Repair or replace damaged parts.
GI
MA
EM
LC
EC
FE
TF
PD
AX
SU
BR
ST
RS
BT
HA
SC
EL
IDX
TROUBLE DIAGNOSES FOR SYMPTOMS
21. TCM Self-diagnosis Does Not Activate (PNP, Overdrive Control and Throttle Position Switches Circuit Checks) (Cont'd)
AT-261
Page 270 of 2395
DescriptionNBAT0093IThe mechanical key interlock mechanism also operates as a
shift lock:
With the key switch turned to ªONº, the selector lever cannot
be shifted from ªPº (parking) to any other position unless the
brake pedal is depressed.
With the key removed, the selector lever cannot be shifted
from ªPº to any other position.
The key cannot be removed unless the selector lever is placed
in ªPº.
IThe shift lock and key interlock mechanisms are controlled by
the ON-OFF operation of the shift lock solenoid and by the
operation of the rotator and slider located inside the key
cylinder, respectively.
SAT145K
GI
MA
EM
LC
EC
FE
TF
PD
AX
SU
BR
ST
RS
BT
HA
SC
EL
IDX
A/T SHIFT LOCK SYSTEM
Description
AT-265
Page 272 of 2395

Diagnostic ProcedureNBAT0095SYMPTOM 1:
ISelector lever cannot be moved from ªPº position with key
in ªONº position and brake pedal applied.
ISelector lever can be moved from ªPº position with key in
ªONº position and brake pedal released.
ISelector lever can be moved from ªPº position when key
is removed from key cylinder.
SYMPTOM 2:
Ignition key cannot be removed when selector lever is set to
ªPº position. It can be removed when selector lever is set to
any position except ªPº.
1 CHECK KEY INTERLOCK CABLE
Check key interlock cable for damage.
OK or NG
OK©GO TO 2.
NG©Repair key interlock cable. Refer to ªKey Interlock Cableº, AT-271.
2 CHECK SELECTOR LEVER POSITION
Check selector lever position for damage.
OK or NG
OK©GO TO 3.
NG©Check selector lever. Refer to ªON-VEHICLE SERVICE Ð PNP Switch and Manual Con-
trol Linkage Adjustmentº, AT-276 and AT-276.
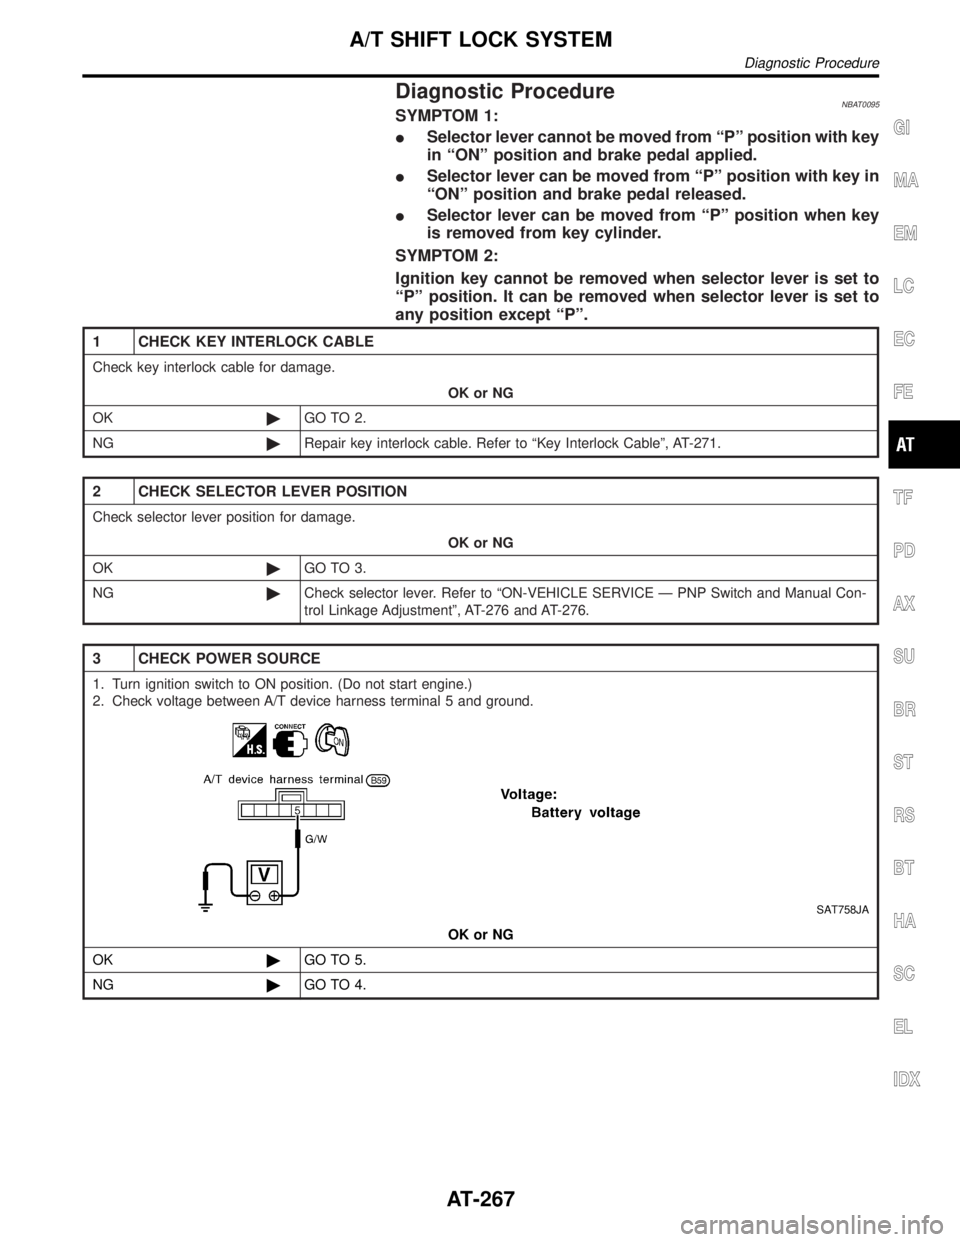
3 CHECK POWER SOURCE
1. Turn ignition switch to ON position. (Do not start engine.)
2. Check voltage between A/T device harness terminal 5 and ground.
SAT758JA
OK or NG
OK©GO TO 5.
NG©GO TO 4.
GI
MA
EM
LC
EC
FE
TF
PD
AX
SU
BR
ST
RS
BT
HA
SC
EL
IDX
A/T SHIFT LOCK SYSTEM
Diagnostic Procedure
AT-267
Page 277 of 2395
SAT354I
InstallationNBAT00991. Set key interlock cable to steering lock assembly and install
lock plate.
2. Clamp cable to steering column and fix to control cable with
band.
3. Set selector lever to P position.
SAT355I
4. Insert interlock rod into adjuster holder.
SAT356I
5. Install casing cap to bracket.
6. Move slider in order to fix adjuster holder to interlock rod.
KEY INTERLOCK CABLE
Installation
AT-272
Page 281 of 2395

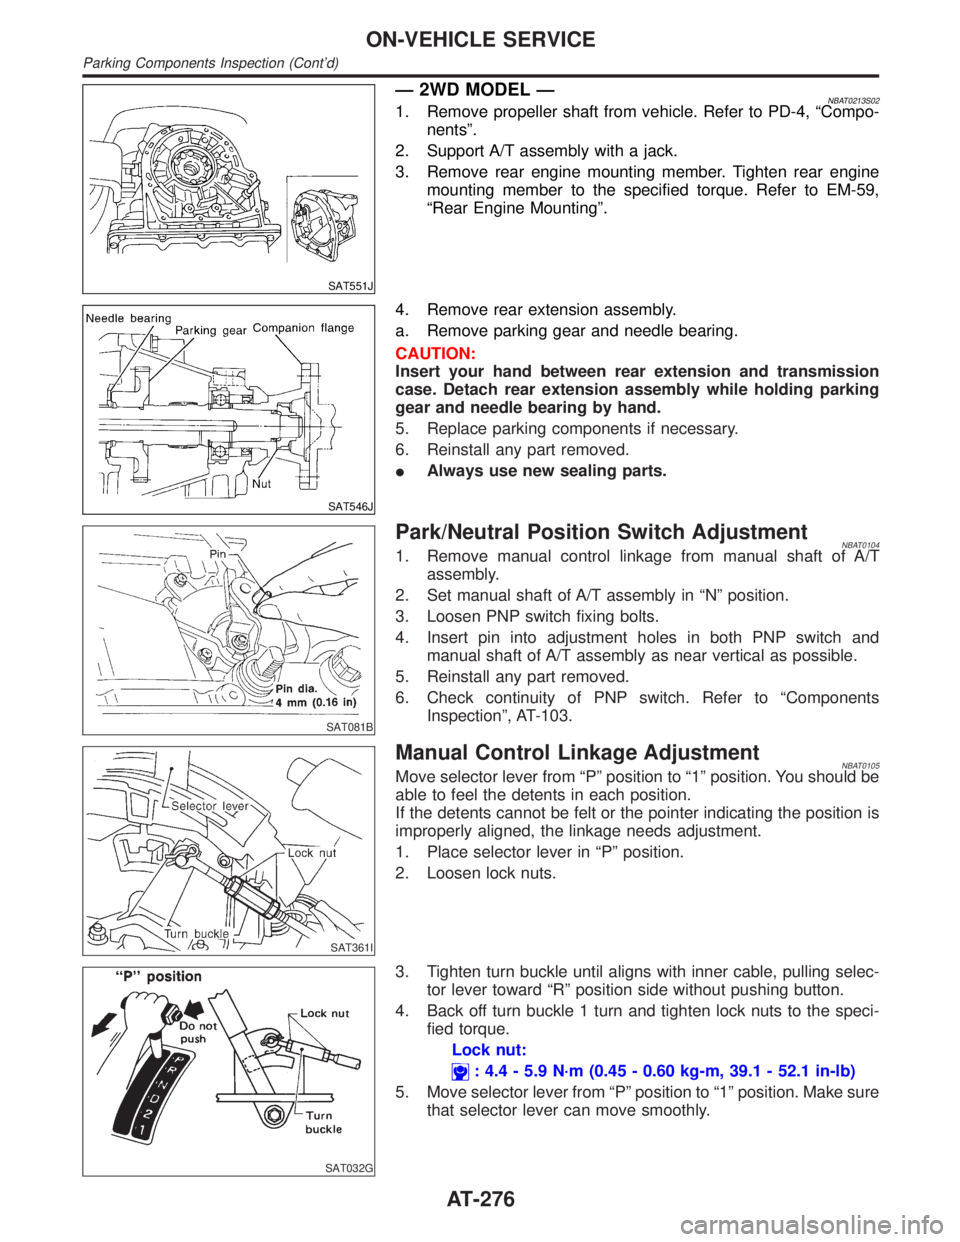
SAT551J
Ð 2WD MODEL ÐNBAT0213S021. Remove propeller shaft from vehicle. Refer to PD-4, ªCompo-
nentsº.
2. Support A/T assembly with a jack.
3. Remove rear engine mounting member. Tighten rear engine
mounting member to the specified torque. Refer to EM-59,
ªRear Engine Mountingº.
SAT546J
4. Remove rear extension assembly.
a. Remove parking gear and needle bearing.
CAUTION:
Insert your hand between rear extension and transmission
case. Detach rear extension assembly while holding parking
gear and needle bearing by hand.
5. Replace parking components if necessary.
6. Reinstall any part removed.
IAlways use new sealing parts.
SAT081B
Park/Neutral Position Switch AdjustmentNBAT01041. Remove manual control linkage from manual shaft of A/T
assembly.
2. Set manual shaft of A/T assembly in ªNº position.
3. Loosen PNP switch fixing bolts.
4. Insert pin into adjustment holes in both PNP switch and
manual shaft of A/T assembly as near vertical as possible.
5. Reinstall any part removed.
6. Check continuity of PNP switch. Refer to ªComponents
Inspectionº, AT-103.
SAT361I
Manual Control Linkage AdjustmentNBAT0105Move selector lever from ªPº position to ª1º position. You should be
able to feel the detents in each position.
If the detents cannot be felt or the pointer indicating the position is
improperly aligned, the linkage needs adjustment.
1. Place selector lever in ªPº position.
2. Loosen lock nuts.
SAT032G
3. Tighten turn buckle until aligns with inner cable, pulling selec-
tor lever toward ªRº position side without pushing button.
4. Back off turn buckle 1 turn and tighten lock nuts to the speci-
fied torque.
Lock nut:
: 4.4 - 5.9 N´m (0.45 - 0.60 kg-m, 39.1 - 52.1 in-lb)
5. Move selector lever from ªPº position to ª1º position. Make sure
that selector lever can move smoothly.
ON-VEHICLE SERVICE
Parking Components Inspection (Cont'd)
AT-276
Page 284 of 2395

SAT017B
IWhen connecting torque converter to transmission, measure
distance ªAº to be certain that they are correctly assembled.
Distance ªAº:
25.0 mm (0.984 in) or more
SAT148K
IInstall converter to drive plate.
IAfter converter is installed to drive plate, rotate crankshaft
several turns and check to be sure that transmission
rotates freely without binding.
SAT149K
ITighten bolts securing transmission.
Bolt No.Tightening torque
N´m (kg-m, ft-lb)Bolt length ªº
mm (in)
1 70 - 80 (7.1 - 8.2, 52 - 59) 65 (2.56)
2 70 - 80 (7.1 - 8.2, 52 - 59) 55 (2.17)
3 29 - 39 (3.0 - 4.0, 22 - 29) 40 (1.57)
IReinstall any part removed.
SAT638A
ICheck fluid level in transmission.
IMove selector lever through all positions to be sure that trans-
mission operates correctly.
With parking brake applied, rotate engine at idling. Move selec-
tor lever through ªNº to ªDº, to ª2º, to ª1º and to ªRº positions.
A slight shock should be felt by hand gripping selector each
time transmission is shifted.
IPerform road test. Refer to ªROAD TESTº, AT-63.
GI
MA
EM
LC
EC
FE
TF
PD
AX
SU
BR
ST
RS
BT
HA
SC
EL
IDX
REMOVAL AND INSTALLATION
Installation (Cont'd)
AT-279
Page 322 of 2395
SAT852A
7. Measure clearance between retaining plate and snap ring. If
not within allowable limit, select proper retaining plate.
Specified clearance:
Standard
0.5 - 0.8 mm (0.020 - 0.031 in)
Allowable limit
1.2 mm (0.047 in)
Retaining plate:
Refer to SDS, AT-358.
SAT841A
8. Check operation of reverse clutch.
Refer to ªDISASSEMBLYº of Reverse Clutch, AT-314.
High Clutch
COMPONENTSNBAT0132
SAT158K
GI
MA
EM
LC
EC
FE
TF
PD
AX
SU
BR
ST
RS
BT
HA
SC
EL
IDX
REPAIR FOR COMPONENT PARTS
Reverse Clutch (Cont'd)
AT-317