Page 292 of 363

Regular cleaning and polishing of
your Honda helps to keep it ‘‘new’’
looking. This section gives you hints
on how to clean your vehicle and
preserve its appearance: the paint,
brightwork, wheels and interior. Also
included are several things you can
do to help prevent corrosion..................................
Exterior Care . 294
.....................................
Washing . 294
.......................................
Waxing . 295
....................
Aluminum Wheels . 295
..........................
Paint Touch-up . 295
..................................
Interior Care . 296
...................................
Carpeting . 296
..................................
Floor mats . 296
.........................................
Fabric . 297
...........................................
Vinyl . 297
...................................
Seat Belts . 297
....................................
Windows . 298
..........................
Air Fresheners . 298
....................
Corrosion Protection . 299
.................................
Body Repairs . 300
Appearance Care
Appearance Care 293
Page 294 of 363

�µ
�µ Your dealer has touch-up paint to
match your vehicle’s color. The color
code is printed on a sticker on the
driver’s doorjamb. Take this code to
your dealer so you are sure to get
the correct color.
Inspect your vehicle f requently f or
chips or scratches in the paint.
Repair them right away to prevent
corrosion of the metal underneath.
Use the touch-up paint only on small
chips and scratches. More extensive
paint damage should be repaired by
a prof essional.
Always wash and dry the whole
vehiclebeforewaxingit.Youshould
wax your vehicle, including the metal
trim, whenever water sits on the
surf ace in large patches. It should
formintobeadsordropletsafter
waxing.
The wheels have a protective clear-
coat that keeps the aluminum from
corroding and tarnishing. Using
harsh chemicals, including some
commercial wheel cleaners, or stif f
brushes can damage this clear-coat.
Only use a mild detergent and sof t
brush or sponge to clean the wheels.
Clean your Honda’s aluminum alloy
wheels as you do the rest of the
exterior.Washthemwiththesame
solution, and rinse them thoroughly.
Cleaning tar, insects, etc. with
removers also takes off the wax.
Remember to re-wax those areas,
even if the rest of the vehicle does
not need waxing.
Polishes Polishes and cleaner/
waxes can restore the shine to paint
that has oxidized and lost some of its
shine. They normally contain mild
abrasives and solvents that remove the top layer of the f inish. You
should use a polish on your Honda if
the f inish does not have its original
shine af ter using a wax.
Waxes A wax coats the finish and
protects it f rom damage by exposure
to sunlight, air pollution, etc. You
should use a wax on your Honda
when it is new.
You should use a quality liquid or
paste wax. Apply it according to the
instructions on the container. In
general, there are two types of
products:
On some models
Exterior Care
Appearance Care
Paint T ouch-up
Waxing
A luminum Wheels
295
Page 298 of 363

Two f actors normally contribute to
causing corrosion in your vehicle:Moisture trapped in body cavities.
Dirtandroadsaltthatcollectsin
hollows on the underside of the
vehicle stays damp, promoting
corrosion in that area.
Removal of paint and protective
coatings f rom the exterior and
underside of the vehicle. Repair chips and scratches in the
paint as soon as you discover them.
Many corrosion-preventive measures
are built into your Honda. You can
help keep your vehicle f rom
corroding by perf orming some
simple periodic maintenance:
Inspect and clean out the drain
holes in the bottom of the doors
and body.
Check the floor coverings for
dampness. Carpeting and f loor
mats may remain damp f or a long
time, especially in winter. This
dampness can eventually cause
the f loor panels to corrode. Use a high-pressure spray to clean
the underside of your vehicle. This
is especially important in areas
that use road salt in winter. It is
also a good idea in humid climates
and areas subject to salt air. Be
caref ul of the ABS wheel sensors
and wiring at each wheel.
Have the corrosion-preventive
coatings on the underside of your
vehicle inspected and repaired
periodically.
1. 2.
Corrosion Prot ect ion
Appearance Care
299
Page 301 of 363

Your vehicle has a compact spare
tire that takes up less space. Use this
sparetireasatemporaryreplace-
ment only. Get your regular tire
repaired or replaced and put it back
on your vehicle as soon as you can.Thecompactsparetirehasashorter
tread lif e than a regular tire. Replace
it when you can see the tread wear
indicator bars. The replacement
shouldbethesamesizeanddesign
tire, mounted on the same wheel.
Thecompactsparetireisnot
designed to be mounted on a regular
wheel, and the compact wheel is not
designed f or mounting a regular tire.
Check the inf lation pressure of the
compact spare tire every time you
check the other tires. It should be
inf lated to:
This tire gives a harsher ride and
less traction on some road sur-
f aces than the regular tire. Use
greater caution while driving on
this tire.
Do not exceed 50 mph (80 km/h)
under any circumstances.
Follow these precautions whenever
you are using the compact spare tire: Do not mount snow chains on the
compact spare.
Do not use the compact spare tire
if you are towing a trailer.
The wheel of the compact spare
tire is designed especially to f it
your vehicle. Do not use your
sparetireonanothervehicle
unlessitisthesamemakeand
model.
Turn off the Traction Control
System (see page ). Driving
withthecompactsparetiremay
activate the TCS.
221
Compact Spare Tire
T aking Care of t he Unexpect ed
302
IINNDDIICCAATTOORRLLOOCCAATTIIOONNMMAARRKK
TTRREEAADDWWEEAARRIINNDDIICCAATTOORRBBAARR
60 psi (420 kPa , 4.2 kgf/cm)
Page 304 of 363
CONT INUED
Open either of the rear sliding
doors. Pull the f loor carpet up by
lif ting up on the edge, then raise
the f loor lid by pulling up on the
handle. To keep the f loor carpet
and lid out of the way, pull out the
hook on the back of the f loor lid
and attach it into the seat-back
handle on the driver’s seat.Remove the spare tire basket.
Unscrew the wing bolt and take
the spare tire out of its well. After
you have removed the spare tire,
screw this wing bolt back into
place.
Loosen the f ive wheel nuts 1/2
turn with the wheel wrench.
If you are changing a rear tire,
close the sliding door. Then turn
of f the sliding door MAIN switch.
8.
9.
11. 12.
10.On EX model On EX model
Changing a Flat T ire
T aking Care of t he Unexpect ed
305
WWHHEEEELLNNUUTTSS
HHOOOOKK
HHAANNDDLLEE
WWIINNGGBBOOLLTT
SSPPAARREETTIIRREEBBAASSKKEETT
SSPPAARREETTIIRREE
Page 305 of 363
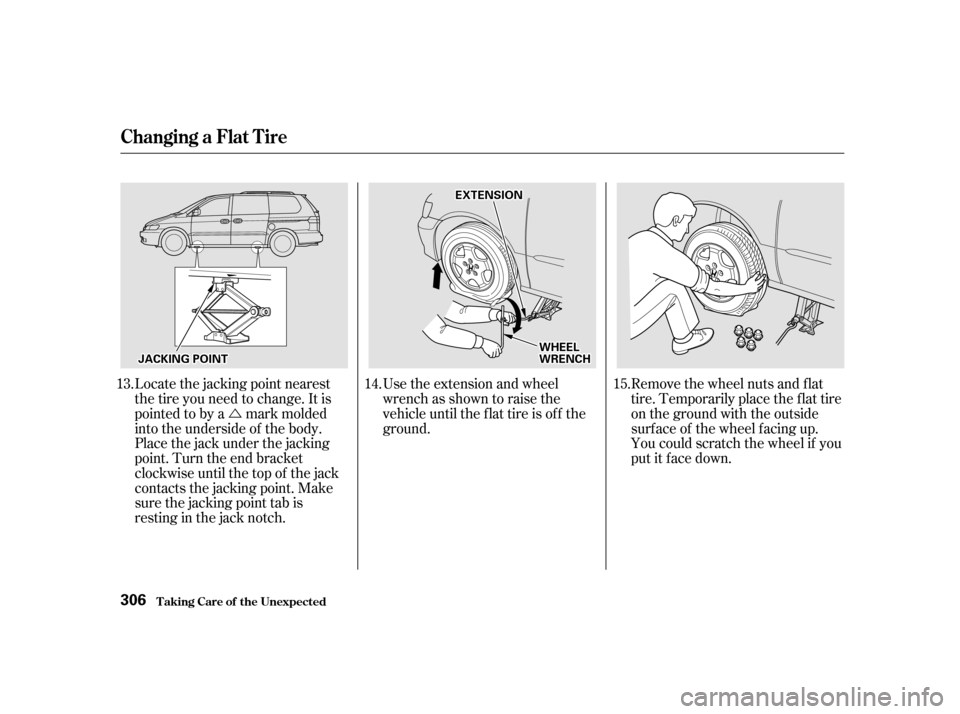
�ÚUse the extension and wheel
wrench as shown to raise the
vehicle until the f lat tire is of f the
ground. Remove the wheel nuts and f lat
tire. Temporarily place the f lat tire
on the ground with the outside
surf ace of the wheel f acing up.
You could scratch the wheel if you
putitfacedown.
Locate the jacking point nearest
thetireyouneedtochange.Itis
pointed to by a mark molded
into the underside of the body.
Place the jack under the jacking
point. Turn the end bracket
clockwise until the top of the jack
contacts the jacking point. Make
sure the jacking point tab is
restinginthejacknotch.
13. 14. 15.
Changing a Flat T ire
T aking Care of t he Unexpect ed
306
JJAACCKKIINNGGPPOOIINNTT
EEXXTTEENNSSIIOONN
WWHHEEEELLWWRREENNCCHH
Page 306 of 363
Put on the spare tire. Put the
wheel nuts back on f inger-tight,
then tighten them in a crisscross
pattern with the wheel wrench
until the wheel is f irmly against
the hub. Do not try to tighten
them f ully.
Bef ore mounting the spare tire,
wipeanydirtoff themounting
surface of the wheel and hub with
a clean cloth. Wipe the hub
carefully,itmaybehotfrom
driving.
Do not attempt to forcibly pry the
wheel cover of f with a screwdriver or
other tool. The wheel cover cannot
be removed without f irst removing
the wheel nuts. 16. 17.
CONT INUED
On LX model
Changing a Flat T ire
T aking Care of t he Unexpect ed
307
BBRRAAKKEEHHUUBB
WWHHEEEELLCCOOVVEERR
Page 307 of 363
Tighten the wheel nuts securely in
the same crisscross pattern. Have
the wheel nut torque checked at
the nearest automotive service
f acility.
Tighten the wheel nuts to:
Lower the vehicle to the ground
and remove the jack.
Put the flat tire in the supplied
vinyl bag. This bag is stored in the
rear compartment on the driver’s
side panel in the third row. Knot
the top of the vinyl bag.
18.
19. 20.
Changing a Flat T ire
T aking Care of t he Unexpect ed
308 80 lbf·ft (108 N·m , 11 kgf·m)