Page 79 of 319

The Immobilizer System protects
your car f rom thef t. A properly-
coded master or valet key must be
used in the ignition switch f or the
engine to start. If an improperly-
coded key (or other device) is used,
the engine’s f uel system is disabled.
When you turn the ignition switch to
ON (II), the Immobilizer System
indicator should come on f or a f ew
seconds, then go out. If the indicator
starts to blink, it means the system
does not recognize the coding of the
key. Turn the ignition switch to
LOCK (0), remove the key, reinsert
it, and turn the switch to ON (II)
again.
These keys contain electronic
circuits that are activated by the
Immobilizer System. They will not
work to start the engine if the
circuits are damaged.
Protect the keys f rom direct
sunlight, high temperature, and
high humidity.
Donotdropthekeysorsetheavy
objects on them.
Keep the keys away f rom liquids.
If they get wet, dry them immedi-
ately with a soft cloth.
The keys do not contain batteries.
Do not try to take them apart. Some models also come with two
remote transmitters; see page for
an explanation of their operation.
85
Keys and Locks
Inst rument s and Cont rols Immobilizer System
Remote Transmitter
80
Page 81 of 319
�µYou can insert or
remove the key only in this position.
To switch f rom ACCESSORY to
LOCK, you must push the key in
slightly as you turn it. If your car has
an automatic transmission, the shif t
lever must also be in Park. The anti-
thef t lock will lock the steering
column when you remove the key.
If the f ront wheels are turned, the
anti-thef t lock may sometimes make
it difficult to turn the key from
LOCK to ACCESSORY. Firmly turn
the steering wheel to the lef t or to
the right as you turn the key.
The ignition switch is on the right
side of the steering column. It has
f our positions:
LOCK(0)
ACCESSORY (I)
ON (II)
START (III)
Inst rument s and Cont rols
Keys and Locks
LOCK (0)
Ignition Switch 82 Removing the key from the
ignition switch while driving
locks the steering. This can
cause you to lose control.
Remove the key from the
ignition switch only whenparked.
Page 82 of 319

�µ
�µ �µ
In this position,
you can operate the audio system
and the accessory power socket.
This is the normal key
position when driving. All f eatures
and accessories on the car are usable.
Several of the lights on the instru-
ment panel come on as a test when
you turn the ignition switch f rom
ACCESSORY to ON.
Each door has a lock tab on the top.
Push the tab down to lock the door
andpullituptounlock.
To lock any passenger’s door when
getting out of the car, push the lock
tab down and close the door. To lock
the driver’s door, pull the outside
door handle and push the lock tab
down. Release the handle, then close
the door.
Use this position
only to start the engine. The switch
returns to ON (II) when you let go of
the key.
The engine will not start if the
Immobilizer System does not
recognize the key’s coding (see page ).
You will hear a reminder beeper if
you leave the key in the ignition
switch in the LOCK (0) or
ACCESSORY (I) position and open
thedriver’sdoor.Removethekeyto
turn of f the beeper. 80
CONT INUED
Keys and Locks
Inst rument s and Cont rols
A CCESSORY (I)
ON (II)
Door L ocks
ST A RT (III)
83
Page 84 of 319

CONT INUED
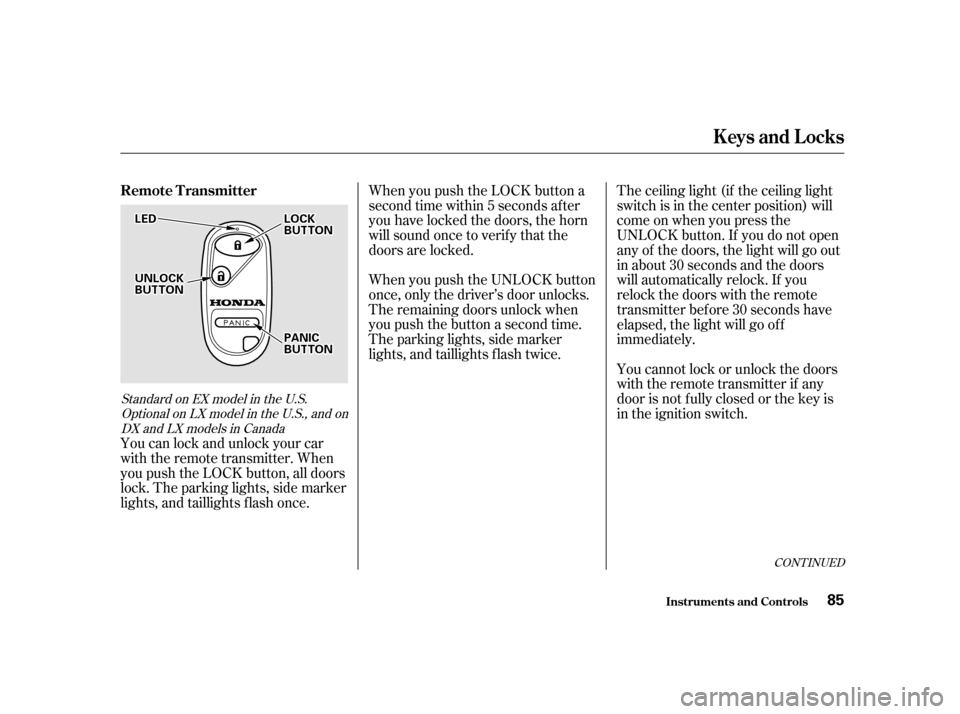
You can lock and unlock your car
with the remote transmitter. When
you push the LOCK button, all doors
lock. The parking lights, side marker
lights, and taillights f lash once.When you push the LOCK button a
second time within 5 seconds after
you have locked the doors, the horn
will sound once to verify that the
doors are locked.
When you push the UNLOCK button
once, only the driver’s door unlocks.
The remaining doors unlock when
you push the button a second time.
The parking lights, side marker
lights, and taillights f lash twice.
The ceiling light (if the ceiling light
switch is in the center position) will
come on when you press the
UNLOCK button. If you do not open
any of the doors, the light will go out
in about 30 seconds and the doors
will automatically relock. If you
relock the doors with the remote
transmitter before 30 seconds have
elapsed, the light will go of f
immediately.
You cannot lock or unlock the doors
with the remote transmitter if any
door is not f ully closed or the key is
in the ignition switch.
Standard on EX model in the U.S.
Optional on LX model in the U.S., and onDX and LX models in Canada
Remote Transmitter
Keys and Locks
Inst rument s and Cont rols 85
LLEEDD
UUNNLLOOCCKKBBUUTTTTOONN
LLOOCCKKBBUUTTTTOONN
PPAANNIICCBBUUTTTTOONN
Page 85 of 319

�´
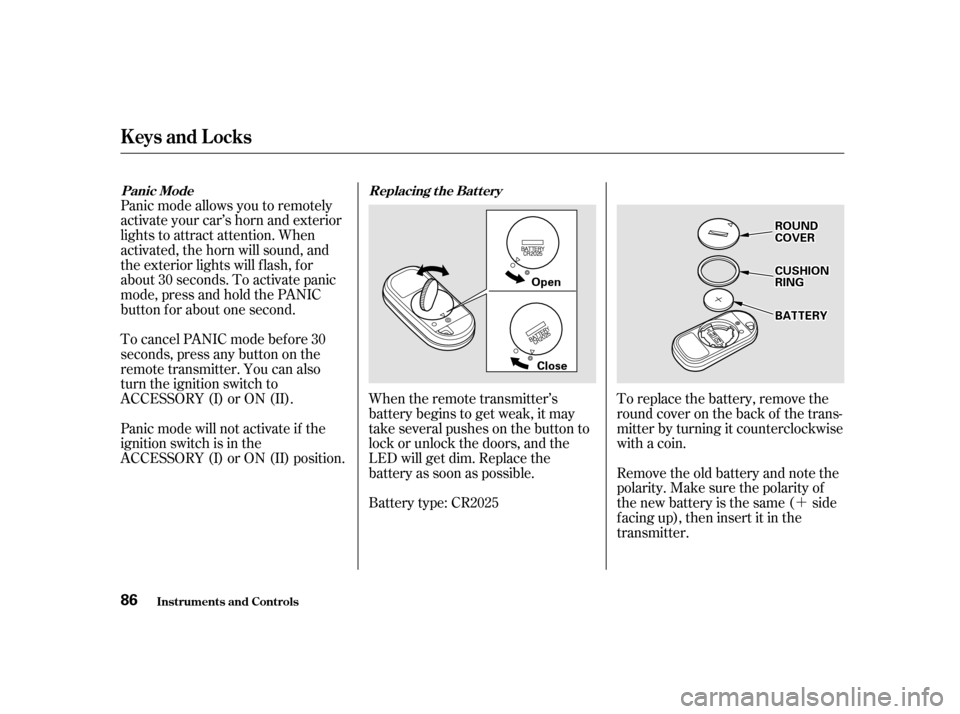
To replace the battery, remove the
round cover on the back of the trans-
mitter by turning it counterclockwise
with a coin.
Remove the old battery and note the
polarity. Make sure the polarity of
the new battery is the same ( side
f acing up), then insert it in the
transmitter.
When the remote transmitter’s
battery begins to get weak, it may
take several pushes on the button to
lock or unlock the doors, and the
LED will get dim. Replace the
battery as soon as possible.
Battery type: CR2025
Panic mode allows you to remotely
activate your car’s horn and exterior
lights to attract attention. When
activated, the horn will sound, and
the exterior lights will f lash, f or
about 30 seconds. To activate panic
mode,pressandholdthePANIC
button f or about one second.
To cancel PANIC mode bef ore 30
seconds, press any button on the
remote transmitter. You can also
turn the ignition switch to
ACCESSORY (I) or ON (II).
Panic mode will not activate if the
ignition switch is in the
ACCESSORY (I) or ON (II) position.
Inst rument s and Cont rols
Keys and Locks
Replacing the Battery
Panic Mode
86
OOppeenn
CClloossee
RROOUUNNDDCCOOVVEERR
CCUUSSHHIIOONNRRIINNGG
BBAATTTTEERRYY
Page 95 of 319

�µ
The master control panel also con-
tains these extra features:
To open the driver’s
window f ully, push the window
switch f irmly down and release it.
The window automatically goes all
the way down. To stop the window
f rom going all the way down, pull
back on the window switch brief ly.
To open the driver’s window only
partially, push the window switch
down lightly and hold it. The window
will stop as soon as you release the
switch.
The AUTO f unction only works to
lower the driver’s window. To raise
the window, you must pull back on
the window switch and hold it until
the window reaches the desired
position. The MAIN switch controls power to
the passengers’ windows. With this
switch of f , the passengers’ windows
cannot be raised or lowered. The
MAIN switch does not af f ect the
driver’s window. Keep the MAIN
switch of f when you have children in
the car so they do not injure them-
selves by operating the windows
unintentionally.
AUTO
Inst rument s and Cont rols
Power Windows
96
Page 97 of 319

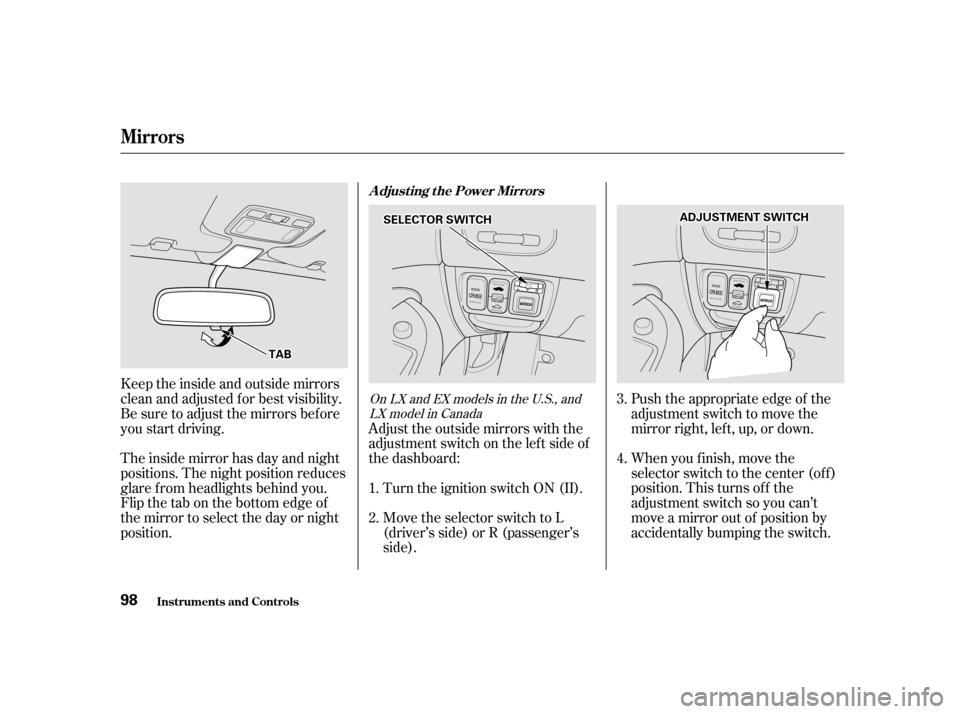
Push the appropriate edge of the
adjustment switch to move the
mirrorright,left,up,ordown.
When you f inish, move the
selector switch to the center (off)
position. This turns of f the
adjustment switch so you can’t
move a mirror out of position by
accidentally bumping the switch.
Adjust the outside mirrors with the
adjustment switch on the lef t side of
the dashboard:
Turn the ignition switch ON (II).
Move the selector switch to L
(driver’s side) or R (passenger’s
side).
Keeptheinsideandoutsidemirrors
clean and adjusted f or best visibility.
Be sure to adjust the mirrors bef ore
you start driving.
The inside mirror has day and night
positions. The night position reduces
glare f rom headlights behind you.
Flip the tab on the bottom edge of
the mirror to select the day or night
position.
3. 4.
1. 2.OnLXandEXmodelsintheU.S.,and LX model in Canada
Inst rument s and Cont rols
Mirrors
Adjusting the Power Mirrors
98
SSEELLEECCTTOORRSSWWIITTCCHH
TTAABB
AADDJJUUSSTTMMEENNTTSSWWIITTCCHH
Page 98 of 319
To apply the parking brake, pull the
lever up f ully. To release it, pull up
slightly, push the button, and lower
the lever. The parking brake light on
the instrument panel should go out
when the parking brake is f ully
released (see page ).
The outside mirrors are heated to re-
move fog and frost. With the ignition
switchON(II),turnontheheaters
by pressing the button. The light in
the button comes on as a reminder.
Press the button again to turn the
heaters off.
62On Canadian LX model
Inst rument s and Cont rols
Mirrors, Parking Brake
Parking Brake
99
PPAARRKKIINNGGBBRRAAKKEELLEEVVEERRDriving the car with the parking brake
applied can damage the rear brakes
and axles.