Page 98 of 319
To apply the parking brake, pull the
lever up f ully. To release it, pull up
slightly, push the button, and lower
the lever. The parking brake light on
the instrument panel should go out
when the parking brake is f ully
released (see page ).
The outside mirrors are heated to re-
move fog and frost. With the ignition
switchON(II),turnontheheaters
by pressing the button. The light in
the button comes on as a reminder.
Press the button again to turn the
heaters off.
62On Canadian LX model
Inst rument s and Cont rols
Mirrors, Parking Brake
Parking Brake
99
PPAARRKKIINNGGBBRRAAKKEELLEEVVEERRDriving the car with the parking brake
applied can damage the rear brakes
and axles.
Page 101 of 319
The coin box is located under the air
vent. To open the coin box, pull the
bottom edge. Close it with a f irm
push.The center pocket is located under
the audio system. To open the lid,
pull it down. Close it with a f irm push.To use the accessory power socket,
pull up the cover. The ignition switch
must be in ACCESSORY (I) or ON
(II).
This socket is intended to supply
power f or 12 volt DC accessories
that are rated 120 watts or less (10
amps).
It will not power an automotive type
cigarette lighter element.On EX model in U.S.
Coin Box, Center Pocket, A ccessory Power Socket
CoinBox CenterPocket AccessoryPowerSocket
Inst rument s and Cont rols
102
Page 102 of 319
The ceiling light has a three-position
switch. In the OFF position, the light
does not come on. In the center
position, the ceiling light comes on
when you open any door. In the ON
position, the ceiling light stays on
continuously.The ceiling light (with the switch in
the center position) comes on when
you remove the key f rom the ignition
switch. If you do not open a door, the
light stays on, then f ades out in
about 10 seconds.
Your car also has a f ront ceiling light
between the sun visors. The ceiling light (with the switch in
the center position) also comes on
when you unlock the door with the
key or the remote transmitter (see
page ).
85On EX model in U.S.
Ceiling L ight
Interior Lights
Inst rument s and Cont rols 103
EEXX
Page 103 of 319
Turn on the spotlight by pushing the
button next to each light. Push the
button again to turn it off. You can
use the spotlights at all times.Your car also has a courtesy light in
the ignition switch. This light comes
on when you open the driver’s door.
It remains on f or several seconds
af ter the door is closed.
Turn on the spotlight by pushing the
lens. Push the lens again to turn it
of f . You can use the spotlights at all
times.
On EX model in U.S.
On EX model in U.S.
On LX model in U.S. and Canada
Interior Lights
Spotlights Courtesy L ights
Inst rument s and Cont rols
104
EEXXLLXX
Page 113 of 319
Your Honda’s audio system provides
clear reception on both AM and FM
bands, while the preset buttons allow
you to easily select your f avorite
stations.
The ignition switch must be in
ACCESSORY (I) or ON (II) to
operate the audio system. Turn the
system on by pressing the PWR/
VOL knob or the AM/FM button.
Adjust the volume by turning the
knob. The band and f requency that theradio was last tuned to is displayed.
To change bands, press the AM/FM
button. On the FM band, ST will be
displayed if the station is broadcast-
ing in stereo. Stereo reproduction on
AM is not available.
For DX model in the U.S. and Canada
Audio System
Comf ort and Convenience Feat ures
AM/FM Stereo Audio System
Operating the Radio 114
PPRREESSEETTBBUUTTTTOONNSS
AAMM//FFMMBBUUTTTTOONN
AAUUTTOOSSEELLEECCTTBBUUTTTTOONN
SSCCAANNBBUUTTTTOONN
PPWWRR//VVOOLLKKNNOOBBSSEEEEKKBBAARRTTUUNNEEKKNNOOBB
SSCCAANNIINNDDIICCAATTOORR
SSTTEERREEOOIINNDDIICCAATTOORR
Page 118 of 319
. The audio system
illuminates when the parking lights
are on, even if the radio i")
You can use the instrument panel
brightness control dial to adjust the il-
lumination of the audio system (see
page ). The audio system
illuminates when the parking lights
are on, even if the radio is turned of f .
Theaudiosystemalsodisplaysthe
time. To set the time, the ignition
switch must be in ACCESSORY (I)
or ON (II), and you must wait about
f ive seconds af ter perf orming any
other operations with the system.You can quickly set the time to the
nearest hour. If the displayed time is
bef ore the half hour, the clock is set
back to the previous hour by
pressing and holding the CLOCK
button, then pressing the RESET
(Preset 6) button. If the displayed
time is af ter the half hour, the clock
is set forward to the beginning of the
next hour.For example:
1:06 would RESET to 1:00.
1:52 would RESET to 2:00.
Adjust the minutes by pressing and
holding the CLOCK button, then
pressing the M (Preset 5) button.
Adjust the hours by pressing and
holding the CLOCK button, then
pressing the H (Preset 4) button. 71
Audio System
Comf ort and Convenience Feat ures
A udio System L ighting
Digital Clock
119
CCLLOOCCKKBBUUTTTTOONN
RREESSEETTBBUUTTTTOONN
MMBBUUTTTTOONN
HHBBUUTTTTOONN
Page 119 of 319

tape, and autoreverse f or continuous
play.
When the system reaches the end of
the tape")
�Î
�Î �Û
The cassette system f eatures Dolby
B noise reduction, automatic
sensing of chromium-dioxide (CrO )
tape, and autoreverse f or continuous
play.
When the system reaches the end of
the tape, it will automatically reverse
direction and play the other side. If
you want to remove the cassette
f rom the drive, press the EJECT
button.
If you turn the system of f while a
tape is playing, either with the PWR/
VOL knob or by turning of f the
ignition, the cassette will remain in
the drive. When you turn the system
back on, the tape will begin playing
where it lef t of f .
To switch to the radio or optional CD
changer while listening to a tape,
press the AM/FM or CD/TAPE
button. To change back to the
cassette player, press the CD/TAPE
button.
The tape direction indicator will light
to show you which side of the
cassette is playing. The indicates
thesideyouinsertedfacingupward
is now playing. If you want to play
the other side, press the PROG
button.
Make sure the tape opening on the
cassette is facing to the right, then
insert the cassette most of the way
into the slot. The system will pull it
in the rest of the way, and begin to
play.
Dolby noise reduction turns on when
you insert a cassette. If the tape was
not recorded with Dolby noise
reduction, turn it of f by pressing the
NR button.
2
Dolby noise reduction manuf actured under
license from Dolby Laboratories Licensing Corpo-
ration. ‘‘DOLBY’’ and the double-D symbol are trademarks of Dolby Laboratories
Licensing Corporation.
Audio System
Comf ort and Convenience Feat ures
Operating the Optional Cassette
Player 120
Page 122 of 319
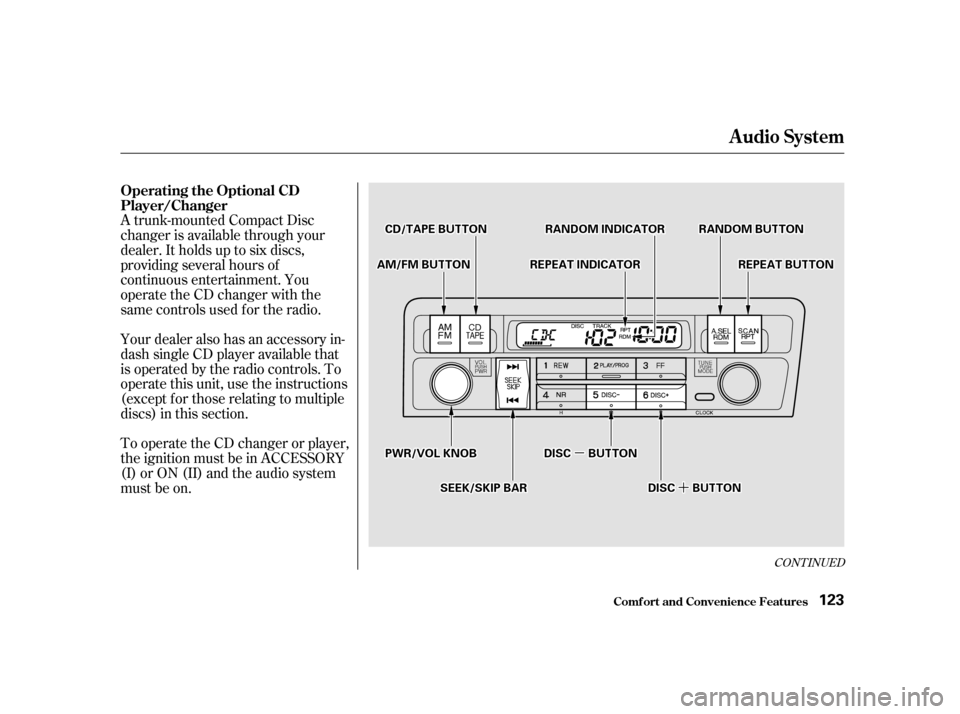
�µ�µ
�´�´
A trunk-mounted Compact Disc
changer is available through your
dealer. It holds up to six discs,
providing several hours of
continuous entertainment. You
operate the CD changer with the
same controls used f or the radio.
Your dealer also has an accessory in-
dash single CD player available that
is operated by the radio controls. To
operate this unit, use the instructions
(except f or those relating to multiple
discs) in this section.
To operate the CD changer or player,
the ignition must be in ACCESSORY
(I) or ON (II) and the audio system
must be on.
CONT INUED
Operating the Optional CD
Player/Changer
Audio System
Comf ort and Convenience Feat ures
123
RRAANNDDOOMMIINNDDIICCAATTOORR
DDIISSCCBBUUTTTTOONN
AAMM//FFMMBBUUTTTTOONNRREEPPEEAATTIINNDDIICCAATTOORRRREEPPEEAATTBBUUTTTTOONN
RRAANNDDOOMMBBUUTTTTOONNCCDD//TTAAPPEEBBUUTTTTOONN
PPWWRR//VVOOLLKKNNOOBB
DDIISSCCBBUUTTTTOONNSSEEEEKK//SSKKIIPPBBAARR