Page 124 of 319

�µ�µ
When you activate the
RepeatfeaturebypressingtheRPT
button, the system continuously
replays the current track. You will
see RPT in the display as a reminder.
Press the RPT button again to turn it
off.
This feature,
when activated, plays the tracks on a
CD in random order, rather than in
the order they are recorded on the
CD. To activate Random Play, press
the RDM button. You will see RDM
in the display. The system will then
select and play tracks randomly on
the current disc. When all tracks on
that disc have been played, the next
disc is loaded and played randomly.
This continues until you deactivate
RandomPlaybypressingtheRDM
button again.
If you push and hold the SEEK/
SKIP bar, the system will continue to
move across tracks. Release the bar
when you think it has reached the
desired place on the disc.
You can use the SEEK/SKIP bar to
select tracks within a disc. If you
press and release the SEEK/SKIP
bar, the system will move to the
beginning of a track. Press the
side to move to the beginning
of the next track, and the side
to move to the beginning of the
current track. To take the system out of CD mode,
press the AM/FM button or insert a
cassette in the player. If a tape is
already in the cassette player, press
the CD/TAPE button. When you
return to CD mode, play will contin-
ue at the same point that it left off.
If you turn the system of f while a CD
is playing, either with the PWR/VOL
knob or the ignition switch, play will
continue at the same point when you
turn it back on.
For inf ormation on how to handle
and protect compact discs, see page
.
For inf ormation, See page .
For inf ormation, See page . 151152
150
Audio System
Comf ort and Convenience Feat ures
REPEAT
RANDOM PLAY
Protecting Compact Discs
CD Player Error Indications
CD Changer Error Indications
CD Player and Changer
125
Page 125 of 319

�Î
�Î
Your Honda’s audio system provides
clear reception on both AM and FM
bands, while the preset buttons allow
you to easily select your f avorite
stations.
The cassette system f eatures Dolby
B noise reduction, automatic
sensing of chromium-dioxide (CrO )
tape, and autoreverse f or continuous
play.
The ignition switch must be in
ACCESSORY (I) or ON (II) to
operate the audio system. Turn the
system on by pressing the PWR/
VOL knob or the AM/FM button.
Adjust the volume by turning the
knob.The band and f requency that the
radio was last tuned to is displayed.
To change bands, press the AM/FM
button. On the FM band, ST will be
displayed if the station is broadcast-
ing in stereo. Stereo reproduction on
AM is not available.
2
Dolby noise reduction manuf actured under
license from Dolby Laboratories Licensing Corpo-
ration. ‘‘DOLBY’’ and the double-D symbol are trademarks of Dolby Laboratories
Licensing Corporation.
For LX model in the U.S.
Audio System
Comf ort and Convenience Feat ures
A M/FM/Cassette Stereo A udio
System
Operating the Radio
126
SSTTEERREEOOIINNDDIICCAATTOORR
PPRREESSEETTBBUUTTTTOONNSS
AAMM//FFMMBBUUTTTTOONNSSCCAANNIINNDDIICCAATTOORR
SSEEEEKKBBAARRSSCCAANNBBUUTTTTOONN
AAUUTTOOSSEELLEECCTTBBUUTTTTOONN
TTUUNNEEKKNNOOBBPPWWRR//VVOOLLKKNNOOBB
Page 130 of 319
. The audio system
illuminates when the parking lights
are on, even if the radio i")
You can use the instrument panel
brightness control dial to adjust the il-
lumination of the audio system (see
page ). The audio system
illuminates when the parking lights
are on, even if the radio is turned of f .
The audio system usually shows the
time when the ignition switch is in
ACCESSORY (I) or ON (II). It
shows the operation mode of the
radio, cassette player, or optional CD
changer when you operate them,
then goes back to the time display
af ter f ive seconds.Adjust the hours by pressing and
holding the CLOCK button, then
pressing the H (Preset 4) button.
Adjust the minutes by pressing and
holding the CLOCK button, then
pressing the M (Preset 5) button.
You can set the time only when the
clock is displayed.
If an error occurs while operating
the optional CD player or changer,
the display will keep showing the
error code and will not switch to the
time display until the error is
corrected (see pages and ).
71
151 152
CONT INUED
Audio System
Comf ort and Convenience Feat ures
A udio System L ighting
Digital Clock
131
CCLLOOCCKKBBUUTTTTOONN
RREESSEETTBBUUTTTTOONN
MMBBUUTTTTOONN
HHBBUUTTTTOONN
Page 132 of 319

�µ
�µ
When the system reaches the end of
the tape, it will automatically reverse
direction and play the other side. If
you want to remove the cassette
f rom the drive, press the EJECT
button.
Dolby B noise reduction turns on
when you insert a cassette. If the
tape was not recorded with Dolby B
noise reduction, turn it of f by
pressing the button.
The Skip Function allows
you to f ind the beginning of a song
or passage. To f ind the beginning of
the song or passage currently
playing, push the lower part of the
SKIP bar. You will see REW f lashing
in the display as the tape rewinds. To
f ind the beginning of the next song,
push the upper part of the SKIP bar.
You will see FF f lashing in the
display as the tape f ast f orwards.
When the system finds the
beginning of a song or passage, it
goes back to PLAY mode.
If you turn the system of f while a
tape is playing, either with the PWR/
VOL knob or by turning of f the
ignition, the cassette will remain in
the drive. When you turn the system
back on, the tape will begin playing
where it lef t of f . To switch to the radio or optional CD
changer while listening to a tape,
press the AM/FM or CD/TAPE
button. To change back to the
cassette player, press the CD/TAPE
button.
Fast Forward and Re-
wind move the tape rapidly. To re-
wind the tape, push the REW button.
You will see REW in the display. To
fast forward the tape, push the FF
button. You will see FF displayed.
Press the PLAY button to take the
system out of rewind or f ast f orward.
If the system reaches the end of the
tape while in f ast f orward or rewind,
it automatically stops that function,
reverses direction, and begins to play.
With a cassette playing, you can use
the FF, REW, SKIP, or REPEAT
f unction to f ind a desired program.
CONT INUED
Audio System
Comf ort and Convenience Feat ures SK IP
FF/REW
T ape Search Functions
133
Page 134 of 319
�µ�µ
�´�´
CONT INUED
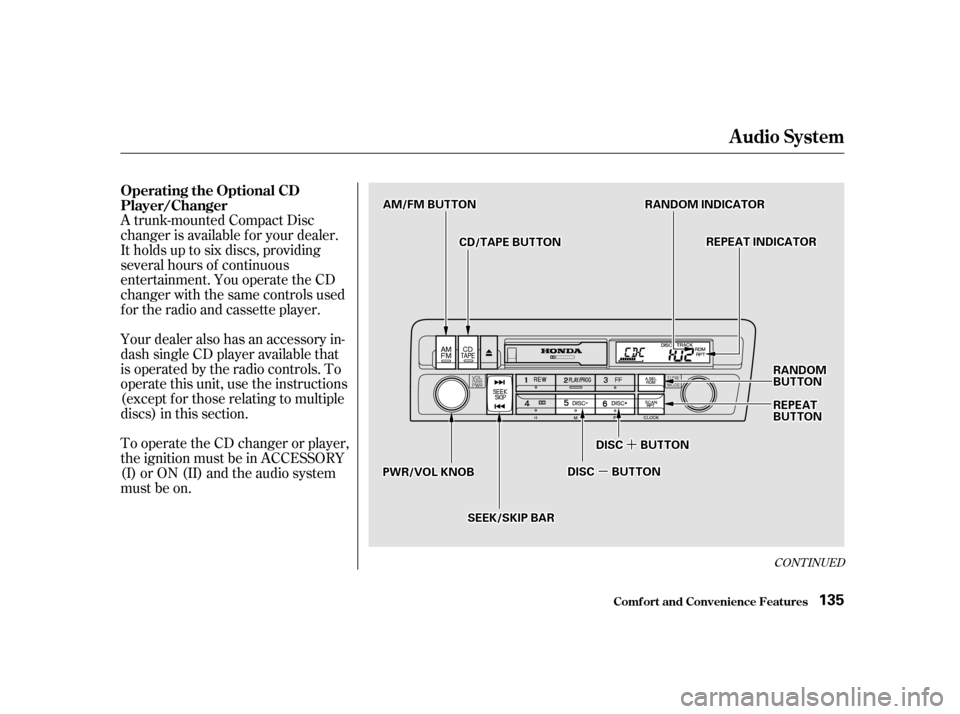
Your dealer also has an accessory in-
dash single CD player available that
is operated by the radio controls. To
operate this unit, use the instructions
(except f or those relating to multiple
discs) in this section.
A trunk-mounted Compact Disc
changer is available f or your dealer.
It holds up to six discs, providing
several hours of continuous
entertainment. You operate the CD
changer with the same controls used
f or the radio and cassette player.
To operate the CD changer or player,
the ignition must be in ACCESSORY
(I) or ON (II) and the audio system
must be on.
Audio System
Comf ort and Convenience Feat ures
Operating the Optional CD
Player/Changer
135
RRAANNDDOOMMIINNDDIICCAATTOORRAAMM//FFMMBBUUTTTTOONN
RREEPPEEAATTIINNDDIICCAATTOORR
PPWWRR//VVOOLLKKNNOOBB
RRAANNDDOOMMBBUUTTTTOONN
RREEPPEEAATTBBUUTTTTOONN
CCDD//TTAAPPEEBBUUTTTTOONN
SSEEEEKK//SSKKIIPPBBAARR
DDIISSCCBBUUTTTTOONN
DDIISSCCBBUUTTTTOONN
Page 136 of 319

�µ�µ
When you activate the
RepeatfeaturebypressingtheRPT
button, the system continuously
replays the current track. You will
see RPT in the display as a reminder.
Press the RPT button again to turn it
off.
This feature,
when activated, plays the tracks on a
CD in random order, rather than in
the order they are recorded on the
CD. To activate Random Play, press
the RDM button. You will see RDM
in the display. The system will then
select and play tracks randomly on
the current disc. When all tracks on
that disc have been played, the next
disc is loaded and played randomly.
This continues until you deactivate
RandomPlaybypressingtheRDM
button again.
If you push and hold the SEEK/
SKIP bar, the system will continue to
move across tracks. Release the bar
when you think it has reached the
desired place on the disc.
You can use the SEEK/SKIP bar to
select tracks within a disc. If you
press and release the SEEK/SKIP
bar, the system will move to the
beginning of a track. Press the
side to move to the beginning
of the next track, and the side
to move to the beginning of the
current track. To take the system out of CD mode,
press the AM/FM button or insert a
cassette in the player. If a tape is
already in the cassette player, press
the CD/TAPE button. When you
return to CD mode, play will contin-
ue at the same point that it left off.
If you turn the system of f while a CD
is playing, either with the PWR/VOL
knob or the ignition switch, play will
continue at the same point when you
turn it back on.
For inf ormation on how to handle
and protect compact discs, see page
.
For inf ormation, See page .
For inf ormation, See page . 151152
150
Audio System
Comf ort and Convenience Feat ures
REPEAT
RANDOM PLAY
Protecting Compact Discs
CD Player Error Indications
CD Changer Error Indications
CD Player and Changer
137
Page 137 of 319

The band and f requency that the
radio was last tuned to is displayed.
To change bands, press the AM/FM
button. On the FM band, ST will be
displayed if the station is broadcast-
ing in stereo. Stereo reproduction on
AM is not available.
Your Honda’s audio system provides
clear reception on both AM and FM
bands, while the preset buttons allow
you to easily select your f avorite
stations.
The anti-thef t f eature will disable the
system if it is disconnected f rom the
car’s battery. To get the system
working again, you must enter a
code number (see page ).
The ignition switch must be in
ACCESSORY (I) or ON (II) to
operate the audio system. Turn the
system on by pushing the PWR/
VOL knob. Adjust the volume by
turning the same knob.
157
For EX model in the U.S., and LX model
in Canada
Audio System
Comf ort and Convenience Feat ures
AM/FM/CD Audio System
Operating the Radio
138
SSTTEERREEOOIINNDDIICCAATTOORR
PPRREESSEETTBBUUTTTTOONNSS
AAMM//FFMMBBUUTTTTOONN
SSEEEEKKBBAARR
AAUUTTOOSSEELLEECCTTBBUUTTTTOONN
TTUUNNEEKKNNOOBBPPWWRR//VVOOLLKKNNOOBB
SSCCAANNIINNDDIICCAATTOORR
SSCCAANNBBUUTTTTOONN
Page 142 of 319
. The audio system
illuminates when the parking lights
are on, even if the radio i")
You can use the instrument panel
brightness control dial to adjust the il-
lumination of the audio system (see
page ). The audio system
illuminates when the parking lights
are on, even if the radio is turned of f .
The display of your audio system
usually shows the time when the
ignition switch is in ACCESSORY (I)
or ON (II). It shows the operation
mode of the radio, CD player, or
optional CD changer/cassette player
when you operate them, and goes
back to the time display after five
seconds.You can set the time only when the
clock is displayed.
Adjust the hours by pressing and
holding the CLOCK button, then
pressing the H (Preset 4) button.
Adjust the minutes by pressing and
holding the CLOCK button, then
pressing the M (Preset 5) button.
If an error occurs while operating
the CD player or optional CD
changer, the display will show the
error code and will not switch to the
time display until the error is
corrected (see pages and ).
71
151 152
CONT INUED
A udio System L ighting
Digital Clock
Audio System
Comf ort and Convenience Feat ures143
CCLLOOCCKKBBUUTTTTOONN
HHBBUUTTTTOONN
MMBBUUTTTTOONNRREESSEETTBBUUTTTTOONN