Page 305 of 394

6-17
Passenger Compartment Air Filter
The filter is located under the instrument panel below
the glove compartment.
To replace the passenger compartment air filter do
the following:
1. Remove the bolts on the access panel and set the
panel aside. Because this operation can be a little
difficult, you may choose to have it done at your
dealer's service department.
2. Reach under the
instrument panel
towards the front of
the vehicle and pull
down on the filter
retaining bracket.
3. Remove the air filter by pulling down on the
element. Remove the second portion of the air filter
by sliding it towards the rear of the vehicle and then
pulling downward.4. Install the new filter by reversing the steps listed
previously. Be sure to follow any instructions that
may be included in the replacement filter package.
Refer to the Maintenance Schedule to determine when
to replace the passenger compartment air filter. See
ªScheduled Maintenanceº in the Index.
Automatic Transmission Fluid
When to Check and Change
A good time to check your automatic transmission fluid
level is when the engine oil is changed.
Change both the fluid and filter every 50,000 miles
(83 000 km) if the vehicle is mainly driven under one
or more of these conditions:
�In heavy city traffic where the outside temperature
regularly reaches 90�F (32�C) or higher.
�In hilly or mountainous terrain.
�When doing frequent trailer towing.
�Uses such as found in taxi, police or delivery service.
If you do not use your vehicle under any of
these conditions, change the fluid and filter
every 100,000 miles (166 000 km).
See ªScheduled Maintenance Servicesº in the Index.
Page 306 of 394

6-18 How to Check
Because this operation can be a little difficult, you may
choose to have this done at the dealership service department.
If you do it yourself, be sure to follow all the instructions
here, or you could get a false reading on the dipstick.
NOTICE:
Too much or too little fluid can damage your
transmission. Too much can mean that some of
the fluid could come out and fall on hot engine
parts or exhaust system parts, starting a fire. Be
sure to get an accurate reading if you check your
transmission fluid.
Wait at least 30 minutes before checking the
transmission fluid level if you have been driving:
�When outside temperatures are above 90�F (32�C).
�At high speed for quite a while.
�In heavy traffic
-- especially in hot weather.
�While pulling a trailer.To get the right reading, the fluid should be at
normal operating temperature, which is 180�F
to 200�F (82�C to 93�C).
Get the vehicle warmed up by driving about 15 miles
(24 km) when outside temperatures are above 50�F
(10�C). If it's colder than 50�F (10�C), drive the
vehicle in THIRD (3) until the engine temperature gage
moves and then remains steady for 10 minutes.
A cold fluid check can be made after the vehicle has
been sitting for eight hours or more with the engine off,
but this is used only as a reference. Let the engine run at
idle for five minutes if outside temperatures are 50�F
(10�C) or more. If it's colder than 50�F (10�C), you
may have to idle the engine longer. Should the fluid
level be low during this cold check, you must check the
fluid hot before adding fluid. Checking the fluid hot will
give you a more accurate reading of the fluid level.
Page 307 of 394
6-19
Checking the Fluid Level
Prepare your vehicle as follows:
�Park your vehicle on a level place. Keep the
engine running.
�With the parking brake applied, place the shift lever
in PARK (P).
�With your foot on the brake pedal, move the shift
lever through each gear range, pausing for about
three seconds in each range. Then, position the shift
lever in PARK (P).
�Let the engine run at idle for three minutes or more.Then, without shutting off the engine, follow these steps:
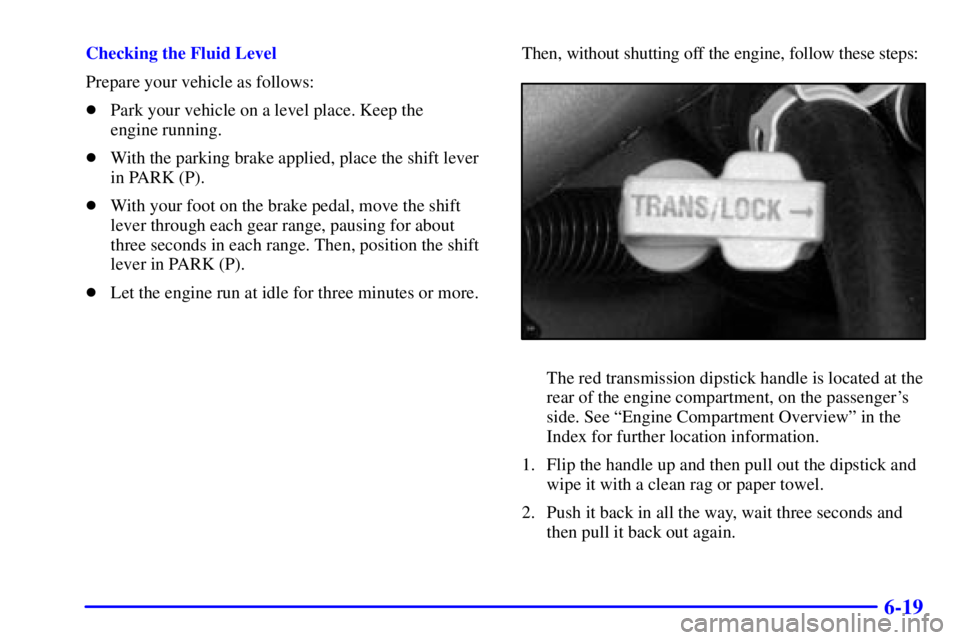
The red transmission dipstick handle is located at the
rear of the engine compartment, on the passenger's
side. See ªEngine Compartment Overviewº in the
Index for further location information.
1. Flip the handle up and then pull out the dipstick and
wipe it with a clean rag or paper towel.
2. Push it back in all the way, wait three seconds and
then pull it back out again.
Page 308 of 394

6-20
3. Check both sides of the dipstick, and read the lower
level. The fluid level must be in the COLD area,
below the cross
-hatched area, for a cold check or in
the HOT area or cross
-hatched area for a hot check.
4. If the fluid level is in the acceptable range, push the
dipstick back in all the way; then flip the handle
down to lock the dipstick in place.
How to Add Fluid
Refer to the Maintenance Schedule to determine what
kind of transmission fluid to use. See ªRecommended
Fluids and Lubricantsº in the Index.Add fluid only after checking the transmission fluid
while it is hot. (A cold check is used only as a
reference.) If the fluid level is low, add only enough of
the proper fluid to bring the level up to the HOT area for
a hot check. It doesn't take much fluid, generally less
than one pint (0.5 L). Don't overfill.
NOTICE:
We recommend you use only fluid labeled
DEXRON�-III, because fluid with that label is
made especially for your automatic transmission.
Damage caused by fluid other than
DEXRON
�-III is not covered by your new
vehicle warranty.
�After adding fluid, recheck the fluid level as
described under ªHow to Check.º
�When the correct fluid level is obtained, push the
dipstick back in all the way; then flip the handle
down to lock the dipstick in place.
Page 352 of 394

6-64
Name Usage
STUD #1 Accessory Power/Trailer Wiring
Feed/Load Leveling
ABS Anti
-Lock Brakes
IGN A Ignition Switch
AIR A.I.R. System
RAP #1 Retained Accessory Power, Power
Mirrors, Power Door Locks,
Power Seat(s)
IGN B Ignition Switch
RAP #2 Retained Accessory Power/Rear
Power Windows, Sunroof, Radio
STUD #2 Accessory Power/Trailer Wiring
Brake Feed
TRL R TRN Right Turn Signal Trailer Wiring
TRL L TRN Left Turn Signal Trailer Wiring
IGN 1 Ignition, Fuel Controls
INJ
-B Ignition, Fuel Controls (Relay)
STARTER Starter (Relay)
PARK LP Parking Lamps
FRT HVAC Climate Control System
STOP LP Exterior Lamps, Stoplamps
ECM 1 VCM/PCMName Usage
CHMSL Center High Mounted Stoplamp
VEH STOP Stoplamps, Cruise Control
TRL B/U Backup Lamps Trailer Wiring
INJ
-A Fuel Controls, Ignition
RR HVAC Rear HVAC
VEH B/U Vehicle Backup Lamps
ENG 1 Engine Controls, Canister Purge,
Fuel System
ETC Electronic Throttle Control
IGN E A/C Compressor Relay, Rear
Window Defogger, Daytime
Running Lamps, A.I.R. System
B/U LP Backup Lamps, Automatic
Transmission Shift Lock
Control System
ATC Automatic Transfer Case
RR DEFOG Rear Window Defogger,
Heated Mirrors (Relay)
RTD Autoride� (Real Time Damping)
RR PRK Right Rear Parking Lamps
ECM B VCM/PCM
F/PMP Fuel Pump (Relay)
Page 353 of 394

TRL PRK Parking Lamps Trailer Wiring
PRIME")
6-65
Name Usage
O2 A Oxygen Sensors
O2 B Oxygen Sensors
LR PRK Left Rear Parking Lamps
RR DEFOG Rear Window Defogger,
Heated Mirrors
HDLP Headlamps (Relay)
TRL PRK Parking Lamps Trailer Wiring
PRIME Not Used
RT HDLP Right Headlamps
DRL Daytime Running Lamps (Relay)
HTD MIR Heated Mirrors
LT HDLP Left Headlamps
A/C Air Conditioning
AUX PWR Cigarette Lighter, Auxiliary
Power Outlets
SEO 2 Special Equipment Option Power,
Power Seats, Aux Roof Mnt Lamp
SEO 1 Special Equipment Option Power,
Aux Roof Mnt Lamp, Cell Phone
DRL Daytime Running Lamps
A/C A/C (Relay)
FOG LP Fog LampsName Usage
FOG LP Fog Lamps (Relay)
RADIO Audio System, Instrument Cluster,
Climate Control System
CIGAR Cigarette Lighter, Auxiliary
Power Outlets
RT TURN Right Turn Signals
BTSI Automatic Transmission Shift
Lock Control System
LT TURN Left Turn Signals
FR PRK Front Parking Lamps,
Sidemarker Lamps
W/W PMP Windshield Washer Pump
HORN Horn (Relay)
IGN C Ignition Switch, Fuel Pump,
PRND321 Display, Crank
RDO AMP Radio Amplifier
HAZ LP Exterior Lamps, Hazard Lamps
EXP LPS Not Used
HORN Horn
CTSY LP Interior Lamps
RR WPR Rear Wipers
TBC Body Control Module, Remote
Keyless Entry, Headlamps
Page 361 of 394
. Re")
Scheduled Maintenance
7-6Engine Oil and Chassis Lubrication
Scheduled Maintenance
Change engine oil and filter as indicated by the
GM Oil Life System� (or every 12 months,
whichever occurs first). Reset the system. The system
will show you when to change the oil
-- usually between
3,000 miles (5 000 km) and 10,000 miles (16 000 km)
since your last oil change. Under severe conditions, the
indicator may come on before 3,000 miles (5 000 km).
Never drive your vehicle more than 10,000 miles
(16 000 km) or 12 months without an oil and
filter change.The system won't detect dust in the oil. So if you
drive in a dusty area, be sure to change your oil and
filter every 3,000 miles (5 000 km) or sooner if the
CHANGE ENGINE OIL message appears. Remember
to reset the Oil Life System when the oil and filter have
been changed. See ªOil Life Systemº in the Index for
information on resetting.
An Emission Control Service.
Lubricate chassis components with each engine oil and
filter change. Lubricate the front suspension, ball joints,
steering linkage, transmission shift linkage, transfer case
shift linkage, parking brake cable guides, and brake
front axle. Ball joints should not be lubricated unless
their temperature is 10�F (
-12�C) or higher, or they
could be damaged.
Page 366 of 394
Scheduled Maintenance
7-11
50,000 Miles (83 000 km)
�Change automatic transmission fluid and filter if the vehicle is mainly driven
under one or more of these conditions:
± In heavy city traffic where the outside temperature regularly reaches
90�F (32�C) or higher.
± In hilly or mountainous terrain.
± When doing frequent trailer towing.
± Uses such as found in taxi, police or delivery service.
If you do not use your vehicle under any of these conditions, change the
fluid and filter at 100,000 miles (166 000 km).
52,500 Miles (87 500 km)
�Check rear/front axle fluid level and add fluid as needed. Check constant
velocity joints and axle seals for leaking.
�Rotate tires. See ªTire Inspection and Rotationº in the Index for proper
rotation pattern and additional information. (See footnote +.)
ACTUAL
SERVICED BY:MILEAGE
DATE
ACTUAL
SERVICED BY:MILEAGE
DATE