2001 FORD SUPER DUTY Mount
[x] Cancel search: MountPage 134 of 288
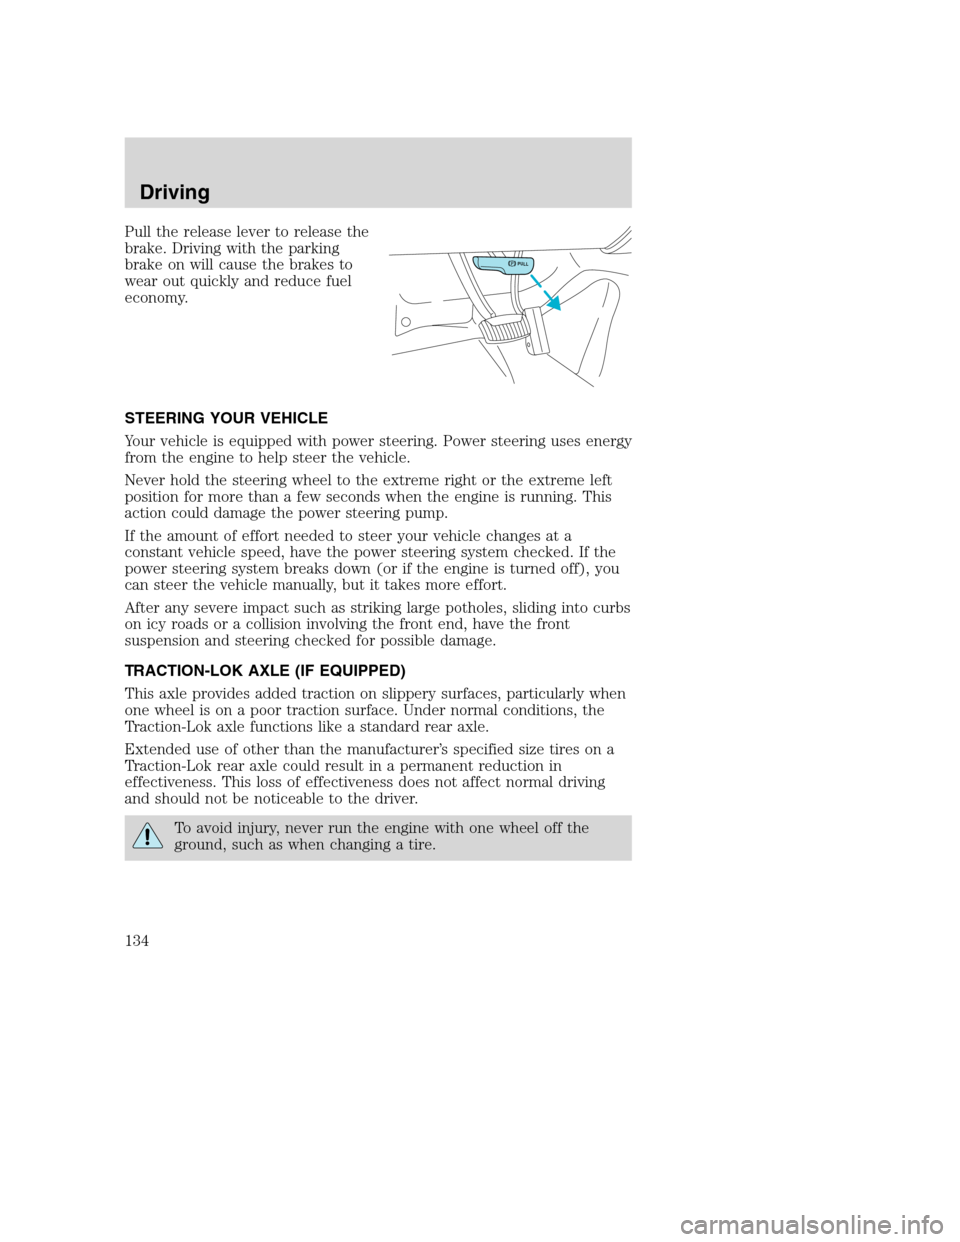
Pull the release lever to release the
brake. Driving with the parking
brake on will cause the brakes to
wear out quickly and reduce fuel
economy.
STEERING YOUR VEHICLE
Your vehicle is equipped with power steering. Power steering uses energy
from the engine to help steer the vehicle.
Never hold the steering wheel to the extreme right or the extreme left
position for more than a few seconds when the engine is running. This
action could damage the power steering pump.
If the amount of effort needed to steer your vehicle changes at a
constant vehicle speed, have the power steering system checked. If the
power steering system breaks down (or if the engine is turned off), you
can steer the vehicle manually, but it takes more effort.
After any severe impact such as striking large potholes, sliding into curbs
on icy roads or a collision involving the front end, have the front
suspension and steering checked for possible damage.
TRACTION-LOK AXLE (IF EQUIPPED)
This axle provides added traction on slippery surfaces, particularly when
one wheel is on a poor traction surface. Under normal conditions, the
Traction-Lok axle functions like a standard rear axle.
Extended use of other than the manufacturer’s specified size tires on a
Traction-Lok rear axle could result in a permanent reduction in
effectiveness. This loss of effectiveness does not affect normal driving
and should not be noticeable to the driver.
To avoid injury, never run the engine with one wheel off the
ground, such as when changing a tire.
PULL
Driving
134
Page 146 of 288
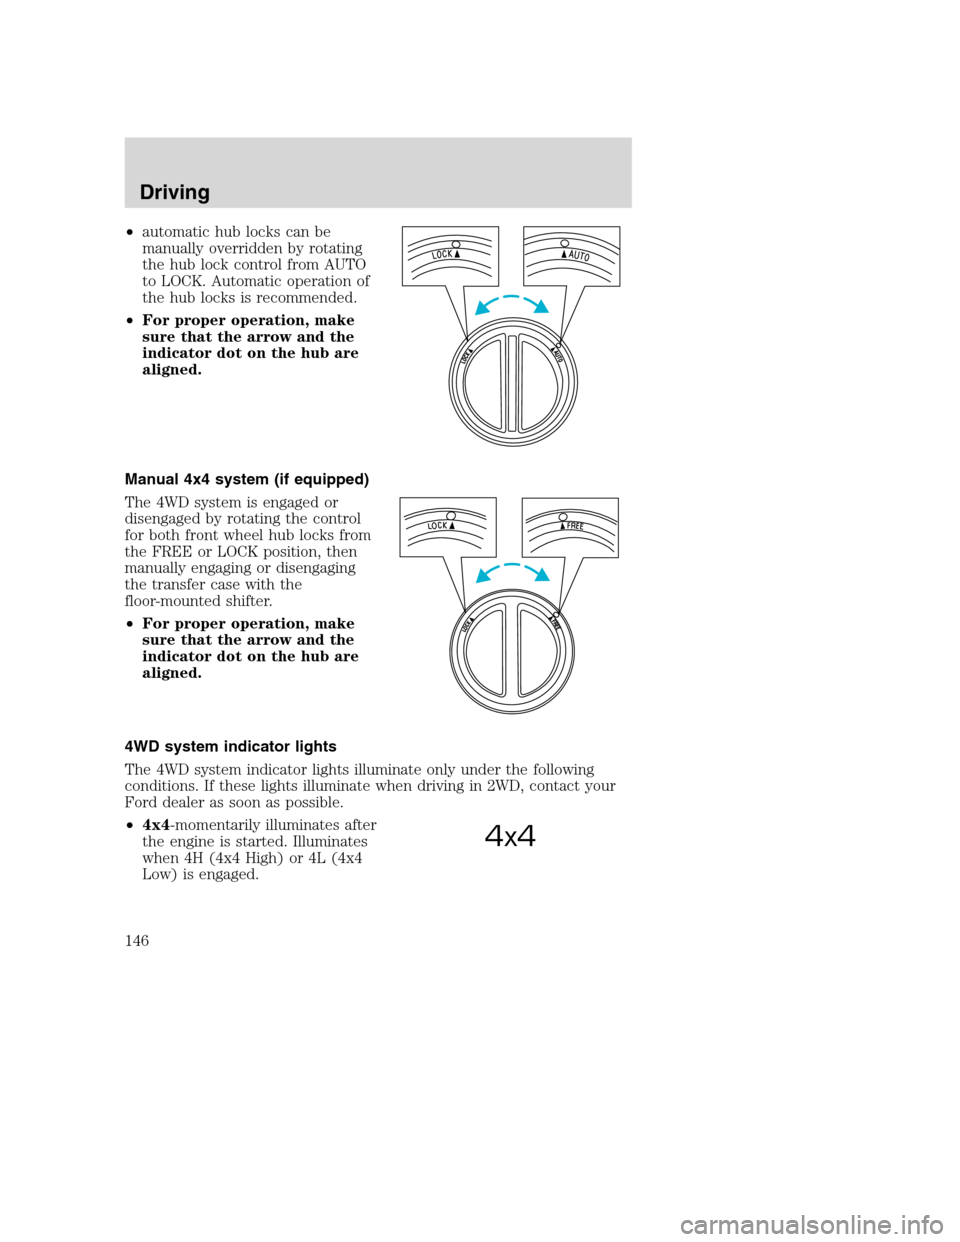
•automatic hub locks can be
manually overridden by rotating
the hub lock control from AUTO
to LOCK. Automatic operation of
the hub locks is recommended.
•For proper operation, make
sure that the arrow and the
indicator dot on the hub are
aligned.
Manual 4x4 system (if equipped)
The 4WD system is engaged or
disengaged by rotating the control
for both front wheel hub locks from
the FREE or LOCK position, then
manually engaging or disengaging
the transfer case with the
floor-mounted shifter.
•For proper operation, make
sure that the arrow and the
indicator dot on the hub are
aligned.
4WD system indicator lights
The 4WD system indicator lights illuminate only under the following
conditions. If these lights illuminate when driving in 2WD, contact your
Ford dealer as soon as possible.
•4x4-momentarily illuminates after
the engine is started. Illuminates
when 4H (4x4 High) or 4L (4x4
Low) is engaged.
4x4
Driving
146
Page 155 of 288
•Maximum Trailer Weight:Maximum weight of a trailer the loaded
vehicle (including occupants and cargo) is permitted to tow. It is
determined by subtracting the weight of the loaded trailer towing
vehicle from the GCWR for the towing vehicle.
•Trailer Weight Range:Specified weight range that the trailer must
fall within that ranges from zero to the maximum trailer weight rating.
Remember to figure in the tongue load of your loaded trailer when
figuring the total weight.
Do not exceed the GVWR or the GAWR specified on the
certification label.
Do not use replacement tires with lower load carrying capacities than the
originals because they may lower the vehicle’s GVWR and GAWR
limitations. Replacement tires with a higher limit than the originals do
not increase the GVWR and GAWR limitations.
The Safety Certification Label, found on the driver’s door pillar, lists
several important vehicle weight rating limitations. Before adding any
additional equipment, refer to these limitations. If you are adding weight
to the front of your vehicle, (potentially including weight added to the
cab), the weight added should not exceed the front axle reserve capacity
(FARC). Additional frontal weight may be added to the front axle reserve
capacity provided you limit your payload in other ways (i.e. restrict the
number of occupants or amount of cargo carried).
Always ensure that the weight of occupants, cargo and equipment being
carried is within the weight limitations that have been established for
your vehicle including both gross vehicle weight and front and rear gross
axle weight rating limits. Under no circumstance should these limitations
be exceeded. Exceeding any vehicle weight rating limitation could result
in serious damage to the vehicle and/or personal injury.
Special loading instructions for owners of pickup trucks and
utility-type vehicles
For important information regarding safe operation of this type
of vehicle, see thePreparing to drive your vehiclesection
intheDrivingchapter of this owner guide.
Driving
155
Page 161 of 288
Do not connect a trailer’s hydraulic brake system directly to your
vehicle’s brake system. Your vehicle may not have enough
braking power and your chances of having a collision greatly increase.
The braking system of the tow vehicle is rated for operation at the
GVWR not GCWR.
Trailer lamps
Trailer lamps are required on most towed vehicles. Make sure your
trailer lamps conform to local and Federal regulations. See your dealer or
trailer rental agency for proper instructions and equipment for hooking
up trailer lamps.
Using a step bumper (if equipped)
The rear bumper is equipped with an integral hitch and only requires a
ball with a 25.4 mm (one inch) shank diameter. The bumper has a
2 270 kg (5 000 lb.) trailer weight and 227 kg (500 lb.) tongue weight
capacity.
If it is necessary to relocate the trailer hitch ball position, a
frame-mounted trailer hitch must be installed.
Driving while you tow
When towing a trailer:
•Ensure that you turn off your speed control. The speed control may
shut off automatically when you are towing on long, steep grades.
•Consult your local motor vehicle speed regulations for towing a trailer.
•Use a lower gear when towing up or down steep hills. This will
eliminate excessive downshifting and upshifting for optimum fuel
economy and transmission cooling.
•Anticipate stops and brake gradually.
Exceeding the GCWR rating may cause internal transmission
damage and void your warranty coverage.
Servicing after towing
If you tow a trailer for long distances, your vehicle will require more
frequent service intervals. Refer to your scheduled maintenance guide for
more information.
Driving
161
Page 167 of 288
GETTING ROADSIDE ASSISTANCE
To fully assist you should you have a vehicle concern, Ford offers a
complimentary roadside assistance program. This program is separate
from the New Vehicle Limited Warranty. The service is available:
•24–hours, seven days a week
•for the Basic warranty period (Canada) or New Vehicle Limited
Warranty period (U.S.) of three years or 60 000 km (36 000 miles),
whichever comes first on Ford and Mercury vehicles, and four years or
80 000 km (50 000 miles) on Lincoln vehicles
Roadside assistance will cover:
•changing a flat tire
•jump-starts
•lock-out assistance
•fuel delivery
•towing of your disabled vehicle up to 56.3 kms (35 miles) from the
point of pickup (this can include to the nearest Ford dealership, or
your selling dealer if within the specified distance.) One tow per
disablement. Even non-warranty related tows, like accidents or getting
stuck in the mud or snow, are covered (some exclusions apply, such
as impound towing or repossession).
Using roadside assistance
Complete the roadside assistance identification card and place it in your
wallet for quick reference. In the United States, this card is found in the
Owner Guide portfolio in the glove compartment in Ford vehicles and is
mailed to you if you own a Mercury or Lincoln. In Canada, the card is
found in the Roadside Assistance book in the glove compartment.
To receive roadside assistance in the United States for Ford or Mercury
vehicles, call 1–800–241–3673 or if you own a Lincoln vehicle, call
1–800–521–4140. In Canada call 1–800–665–2006.
Should you need to arrange roadside assistance for yourself, Ford will
reimburse a reasonable amount. To obtain information about
reimbursement, call 1–800–241–3673 in the United States for Ford or
Mercury vehicles; or if you own a Lincoln vehicle, call 1–800–521–4140.
Call 1–800–665–2006 in Canada.
Roadside emergencies
167
Page 173 of 288
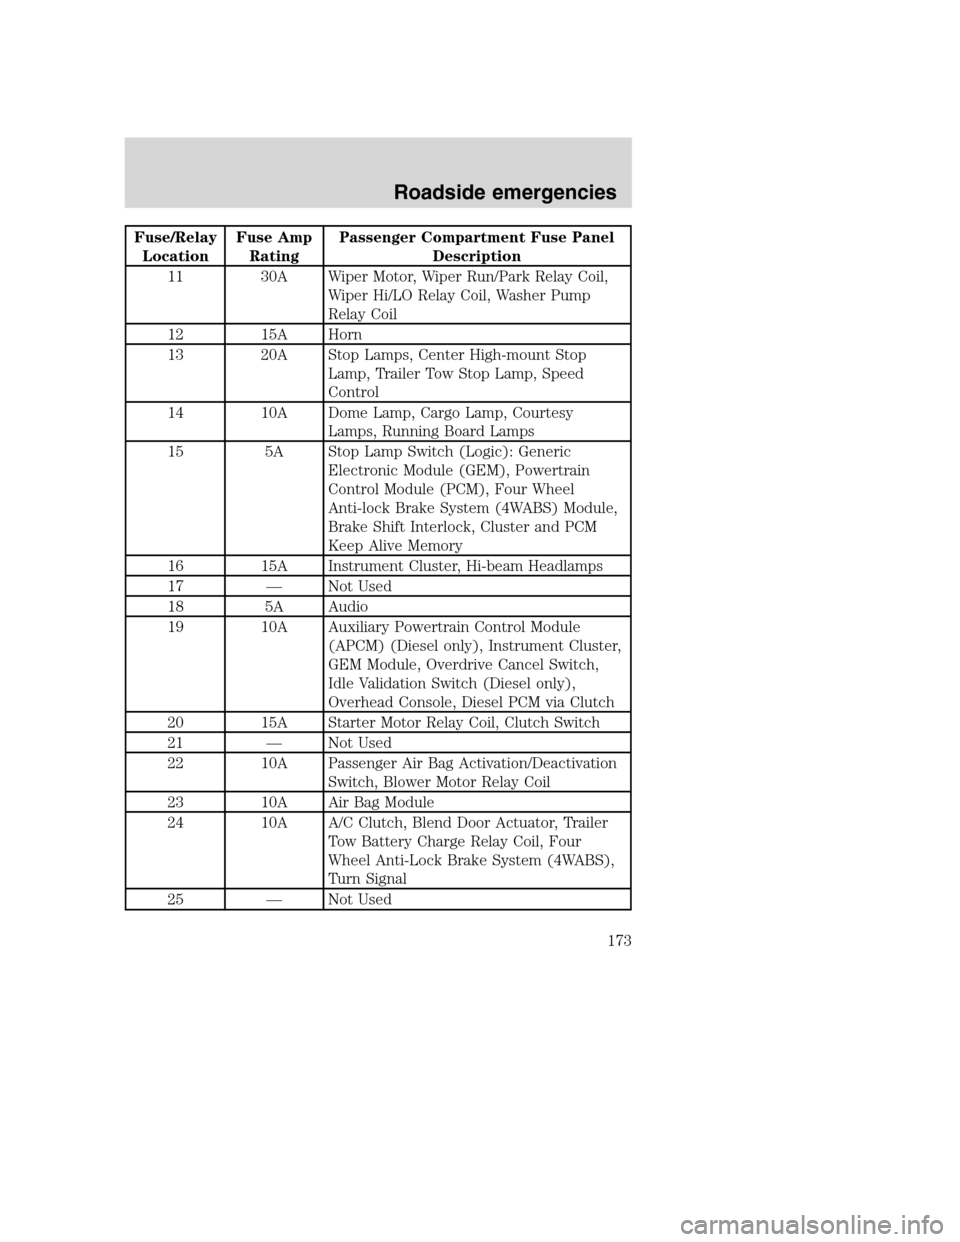
Fuse/Relay
LocationFuse Amp
RatingPassenger Compartment Fuse Panel
Description
11 30A Wiper Motor, Wiper Run/Park Relay Coil,
Wiper Hi/LO Relay Coil, Washer Pump
Relay Coil
12 15A Horn
13 20A Stop Lamps, Center High-mount Stop
Lamp, Trailer Tow Stop Lamp, Speed
Control
14 10A Dome Lamp, Cargo Lamp, Courtesy
Lamps, Running Board Lamps
15 5A Stop Lamp Switch (Logic): Generic
Electronic Module (GEM), Powertrain
Control Module (PCM), Four Wheel
Anti-lock Brake System (4WABS) Module,
Brake Shift Interlock, Cluster and PCM
Keep Alive Memory
16 15A Instrument Cluster, Hi-beam Headlamps
17 — Not Used
18 5A Audio
19 10A Auxiliary Powertrain Control Module
(APCM) (Diesel only), Instrument Cluster,
GEM Module, Overdrive Cancel Switch,
Idle Validation Switch (Diesel only),
Overhead Console, Diesel PCM via Clutch
20 15A Starter Motor Relay Coil, Clutch Switch
21 — Not Used
22 10A Passenger Air Bag Activation/Deactivation
Switch, Blower Motor Relay Coil
23 10A Air Bag Module
24 10A A/C Clutch, Blend Door Actuator, Trailer
Tow Battery Charge Relay Coil, Four
Wheel Anti-Lock Brake System (4WABS),
Turn Signal
25 — Not Used
Roadside emergencies
173
Page 190 of 288
The following steps apply to all vehicles:
19.
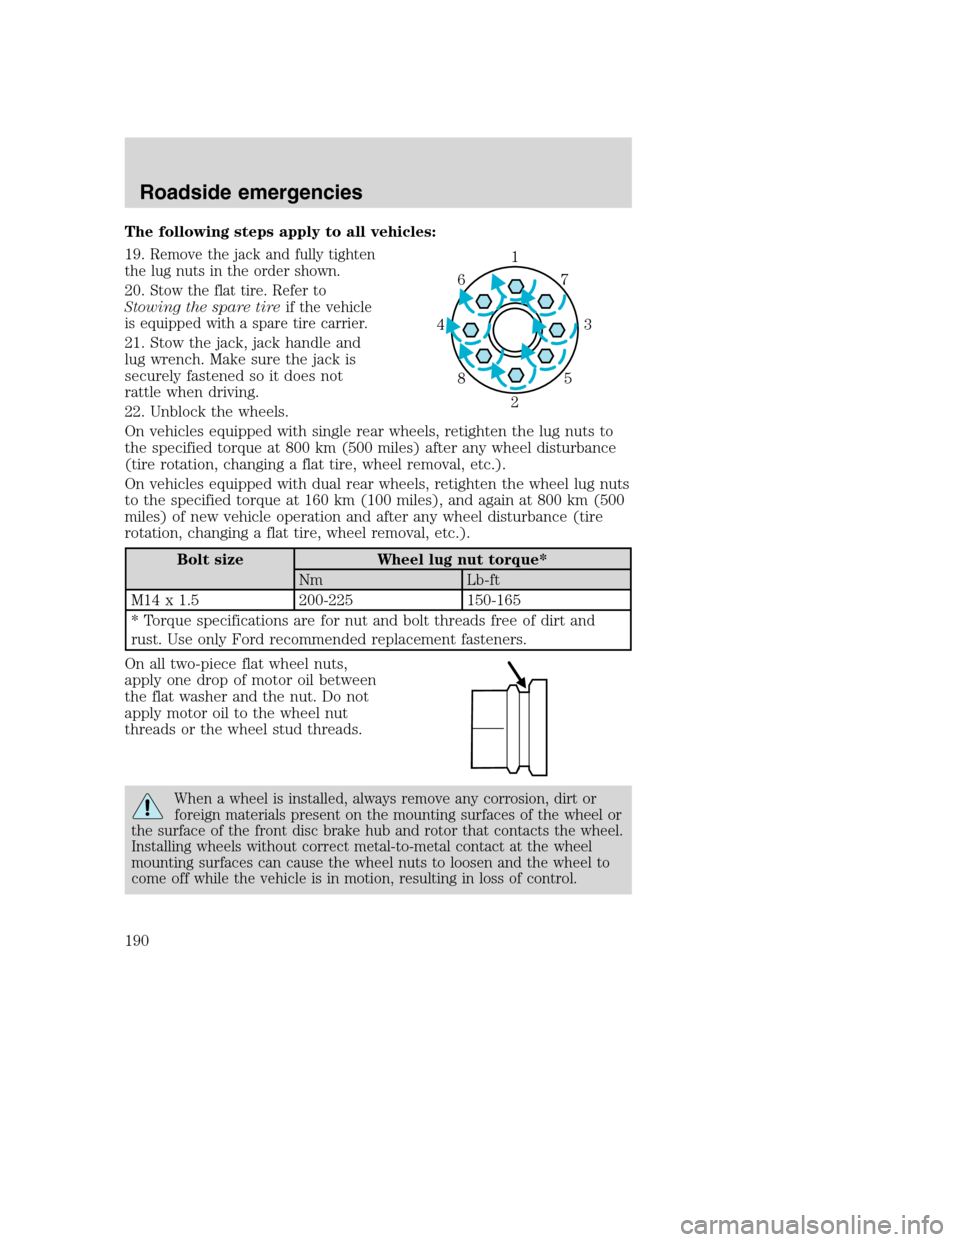
Remove the jack and fully tighten
the lug nuts in the order shown.
20.Stow the flat tire. Refer to
Stowing the spare tireif the vehicle
is equipped with a spare tire carrier.
21. Stow the jack, jack handle and
lug wrench. Make sure the jack is
securely fastened so it does not
rattle when driving.
22. Unblock the wheels.
On vehicles equipped with single rear wheels, retighten the lug nuts to
the specified torque at 800 km (500 miles) after any wheel disturbance
(tire rotation, changing a flat tire, wheel removal, etc.).
On vehicles equipped with dual rear wheels, retighten the wheel lug nuts
to the specified torque at 160 km (100 miles), and again at 800 km (500
miles) of new vehicle operation and after any wheel disturbance (tire
rotation, changing a flat tire, wheel removal, etc.).
Bolt size Wheel lug nut torque*
Nm Lb-ft
M14 x 1.5 200-225 150-165
* Torque specifications are for nut and bolt threads free of dirt and
rust. Use only Ford recommended replacement fasteners.
On all two-piece flat wheel nuts,
apply one drop of motor oil between
the flat washer and the nut. Do not
apply motor oil to the wheel nut
threads or the wheel stud threads.
When a wheel is installed, always remove any corrosion, dirt or
foreign materials present on the mounting surfaces of the wheel or
the surface of the front disc brake hub and rotor that contacts the wheel.
Installing wheels without correct metal-to-metal contact at the wheel
mounting surfaces can cause the wheel nuts to loosen and the wheel to
come off while the vehicle is in motion, resulting in loss of control.
1
3 4
27 6
5 8
Roadside emergencies
190
Page 208 of 288
Adding engine coolant
When adding coolant, make sure it is a 50/50 mixture of engine coolant
and distilled water. Add the mixture to the coolant reservoir,when the
engine is cool, until the appropriate fill level is obtained.
Do not add engine coolant when the engine is hot. Steam and
scalding liquids released from a hot cooling system can burn you
badly. Also, you can be burned if you spill coolant on hot engine parts.
Do not put engine coolant in the windshield washer fluid
container. If sprayed on the windshield, engine coolant could
make it difficult to see through the windshield.
The cooling system in your vehicle is filled with either green-colored
Motorcraft Premium Engine Coolant meeting Ford specification
ESE-M97B44–A or yellow-colored Motorcraft Premium Gold Engine
Coolant meeting Ford Specification WSS-M97B51–A1. To determine your
vehicle’s coolant type (color), check your coolant reservoir.
•Add Motorcraft Premium Engine Coolant (green-colored),
VC-4–A (U.S.) or CXC-10 (Canada) or Motorcraft Premium
Gold Engine Coolant (yellow-colored), VC-7–A, depending on
the type of coolant originally equipped in your vehicle.If you
are unsure which type of coolant your vehicle requires, check your
coolant reservoir or contact your local dealer.
•Do not add/mix an orange-colored, extended life coolant such
as Motorcraft Speciality Orange Engine Coolant, VC-2 (US) or
CXC-209 (Canada), meeting Ford specification WSS-M97B44–D
with the factory-filled coolant.Mixing Motorcraft Speciality Orange
Engine Coolant or any orange-colored extended life product with your
factory filled coolant can result in degraded corrosion protection.
•A large amount of water without engine coolant may be added, in case
of emergency, to reach a vehicle service location. In this instance, the
cooling system must be drained and refilled with a 50/50 mixture of
engine coolant and distilled water as soon as possible. Water alone
(without engine coolant) can cause engine damage from corrosion,
overheating or freezing.
Maintenance and care
208