Page 137 of 240
1 (First)
The transmission has to be manually shifted into 1 (First) and will not
shift into a higher gear. Use this position when pulling through mud or
snow, driving up steep grades, hauling extra heavy loads or where
maximum reduction is required.
Allison 2400 series
This transmission provides five forward speeds in four ranges and one
reverse range.
P (Park)
Use this position when you start the engine. The engine is designed to
start in the P (Park) or N (Neutral) position only.
Always come to a complete stop before shifting into P (Park). Make sure
the gearshift is securely latched in P (Park). This position locks the
transmission and prevents the rear wheels from turning.
Always set the parking brake fully and make sure the gearshift
lever is latched in P (Park). Turn off the ignition whenever you
leave your vehicle.
When parking on hilly or off-road terrains, be sure to set the parking
brake fully and chock the wheels to prevent unexpected and possibly
sudden vehicle movement.
R (Reverse)
Use this position to move the vehicle backwards. Completely stop the
vehicle before shifting from a forward gear (1, 2, 4 or D) to R (Reverse),
or from R (Reverse) to any forward gear. The reverse warning signal will
sound when the selector is in R (Reverse). Reverse has only one gear
and provides the greatest gear reduction.
N (Neutral)
This position can be used when starting the engine. The engine is
designed to start in the P (Park) or N (Neutral) position only. The
engine should be at idle speed when any shift from N (Neutral) to a
drive range is made.
The N (Neutral) position may also be used during stationary operation of
the Power Take-Off (PTO), if equipped.
Driving
137
Page 145 of 240
Passenger compartment fuse panel
The fuse panel is located below and to the left of the steering wheel by
the brake pedal. Remove the panel cover to access the fuses.
To remove a fuse use the fuse puller tool provided on the fuse panel cover.
The fuses are coded as follows.
Fuse/Relay
LocationFuse Amp
RatingPassenger Compartment Fuse
Panel Description
1 20A Horn
2 15A Turn/Hazard Lamps
3 20A Cigar Lighter
4 10A Diagnostic Connectors
5 15A Back-Up Lamps, DRL Relays,
Blend Door Actuator, Heated Seat
Module (SuperCrewzer only),
On/Off Fan Clutch (SuperCrewzer
only), Warning Chime Module
(SuperCrewzer only)
Relay #1
Relay #2
Relay #3
Horn
Relay #4
Relay #5 One Touch
Down Interior
Lamps#1
#12#22
#2
#3
#4
#5
#6
#7
#8
#9
#10
#11#13
#23
#14
#15
#16
#17#24
#25
#26
#27
#18
#28
#19
#29
#20
#21#30
#31
Roadside emergencies
145
Page 146 of 240
Fuse/Relay
LocationFuse Amp
RatingPassenger Compartment Fuse
Panel Description
6 Ð Not Used
7 Ð Not Used
8 5A Radio, GEM
9 5A Switch Illumination (Headlamp,
Power Windows, Power Door
Locks), Power Window Relay,
Trailer Hook Up Lamps
(SuperCrewzer only)
10 Ð Not Used
11 30A Wiper Motor, Washer Pump Relay
12 10A Stoplamp Switch (Hydraulic
Vehicles Only)
13 20A Radio, Cluster, 7.3L Power Stroke
Powertrain Control Module
(PCM), Keep Alive Memory
14 10A Interior Lamps, Runningboard
lamps (SuperCrewzer only)
15 10A GEM, Interior Lamp Relay, Map
Lamps, Glove Box Lamps
(SuperCrewzer only), Power
Mirrors (SuperCrewzer only),
Warning Chime Module
(SuperCrewzer only)
16 15A Highbeams
17 Ð Not Used
18 5A Headlamp switch, GEM
19 15A Engine, Cluster, Cummins PC M,
CAT PCM, 7.3L Power Stroke
PCM (Idle Valid Switch Input)
20 15A Starter Relay, GEM
21 10A Daytime Running Lamps (DRL)
22 15A Exhaust Brake (SuperCrewzer
only), Heated Mirrors
(SuperCrewzer only), Rear Air
Suspension (SuperCrewzer only)
Roadside emergencies
146
Page 166 of 240
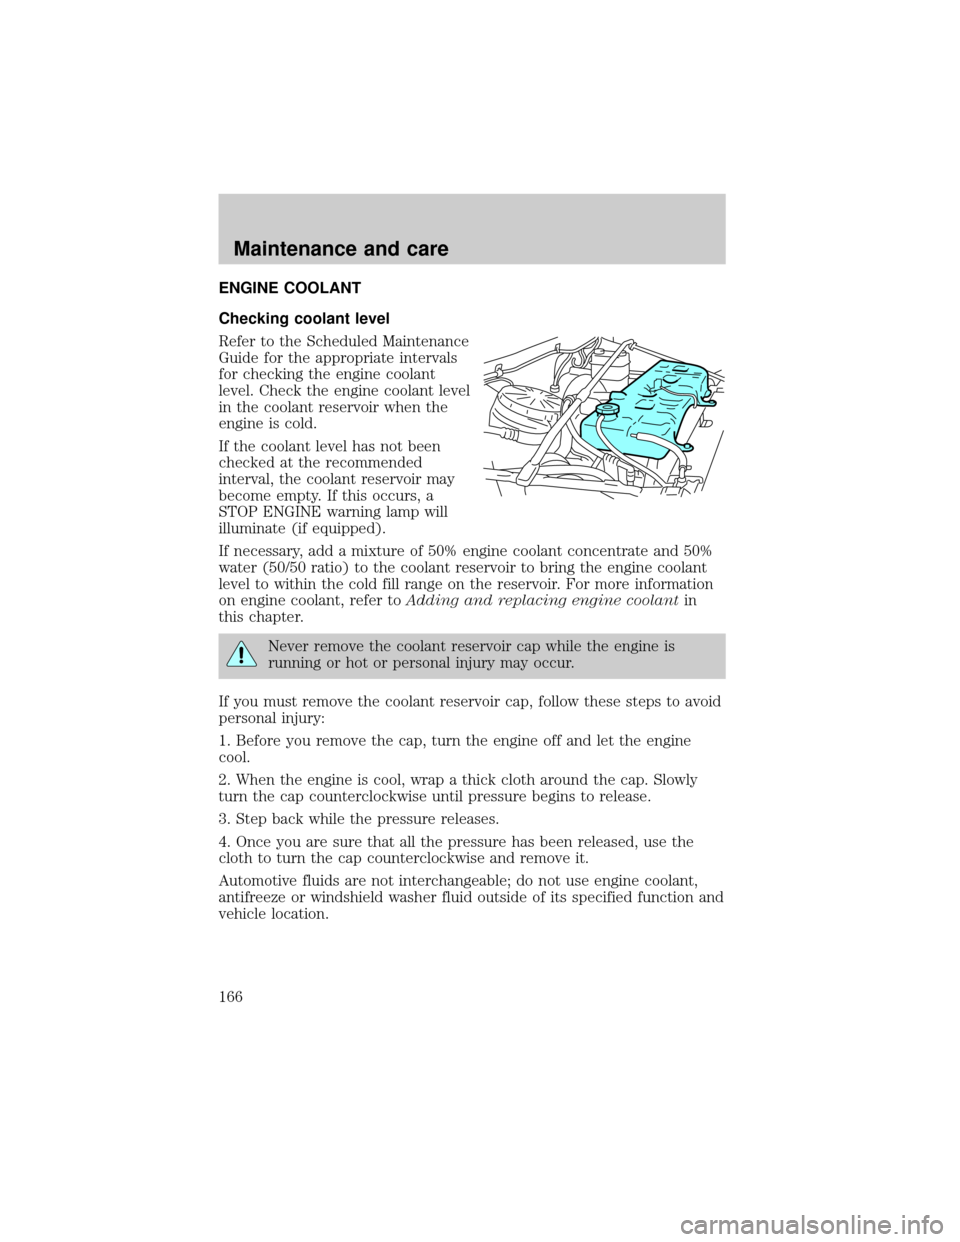
ENGINE COOLANT
Checking coolant level
Refer to the Scheduled Maintenance
Guide for the appropriate intervals
for checking the engine coolant
level. Check the engine coolant level
in the coolant reservoir when the
engine is cold.
If the coolant level has not been
checked at the recommended
interval, the coolant reservoir may
become empty. If this occurs, a
STOP ENGINE warning lamp will
illuminate (if equipped).
If necessary, add a mixture of 50% engine coolant concentrate and 50%
water (50/50 ratio) to the coolant reservoir to bring the engine coolant
level to within the cold fill range on the reservoir. For more information
on engine coolant, refer toAdding and replacing engine coolantin
this chapter.
Never remove the coolant reservoir cap while the engine is
running or hot or personal injury may occur.
If you must remove the coolant reservoir cap, follow these steps to avoid
personal injury:
1. Before you remove the cap, turn the engine off and let the engine
cool.
2. When the engine is cool, wrap a thick cloth around the cap. Slowly
turn the cap counterclockwise until pressure begins to release.
3. Step back while the pressure releases.
4. Once you are sure that all the pressure has been released, use the
cloth to turn the cap counterclockwise and remove it.
Automotive fluids are not interchangeable; do not use engine coolant,
antifreeze or windshield washer fluid outside of its specified function and
vehicle location.
Maintenance and care
166
Page 180 of 240
Tires are one of the weaker weight carrying components of the
vehicle. Do not overload the vehicle beyond safe load carrying
capacity.
Avoid hammering rim with steel hammers.
Never run the engine with one wheel off the ground.
Failure to retighten wheel lug nuts as required could allow the
wheel to come off while the vehicle is in motion, possibly causing
loss of vehicle control and collision. Loose wheel studs may also cause
shimmy and vibration.
Use of aftermarket wheel assemblies is not recommended; they
may be incompatible with your vehicle and may result in
equipment failure and possible injury. Replacement with used wheels is
not advised; they may have been treated harshly or have high mileage
and could fail without warning.
A wheel or tire of the wrong size or type may adversely affect
such things as load carrying capacity, wheel and bearing life,
brake cooling, speedometer/odometer calibration, stopping ability,
headlight aim, bumper height, vehicle ground clearance and tire or tire
chain clearance to the body and chassis.
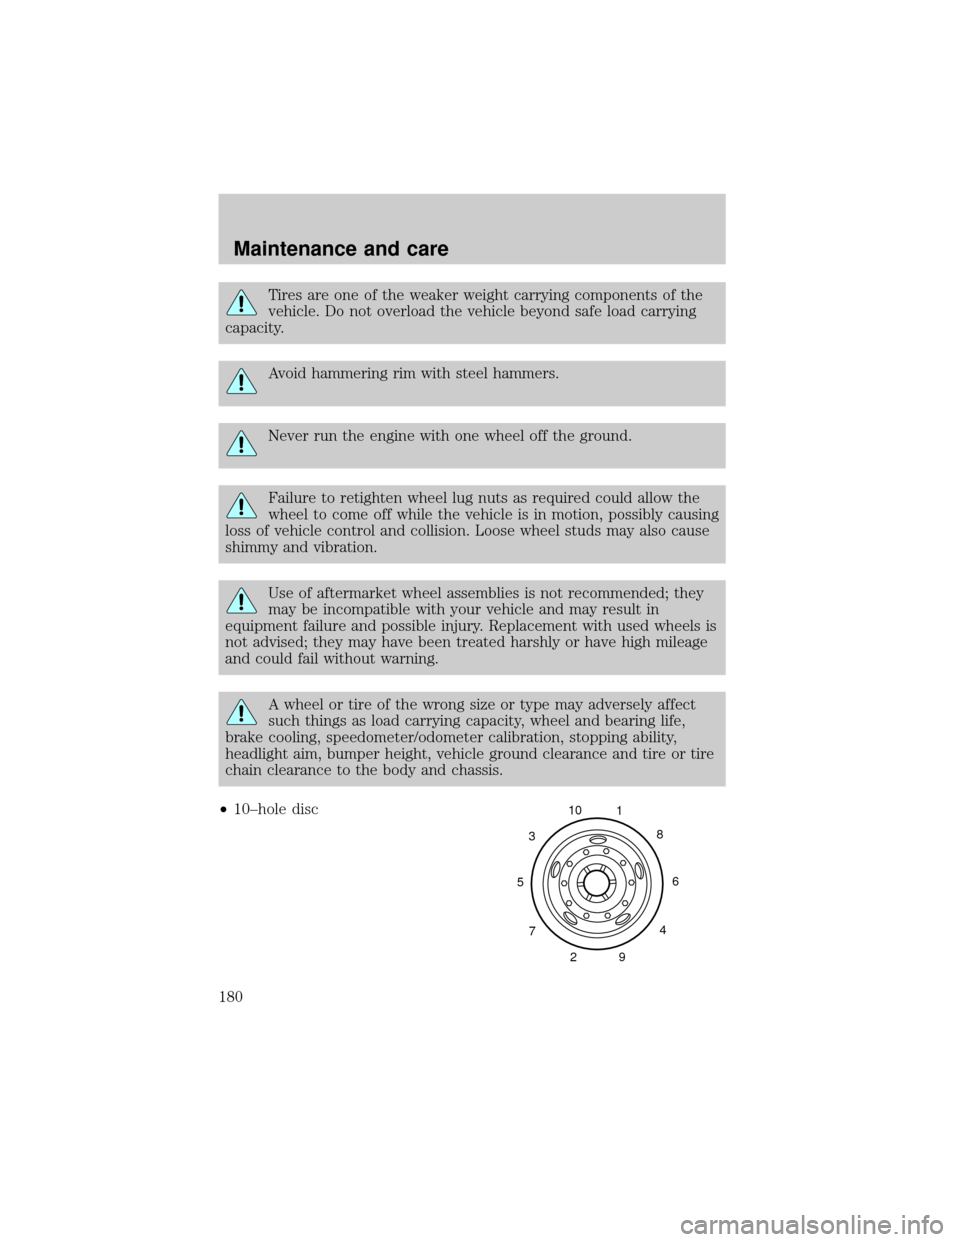
²10±hole disc
5310
1
8
6
4
9 2 7
Maintenance and care
180
Page 192 of 240
EXTERIOR BULBS
Check operation of lamps, safety equipment and warning signals
It is a good safety practice to check operation of headlamps, parking
lamps, turn signals, clearance and marker lamps, instrument panel and
control lamps each day.
Replacing headlamp bulbs
To remove the headlamp bulbs:
1. Make sure headlamp switch is in OFF position.
2. Open the hood.
3. Remove four screws and move
the parking lamp assembly away
from the headlamp bulb.
4. Remove four screws and the
retaining bracket from the headlamp
bulb.
5. Pull headlamp bulb out of the
housing, disconnect the electrical
connector and remove the headlamp
bulb.
6. To complete installation, follow
the removal procedure in reverse
order.
Maintenance and care
192
Page 208 of 240
OWNER MAINTENANCE
You can do much of the maintenance your vehicle requires yourself, if
you have the time and a reasonable amount of mechanical ability. If you
prefer to have this work done professionally, your authorized dealer
stands ready to help you.
All mechanical components and attachments are important in that they
could affect the performance of vital components and systems. If
replacement becomes necessary, they must be replaced with parts having
the same part number or with equivalent parts. Torque values of the
attaching parts must be used as specified during any reassembly
procedure to assure proper retention.
EMISSIONS CONTROL SYSTEM
To assure the emissions control systems operate effectively, you should
have the services listed in the maintenance schedule performed at the
specified time and km/mileage intervals. You should avoid running out of
fuel or turning off the ignition while the vehicle is in motion, especially
at high speeds.
Because of high engine compartment and exhaust system
temperatures resulting from emissions equipment, do not park,
idle or operate your vehicle in dry grass or other dry ground cover
where the possibility of ground fire exists.
Do not make unauthorized modifications to the engine or vehicle.
Modifications causing increased amounts of unburned fuel to reach the
exhaust system can significantly increase the temperature of the engine
compartment and/or the exhaust system.
Avoid driving your vehicle if it does not operate properly. If the engine
diesels (more than five seconds of engine run-on after shut-off), misfires,
surges, stalls or backfires, see your dealer. Be alert for fluid leakage,
odor, smoke, loss of oil pressure, or charge indicator or over temperature
warning.
Do NOT use diesel fuel blended with waste oil in engines equipped with
a CATALYTIC CONVERTER-MUFFLER. Waste lube oil blending in fuel
will plug the CATALYTIC CONVERTER-MUFFLER, resulting in a
significant loss of engine power.
General maintenance information
208
Page 220 of 240
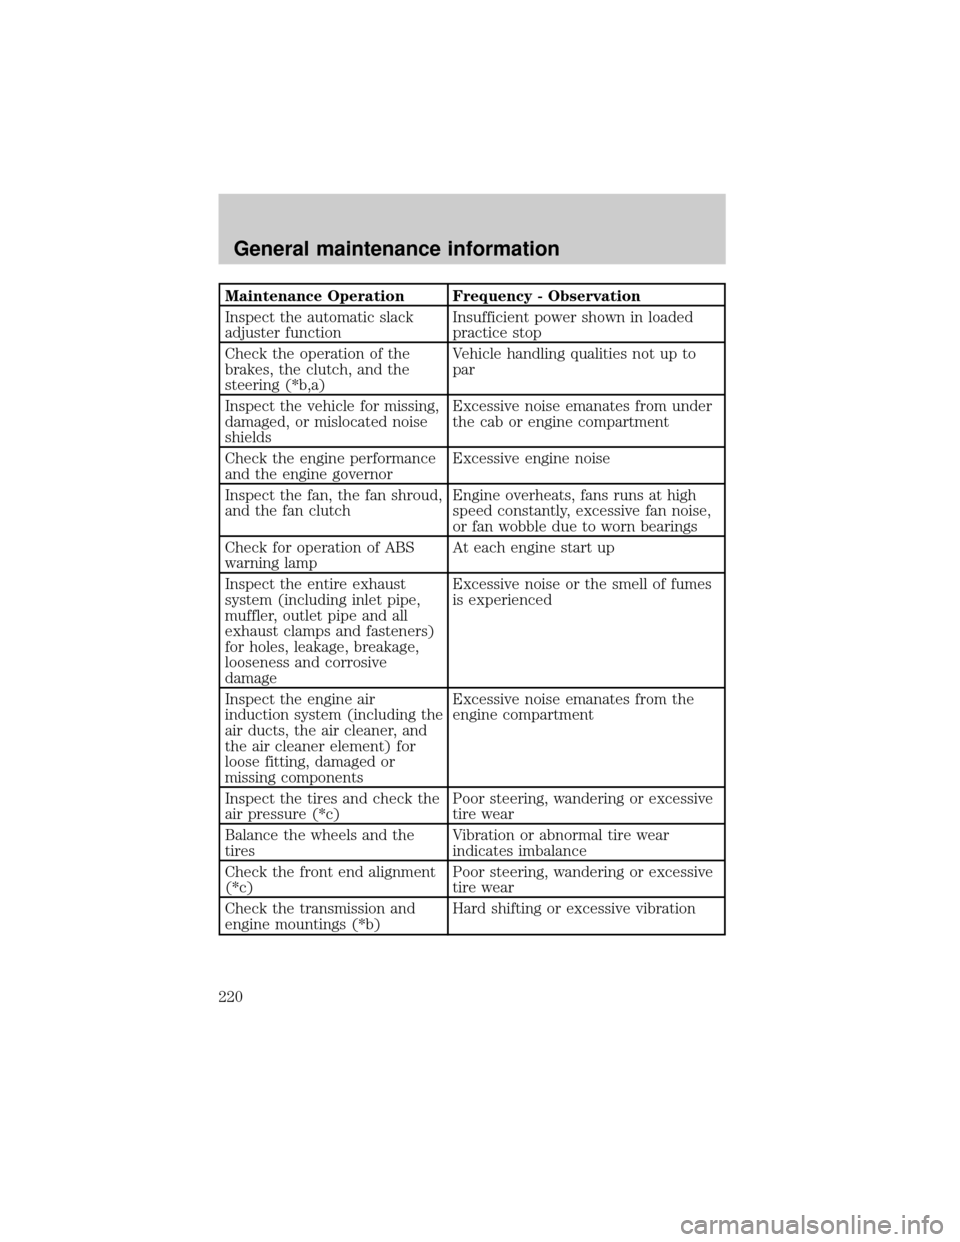
Maintenance Operation Frequency - Observation
Inspect the automatic slack
adjuster functionInsufficient power shown in loaded
practice stop
Check the operation of the
brakes, the clutch, and the
steering (*b,a)Vehicle handling qualities not up to
par
Inspect the vehicle for missing,
damaged, or mislocated noise
shieldsExcessive noise emanates from under
the cab or engine compartment
Check the engine performance
and the engine governorExcessive engine noise
Inspect the fan, the fan shroud,
and the fan clutchEngine overheats, fans runs at high
speed constantly, excessive fan noise,
or fan wobble due to worn bearings
Check for operation of ABS
warning lampAt each engine start up
Inspect the entire exhaust
system (including inlet pipe,
muffler, outlet pipe and all
exhaust clamps and fasteners)
for holes, leakage, breakage,
looseness and corrosive
damageExcessive noise or the smell of fumes
is experienced
Inspect the engine air
induction system (including the
air ducts, the air cleaner, and
the air cleaner element) for
loose fitting, damaged or
missing componentsExcessive noise emanates from the
engine compartment
Inspect the tires and check the
air pressure (*c)Poor steering, wandering or excessive
tire wear
Balance the wheels and the
tiresVibration or abnormal tire wear
indicates imbalance
Check the front end alignment
(*c)Poor steering, wandering or excessive
tire wear
Check the transmission and
engine mountings (*b)Hard shifting or excessive vibration
General maintenance information
220