Page 186 of 240
Fuel filter/water separator
The fuel filter/water separator removes any contaminated particles
and/or water from the fuel before the fuel enters the engine.
The fuel filter/water separator should be drained as recommended in the
Scheduled Maintenance Guide.
Draining the fuel filter/water separatorÐCaterpillar 3126 B engine
1. With the engine off, open the
drain valve located at the bottom of
the fuel filter/water separator by
turning it counterclockwise.
2. Drain the filter until clear fuel is visible.
3. Turn the drain valve clockwise to close the valve. Do not overtighten the
drain valve as this could cause damage to the fuel filter/water separator.
Draining the fuel filter/water separatorÐ7.3L Power Stoke engine
1. With the engine off, open the
drain valve located on the side of
the fuel filter/water separator using
your hand.
2. Drain the filter until clear fuel is visible.
3. Close the drain valve completely.
Maintenance and care
186
Page 187 of 240
Draining the fuel filter/water separatorÐCummins B engine
Refer to your engine operator's manual for service procedures.
Fuel filter replacementÐCaterpillar 3126 B engine
The fuel filter/water separator is
located on the left side of the
engine. Replace the fuel filter/water
separator as recommended in the
Scheduled Maintenance Guide, or
sooner if it becomes plugged.
Vehicles operated on fuel with more
than average impurities may require
replacement of the fuel filter more
frequently. The spin-on filter has a
water drain valve built into the
bottom of the filter canister.
Removal
1. Using an oil filter wrench, remove the filter.
2. Carefully clean the mating surfaces.
Installation
1. Fill the filter with clean, fresh diesel fuel.
2. Coat the filter seal with clean, fresh diesel fuel.
3. Hand-tighten the filter until it seats firmly against the mount, then
tighten (by hand) an additional
1¤3to1¤2turn.
4. Start the engine and check for fuel leaks.
Maintenance and care
187
Page 188 of 240
Fuel filter replacementÐ7.3L Power Stroke engine
The fuel filter/water separator is
located on the right side of the
engine. Replace the fuel filter/water
separator as recommended in the
Scheduled Maintenance Guide, or
sooner if it becomes plugged.
Vehicles operated on fuel with more
than average impurities may require
replacement of the fuel filter more
frequently. The filter has a water
drain valve built into the bottom of
the filter housing.
Removal
1. Remove the fuel filter cap by
turning counterclockwise. The fuel
filter element will come out with the
cap.
2. Remove and discard the bevel gasket. Carefully clean the mating
surfaces.
3. Press in on the fuel filter element locking tabs to separate the element
from the cap.
Maintenance and care
188
Page 189 of 240

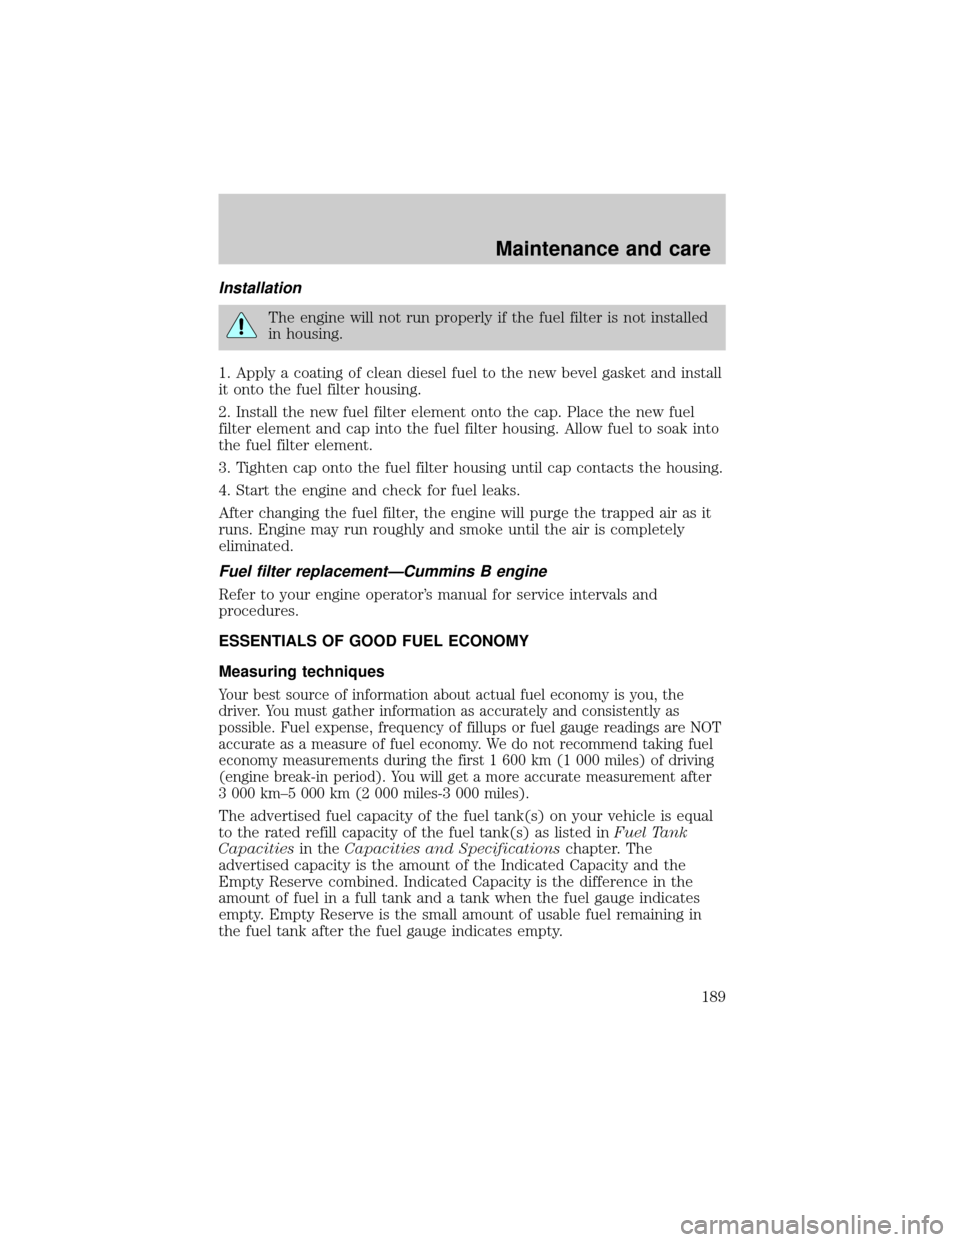
Installation
The engine will not run properly if the fuel filter is not installed
in housing.
1. Apply a coating of clean diesel fuel to the new bevel gasket and install
it onto the fuel filter housing.
2. Install the new fuel filter element onto the cap. Place the new fuel
filter element and cap into the fuel filter housing. Allow fuel to soak into
the fuel filter element.
3. Tighten cap onto the fuel filter housing until cap contacts the housing.
4. Start the engine and check for fuel leaks.
After changing the fuel filter, the engine will purge the trapped air as it
runs. Engine may run roughly and smoke until the air is completely
eliminated.
Fuel filter replacementÐCummins B engine
Refer to your engine operator's manual for service intervals and
procedures.
ESSENTIALS OF GOOD FUEL ECONOMY
Measuring techniques
Your best source of information about actual fuel economy is you, the
driver. You must gather information as accurately and consistently as
possible. Fuel expense, frequency of fillups or fuel gauge readings are NOT
accurate as a measure of fuel economy. We do not recommend taking fuel
economy measurements during the first 1 600 km (1 000 miles) of driving
(engine break-in period). You will get a more accurate measurement after
3 000 km±5 000 km (2 000 miles-3 000 miles).
The advertised fuel capacity of the fuel tank(s) on your vehicle is equal
to the rated refill capacity of the fuel tank(s) as listed inFuel Tank
Capacitiesin theCapacities and Specificationschapter. The
advertised capacity is the amount of the Indicated Capacity and the
Empty Reserve combined. Indicated Capacity is the difference in the
amount of fuel in a full tank and a tank when the fuel gauge indicates
empty. Empty Reserve is the small amount of usable fuel remaining in
the fuel tank after the fuel gauge indicates empty.
Maintenance and care
189
Page 195 of 240

Using the right bulbs
Function Number of
bulbsTrade number
Headlamps 2 4652
Park/turn signal 2 1157
Sidemarker/rear marker lamp 5 red 12
(amber)194
Tail/stop lamp 4 2057
Backup 4 1156
Foglamp 2 899
Running board/courtesy lamp 6 194
License plate lamp 2 194
Cabmarker 5 168
Exterior visor lamp (if equipped) 4 194
Rear fender clearance 4
(a)
Rear identification 3 194
Dome lamp 1 105
To replace all instrument panel lights - see your dealer
(a)Replace entire lamp assembly; bulb is not serviceable.
AIMING THE HEADLAMPS
The headlamps on your vehicle are properly aimed at the assembly plant.
If your vehicle has been in an accident the alignment of your headlamps
should be checked by a qualified service technician.
MINOR TROUBLESHOOTING GUIDE
Diesel engine
For troubleshooting information, refer to the diesel engine operator's
manual.
If engine won't crank
For troubleshooting information, refer to the engine operator's manual.
If engine cranks but won't start
For troubleshooting information, refer to the engine operator's manual.
Maintenance and care
195
Page 196 of 240

If engine runs hot
For troubleshooting information, refer to the engine operator's manual.
If fuses burn out
Burned-out or ªblown-outº fuses or circuit breaker tripping (if equipped)
usually indicate an electrical short circuit, although a fuse may
occasionally fail from vibration. Insert a second fuse or reset the breaker
(if equipped). If this fuse immediately burns out or the breaker (if
equipped) trips and you cannot locate the fuse, return your vehicle to
your dealer for a circuit check.
If lamp bulbs burn out
Repeated lamp burn-out usually indicates a loose connection, either at
the lamp socket, the system ground or a malfunctioning voltage
regulator. If examination does not indicate the cause of the trouble,
return your vehicle to your dealer for inspection.
If headlamps flash on and off
If headlamps flash on and off at regular intervals, the system circuit
breaker (if equipped) is operating, indicating a short circuit or overload.
Take your vehicle to your dealer for a circuit check.
CLEANING AND CARING FOR YOUR VEHICLE
Refer to the Customer Assistance chapter for a list of Ford-approved
cleaners, polishes and waxes.
Washing your vehicle
Wash your vehicle regularly with
cold or lukewarm water. Never use
strong detergents or soap. If your
vehicle is particularly dirty, use a
quality car wash detergent. Always
use a clean sponge, washing glove
or similar device and plenty of water
for best results. To avoid spots,
avoid washing when the hood is still
warm, immediately after or during
exposure to strong sunlight.
Maintenance and care
196
Page 198 of 240

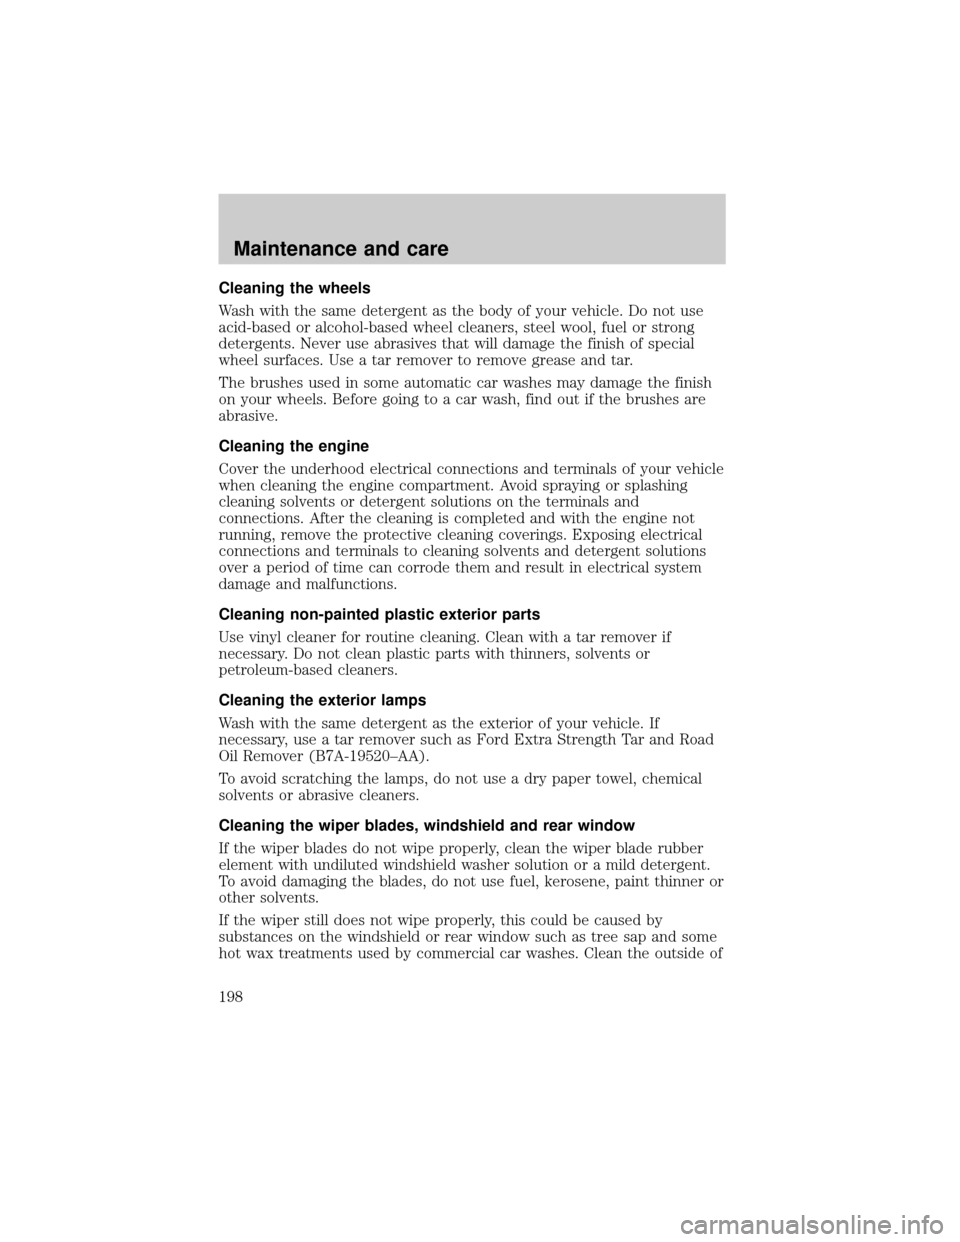
Cleaning the wheels
Wash with the same detergent as the body of your vehicle. Do not use
acid-based or alcohol-based wheel cleaners, steel wool, fuel or strong
detergents. Never use abrasives that will damage the finish of special
wheel surfaces. Use a tar remover to remove grease and tar.
The brushes used in some automatic car washes may damage the finish
on your wheels. Before going to a car wash, find out if the brushes are
abrasive.
Cleaning the engine
Cover the underhood electrical connections and terminals of your vehicle
when cleaning the engine compartment. Avoid spraying or splashing
cleaning solvents or detergent solutions on the terminals and
connections. After the cleaning is completed and with the engine not
running, remove the protective cleaning coverings. Exposing electrical
connections and terminals to cleaning solvents and detergent solutions
over a period of time can corrode them and result in electrical system
damage and malfunctions.
Cleaning non-painted plastic exterior parts
Use vinyl cleaner for routine cleaning. Clean with a tar remover if
necessary. Do not clean plastic parts with thinners, solvents or
petroleum-based cleaners.
Cleaning the exterior lamps
Wash with the same detergent as the exterior of your vehicle. If
necessary, use a tar remover such as Ford Extra Strength Tar and Road
Oil Remover (B7A-19520±AA).
To avoid scratching the lamps, do not use a dry paper towel, chemical
solvents or abrasive cleaners.
Cleaning the wiper blades, windshield and rear window
If the wiper blades do not wipe properly, clean the wiper blade rubber
element with undiluted windshield washer solution or a mild detergent.
To avoid damaging the blades, do not use fuel, kerosene, paint thinner or
other solvents.
If the wiper still does not wipe properly, this could be caused by
substances on the windshield or rear window such as tree sap and some
hot wax treatments used by commercial car washes. Clean the outside of
Maintenance and care
198
Page 200 of 240

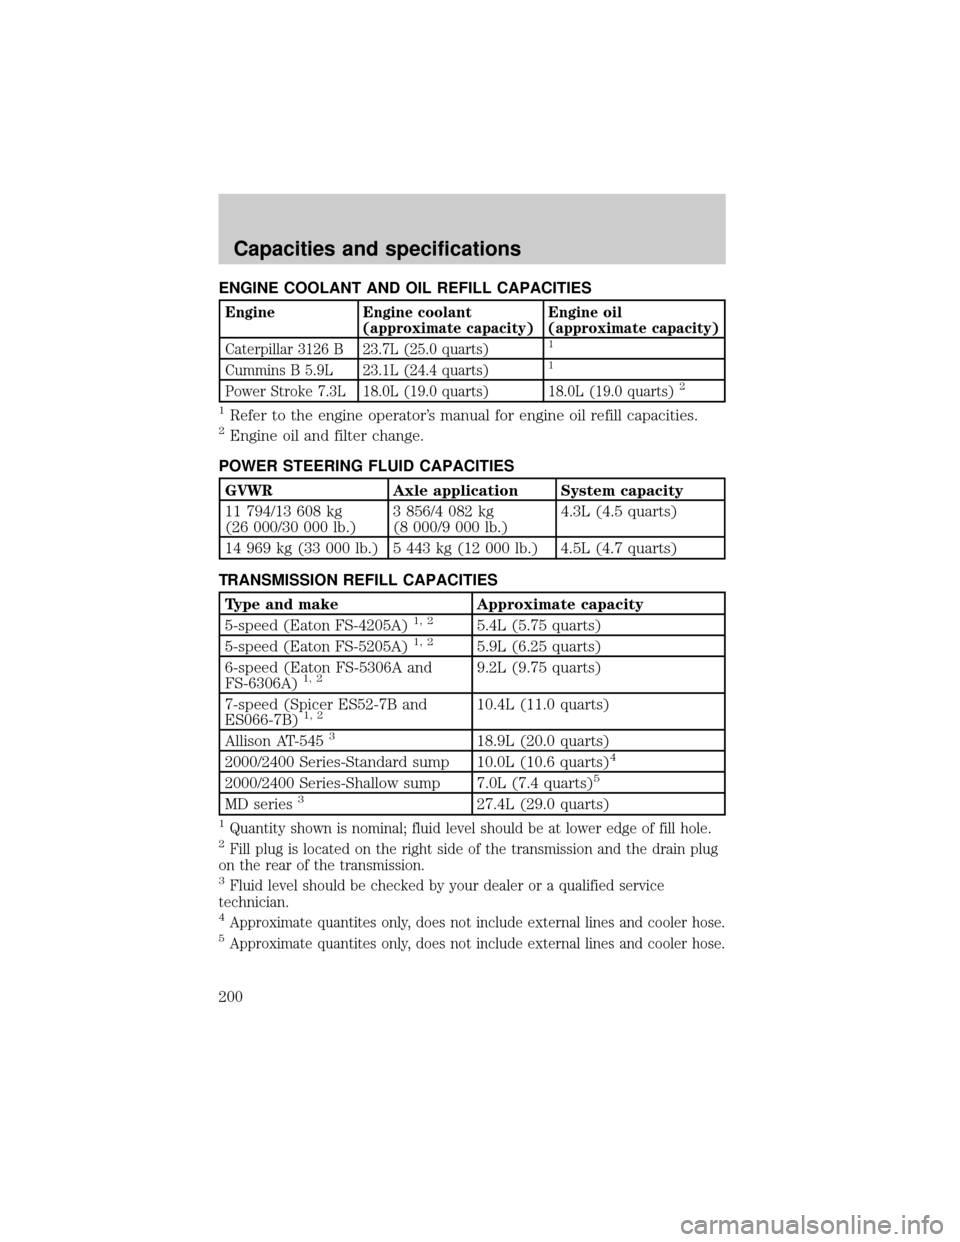
ENGINE COOLANT AND OIL REFILL CAPACITIES
Engine Engine coolant
(approximate capacity)Engine oil
(approximate capacity)
Caterpillar 3126 B 23.7L (25.0 quarts)
1
Cummins B 5.9L 23.1L (24.4 quarts)1
Power Stroke 7.3L 18.0L (19.0 quarts) 18.0L (19.0 quarts)2
1Refer to the engine operator's manual for engine oil refill capacities.2Engine oil and filter change.
POWER STEERING FLUID CAPACITIES
GVWR Axle application System capacity
11 794/13 608 kg
(26 000/30 000 lb.)3 856/4 082 kg
(8 000/9 000 lb.)4.3L (4.5 quarts)
14 969 kg (33 000 lb.) 5 443 kg (12 000 lb.) 4.5L (4.7 quarts)
TRANSMISSION REFILL CAPACITIES
Type and make Approximate capacity
5-speed (Eaton FS-4205A)1, 25.4L (5.75 quarts)
5-speed (Eaton FS-5205A)1, 25.9L (6.25 quarts)
6-speed (Eaton FS-5306A and
FS-6306A)
1, 29.2L (9.75 quarts)
7-speed (Spicer ES52-7B and
ES066-7B)
1, 210.4L (11.0 quarts)
Allison AT-545
318.9L (20.0 quarts)
2000/2400 Series-Standard sump 10.0L (10.6 quarts)4
2000/2400 Series-Shallow sump 7.0L (7.4 quarts)5
MD series327.4L (29.0 quarts)
1Quantity shown is nominal; fluid level should be at lower edge of fill hole.2Fill plug is located on the right side of the transmission and the drain plug
on the rear of the transmission.
3Fluid level should be checked by your dealer or a qualified service
technician.
4Approximate quantites only, does not include external lines and cooler hose.5Approximate quantites only, does not include external lines and cooler hose.
Capacities and specifications
200