Page 89 of 104

Installation
1. Install the fuel filter.
2. Lubricate the tube end with clean
engine oil meeting Ford
specification WSS-M2C153–G to
ease assembly.
•Pull on the fitting to make sure it
is fully engaged, then install
safety clip.
•Align and push the tube into the
fitting until you hear a click.
3. Remove the EFI/CFI Fuel
Pressure Gauge.
4. Install the Schrader valve cap securely.
EMISSION CONTROL SYSTEM
Your vehicle is equipped with various emission control components and a
catalytic converter which will enable your vehicle to comply with
applicable exhaust emission standards. To make sure that the catalytic
converter and other emission control components continue to work
properly:
•Use only the specified fuel listed.
•Avoid running out of fuel.
•Do not turn off the ignition while your vehicle is moving, especially at
high speeds.
•Have the items listed in your scheduled maintenance guide performed
according to the specified schedule.
The scheduled maintenance items listed in the scheduled maintenance
guide are essential to the life and performance of your vehicle and to its
emissions system.
Maintenance and care
89
Page 90 of 104

If other than Ford, Motorcraft or Ford-authorized parts are used for
maintenance replacements or for service of components affecting
emission control, such non-Ford parts should be equivalent to genuine
Ford Motor Company parts in performance and durability.
Do not park, idle, or drive your vehicle in dry grass or other dry
ground cover. The emission system heats up the engine
compartment and exhaust system, which can start a fire.
Illumination of the “Service Engine Soon” light, charging system warning
light or the temperature warning light, fluid leaks, strange odors, smoke
or loss of engine power, could indicate that the emission control system
is not working properly.
Exhaust leaks may result in entry of harmful and potentially
lethal fumes into the passenger compartment.
Do not make any unauthorized changes to your vehicle or engine. By
law, vehicle owners and anyone who manufactures, repairs, services,
sells, leases, trades vehicles, or supervises a fleet of vehicles are not
permitted to intentionally remove an emission control device or prevent
it from working. Information about your vehicle’s emission system is on
the Vehicle Emission Control Information Decal located on or near the
engine. This decal identifies engine displacement and gives some tune up
specifications.
Please consult your “Warranty Guide” for complete emission warranty
information.
Readiness for Inspection/Maintenance (I/M) testing
In some localities, it may be a legal requirement to pass an I/M test of
the on-board diagnostics system. If your “Check Engine/Service Engine
Soon” light is on, refer to the description in theWarning Lights and
Chimessection of theInstrumentationchapter. Your vehicle may not
pass the I/M test with the “Check Engine/Service Engine Soon” light on.
If the vehicle’s powertrain system or its battery has just been serviced,
the on-board diagnostics system is reset to a “not ready for I/M test”
condition. To ready the on-board diagnostics system for I/M testing, a
minimum of 30 minutes of city and highway driving is necessary as
described below:
•First, at least 10 minutes of driving on an expressway or highway.
Maintenance and care
90
Page 91 of 104

•Next, at least 20 minutes driving in stop-and-go, city-type traffic with
at least four idle periods.
Allow the vehicle to sit for at least eight hours without starting the
engine. Then, start the engine and complete the above driving cycle. The
engine must warm up to its normal operating temperature. Once started,
do not turn off the engine until the above driving cycle is complete.
BULBS
Replacing exterior bulbs
Check the operation of the following lamps frequently:
•Headlamps
•Tail lamps
•Brakelamps
•Turn signals
•Backup lamps
•License plate lamp
Do not remove lamp bulbs unless they will be replaced immediately. If a
bulb is removed for an extended period of time, contaminants may enter
the lamp housings and affect performance.
CLEANING AND CARING FOR YOUR VEHICLE
Refer to the Customer Assistance chapter for a list of Ford-approved
cleaners, polishes and waxes.
Cleaning the wheels
Wash with the same detergent as the body of your vehicle. Do not use
acid-based or alcohol-based wheel cleaners, steel wool, fuel or strong
detergents. Never use abrasives that will damage the finish of special
wheel surfaces. Use a tar remover to remove grease and tar.
The brushes used in some automatic car washes may damage the finish
on your wheels. Before going to a car wash, find out if the brushes are
abrasive.
Maintenance and care
91
Page 92 of 104
Cleaning the engine
Engines are more efficient when they are clean because grease and dirt
buildup keep the engine warmer than normal. When washing:
•Take care when using a power washer to clean the engine. The high
pressure fluid could penetrate the sealed parts and cause damage.
•Do not spray with cold water to avoid cracking the engine block or
other engine components.
•Cover the air cleaner and battery to prevent water damage when
cleaning the engine.
•Never wash or rinse the engine while it is running; water in the
running engine may cause internal damage.
Underbody
Flush the complete underside of vehicle frequently. Keep body drain
holes unplugged. Inspect for road damage.
Maintenance and care
92
Page 93 of 104
MOTORCRAFT PART NUMBERS
Component 6.8L V10 engine
Air filter element FA-1634
Battery BXT-65-750
Fuel filter FG-986B
Oil filter FL-820-S
PCV valve EV-233
Spark plugs* AWSF-22E
*Refer to Vehicle Emissions Control Information (VECI) decal for spark
plug gap information.
Capacities and specifications
93
Page 94 of 104
Motorcraft SAE
5")
REFILL CAPACITIES
Fluid Ford Part
NameApplication Capacity
Brake fluid High
Performance
DOT 3 Motor
Vehicle Brake
FluidAll Fill to line on
reservoir
Engine oil
(includes filter
change)Motorcraft SAE
5W-20 Super
Premium Motor
OilAll 5.7L (6.0 quarts)
Engine coolant
1Premium Engine
CoolantAll 29.0L (30.6 quarts)
Power steering
fluidMotorcraft
MERCON�AT FAll Keep in FULL range
on dispstick
Rear axle
2Motorcraft SAE
75W-140
Synthetic Rear
Axle LubricantDana 80 3.9L (4.0 quarts)3
Dana 135 11.7L (12.0 quarts)3
Fuel tank N/A All284.0L (75 .0
gallons)
Transmission4Motorcraft
MERCON�AT FAll 16.8L (17.7 quarts)5
Your vehicle’s rear axle is filled with a synthetic rear axle lubricant and is
considered lubricated for life. These lubricants do not need to be
checked or changed unless a leak is suspected, service is required or the
axle assembly has been submerged in water. The axle lubricant should
be changed any time the rear axle has been submerged in water.
1Use Ford Premium Engine Coolant (green in color). DO NOT USE Ford
Extended Life Engine Coolant (orange in color). Refer toAdding engine
coolant, in the Maintenance and Care chapter.
2Fill 6 mm to 14 mm (1/4 inch to 9/16 inch) below bottom of fill hole.
3Fill Dana rear axles to 6 mm to 14 mm (1/4 inch to 3/4 inch) below
bottom of fill hole.
4Ensure the correct automatic transmission fluid is used. Transmission
fluid requirements are indicated on the dipstick or on the dipstick
handle. Check the container to verify the fluid being added is of the
Capacities and specifications
94
Page 95 of 104

correct type. Refer to your scheduled maintenance guide to determine
the correct service interval.
Some transmission fluids may be labeled as dual usage, such as
MERCON�and MERCON�V. These dual usage fluids are not to be used
in an automatic transmission that requires use of the MERCON�type
fluid. However, these dual usage fluids may be used in transmissions that
require the MERCON�V type fluid.
MERCON�and MERCON�V type fluids are not interchangeable.
DO NOT mix MERCON�and MERCON�V. Use of a transmission
fluid that indicates dual usage (MERCON�and MERCON�V) in
an automatic transmission application requiring MERCON�may
cause transmission damage. Use of any fluid other than the
recommended fluid may cause transmission damage.
5Indicates only approximate dry-fill capacity. Some applications may
vary based on cooler size and if equipped with in-tank cooler. The
amount of transmission fluid and fluid level should be set by the
indication on the dipstick’s normal operating range.
LUBRICANT SPECIFICATIONS
Item Ford part
nameFord part
numberFord
specification
Brake fluid High
Performance
DOT 3 Motor
Vehicle Brake
FluidC6AZ-19542-AB ESA-M6C25-A
and DOT 3
Engine coolant Ford Premium
Engine CoolantE2FZ-19549-AA
(in Canada,
Motorcraft
CXC-10)ESE-M97B44-A
Engine oil Motorcraft SAE
5W-20 Super
Premium Motor
OilXO-5W20-QSP WSS-M2C153-H
with API
Certification
Mark
Automatic
transmission
(4R100)
1
Motorcraft
MERCON�AT FXT-2-QDX MERCON�
Power steering
fluidMotorcraft
MERCON�AT FXT-2-QDX MERCON�
Capacities and specifications
95
Page 96 of 104

Item Ford part
nameFord part
numberFord
specification
Parking brake
assemblyMotorcraft
MERCON�XT-2-QDX MERCON�
Dana Axle Motorcraft SAE
75W-140 High
Performance
Synthetic Rear
Axle LubricantF1TZ-19580-B WSL-M2C192-A
1Ensure the correct automatic transmission fluid is used. Transmission
fluid requirements are indicated on the dipstick or on the dipstick
handle. Check the container to verify the fluid being added is of the
correct type. Refer to your scheduled maintenance guide to determine
the correct service interval.
Some transmission fluids may be labeled as dual usage, such as
MERCON�and MERCON�V. These dual usage fluids are not to be used
in an automatic transmission that requires use of the MERCON�type
fluid. However, these dual usage fluids may be used in transmissions that
require the MERCON�V type fluid.
MERCON�and MERCON�V type fluids are not interchangeable.
DO NOT mix MERCON�and MERCON�V. Use of a transmission
fluid that indicates dual usage (MERCON�and MERCON�V) in
an automatic transmission application requiring MERCON�may
cause transmission damage. Use of any fluid other than the
recommended fluid may cause transmission damage.
ENGINE DATA
Engine 6.8L V10 engine
Cubic inches 415
Required fuel 87 octane
Firing order 1-6-5-10-2-7-3-8-4-9
Spark plug gap 1.3-1.4 mm (0.052-0.056 inch)
Ignition system Coil on plug
Compression ratio 9.0:1
Capacities and specifications
96
 1
1 2
2 3
3 4
4 5
5 6
6 7
7 8
8 9
9 10
10 11
11 12
12 13
13 14
14 15
15 16
16 17
17 18
18 19
19 20
20 21
21 22
22 23
23 24
24 25
25 26
26 27
27 28
28 29
29 30
30 31
31 32
32 33
33 34
34 35
35 36
36 37
37 38
38 39
39 40
40 41
41 42
42 43
43 44
44 45
45 46
46 47
47 48
48 49
49 50
50 51
51 52
52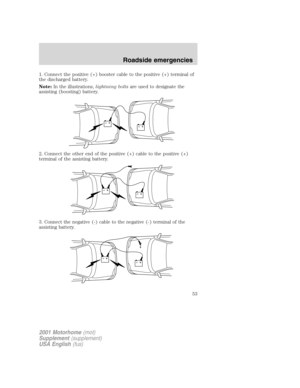 53
53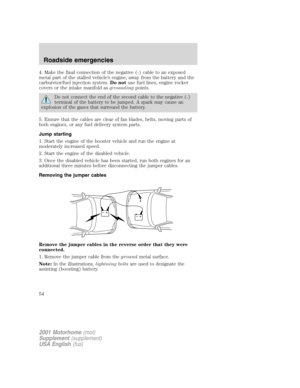 54
54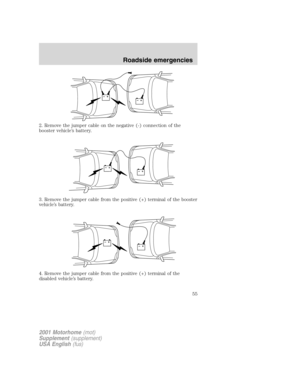 55
55 56
56 57
57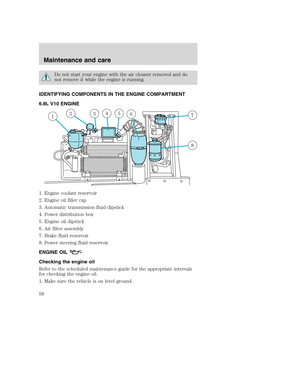 58
58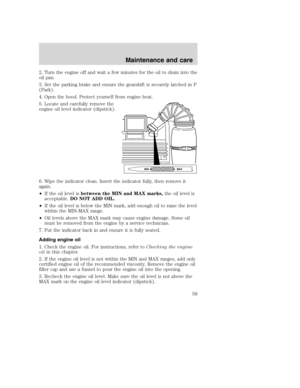 59
59 60
60 61
61 62
62 63
63 64
64 65
65 66
66 67
67 68
68 69
69 70
70 71
71 72
72 73
73 74
74 75
75 76
76 77
77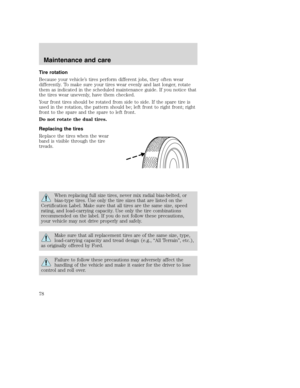 78
78 79
79 80
80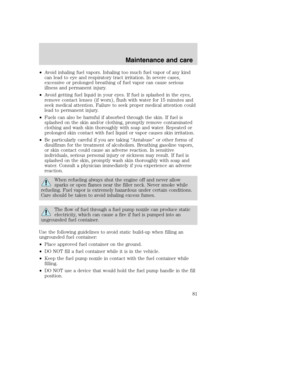 81
81 82
82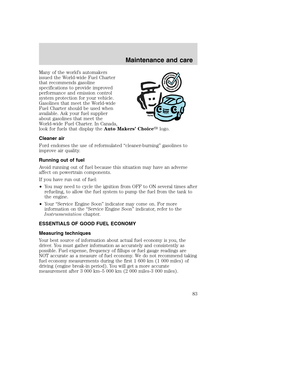 83
83 84
84 85
85 86
86 87
87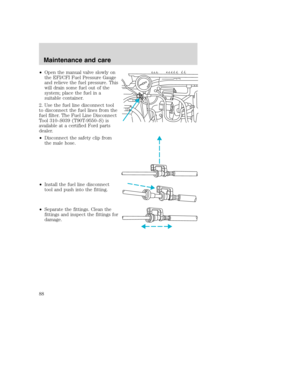 88
88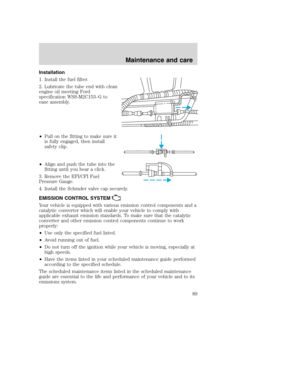 89
89 90
90 91
91 92
92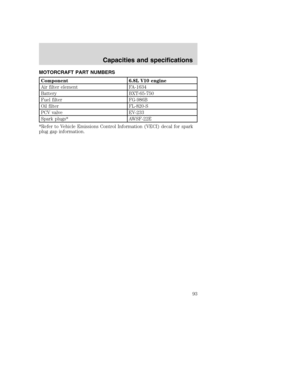 93
93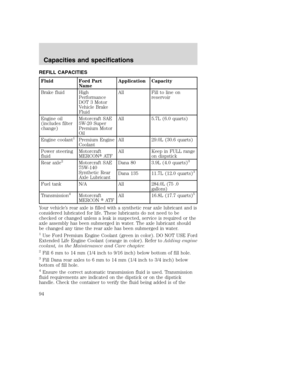 94
94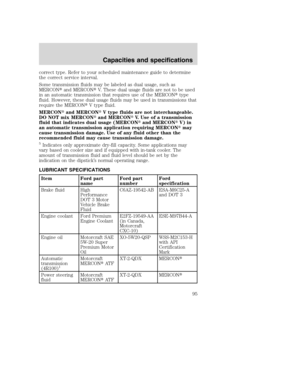 95
95 96
96 97
97 98
98 99
99 100
100 101
101 102
102 103
103
