Page 169 of 264
Location of the spare tire and tools
The spare tire and tools for your vehicle are stowed in the following
locations:
Tool Location
Spare tire Under the vehicle, just in front of
the rear bumper
Jack, Jack handle, jack handle
extension, wheel lug nut wrenchIn the passenger side rear cab
compartment behind the access
door in trim panel
Removing the jack and tools
1. To remove, turn the thumbwheel
counterclockwise and lower the
jack.
2. Remove the jack, lug wrench and
jack handles from the bracket.
Removing the spare tire
1. Assemble the jack handle with the spade end to the lug wrench as
shown in the illustration.
²To assemble, depress button and
slide together.
Roadside emergencies
169
Page 170 of 264

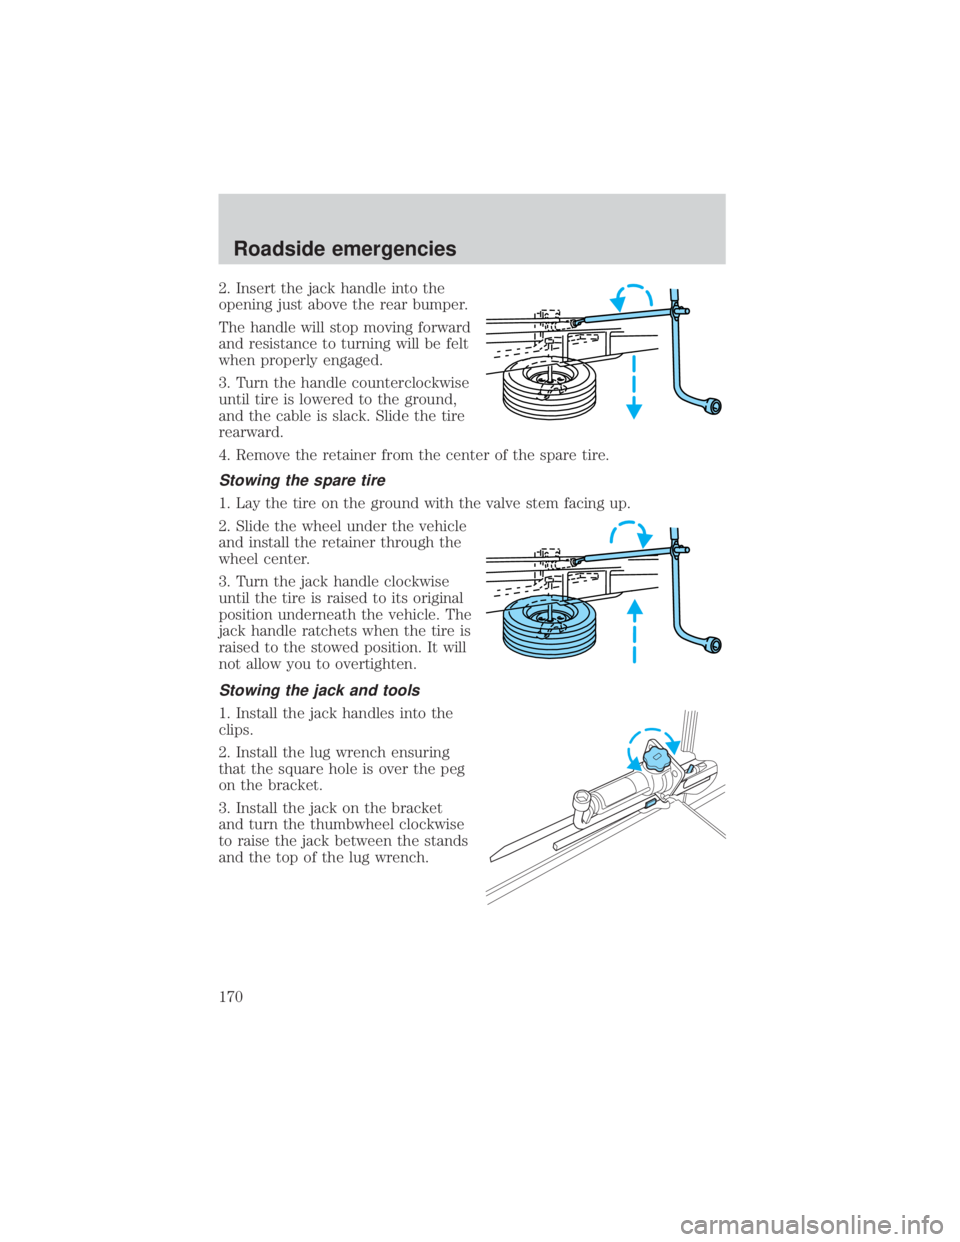
2. Insert the jack handle into the
opening just above the rear bumper.
The handle will stop moving forward
and resistance to turning will be felt
when properly engaged.
3. Turn the handle counterclockwise
until tire is lowered to the ground,
and the cable is slack. Slide the tire
rearward.
4. Remove the retainer from the center of the spare tire.
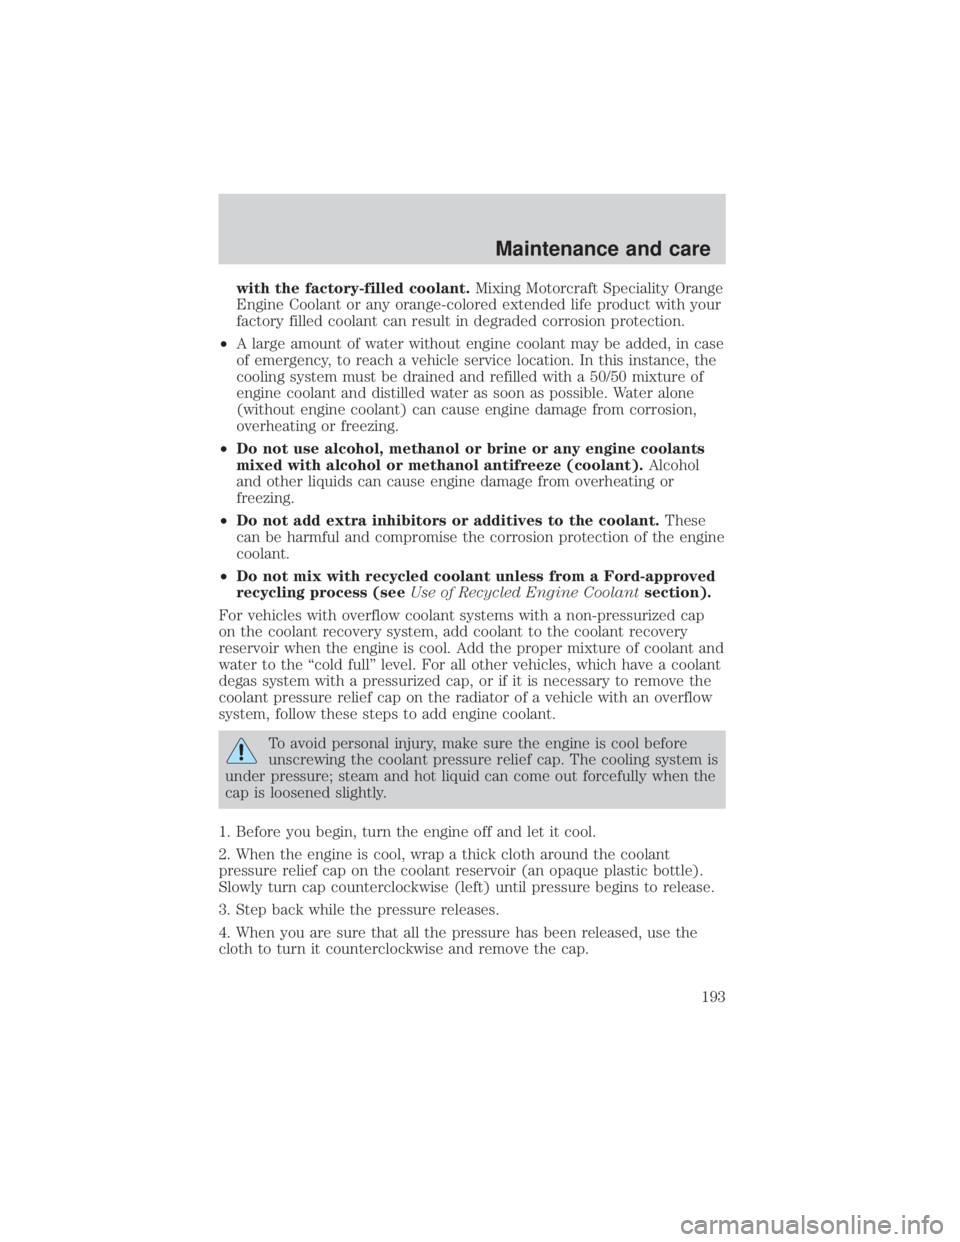
Stowing the spare tire
1. Lay the tire on the ground with the valve stem facing up.
2. Slide the wheel under the vehicle
and install the retainer through the
wheel center.
3. Turn the jack handle clockwise
until the tire is raised to its original
position underneath the vehicle. The
jack handle ratchets when the tire is
raised to the stowed position. It will
not allow you to overtighten.
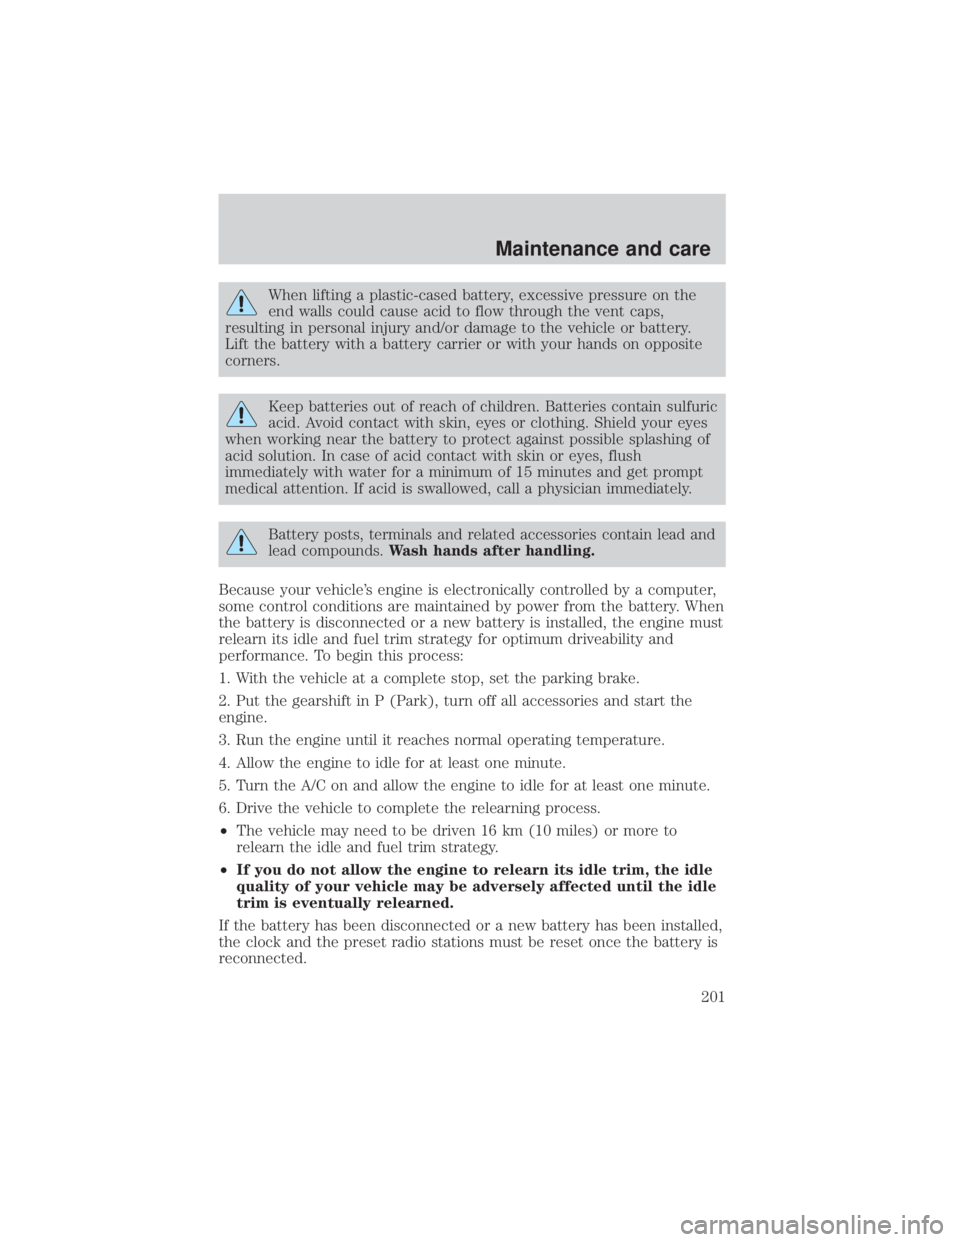
Stowing the jack and tools
1. Install the jack handles into the
clips.
2. Install the lug wrench ensuring
that the square hole is over the peg
on the bracket.
3. Install the jack on the bracket
and turn the thumbwheel clockwise
to raise the jack between the stands
and the top of the lug wrench.
Roadside emergencies
170
Page 172 of 264
4. Insert tapered end of the lug nut
wrench to remove any wheel trim.
5. Loosen each wheel lug nut
one-half turn counterclockwise but
do not remove them until the wheel
is raised off the ground.
6. Assemble the jack handle
extension on the lug nut wrench by
sliding the parts together. To
disconnect, depress button and pull
apart.
7. Position the jack according to the following guides and turn the jack
handle clockwise until the tire is a maximum of 25 mm (1 inch) off the
ground.
²Front
Roadside emergencies
172
Page 173 of 264
²Rear
To lessen the risk of
personal injury, do not put
any part of your body under the
vehicle while changing a tire. Do
not start the engine when your
vehicle is on the jack. The jack is
only meant for changing the tire.
²Never use the differential as a
jacking point.
8. Remove the wheel lug nuts with the lug nut wrench.
9. Replace the flat tire with the spare tire, making sure the valve stem is
facing outward. Reinstall the lug nuts (cone side in) until the wheel is
snug against the hub. Do not fully tighten the lug nuts until the wheel
has been lowered.
10. Lower the wheel by turning the jack handle counterclockwise.
Roadside emergencies
173
Page 186 of 264

²If the oil level is below the ADD
mark or MIN mark, add enough
oil to raise the level within the
ADD-FULL range or MIN-MAX
range.
²Oil levels above the letter F in FULL or the MAX mark may cause
engine damage. Some oil must be removed from the engine by a
service technician.
7. Put the indicator back in and ensure it is fully seated.
Adding engine oil
1. Check the engine oil. For instructions, refer toChecking the engine
oilin this chapter.
2. If the engine oil level is not within the normal range, add only certified
engine oil of the recommended viscosity. Remove the engine oil filler cap
and use a funnel to pour the engine oil into the opening.
3. Recheck the engine oil level. Make sure the oil level is not above the
MAX mark or the letter F in FULL on the engine oil level indicator
(dipstick).
4. Install the indicator and ensure it is fully seated.
5. Fully install the engine oil filler cap by turning the filler cap clockwise
until three clicks can be heard.
To avoid possible oil loss, DO NOT operate the vehicle with the
engine oil level indicator and/or the engine oil filler cap removed.
Maintenance and care
186
Page 193 of 264

with the factory-filled coolant.Mixing Motorcraft Speciality Orange
Engine Coolant or any orange-colored extended life product with your
factory filled coolant can result in degraded corrosion protection.
²A large amount of water without engine coolant may be added, in case
of emergency, to reach a vehicle service location. In this instance, the
cooling system must be drained and refilled with a 50/50 mixture of
engine coolant and distilled water as soon as possible. Water alone
(without engine coolant) can cause engine damage from corrosion,
overheating or freezing.
²Do not use alcohol, methanol or brine or any engine coolants
mixed with alcohol or methanol antifreeze (coolant).Alcohol
and other liquids can cause engine damage from overheating or
freezing.
²Do not add extra inhibitors or additives to the coolant.These
can be harmful and compromise the corrosion protection of the engine
coolant.
²Do not mix with recycled coolant unless from a Ford-approved
recycling process (seeUse of Recycled Engine Coolantsection).
For vehicles with overflow coolant systems with a non-pressurized cap
on the coolant recovery system, add coolant to the coolant recovery
reservoir when the engine is cool. Add the proper mixture of coolant and
water to the ªcold fullº level. For all other vehicles, which have a coolant
degas system with a pressurized cap, or if it is necessary to remove the
coolant pressure relief cap on the radiator of a vehicle with an overflow
system, follow these steps to add engine coolant.
To avoid personal injury, make sure the engine is cool before
unscrewing the coolant pressure relief cap. The cooling system is
under pressure; steam and hot liquid can come out forcefully when the
cap is loosened slightly.
1. Before you begin, turn the engine off and let it cool.
2. When the engine is cool, wrap a thick cloth around the coolant
pressure relief cap on the coolant reservoir (an opaque plastic bottle).
Slowly turn cap counterclockwise (left) until pressure begins to release.
3. Step back while the pressure releases.
4. When you are sure that all the pressure has been released, use the
cloth to turn it counterclockwise and remove the cap.
Maintenance and care
193
Page 201 of 264

When lifting a plastic-cased battery, excessive pressure on the
end walls could cause acid to flow through the vent caps,
resulting in personal injury and/or damage to the vehicle or battery.
Lift the battery with a battery carrier or with your hands on opposite
corners.
Keep batteries out of reach of children. Batteries contain sulfuric
acid. Avoid contact with skin, eyes or clothing. Shield your eyes
when working near the battery to protect against possible splashing of
acid solution. In case of acid contact with skin or eyes, flush
immediately with water for a minimum of 15 minutes and get prompt
medical attention. If acid is swallowed, call a physician immediately.
Battery posts, terminals and related accessories contain lead and
lead compounds.Wash hands after handling.
Because your vehicle's engine is electronically controlled by a computer,
some control conditions are maintained by power from the battery. When
the battery is disconnected or a new battery is installed, the engine must
relearn its idle and fuel trim strategy for optimum driveability and
performance. To begin this process:
1. With the vehicle at a complete stop, set the parking brake.
2. Put the gearshift in P (Park), turn off all accessories and start the
engine.
3. Run the engine until it reaches normal operating temperature.
4. Allow the engine to idle for at least one minute.
5. Turn the A/C on and allow the engine to idle for at least one minute.
6. Drive the vehicle to complete the relearning process.
²The vehicle may need to be driven 16 km (10 miles) or more to
relearn the idle and fuel trim strategy.
²If you do not allow the engine to relearn its idle trim, the idle
quality of your vehicle may be adversely affected until the idle
trim is eventually relearned.
If the battery has been disconnected or a new battery has been installed,
the clock and the preset radio stations must be reset once the battery is
reconnected.
Maintenance and care
201
Page 214 of 264

Fuel Filler Cap
Your fuel tank filler cap has an indexed design with a 1/8 turn on/off
feature.
When fueling your vehicle:
1. Turn the engine off.
2. Carefully turn the filler cap counterclockwise 1/8 of a turn until it
stops.
3. Pull to remove the cap from the fuel filler pipe.
4. To install the cap, align the tabs on the cap with the notches on the
filler pipe.
5. Turn the filler cap clockwise 1/8 of a turn until it stops.
If the ªCheck Fuel Capº indicator comes on and stays on after you start
the engine, the fuel filler cap may not be properly installed. Turn off the
engine, remove the fuel filler cap, align the cap properly and reinstall it.
If you must replace the fuel filler cap, replace it with a fuel filler
cap that is designed for your vehicle. The customer warranty may
be void for any damage to the fuel tank or fuel system if the
correct genuine Ford or Motorcraft fuel filler cap is not used.
The fuel system may be under pressure. If the fuel filler cap is
venting vapor or if you hear a hissing sound, wait until it stops
before completely removing the fuel filler cap. Otherwise, fuel may
spray out and injure you or others.
If you do not use the proper fuel filler cap, excessive pressure or
vacuum in the fuel tank may damage the fuel system or cause
the fuel cap to disengage in a collision, which may result in possible
personal injury.
Maintenance and care
214