Page 244 of 288
Replacing headlamp bulbs
To remove the headlamp bulb:
1. Make sure headlamp switch is in
OFF position, then lift hood and
open the hinged headlamp cover.
2. Disconnect the electrical
connector from the bulb by pulling
rearward.
3. Remove the bulb retaining ring by
rotating it counterclockwise (when
viewed from the rear) to free it
from the bulb socket, and slide the
ring off the plastic base. Keep the
ring to retain the new bulb.
4. Remove the old bulb from the
lamp assembly by gently pulling it
straight back out of the lamp
assembly.
To install the new bulb:
Handle a halogen headlamp bulb carefully and keep out of
children's reach. Grasp the bulb only by its plastic base and do
not touch the glass. The oil from your hand could cause the bulb to
break the next time the headlamps are operated.
LIFT
Maintenance and care
244
Page 245 of 288
If the bulb is accidentally touched, it should be cleaned with rubbing
alcohol before being used.
1. With the flat side of the new bulb's plastic base facing upward, insert
the glass end of the bulb into the lamp assembly. You may need to turn
the bulb left or right to align the grooves in the plastic base with the
tabs in the lamp assembly. When the grooves are aligned, push the bulb
into the lamp assembly until the plastic base contacts the rear of the
lamp assembly.
2. Install the bulb retaining ring over the plastic base until it contacts the
rear of the socket by rotating clockwise until you feel a ªstop.º
3. Install the electrical connector into the rear of the plastic base until it
snaps, locking it into position.
4. Turn the headlamps on and make sure they work properly. If the
headlamp was correctly aligned before you changed the bulb, you should
not need to align it again.
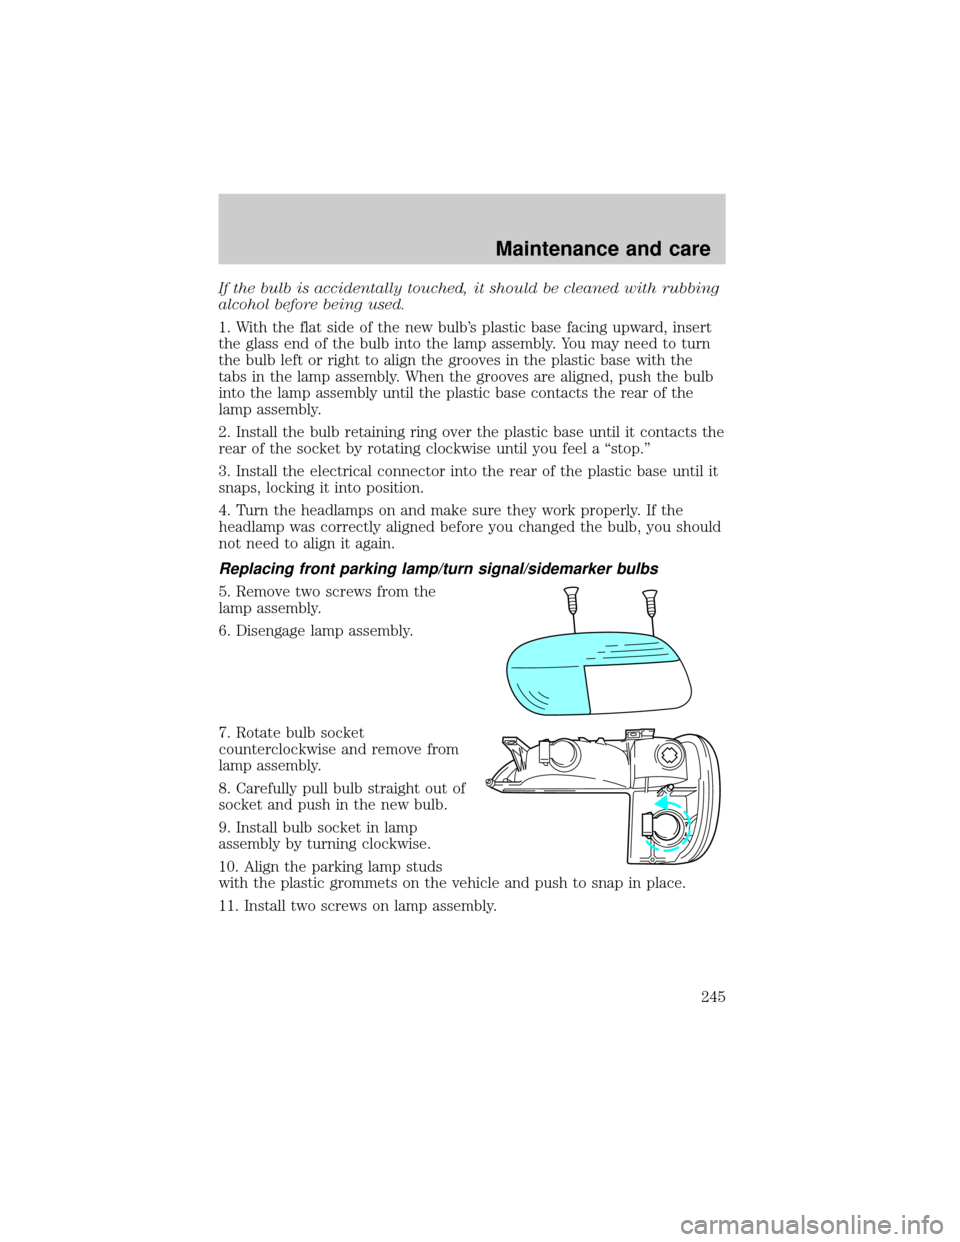
Replacing front parking lamp/turn signal/sidemarker bulbs
5. Remove two screws from the
lamp assembly.
6. Disengage lamp assembly.
7. Rotate bulb socket
counterclockwise and remove from
lamp assembly.
8. Carefully pull bulb straight out of
socket and push in the new bulb.
9. Install bulb socket in lamp
assembly by turning clockwise.
10. Align the parking lamp studs
with the plastic grommets on the vehicle and push to snap in place.
11. Install two screws on lamp assembly.
Maintenance and care
245
Page 246 of 288
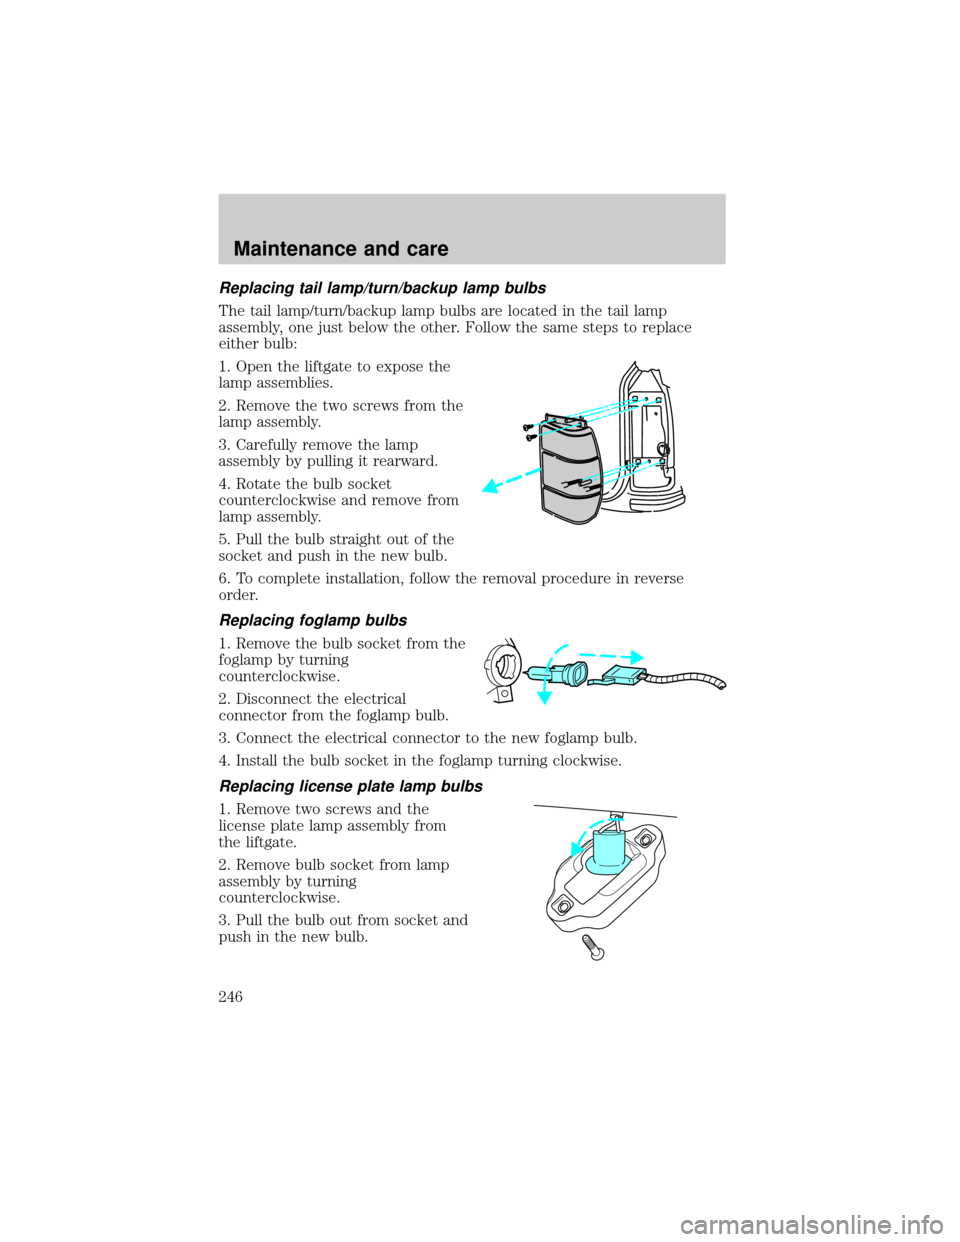
Replacing tail lamp/turn/backup lamp bulbs
The tail lamp/turn/backup lamp bulbs are located in the tail lamp
assembly, one just below the other. Follow the same steps to replace
either bulb:
1. Open the liftgate to expose the
lamp assemblies.
2. Remove the two screws from the
lamp assembly.
3. Carefully remove the lamp
assembly by pulling it rearward.
4. Rotate the bulb socket
counterclockwise and remove from
lamp assembly.
5. Pull the bulb straight out of the
socket and push in the new bulb.
6. To complete installation, follow the removal procedure in reverse
order.
Replacing foglamp bulbs
1. Remove the bulb socket from the
foglamp by turning
counterclockwise.
2. Disconnect the electrical
connector from the foglamp bulb.
3. Connect the electrical connector to the new foglamp bulb.
4. Install the bulb socket in the foglamp turning clockwise.
Replacing license plate lamp bulbs
1. Remove two screws and the
license plate lamp assembly from
the liftgate.
2. Remove bulb socket from lamp
assembly by turning
counterclockwise.
3. Pull the bulb out from socket and
push in the new bulb.
Maintenance and care
246
Page 247 of 288
4. Install the bulb socket in lamp assembly turning it clockwise,
5. Install the lamp assembly on liftgate with two screws.
Replacing high-mount brake lamp bulbs
1. Remove the two screws and move
the lamp assembly away from the
liftgate.
2. Disconnect the washer hose.
3. Remove the bulb holder from the
lamp assembly by depressing the
snaps.
4. Pull the bulb straight out of the
socket and push in the new bulb.
To complete installation, follow the
removal procedure in reverse order.
Maintenance and care
247
Page 250 of 288
Repairing paint chips
Minor scratches or paint damage from road debris may be repaired with
the Ultra Touch Prep and Finishing Kit (#F7AZ-19K507±BA), Lacquer
Touch-up Paint (#ALBZ-19500±XXXXA), or Exterior Acrylic Spray
Lacquer (#ALAZ-19500±XXXXA) from the Ford Car Care Chemicals line.
Please note that the part numbers (shown as XXXX above) will vary with
your vehicle's specific coloring. Observe the application instructions on
the products.
Remove particles such as bird droppings, tree sap, insect remains, tar
spots, road salt and industrial fallout immediately.
Cleaning the engine
Engines are more efficient when they are clean because grease and dirt
buildup keep the engine warmer than normal. When washing:
²Take care when using a power washer to clean the engine. The high
pressure fluid could penetrate the sealed parts and cause damage.
²Do not spray with cold water to avoid cracking the engine block or
other engine components.
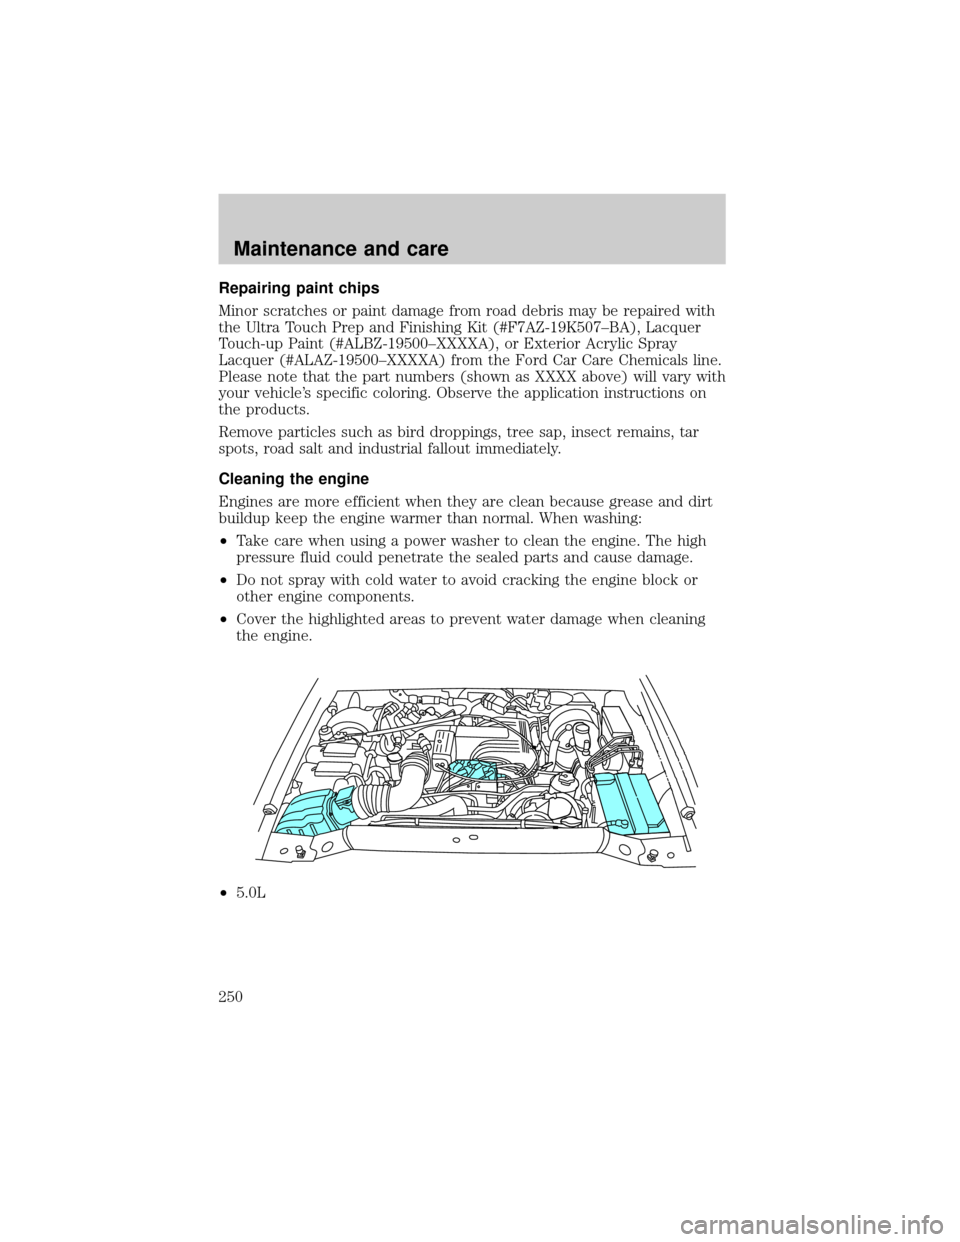
²Cover the highlighted areas to prevent water damage when cleaning
the engine.
²5.0L
Maintenance and care
250
Page 258 of 288
LUBRICANT SPECIFICATIONS
ItemFord Part Name
or equivalentFord Part
NumberFord
Specification
Body hinges,
latches, door
striker plates and
rotors, seat
tracks, fuel filler
door hinge and
spring, hood
latch, auxiliary
latch, seat tracksMulti-Purpose
GreaseD0AZ-19584-AA
or
F5AZ-19G209-AAESB-M1C93-B or
ESR-M1C159-A
Hydraulic clutch
fluid and brake
fluidHigh
Perfromance
DOT 3 Motor
Vehicle Brake
FluidC6AZ-19542-ABESA-M6C25-A
and DOT 3
Driveshaft, slip
spline, universal
jointsPremium Long
Life GreaseXG-1-C or
XG-1-T or
XG-1-KESA-M1C75-B
Engine coolant
1Ford Premium
Engine CoolantE2FZ-19549-AA
(in Canada,
Motorcraft
CXC-10-c)ESE-M97B44-A
Engine oil
5.0L V8Motorcraft SAE
5W-20 Super
Premium Motor
OilXO-5W20-QSPWSS-M2C153-H
with API
Certification
Mark
Engine oil
4.0L SOHC V6MotorcraftSAE
5W-30 Super
Premium Motor
OilXO-5W30-QSPWSS-M2C153-G
with API
Certification
Mark
Lock cylindersMotorcraft
penetrating and
lock lubricantMotorcraft XL-1 none
Automatic
transmission
2Motorcraft
MERCONtVATFXT-5-QM MERCONtV
Power steering
fluidMotorcraft
MERCONtAT FXT-2-QDX MERCONt
Capacities and specifications
258
Page 262 of 288
IDENTIFYING YOUR VEHICLE
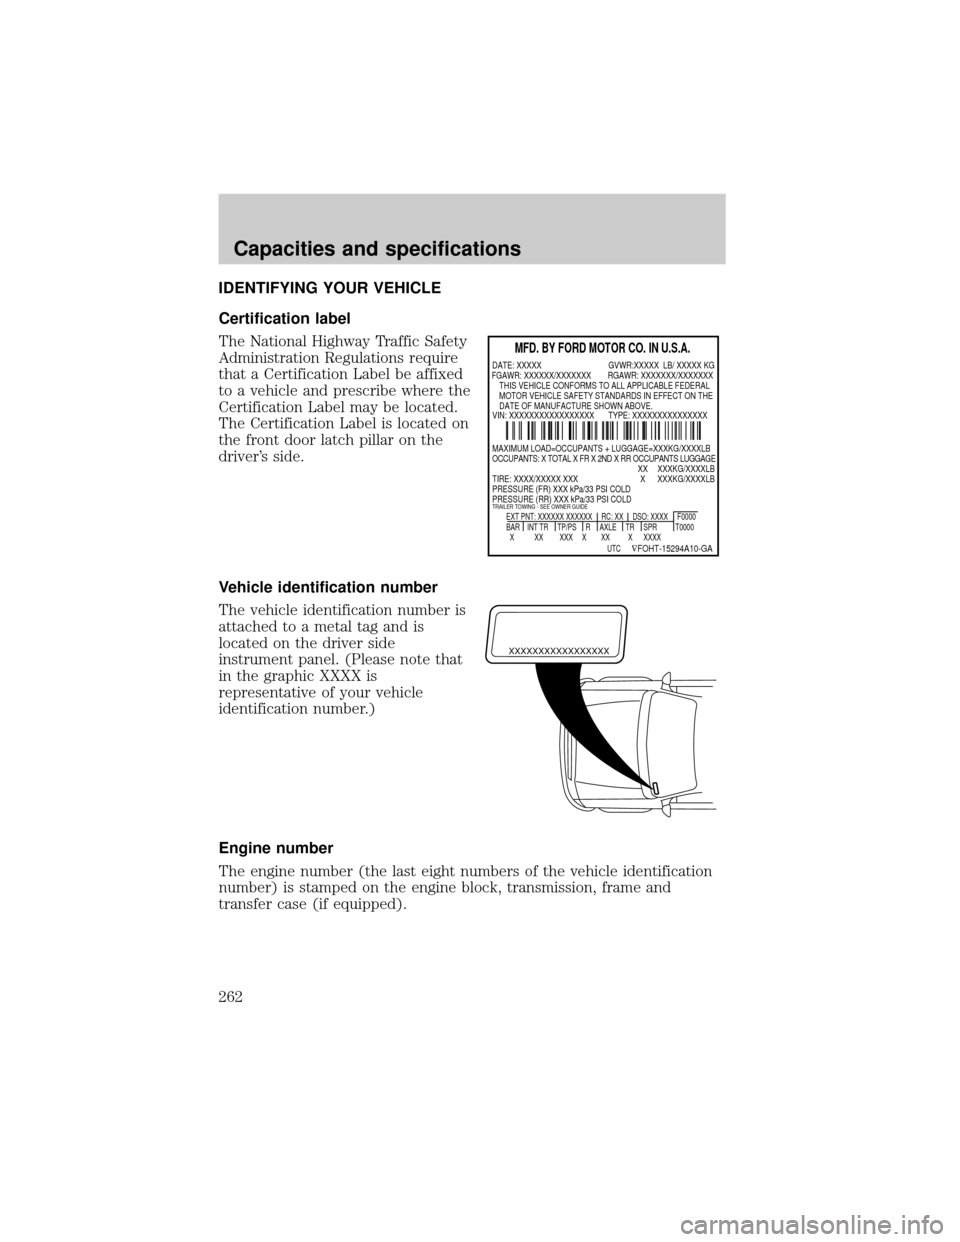
Certification label
The National Highway Traffic Safety
Administration Regulations require
that a Certification Label be affixed
to a vehicle and prescribe where the
Certification Label may be located.
The Certification Label is located on
the front door latch pillar on the
driver's side.
Vehicle identification number
The vehicle identification number is
attached to a metal tag and is
located on the driver side
instrument panel. (Please note that
in the graphic XXXX is
representative of your vehicle
identification number.)
Engine number
The engine number (the last eight numbers of the vehicle identification
number) is stamped on the engine block, transmission, frame and
transfer case (if equipped).
MFD. BY FORD MOTOR CO. IN U.S.A.
EXT PNT: XXXXXX XXXXXX RC: XX DSO: XXXX F0000
BAR INT TR TP/PS R AXLE TR SPR T0000
X XX XXX X XX X XXXX
UTC
ÑFOHT-15294A10-GA
MAXIMUM LOAD=OCCUPANTS + LUGGAGE=XXXKG/XXXXLB
OCCUPANTS: X TOTAL X FR X 2ND X RR OCCUPANTS LUGGAGE
XX XXXKG/XXXXLB
TIRE: XXXX/XXXXX XXX X XXXKG/XXXXLB
PRESSURE (FR) XXX kPa/33 PSI COLD
PRESSURE (RR) XXX kPa/33 PSI COLD
TRAILER TOWING - SEE OWNER GUIDE
DATE: XXXXX GVWR:XXXXX LB/ XXXXX KG
VIN: XXXXXXXXXXXXXXXXX TYPE: XXXXXXXXXXXXXXX FGAWR: XXXXXX/XXXXXXX RGAWR: XXXXXXX/XXXXXXX
THIS VEHICLE CONFORMS TO ALL APPLICABLE FEDERAL
MOTOR VEHICLE SAFETY STANDARDS IN EFFECT ON THE
DATE OF MANUFACTURE SHOWN ABOVE.
XXXXXXXXXXXXXXXXX
Capacities and specifications
262
Page 271 of 288
Ford Deluxe Leather and Vinyl Cleaner (not available in Canada)
Motorcraft Vinyl Cleaner (Canada only)
Ford Extra Strength Tar and Road Oil Remover* (not available in
Canada)
Ford Extra Strength Upholstery Cleaner (Canada only)
Ford Extra Strength Upholstery Cleaner (not available in Canada)
Ford Metal Surface Cleaner
Ford Multi-Purpose Cleaner*
Motorcraft Car Wash Concentrate
Motorcraft Carlite Glass Cleaner
Ford Spot and Stain Remover*
Ford Super Premium Tire and Trim Dressing
Ford Triple Clean
Ford Ultra-Clear Spray Glass Cleaner (not available in Canada)
* May be sold with the Motorcraft name
FORD ACCESSORIES FOR YOUR VEHICLE
A wide selection of Ford accessories are available for your vehicle
through your local authorized Ford, Lincoln Mercury or Ford of Canada
dealer. These quality accessories have been specifically engineered to
fulfill your automotive needs; they are custom designed to complement
the style and aerodynamic appearance of your vehicle. In addition, each
accessory is made from high quality materials and meets or exceeds
Ford's rigid engineering and safety specifications. Ford accessories are
warranted for up to 12 months or 20 000 km (12 000 miles) on all cars
and light trucks and 12 months with unlimited distance on medium/heavy
duty trucks unless the accessory is installed on a new vehicle, then the
warranty becomes the balance of the new vehicle's warranty or the
accessories warranty, whichever is greater. See your dealer for complete
warranty information and availability.
Not all accessories are available for all models.
Vehicle Security
Styled wheel locks
Vehicle security systems
Customer assistance
271