2001 DODGE TOWN AND COUNTRY battery
[x] Cancel search: batteryPage 613 of 2321
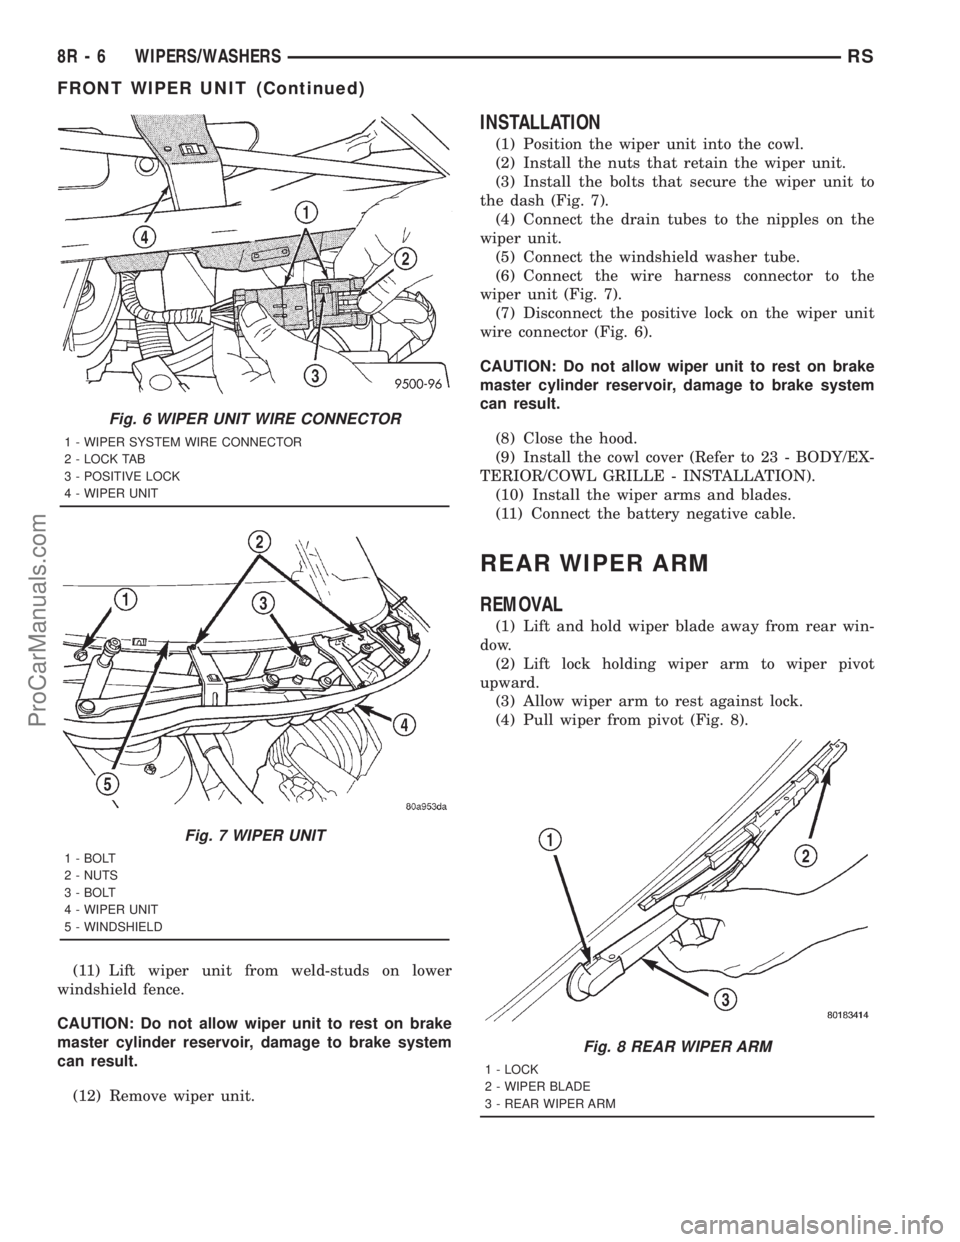
(11) Lift wiper unit from weld-studs on lower
windshield fence.
CAUTION: Do not allow wiper unit to rest on brake
master cylinder reservoir, damage to brake system
can result.
(12) Remove wiper unit.
INSTALLATION
(1) Position the wiper unit into the cowl.
(2) Install the nuts that retain the wiper unit.
(3) Install the bolts that secure the wiper unit to
the dash (Fig. 7).
(4) Connect the drain tubes to the nipples on the
wiper unit.
(5) Connect the windshield washer tube.
(6) Connect the wire harness connector to the
wiper unit (Fig. 7).
(7) Disconnect the positive lock on the wiper unit
wire connector (Fig. 6).
CAUTION: Do not allow wiper unit to rest on brake
master cylinder reservoir, damage to brake system
can result.
(8) Close the hood.
(9) Install the cowl cover (Refer to 23 - BODY/EX-
TERIOR/COWL GRILLE - INSTALLATION).
(10) Install the wiper arms and blades.
(11) Connect the battery negative cable.
REAR WIPER ARM
REMOVAL
(1) Lift and hold wiper blade away from rear win-
dow.
(2) Lift lock holding wiper arm to wiper pivot
upward.
(3) Allow wiper arm to rest against lock.
(4) Pull wiper from pivot (Fig. 8).
Fig. 6 WIPER UNIT WIRE CONNECTOR
1 - WIPER SYSTEM WIRE CONNECTOR
2 - LOCK TAB
3 - POSITIVE LOCK
4 - WIPER UNIT
Fig. 7 WIPER UNIT
1 - BOLT
2 - NUTS
3 - BOLT
4 - WIPER UNIT
5 - WINDSHIELD
Fig. 8 REAR WIPER ARM
1 - LOCK
2 - WIPER BLADE
3 - REAR WIPER ARM
8R - 6 WIPERS/WASHERSRS
FRONT WIPER UNIT (Continued)
ProCarManuals.com
Page 614 of 2321

INSTALLATION
(1) Position arm on pivot.
(2) Pull up on arm and release lock
(3) Allow wiper arm to rest on rear window.
REAR WIPER MOTOR
REMOVAL
(1) Disconnect and isolate the negative battery
cable.
(2) Remove rear wiper arm. (Refer to 8 - ELEC-
TRICAL/WIPERS/WASHERS/WIPER ARMS -
REMOVAL) in this section.
(3) Open liftgate.
(4) Remove liftgate trim panel. (Refer to 23 -
BODY/DECKLID/HATCH/LIFTGATE/TAILGATE/
TRIM PANEL - REMOVAL).
(5) Disconnect wire connector from rear wiper
motor.
(6) Remove screws holding rear wiper motor to lift-
gate (Fig. 9).
(7) Remove wiper motor from liftgate.
INSTALLATION
(1) Position the wiper motor in the liftgate.
(2) Install the retaining screws.
(3) Connect the wire harness connector.
(4) Install the liftgate trim panel. (Refer to 23 -
BODY/DECKLID/HATCH/LIFTGATE/TAILGATE/
TRIM PANEL - INSTALLATION).
(5) Disconnect wire connector from rear wiper
motor.
(6) Remove screws holding rear wiper motor to lift-
gate (Fig. 9).(7) Remove wiper motor from liftgate (Fig. 9).
(8) Close the liftgate.
(9) Install the wiper arm. (Refer to 8 - ELECTRI-
CAL/WIPERS/WASHERS/WIPER ARMS - INSTAL-
LATION) in this section.
(10) Connect the battery negative cable.
REAR WIPER/WASHER
SWITCH
DESCRIPTION
The rear window wiper/washer switches are
located on the center bezel with the hazard and
heated seat switches (Fig. 10). They are not service-
able seperately from the hazard and heated seat
switches. If defective, the entire switch assembly
must be replaced.
OPERATION
Refer to the vehicle Owner's Manual for operating
instructions for the rear window wiper and washer.
WASHER HOSES
REMOVAL
(1) Remove rear window wiper motor. (Refer to 8 -
ELECTRICAL/WIPERS/WASHERS/REAR WIPER
MOTOR - REMOVAL).
(2) Peel wiper pivot seal grommet from rear glass.
(3) Remove grommets from vehicle (Fig. 11).
Fig. 9 REAR WINDOW WIPER MOTOR
1 - REAR WINDOW
2 - REAR WIPER MOTOR
3 - CHMSL
4 - WELL NUTS
Fig. 10 HVAC CONTROL PANEL
1 - TRIM BEZEL
2 - ACT SENSOR
3 - A/C REQUEST SWITCH
4 - REAR WINDOW DEFOGGER/HEATED MIRRORS SWITCH
COMBO
5 - FRONT WINDOW DEFROSTER MODE SELECTOR
RSWIPERS/WASHERS8R-7
REAR WIPER ARM (Continued)
ProCarManuals.com
Page 615 of 2321

INSTALLATION
(1) Install rear window wiper motor. (Refer to 8 -
ELECTRICAL/WIPERS/WASHERS/REAR WIPER
MOTOR - INSTALLATION).
(2) Peel wiper pivot seal grommet from rear glass.
(3) Install grommets from (Fig. 11).
WASHER RESERVOIR
REMOVAL
(1) Disconnect and isolate the negative battery
cable.
(2) Hoist and support vehicle on safety stands.
(3) Remove the right front wheel (Refer to 22 -
TIRES/WHEELS - REMOVAL).
(4) Remove front wheelhouse splash shield.
(5) Disconnect connectors from the front wind-
shield and rear window washer pumps, the fluid
level sensor, and the rear washer hose (Fig. 12).
(6) If washer bottle has fluid in it place a suitable
drain pan under the hose connections.
(7) Disconnect the front washer hose at the front
wiper unit in the engine compartment (Fig. 13). The
front hose will be removed with the bottle.
(8) Allow the washer bottle to drain.
(9) Remove the screws holding the washer bottle to
the front fender support and remove the bottle.
INSTALLATION
(1) Place the washer bottle in position and attach
to the front fender support using proper screws.
(2) Connect the front washer hose at the front
wiper unit in the engine compartment (Fig. 13).
(3) Connect the front windshield and the rear win-
dow washer pumps, fluid level sensor and the rear
washer hose (Fig. 12).
(4) Install the front wheelhouse splashshield.
(5) Install the right front wheel (Refer to 22 -
TIRES/WHEELS - INSTALLATION).
(6) Lower the vehicle.
Fig. 11 REAR GLASS RUBBER GROMMET
1 - WIPER MOTOR PIVOT GROMMET
Fig. 12 WINDSHIELD WASHER BOTTLE - TYPICAL
1 - INNER FENDER
2 - FRONT FASCIA
3 - REAR PUMP
4 - FRONT PUMP
5 - WINDSHIELD AND REAR WINDOW WASHER BOTTLE
Fig. 13 (TYPICAL) Front Washer Hose
1 - WINDSHIELD WASHER BOTTLE
2 - FRONT WINDSHIELD WASHER HOSE
8R - 8 WIPERS/WASHERSRS
WASHER HOSES (Continued)
ProCarManuals.com
Page 624 of 2321
TERMINOLOGY
This is a list of terms and definitions used in the
wiring diagrams.
LHD .................Left Hand Drive Vehicles
RHD................Right Hand Drive Vehicles
ATX . . Automatic Transmissions-Front Wheel Drive
MTX....Manual Transmissions-Front Wheel Drive
AT ....Automatic Transmissions-Rear Wheel Drive
MT .....Manual Transmissions-Rear Wheel Drive
SOHC...........Single Over Head Cam Engine
DOHC..........Double Over Head Cam Engine
Built-Up-Export.......... Vehicles Built For Sale
In Markets Other Than North America
Except-Built-Up-Export.... Vehicles Built For Sale
In North America
WARNINGS - GENERAL
WARNINGSprovide information to prevent per-
sonal injury and vehicle damage. Below is a list of
general warnings that should be followed any time a
vehicle is being serviced.
WARNING:: ALWAYS WEAR SAFETY GLASSES FOR
EYE PROTECTION.
WARNING: USE SAFETY STANDS ANYTIME A PRO-
CEDURE REQUIRES BEING UNDER A VEHICLE.
WARNING: BE SURE THAT THE IGNITION SWITCH
ALWAYS IS IN THE OFF POSITION, UNLESS THE
PROCEDURE REQUIRES IT TO BE ON.
WARNING: SET THE PARKING BRAKE WHEN
WORKING ON ANY VEHICLE. AN AUTOMATIC
TRANSMISSION SHOULD BE IN PARK. A MANUAL
TRANSMISSION SHOULD BE IN NEUTRAL.
WARNING: OPERATE THE ENGINE ONLY IN A
WELL-VENTILATED AREA.
WARNING: KEEP AWAY FROM MOVING PARTS
WHEN THE ENGINE IS RUNNING, ESPECIALLY THE
FAN AND BELTS.
WARNING: TO PREVENT SERIOUS BURNS, AVOID
CONTACT WITH HOT PARTS SUCH AS THE RADIA-
TOR, EXHAUST MANIFOLD(S), TAIL PIPE, CATA-
LYTIC CONVERTER AND MUFFLER.WARNING: DO NOT ALLOW FLAME OR SPARKS
NEAR THE BATTERY. GASES ARE ALWAYS
PRESENT IN AND AROUND THE BATTERY.
WARNING: ALWAYS REMOVE RINGS, WATCHES,
LOOSE HANGING JEWELRY AND LOOSE CLOTH-
ING.
DIAGNOSIS AND TESTING - WIRING HARNESS
TROUBLESHOOTING TOOLS
When diagnosing a problem in an electrical circuit
there are several common tools necessary. These tools
are listed and explained below.
²Jumper Wire - This is a test wire used to con-
nect two points of a circuit. It can be used to bypass
an open in a circuit.
WARNING: NEVER USE A JUMPER WIRE ACROSS
A LOAD, SUCH AS A MOTOR, CONNECTED
BETWEEN A BATTERY FEED AND GROUND.
²Voltmeter - Used to check for voltage on a cir-
cuit. Always connect the black lead to a known good
ground and the red lead to the positive side of the
circuit.
CAUTION: Most of the electrical components used
in today's vehicles are Solid State. When checking
voltages in these circuits, use a meter with a 10 -
megohm or greater impedance rating.
²Ohmmeter - Used to check the resistance
between two points of a circuit. Low or no resistance
in a circuit means good continuity.
CAUTION: Most of the electrical components used
in today's vehicles are Solid State. When checking
resistance in these circuits use a meter with a 10 -
megohm or greater impedance rating. In addition,
make sure the power is disconnected from the cir-
cuit. Circuits that are powered up by the vehicle's
electrical system can cause damage to the equip-
ment and provide false readings.
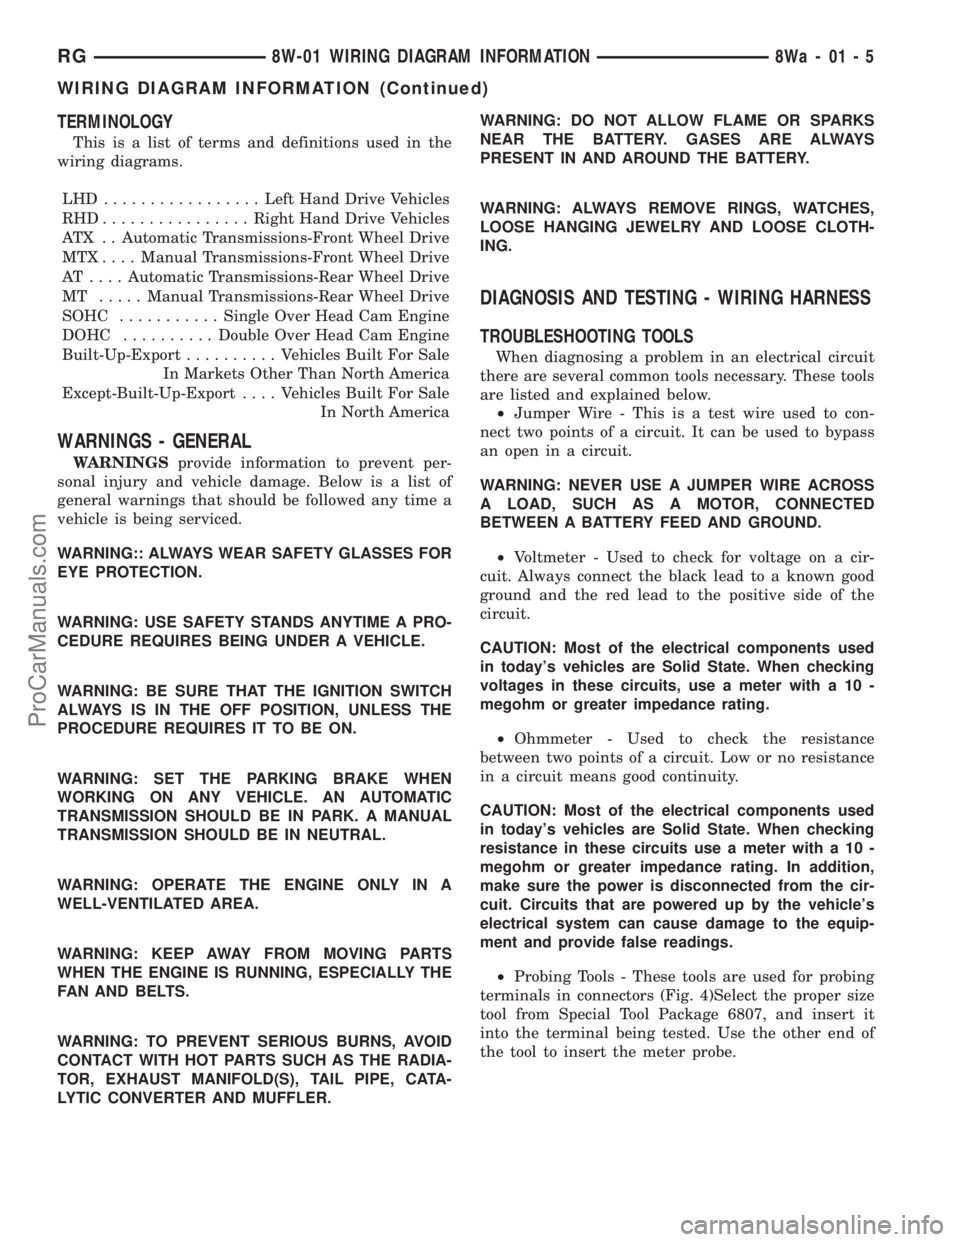
²Probing Tools - These tools are used for probing
terminals in connectors (Fig. 4)Select the proper size
tool from Special Tool Package 6807, and insert it
into the terminal being tested. Use the other end of
the tool to insert the meter probe.
RG8W-01 WIRING DIAGRAM INFORMATION8Wa-01-5
WIRING DIAGRAM INFORMATION (Continued)
ProCarManuals.com
Page 625 of 2321
INTERMITTENT AND POOR CONNECTIONS
Most intermittent electrical problems are caused
by faulty electrical connections or wiring. It is also
possible for a sticking component or relay to cause a
problem. Before condemning a component or wiring
assembly, check the following items.
²Connectors are fully seated
²Spread terminals, or terminal push out
²Terminals in the wiring assembly are fully
seated into the connector/component and locked into
position
²Dirt or corrosion on the terminals. Any amount
of corrosion or dirt could cause an intermittent prob-
lem
²Damaged connector/component casing exposing
the item to dirt or moisture
²Wire insulation that has rubbed through causing
a short to ground
²Some or all of the wiring strands broken inside
of the insulation
²Wiring broken inside of the insulation
TROUBLESHOOTING WIRING PROBLEMS
When troubleshooting wiring problems there are
six steps which can aid in the procedure. The steps
are listed and explained below. Always check for non-
factory items added to the vehicle before doing any
diagnosis. If the vehicle is equipped with these items,
disconnect them to verify these add-on items are not
the cause of the problem.
(1) Verify the problem.
(2) Verify any related symptoms. Do this by per-
forming operational checks on components that are
in the same circuit. Refer to the wiring diagrams.
(3) Analyze the symptoms. Use the wiring dia-
grams to determine what the circuit is doing, where
the problem most likely is occurring and where the
diagnosis will continue.
(4) Isolate the problem area.
(5) Repair the problem area.(6) Verify the proper operation. For this step,
check for proper operation of all items on the
repaired circuit. Refer to the wiring diagrams.
STANDARD PROCEDURE - TESTING FOR
VOLTAGE POTENTIAL
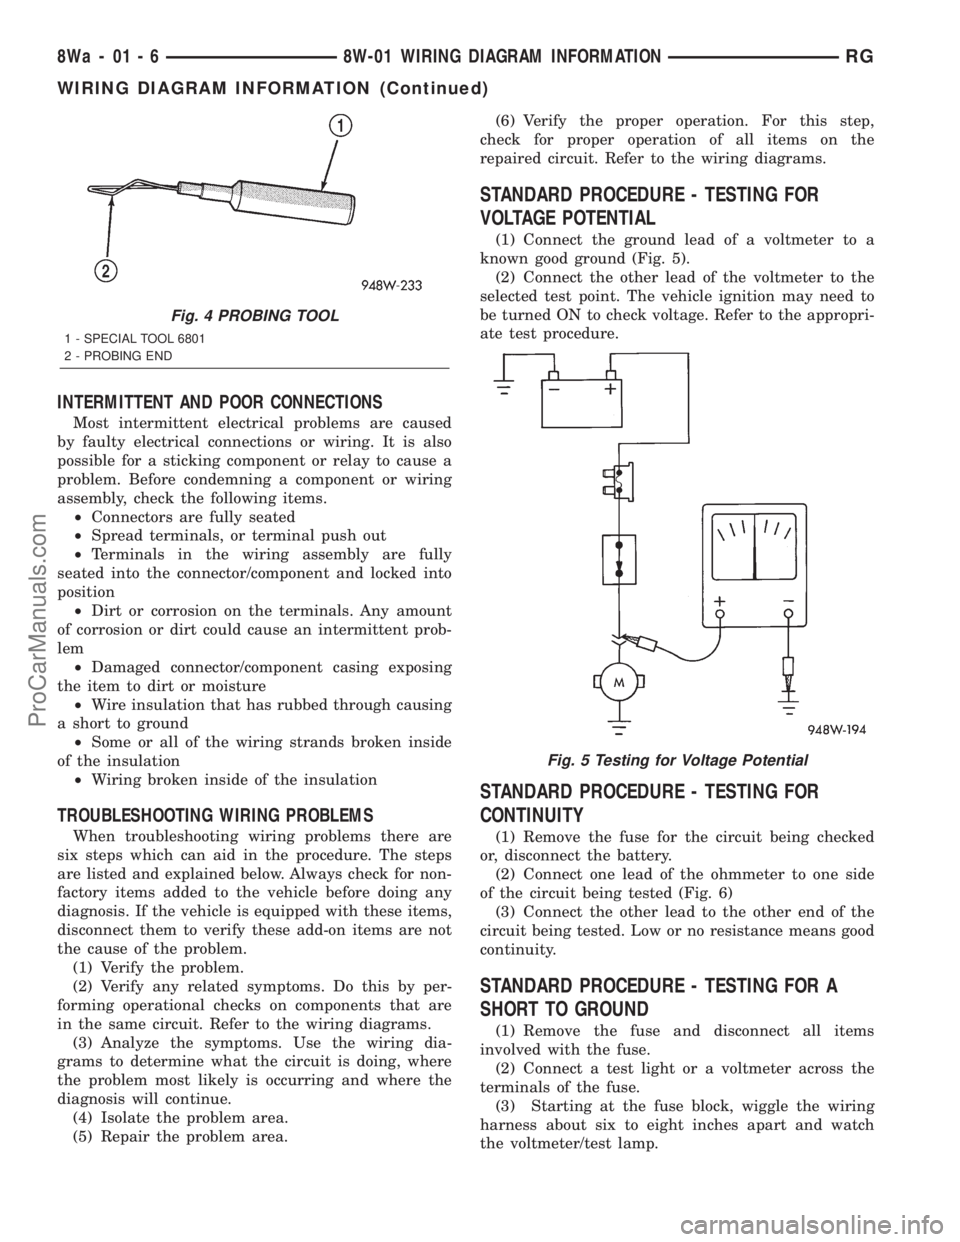
(1) Connect the ground lead of a voltmeter to a
known good ground (Fig. 5).
(2) Connect the other lead of the voltmeter to the
selected test point. The vehicle ignition may need to
be turned ON to check voltage. Refer to the appropri-
ate test procedure.
STANDARD PROCEDURE - TESTING FOR
CONTINUITY
(1) Remove the fuse for the circuit being checked
or, disconnect the battery.
(2) Connect one lead of the ohmmeter to one side
of the circuit being tested (Fig. 6)
(3) Connect the other lead to the other end of the
circuit being tested. Low or no resistance means good
continuity.
STANDARD PROCEDURE - TESTING FOR A
SHORT TO GROUND
(1) Remove the fuse and disconnect all items
involved with the fuse.
(2) Connect a test light or a voltmeter across the
terminals of the fuse.
(3) Starting at the fuse block, wiggle the wiring
harness about six to eight inches apart and watch
the voltmeter/test lamp.
Fig. 4 PROBING TOOL
1 - SPECIAL TOOL 6801
2 - PROBING END
Fig. 5 Testing for Voltage Potential
8Wa - 01 - 6 8W-01 WIRING DIAGRAM INFORMATIONRG
WIRING DIAGRAM INFORMATION (Continued)
ProCarManuals.com
Page 626 of 2321
(4) If the voltmeter registers voltage or the test
lamp glows, there is a short to ground in that gen-
eral area of the wiring harness.
STANDARD PROCEDURE - TESTING FOR
SHORT TO GROUND ON FUSES POWERING
SEVERAL LOADS
(1) Refer to the wiring diagrams and disconnect or
isolate all items on the suspected fused circuits.
(2) Replace the blown fuse.
(3) Supply power to the fuse by turning ON the
ignition switch or re-connecting the battery.
(4) Start connecting the items in the fuse circuit
one at a time. When the fuse blows the circuit with
the short to ground has been isolated.
STANDARD PROCEDURE - TESTING FOR A
VOLTAGE DROP
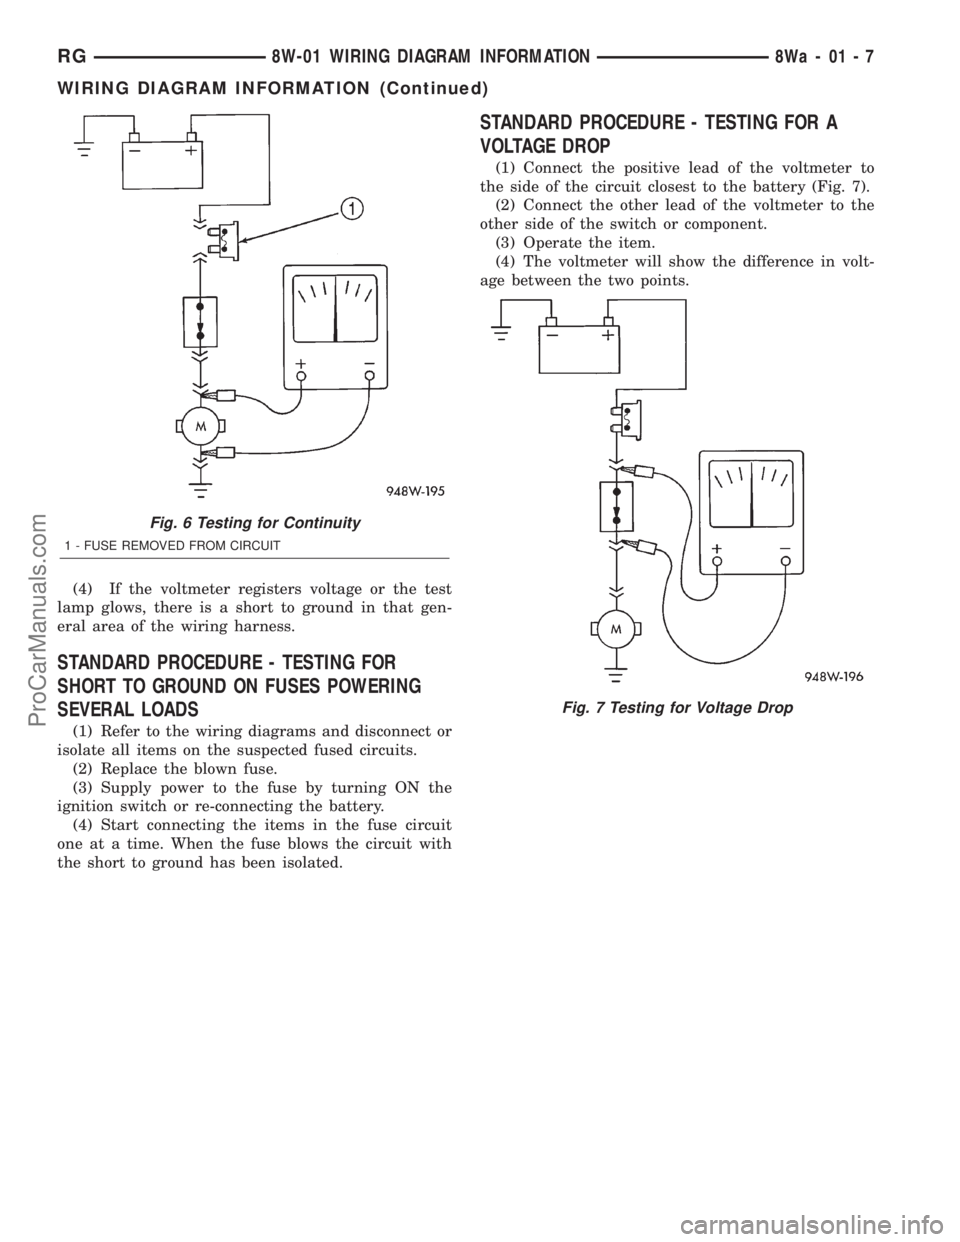
(1) Connect the positive lead of the voltmeter to
the side of the circuit closest to the battery (Fig. 7).
(2) Connect the other lead of the voltmeter to the
other side of the switch or component.
(3) Operate the item.
(4) The voltmeter will show the difference in volt-
age between the two points.
Fig. 6 Testing for Continuity
1 - FUSE REMOVED FROM CIRCUIT
Fig. 7 Testing for Voltage Drop
RG8W-01 WIRING DIAGRAM INFORMATION8Wa-01-7
WIRING DIAGRAM INFORMATION (Continued)
ProCarManuals.com
Page 627 of 2321
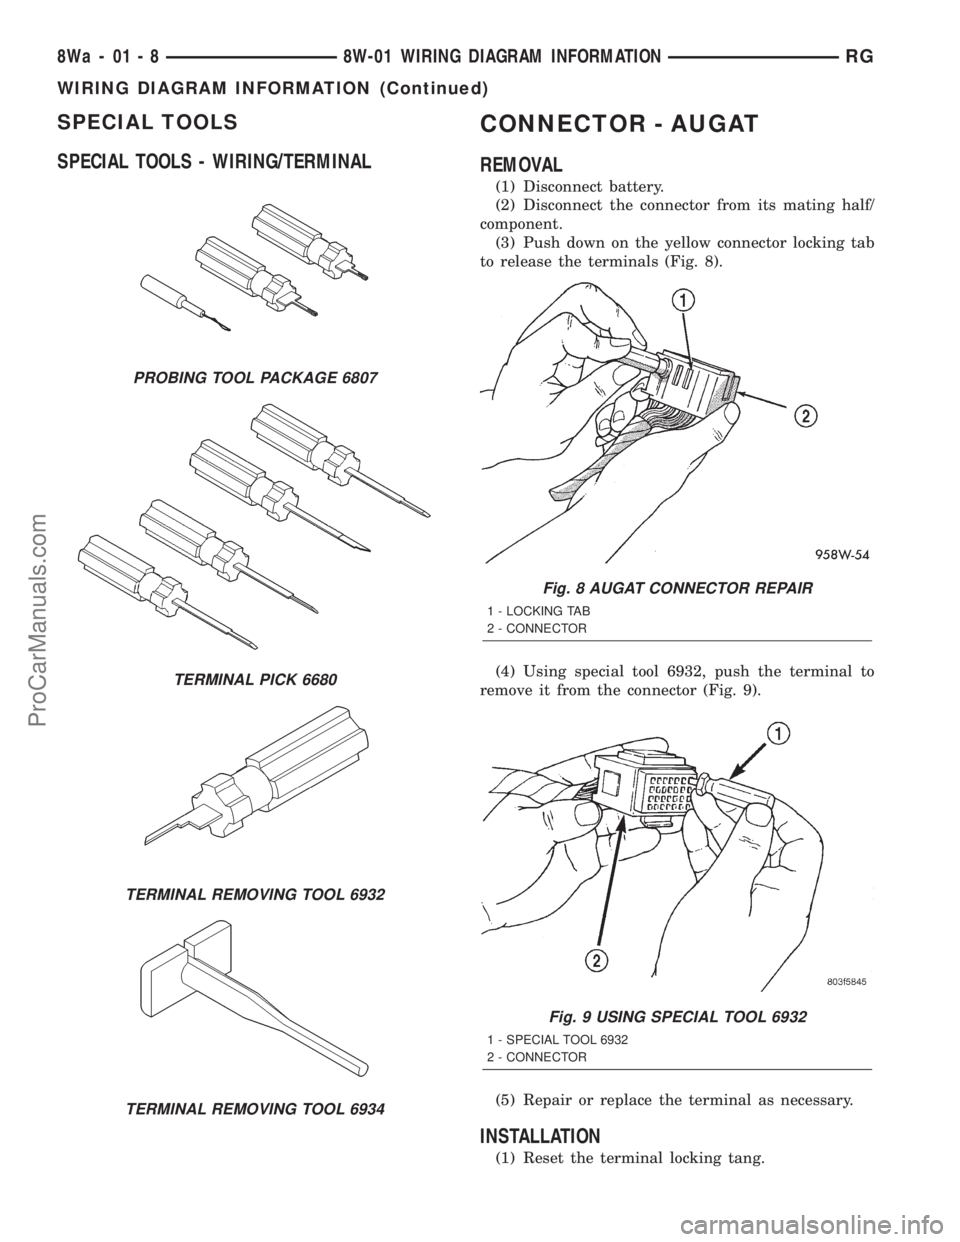
SPECIAL TOOLS
SPECIAL TOOLS - WIRING/TERMINALCONNECTOR - AUGAT
REMOVAL
(1) Disconnect battery.
(2) Disconnect the connector from its mating half/
component.
(3) Push down on the yellow connector locking tab
to release the terminals (Fig. 8).
(4) Using special tool 6932, push the terminal to
remove it from the connector (Fig. 9).
(5) Repair or replace the terminal as necessary.
INSTALLATION
(1) Reset the terminal locking tang.
PROBING TOOL PACKAGE 6807
TERMINAL PICK 6680
TERMINAL REMOVING TOOL 6932
TERMINAL REMOVING TOOL 6934
Fig. 8 AUGAT CONNECTOR REPAIR
1 - LOCKING TAB
2 - CONNECTOR
Fig. 9 USING SPECIAL TOOL 6932
1 - SPECIAL TOOL 6932
2 - CONNECTOR
8Wa - 01 - 8 8W-01 WIRING DIAGRAM INFORMATIONRG
WIRING DIAGRAM INFORMATION (Continued)
ProCarManuals.com
Page 628 of 2321
(2) Insert the removed wire in the same cavity on
the repair connector.
(3) Repeat steps for each wire in the connector,
being sure that all wires are inserted into the proper
cavities. For additional connector pin-out identifica-
tion, refer to the wiring diagrams.
(4) When the connector is re-assembled, the lock-
ing tab must be placed in the locked position to pre-
vent terminal push out.
(5) Connect connector to its mating half/compo-
nent.
(6) Connect battery and test all affected systems.
CONNECTOR - MOLEX
REMOVAL
(1) Disconnect battery.
(2) Disconnect the connector from its mating half/
component.
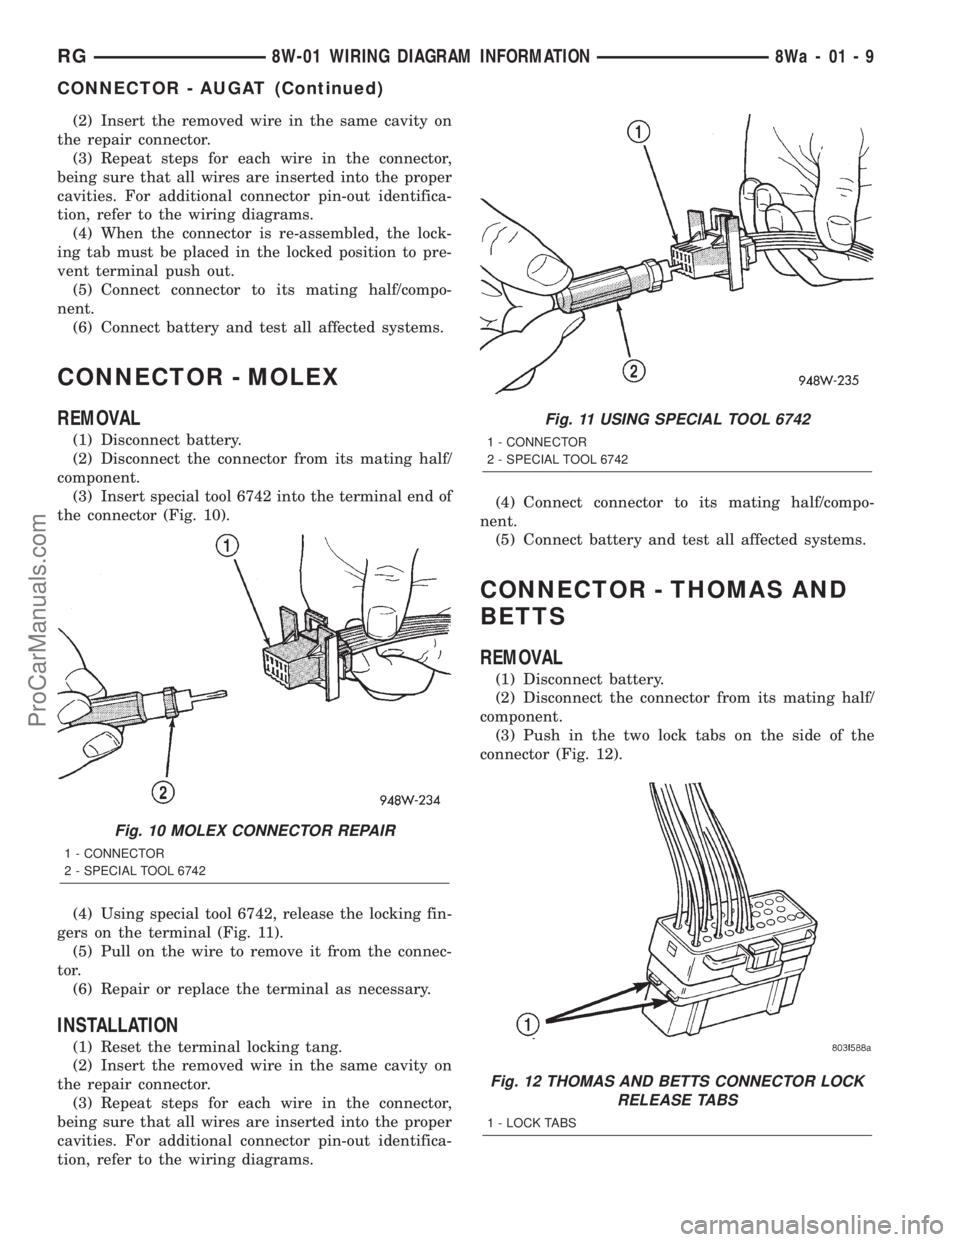
(3) Insert special tool 6742 into the terminal end of
the connector (Fig. 10).
(4) Using special tool 6742, release the locking fin-
gers on the terminal (Fig. 11).
(5) Pull on the wire to remove it from the connec-
tor.
(6) Repair or replace the terminal as necessary.
INSTALLATION
(1) Reset the terminal locking tang.
(2) Insert the removed wire in the same cavity on
the repair connector.
(3) Repeat steps for each wire in the connector,
being sure that all wires are inserted into the proper
cavities. For additional connector pin-out identifica-
tion, refer to the wiring diagrams.(4) Connect connector to its mating half/compo-
nent.
(5) Connect battery and test all affected systems.
CONNECTOR - THOMAS AND
BETTS
REMOVAL
(1) Disconnect battery.
(2) Disconnect the connector from its mating half/
component.
(3) Push in the two lock tabs on the side of the
connector (Fig. 12).
Fig. 10 MOLEX CONNECTOR REPAIR
1 - CONNECTOR
2 - SPECIAL TOOL 6742
Fig. 11 USING SPECIAL TOOL 6742
1 - CONNECTOR
2 - SPECIAL TOOL 6742
Fig. 12 THOMAS AND BETTS CONNECTOR LOCK
RELEASE TABS
1 - LOCK TABS
RG8W-01 WIRING DIAGRAM INFORMATION8Wa-01-9
CONNECTOR - AUGAT (Continued)
ProCarManuals.com