2001 DODGE RAM lock
[x] Cancel search: lockPage 150 of 2889
REAR AXLE-91/4
TABLE OF CONTENTS
page page
REAR AXLE-91/4
DESCRIPTION...........................77
OPERATION.............................77
DIAGNOSIS AND TESTING.................80
AXLE................................80
REMOVAL..............................83
INSTALLATION...........................84
ADJUSTMENTS..........................84
SPECIFICATIONS........................90
SPECIAL TOOLS.........................90
AXLE SHAFTS
REMOVAL..............................93
INSTALLATION...........................93
AXLE SHAFT SEALS
REMOVAL..............................94
INSTALLATION...........................94
AXLE BEARINGS
REMOVAL..............................94
INSTALLATION...........................95PINION SEAL
REMOVAL..............................95
INSTALLATION...........................95
DIFFERENTIAL
REMOVAL..............................96
DISASSEMBLY...........................97
ASSEMBLY.............................98
INSTALLATION...........................98
DIFFERENTIAL - TRAC-LOK
DIAGNOSIS AND TESTING.................98
TRAC-LOK............................98
DISASSEMBLY...........................99
ASSEMBLY............................101
DIFFERENTIAL CASE BEARINGS
REMOVAL.............................103
INSTALLATION..........................103
PINION GEAR/RING GEAR/TONE RING
REMOVAL.............................103
INSTALLATION..........................105
REAR AXLE-91/4
DESCRIPTION
The 9 1/4 Inch axle housings consist of a cast iron
center section with axle tubes extending from either
side. The tubes are pressed into and welded to the
differential housing to form a one-piece axle housing
(Fig. 1).
The axles have a vent hose to relieve internal pres-
sure caused by lubricant vaporization and internal
expansion.
The axles are equipped with semi-floating axle
shafts, meaning vehicle loads are supported by the
axle shaft and bearings. The axle shafts are retained
by C-locks in the differential side gears.
The removable, stamped steel cover provides a
means for inspection and service without removing
the complete axle from the vehicle.
The axle has a date tag and a gear ratio tag. The
tags are attached to the differential housing by a
cover bolt.
The rear wheel anti-lock (RWAL) brake speed sen-
sor is attached to the top, forward exterior of the dif-
ferential housing. A seal is located between the
sensor and the wire harness connector. The seal must
be in place when the wire connector is connected to
the sensor. The RWAL brake exciter ring is press-fit-ted onto the differential case against the ring gear
flange.
The differential case is a one-piece design. The dif-
ferential pinion shaft is retained with a screw. Differ-
ential bearing preload and ring gear backlash are set
and maintained by threaded adjusters at the outside
of the differential housing. Pinion bearing preload is
set and maintained by the use of a collapsible spacer.
Axles equipped with a Trac-Lokydifferential are
optional. A differential has a one-piece differential
case, and the same internal components as a stan-
dard differential, plus two clutch disc packs.
AXLE IDENTIFICATION
The axle differential cover can be used for identifi-
cation of the axle (Fig. 2). A ratio tag is attached to
the top of the differential cover.
OPERATION
The axle receives power from the transmission/
transfer case through the rear propeller shaft. The
rear propeller shaft is connected to the drive pinion
which rotates the differential through the gear mesh
with the ring gear bolted to the differential case. The
engine power is transmitted to the axle shafts
through the differential pinions and side gears. The
side gears are splined to the axle shafts.
BR/BEREAR AXLE - 9 1/4 3 - 77
Page 152 of 2889
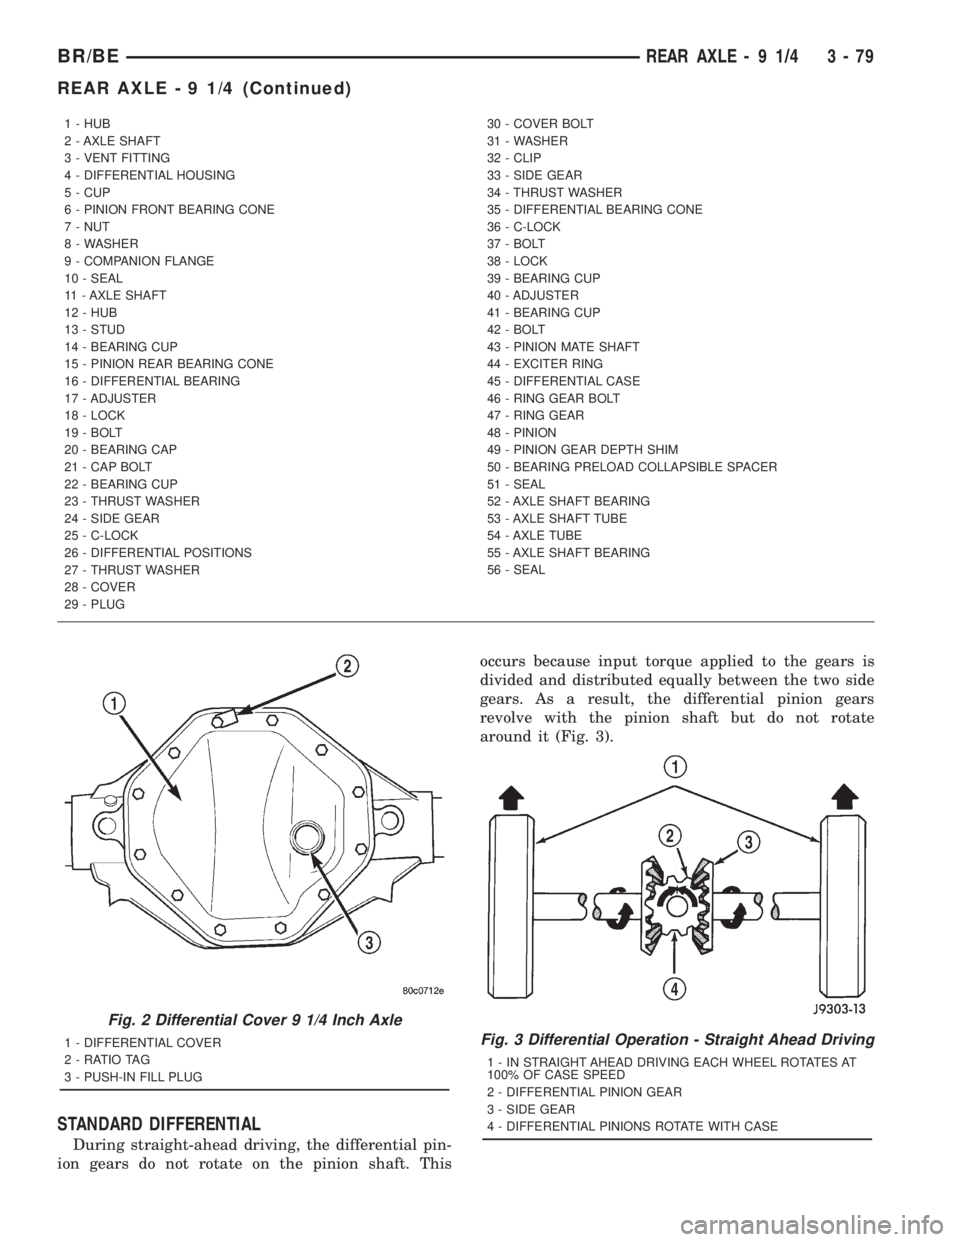
STANDARD DIFFERENTIAL
During straight-ahead driving, the differential pin-
ion gears do not rotate on the pinion shaft. Thisoccurs because input torque applied to the gears is
divided and distributed equally between the two side
gears. As a result, the differential pinion gears
revolve with the pinion shaft but do not rotate
around it (Fig. 3).
1 - HUB
2 - AXLE SHAFT
3 - VENT FITTING
4 - DIFFERENTIAL HOUSING
5 - CUP
6 - PINION FRONT BEARING CONE
7 - NUT
8 - WASHER
9 - COMPANION FLANGE
10 - SEAL
11 - AXLE SHAFT
12 - HUB
13 - STUD
14 - BEARING CUP
15 - PINION REAR BEARING CONE
16 - DIFFERENTIAL BEARING
17 - ADJUSTER
18 - LOCK
19 - BOLT
20 - BEARING CAP
21 - CAP BOLT
22 - BEARING CUP
23 - THRUST WASHER
24 - SIDE GEAR
25 - C-LOCK
26 - DIFFERENTIAL POSITIONS
27 - THRUST WASHER
28 - COVER
29 - PLUG30 - COVER BOLT
31 - WASHER
32 - CLIP
33 - SIDE GEAR
34 - THRUST WASHER
35 - DIFFERENTIAL BEARING CONE
36 - C-LOCK
37 - BOLT
38 - LOCK
39 - BEARING CUP
40 - ADJUSTER
41 - BEARING CUP
42 - BOLT
43 - PINION MATE SHAFT
44 - EXCITER RING
45 - DIFFERENTIAL CASE
46 - RING GEAR BOLT
47 - RING GEAR
48 - PINION
49 - PINION GEAR DEPTH SHIM
50 - BEARING PRELOAD COLLAPSIBLE SPACER
51 - SEAL
52 - AXLE SHAFT BEARING
53 - AXLE SHAFT TUBE
54 - AXLE TUBE
55 - AXLE SHAFT BEARING
56 - SEAL
Fig. 2 Differential Cover 9 1/4 Inch Axle
1 - DIFFERENTIAL COVER
2 - RATIO TAG
3 - PUSH-IN FILL PLUGFig. 3 Differential Operation - Straight Ahead Driving
1 - IN STRAIGHT AHEAD DRIVING EACH WHEEL ROTATES AT
100% OF CASE SPEED
2 - DIFFERENTIAL PINION GEAR
3 - SIDE GEAR
4 - DIFFERENTIAL PINIONS ROTATE WITH CASE
BR/BEREAR AXLE - 9 1/4 3 - 79
REAR AXLE - 9 1/4 (Continued)
Page 156 of 2889

Condition Possible Causes Correction
Axle Overheating 1. Lubricant level low. 1. Fill differential to correct level.
2. Improper grade of lubricant. 2. Fill differential with the correct fluid
type and quantity.
3. Bearing pre-loads too high. 3. Re-adjust bearing pre-loads.
4. Insufficient ring gear backlash. 4. Re-adjust ring gear backlash.
Gear Teeth Broke 1. Overloading. 1. Replace gears. Examine other gears
and bearings for possible damage.
2. Erratic clutch operation. 2. Replace gears and examine the
remaining parts for damage. Avoid
erratic clutch operation.
3. Ice-spotted pavement. 3. Replace gears and examine
remaining parts for damage.
4. Improper adjustments. 4. Replace gears and examine
remaining parts for damage. Ensure ring
gear backlash is correct.
Axle Noise 1. Insufficient lubricant. 1. Fill differential with the correct fluid
type and quantity.
2. Improper ring gear and pinion
adjustment.2. Check ring gear and pinion contact
pattern. Adjust backlash or pinion depth.
3. Unmatched ring gear and pinion. 3. Replace gears with a matched ring
gear and pinion.
4. Worn teeth on ring gear and/or
pinion.4. Replace ring gear and pinion.
5. Loose pinion bearings. 5. Adjust pinion bearing pre-load.
6. Loose differential bearings. 6. Adjust differential bearing pre-load.
7. Mis-aligned or sprung ring gear. 7. Measure ring gear run-out. Replace
components as necessary.
8. Loose differential bearing cap bolts. 8. Inspect differential components and
replace as necessary. Ensure that the
bearing caps are torqued tot he proper
specification.
9. Housing not machined properly. 9. Replace housing.
REMOVAL
(1) Raise and support the vehicle.
(2) Position a suitable lifting device under the
axle.
(3) Secure axle to device.
(4) Remove the wheels and tires.
(5) Secure brake drums to the axle shaft.
(6) Remove the RWAL sensor from the differential
housing, if necessary. Refer to 5 Brakes for proce-
dures.
(7) Disconnect the brake hose at the axle junction
block. Do not disconnect the brake hydraulic lines at
the wheel cylinders. Refer to 5 Brakes for procedures.(8) Disconnect the parking brake cables and cable
brackets.
(9) Disconnect the vent hose from the axle shaft
tube.
(10) Mark the propeller shaft and companion
flange for installation alignment reference.
(11) Remove propeller shaft.
(12) Disconnect shock absorbers from axle.
(13) Remove the spring clamps and spring brack-
ets. Refer to 2 Suspension for procedures.
(14) Separate the axle from the vehicle.
BR/BEREAR AXLE - 9 1/4 3 - 83
REAR AXLE - 9 1/4 (Continued)
Page 157 of 2889

INSTALLATION
(1) Raise the axle with lifting device and align to
the leaf spring centering bolts.
(2) Install the spring clamps and spring brackets.
Refer to 2 Suspension for procedures.
(3) Install shock absorbers and tighten nuts to 82
N´m (60 ft. lbs.).
(4) Install the RWAL sensor to the differential
housing, if necessary. Refer to 5 Brakes for proce-
dures.
(5) Connect the parking brake cables and cable
brackets.
(6) Install the brake drums. Refer to 5 Brakes for
procedures.
(7) Connect the brake hose to the axle junction
block. Refer to 5 Brakes for procedures.
(8) Install axle vent hose.
(9) Align propeller shaft and pinion companion
flange reference marks. Install the companion flange
bolts. Tighten to 108 N´m (80 ft. lbs.).
(10) Install the wheels and tires.
(11) Add gear lubricant, if necessary. Refer to
Specifications for lubricant requirements.
(12) Remove lifting device from axle and lower the
vehicle.
ADJUSTMENTS
Ring gear and pinion are supplied as matched sets
only. The identifying numbers for the ring gear and
pinion are painted onto the pinion gear head (Fig. 6)
and the side of the ring gear. A plus (+) number,
minus (±) number or zero (0) along with the gear set
sequence number (01 to 99) is on each gear. This first
number is the amount (in thousandths of an inch)
the depth varies from the standard depth setting of a
pinion marked with a (0). The next two numbers are
the sequence number of the gear set. The standard
depth provides the best teeth contact pattern. Refer
to Backlash and Contact Pattern for additional infor-
mation.
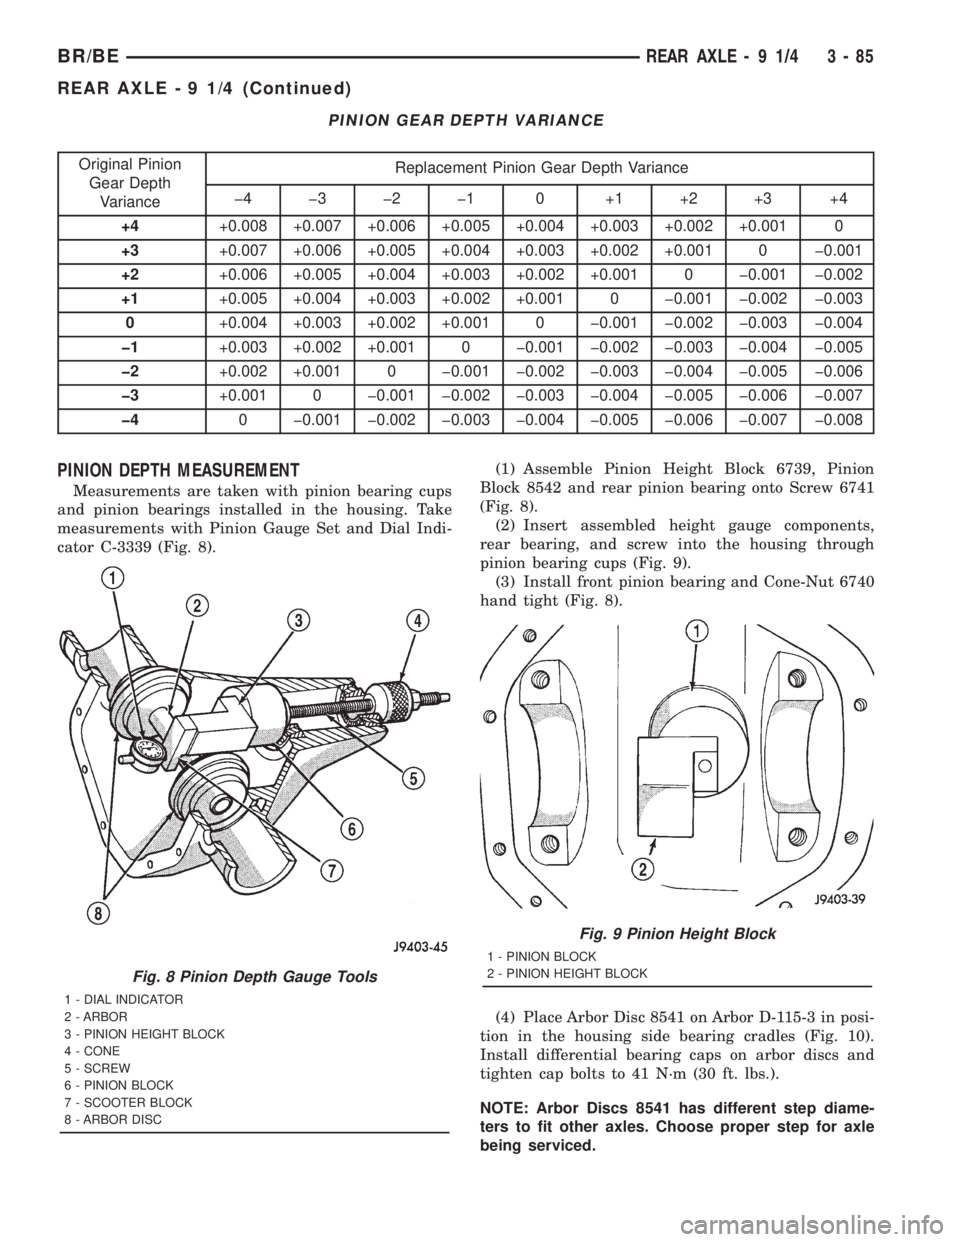
Compensation for pinion depth variance is
achieved with select shims. The shims are placed
behind the rear pinion bearing. (Fig. 7).
If a new gear set is being installed, note the depth
variance painted onto both the original and replace-
ment pinion. Add or subtract the thickness of the
original depth shims to compensate for the difference
in the depth variances. Refer to the Depth Variance
chart.
Note where Old and New Pinion Marking columns
intersect. Intersecting figure represents plus or
minus the amount needed.Note the painted number on the shaft of the drive
pinion (±1, ±2, 0, +1, +2, etc.). The numbers repre-
sent thousands of an inch deviation from the stan-
dard. If the number is negative, add that value to the
required thickness of the depth shims. If the number
is positive, subtract that value from the thickness of
the depth shim. If the number is 0 no change is nec-
essary.
Fig. 6 Pinion ID Number
1 - PRODUCTION NUMBER
2 - PINION GEAR DEPTH VARIANCE
3 - GEAR MATCHING NUMBER
Fig. 7 Adjustment Shim Locations
1 - AXLE HOUSING
2 - COLLAPSIBLE SPACER
3 - PINION BEARING
4 - PINION DEPTH SHIM
5 - DRIVE PINION GEAR
6 - BEARING CUP
3 - 84 REAR AXLE-91/4BR/BE
REAR AXLE - 9 1/4 (Continued)
Page 158 of 2889
PINION GEAR DEPTH VARIANCE
Original Pinion
Gear Depth
VarianceReplacement Pinion Gear Depth Variance
þ4 þ3 þ2 þ1 0 +1 +2 +3 +4
+4+0.008 +0.007 +0.006 +0.005 +0.004 +0.003 +0.002 +0.001 0
+3+0.007 +0.006 +0.005 +0.004 +0.003 +0.002 +0.001 0 þ0.001
+2+0.006 +0.005 +0.004 +0.003 +0.002 +0.001 0 þ0.001 þ0.002
+1+0.005 +0.004 +0.003 +0.002 +0.001 0 þ0.001 þ0.002 þ0.003
0+0.004 +0.003 +0.002 +0.001 0 þ0.001 þ0.002 þ0.003 þ0.004
þ1+0.003 +0.002 +0.001 0 þ0.001 þ0.002 þ0.003 þ0.004 þ0.005
þ2+0.002 +0.001 0 þ0.001 þ0.002 þ0.003 þ0.004 þ0.005 þ0.006
þ3+0.001 0 þ0.001 þ0.002 þ0.003 þ0.004 þ0.005 þ0.006 þ0.007
þ40 þ0.001 þ0.002 þ0.003 þ0.004 þ0.005 þ0.006 þ0.007 þ0.008
PINION DEPTH MEASUREMENT
Measurements are taken with pinion bearing cups
and pinion bearings installed in the housing. Take
measurements with Pinion Gauge Set and Dial Indi-
cator C-3339 (Fig. 8).(1) Assemble Pinion Height Block 6739, Pinion
Block 8542 and rear pinion bearing onto Screw 6741
(Fig. 8).
(2) Insert assembled height gauge components,
rear bearing, and screw into the housing through
pinion bearing cups (Fig. 9).
(3) Install front pinion bearing and Cone-Nut 6740
hand tight (Fig. 8).
(4) Place Arbor Disc 8541 on Arbor D-115-3 in posi-
tion in the housing side bearing cradles (Fig. 10).
Install differential bearing caps on arbor discs and
tighten cap bolts to 41 N´m (30 ft. lbs.).
NOTE: Arbor Discs 8541 has different step diame-
ters to fit other axles. Choose proper step for axle
being serviced.
Fig. 8 Pinion Depth Gauge Tools
1 - DIAL INDICATOR
2 - ARBOR
3 - PINION HEIGHT BLOCK
4 - CONE
5 - SCREW
6 - PINION BLOCK
7 - SCOOTER BLOCK
8 - ARBOR DISC
Fig. 9 Pinion Height Block
1 - PINION BLOCK
2 - PINION HEIGHT BLOCK
BR/BEREAR AXLE - 9 1/4 3 - 85
REAR AXLE - 9 1/4 (Continued)
Page 159 of 2889
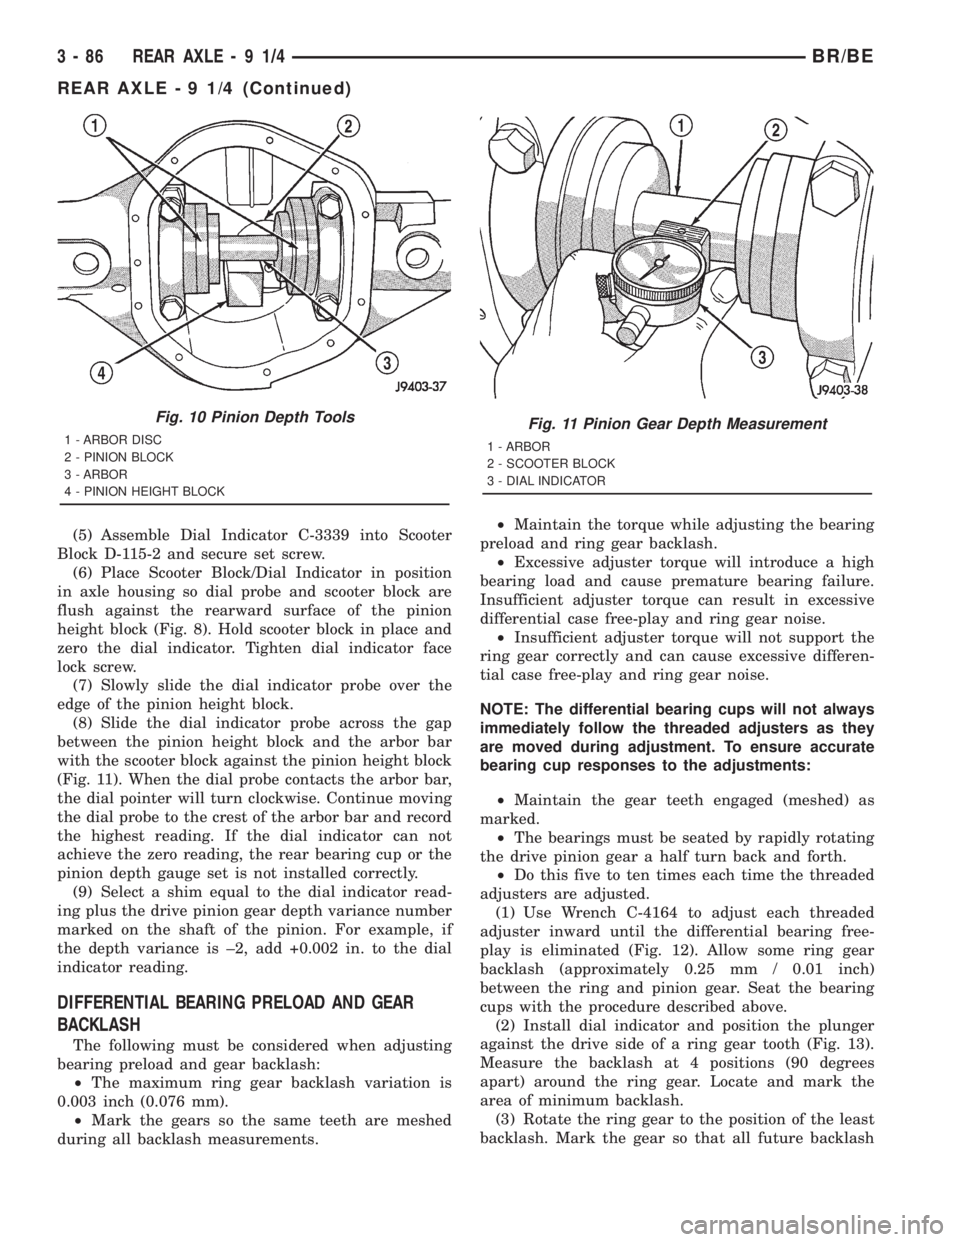
(5) Assemble Dial Indicator C-3339 into Scooter
Block D-115-2 and secure set screw.
(6) Place Scooter Block/Dial Indicator in position
in axle housing so dial probe and scooter block are
flush against the rearward surface of the pinion
height block (Fig. 8). Hold scooter block in place and
zero the dial indicator. Tighten dial indicator face
lock screw.
(7) Slowly slide the dial indicator probe over the
edge of the pinion height block.
(8) Slide the dial indicator probe across the gap
between the pinion height block and the arbor bar
with the scooter block against the pinion height block
(Fig. 11). When the dial probe contacts the arbor bar,
the dial pointer will turn clockwise. Continue moving
the dial probe to the crest of the arbor bar and record
the highest reading. If the dial indicator can not
achieve the zero reading, the rear bearing cup or the
pinion depth gauge set is not installed correctly.
(9) Select a shim equal to the dial indicator read-
ing plus the drive pinion gear depth variance number
marked on the shaft of the pinion. For example, if
the depth variance is ±2, add +0.002 in. to the dial
indicator reading.
DIFFERENTIAL BEARING PRELOAD AND GEAR
BACKLASH
The following must be considered when adjusting
bearing preload and gear backlash:
²The maximum ring gear backlash variation is
0.003 inch (0.076 mm).
²Mark the gears so the same teeth are meshed
during all backlash measurements.²Maintain the torque while adjusting the bearing
preload and ring gear backlash.
²Excessive adjuster torque will introduce a high
bearing load and cause premature bearing failure.
Insufficient adjuster torque can result in excessive
differential case free-play and ring gear noise.
²Insufficient adjuster torque will not support the
ring gear correctly and can cause excessive differen-
tial case free-play and ring gear noise.
NOTE: The differential bearing cups will not always
immediately follow the threaded adjusters as they
are moved during adjustment. To ensure accurate
bearing cup responses to the adjustments:
²Maintain the gear teeth engaged (meshed) as
marked.
²The bearings must be seated by rapidly rotating
the drive pinion gear a half turn back and forth.
²Do this five to ten times each time the threaded
adjusters are adjusted.
(1) Use Wrench C-4164 to adjust each threaded
adjuster inward until the differential bearing free-
play is eliminated (Fig. 12). Allow some ring gear
backlash (approximately 0.25 mm / 0.01 inch)
between the ring and pinion gear. Seat the bearing
cups with the procedure described above.
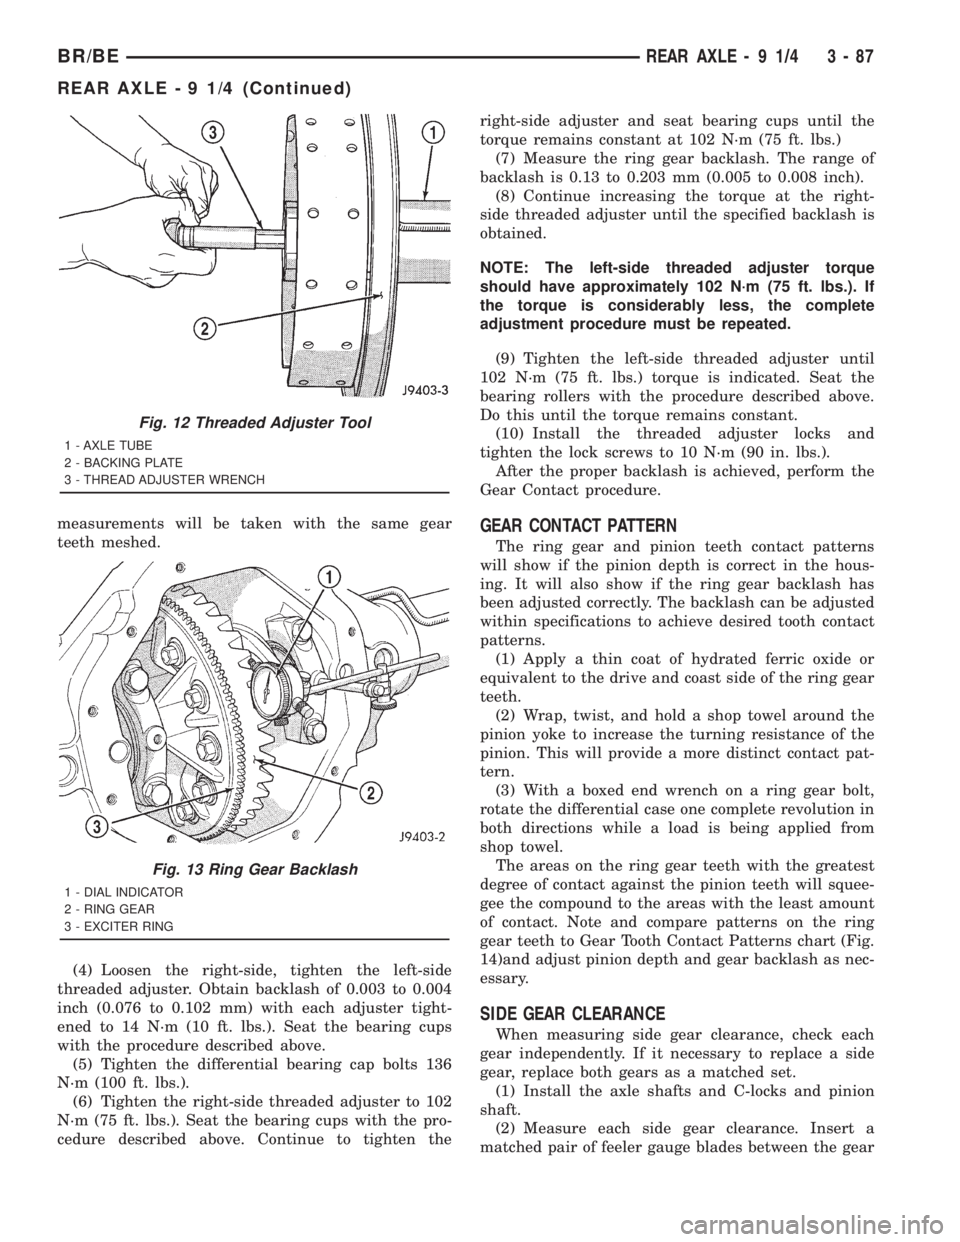
(2) Install dial indicator and position the plunger
against the drive side of a ring gear tooth (Fig. 13).
Measure the backlash at 4 positions (90 degrees
apart) around the ring gear. Locate and mark the
area of minimum backlash.
(3) Rotate the ring gear to the position of the least
backlash. Mark the gear so that all future backlash
Fig. 10 Pinion Depth Tools
1 - ARBOR DISC
2 - PINION BLOCK
3 - ARBOR
4 - PINION HEIGHT BLOCKFig. 11 Pinion Gear Depth Measurement
1 - ARBOR
2 - SCOOTER BLOCK
3 - DIAL INDICATOR
3 - 86 REAR AXLE-91/4BR/BE
REAR AXLE - 9 1/4 (Continued)
Page 160 of 2889
measurements will be taken with the same gear
teeth meshed.
(4) Loosen the right-side, tighten the left-side
threaded adjuster. Obtain backlash of 0.003 to 0.004
inch (0.076 to 0.102 mm) with each adjuster tight-
ened to 14 N´m (10 ft. lbs.). Seat the bearing cups
with the procedure described above.
(5) Tighten the differential bearing cap bolts 136
N´m (100 ft. lbs.).
(6) Tighten the right-side threaded adjuster to 102
N´m (75 ft. lbs.). Seat the bearing cups with the pro-
cedure described above. Continue to tighten theright-side adjuster and seat bearing cups until the
torque remains constant at 102 N´m (75 ft. lbs.)
(7) Measure the ring gear backlash. The range of
backlash is 0.13 to 0.203 mm (0.005 to 0.008 inch).
(8) Continue increasing the torque at the right-
side threaded adjuster until the specified backlash is
obtained.
NOTE: The left-side threaded adjuster torque
should have approximately 102 N´m (75 ft. lbs.). If
the torque is considerably less, the complete
adjustment procedure must be repeated.
(9) Tighten the left-side threaded adjuster until
102 N´m (75 ft. lbs.) torque is indicated. Seat the
bearing rollers with the procedure described above.
Do this until the torque remains constant.
(10) Install the threaded adjuster locks and
tighten the lock screws to 10 N´m (90 in. lbs.).
After the proper backlash is achieved, perform the
Gear Contact procedure.GEAR CONTACT PATTERN
The ring gear and pinion teeth contact patterns
will show if the pinion depth is correct in the hous-
ing. It will also show if the ring gear backlash has
been adjusted correctly. The backlash can be adjusted
within specifications to achieve desired tooth contact
patterns.
(1) Apply a thin coat of hydrated ferric oxide or
equivalent to the drive and coast side of the ring gear
teeth.
(2) Wrap, twist, and hold a shop towel around the
pinion yoke to increase the turning resistance of the
pinion. This will provide a more distinct contact pat-
tern.
(3) With a boxed end wrench on a ring gear bolt,
rotate the differential case one complete revolution in
both directions while a load is being applied from
shop towel.
The areas on the ring gear teeth with the greatest
degree of contact against the pinion teeth will squee-
gee the compound to the areas with the least amount
of contact. Note and compare patterns on the ring
gear teeth to Gear Tooth Contact Patterns chart (Fig.
14)and adjust pinion depth and gear backlash as nec-
essary.
SIDE GEAR CLEARANCE
When measuring side gear clearance, check each
gear independently. If it necessary to replace a side
gear, replace both gears as a matched set.
(1) Install the axle shafts and C-locks and pinion
shaft.
(2) Measure each side gear clearance. Insert a
matched pair of feeler gauge blades between the gear
Fig. 12 Threaded Adjuster Tool
1 - AXLE TUBE
2 - BACKING PLATE
3 - THREAD ADJUSTER WRENCH
Fig. 13 Ring Gear Backlash
1 - DIAL INDICATOR
2 - RING GEAR
3 - EXCITER RING
BR/BEREAR AXLE - 9 1/4 3 - 87
REAR AXLE - 9 1/4 (Continued)
Page 162 of 2889
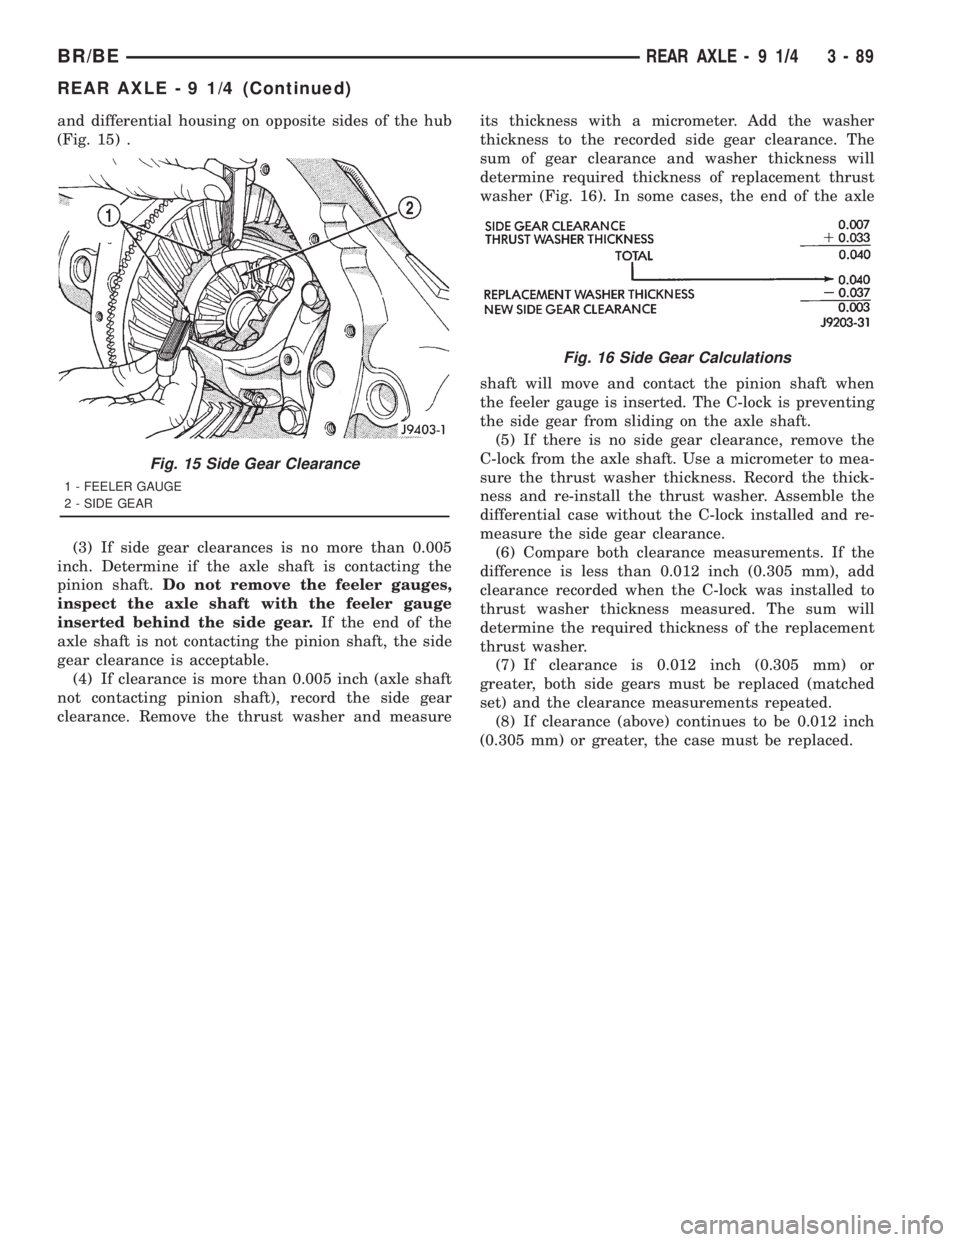
and differential housing on opposite sides of the hub
(Fig. 15) .
(3) If side gear clearances is no more than 0.005
inch. Determine if the axle shaft is contacting the
pinion shaft.Do not remove the feeler gauges,
inspect the axle shaft with the feeler gauge
inserted behind the side gear.If the end of the
axle shaft is not contacting the pinion shaft, the side
gear clearance is acceptable.
(4) If clearance is more than 0.005 inch (axle shaft
not contacting pinion shaft), record the side gear
clearance. Remove the thrust washer and measureits thickness with a micrometer. Add the washer
thickness to the recorded side gear clearance. The
sum of gear clearance and washer thickness will
determine required thickness of replacement thrust
washer (Fig. 16). In some cases, the end of the axle
shaft will move and contact the pinion shaft when
the feeler gauge is inserted. The C-lock is preventing
the side gear from sliding on the axle shaft.
(5) If there is no side gear clearance, remove the
C-lock from the axle shaft. Use a micrometer to mea-
sure the thrust washer thickness. Record the thick-
ness and re-install the thrust washer. Assemble the
differential case without the C-lock installed and re-
measure the side gear clearance.
(6) Compare both clearance measurements. If the
difference is less than 0.012 inch (0.305 mm), add
clearance recorded when the C-lock was installed to
thrust washer thickness measured. The sum will
determine the required thickness of the replacement
thrust washer.
(7) If clearance is 0.012 inch (0.305 mm) or
greater, both side gears must be replaced (matched
set) and the clearance measurements repeated.
(8) If clearance (above) continues to be 0.012 inch
(0.305 mm) or greater, the case must be replaced.
Fig. 15 Side Gear Clearance
1 - FEELER GAUGE
2 - SIDE GEAR
Fig. 16 Side Gear Calculations
BR/BEREAR AXLE - 9 1/4 3 - 89
REAR AXLE - 9 1/4 (Continued)