2001 CHRYSLER VOYAGER sensor
[x] Cancel search: sensorPage 1225 of 4284
J1850 COMMUNICATION BUS SPI ERROR
J1850 COMMUNICATION BUS RECEIVE TIME-
OUT
J1850 COMMUNICATION BUS UNAUTHO-
RIZED RESET
EEPROM PLAUSIBILITY CHECKSUM ERROR
EEPROM PLAUSIBILITY VIN CHECKSUM
ERROR
EEPROM PLAUSIBILITY COMMUNICATION
ERROR
EEPROM PLAUSIBILITY WRITE ERROR
EEPROM PLAUSIBILITY VARIATION NUM-
BER ERROR
EEPROM PLAUSIBILITY CODE WORD IN-
CORRECT OR MISSING
SKIM SYSTEM SKIM ERROR
SKIM SYSTEM WRITE ACCESS TO EEPROM
FAILURE
SKIM SYSTEM INVALID SECRET KEY IN EE-
PROM
SKIM SYSTEM KEY COMMUNICATION
TIMED OUT
SKIM SYSTEM INVALID KEY CODE RE-
CEIVED
EEPROM RECOVERY OCCURRED
EEPROM REDUNDANT OVERRUN MONI-
TORING
EEPROM QUANTITY STOP
EEPROM COMMUNICATION ERROR
EEPROM COMMUNICATION NOT VERIFIED
ACC PEDAL POSITION SENSOR 1 CKT SIG-
NAL VOLTAGE TOO HIGH
ACC PEDAL POSITION SENSOR 1 CKT SIG-
NAL VOLTAGE TOO LOW
ACC PEDAL POSITION SENSOR 1 CKT SUP-
PLY VOLTAGE TOO HIGH OR LOW
ACC PEDAL POSITION SENSOR 1 CKT PLAU-
SIBILITY WITH POTENTIOMETER
ACC PEDAL POSITION SENSOR 1 CKT PLAU-
SIBILITY WITH BRAKE SWITCH
ACC PEDAL POSITION SENSOR 1 CKT PLAU-
SIBILITY
3.3.4 SKIM DIAGNOSTIC TROUBLE CODES
ANTENNA FAILURE
COP FAILURE
EEPROM FAILURE
PCM STATUS FAILURE
INTERNAL FAULT
RAM FAILURE
ROLLING CODE FAILURE
SERIAL LINK EXTERNAL FAULT
SERIAL LINK INTERNAL FAULT
STACK OVERFLOW FAILURE
TRANSPONDER COMMUNICATION FAILURE
TRANSPONDER CRC (CYCLIC REDUN-
DANCY CHECK) FAILURE
TRANSPONDER ID MISMATCHTRANSPONDER RESPONSE MISMATCH
VIN MISMATCH
3.3.5 HANDLING NO TROUBLE CODE
PROBLEMS
After reading Section 3.0 (System Description
and Functional Operation), you should have a bet-
ter understanding of the theory and operation of the
on-board diagnostics, and how this relates to the
diagnosis of a vehicle that may have a driveability-
related symptom or complaint.
3.4 USING THE DRBIIIT
Refer to the DRBIIItuser 's guide for instructions
and assistance with reading the DTCs, erasing the
DTCs, lab scope usage and other DRBIIItfunc-
tions.
3.4.1 DRBIIITDOES NOT POWER UP
If the LEDs do not light or no sound is emitted at
start up, check for loose cable connections or a bad
cable. Check the vehicle battery voltage at data link
connector cavity 16. A minimum of 11.0 volts is
required to adequately power the DRB. Check for
proper ground connection at data link connector
cavities 4 and 5.
If all connections are proper between the
DRBIIItand the vehicle or other devices, and the
vehicle battery is fully charged, an inoperative
DRBIIItmay be the result of a faulty cable or
vehicle wiring. For a blank screen, refer to the
appropriate diagnostic manual.
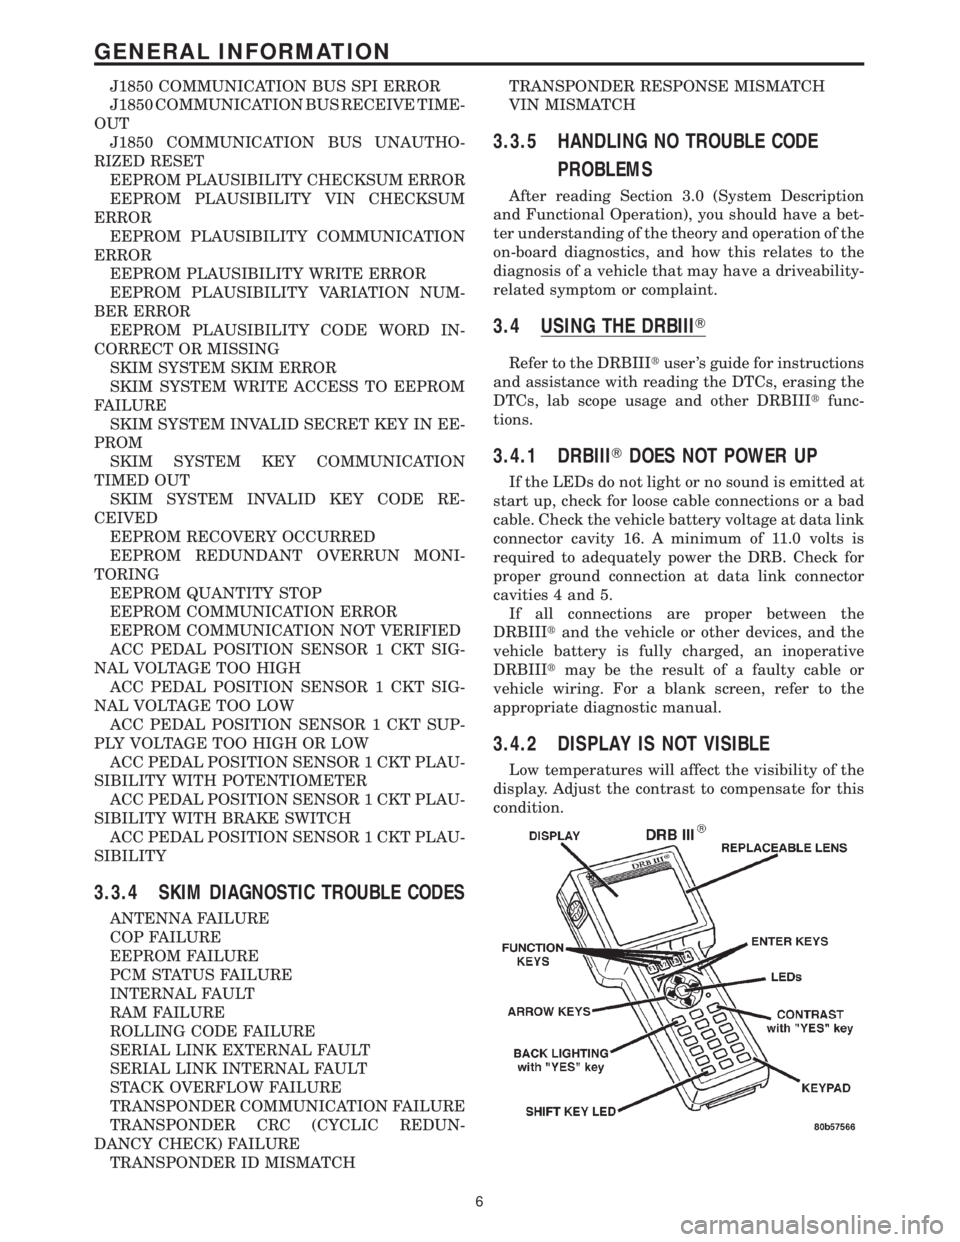
3.4.2 DISPLAY IS NOT VISIBLE
Low temperatures will affect the visibility of the
display. Adjust the contrast to compensate for this
condition.
6
GENERAL INFORMATION
Page 1227 of 4284
4.3 WARNINGS AND CAUTIONS
4.3.1 ROAD TEST WARNINGS
Some complaints will require a test drive as part
of the repair verification procedure. The purpose of
the test drive is to try to duplicate the diagnostic
code or symptom condition.
CAUTION: BEFORE ROAD TESTING A
VEHICLE, BE SURE THAT ALL
COMPONENTS ARE REASSEMBLED. DUR-
ING THE TEST DRIVE, DO NOT HANG THE
DRBIIITFROM THE REAR VIEW MIRROR. DO
NOT ATTEMPT TO READ THE DRBIIITWHILE
DRIVING. HAVE AN ASSISTANT AVAILABLE
TO OPERATE THE DRBIIIT.
4.3.2 VEHICLE DAMAGE CAUTIONS
Before disconnecting any control module, make
sure the ignition is off. Failure to do so could
damage the module. When testing voltage or circuit
integrity at any control module, use the terminal
side (not the wire end) of the harness connector. Do
not probe through the insulation; this will damage
it and eventually cause it to fail because of corro-
sion.
Be careful when performing electrical test so as to
prevent accidental shorting of terminals. Such a
mistake can damage fuses or components. Also, a
second code could be set, making diagnosis of the
original problem more difficult.
5.0 REQUIRED TOOLS AND
EQUIPMENT
DRBIIIt(diagnostic read-out box) scan tool
vacuum gauge
ammeter
ohmmeter
jumper wires and probes
oscilloscope
6.0 GLOSSARY OF TERMS
A/Cair conditioning
APPaccelerator pedal position (sensor)
backfire,
popbackfuel ignites in either the intake or
the exhaust system
BCMbody control module
BPboost pressure (sensor)CKPcrankshaft position (sensor)
CMPcamshaft position (sensor)
cuts out,
missesa steady pulsation or the inability of
the engine to maintain a consistent
rpm
DLCdata link connector
detona-
tion,
spark
knocka mild to severe ping, especially un-
der loaded engine conditions
ECMengine control module
ECTengine coolant temperature (sensor)
EGRexhaust gas recirculation
(solenoid/valve)
hard
startthe engine takes longer than usual
to start, even though it is able to
crank at normal speed.
IATintake air temperature (sensor)
IPMintelligent power module
lack of
power,
sluggishthe engine power output has been
reduced
MAFmass air flow (sensor)
MILmalfunction indicator lamp
msmillisecond(s)
PDCpower distribution center
poor fuel
economythere is significantly less fuel mile-
age than other vehicles of the same
design and configuration
runs
rough/
unstable
idlethe engine runs unevenly at idle
causing the engine to shake if it is
severe enough
S/Cspeed control
SKIMsentry key immobilizer module
SKISsentry key immobilizer system
start and
stallThe engine starts but immediately
dies (stalls)
surgeengine rpm fluctuation without cor-
responding change in accelerator
pedal position
SRCsignal range check
WIFwater in fuel (sensor)
VSSvehicle speed sensor
8
GENERAL INFORMATION
Page 1232 of 4284
Symptom List:
P0100-MASS AIR FLOW SENSOR PLAUSIBILITY
P0100-MASS AIR FLOW SENSOR PLAUSIBILITY POSITIVE AREA
P0100-MASS AIR FLOW SENSOR SIGNAL VOLTAGE TOO HIGH
P0100-MASS AIR FLOW SENSOR SIGNAL VOLTAGE TOO LOW
P0100-MASS AIR FLOW SENSOR SUPPLY VOLTAGE TOO HIGH OR
LOW
Test Note: All symptoms listed above are diagnosed using the same tests.
The title for the tests will be P0100-MASS AIR FLOW SENSOR
PLAUSIBILITY.
When Monitored and Set Condition:
P0100-MASS AIR FLOW SENSOR PLAUSIBILITY
When Monitored: With the engine running.
Set Condition: The mass airflow measure does not correspond with the enigne load
measurements.
P0100-MASS AIR FLOW SENSOR SIGNAL VOLTAGE TOO HIGH
When Monitored: With the ignition on.
Set Condition: The Boost Pressure Sensor Signal voltage is above 4.5 volts.
P0100-MASS AIR FLOW SENSOR SIGNAL VOLTAGE TOO LOW
When Monitored: With the ignition on.
Set Condition: The Mass Air Flow Sensor Signal voltage is below 0.2 volt.
P0100-MASS AIR FLOW SENSOR SUPPLY VOLTAGE TOO HIGH OR LOW
When Monitored: With the ignition on.
Set Condition: The Sensor Reference Voltage9A9voltage to the MAF is below 4.8 volts or
above 5.2 volts for at least 100 ms.
POSSIBLE CAUSES
ECM - 5-VOLT SUPPLY CIRCUIT
ECM/PCM RELAY OUTPUT CIRCUIT OPEN
MAF SENSOR IDLE VOLTAGE
MAF SENSOR SIGNAL - FULL THROTTLE VOLTAGE
SENSOR GROUND OPEN
INTERMITTENT CONDITION
5-VOLT SUPPLY CIRCUIT OPEN
13
DRIVEABILITY - DIESEL
Page 1233 of 4284
POSSIBLE CAUSES
MAF SENSOR SIGNAL CIRCUIT OPEN
5-VOLT SUPPLY CIRCUIT SHORTED TO THE SENSOR GROUND CIRCUIT
5-VOLT SUPPLY CIRCUIT SHORTED TO THE SENSOR GROUND CIRCUIT
MAF SENSOR SIGNAL CIRCUIT SHORTED TO GROUND
5-VOLT SUPPLY CIRCUIT SHORTED TO GROUND
5-VOLT SUPPLY CIRCUIT SHORTED TO GROUND
ECM SENSOR GROUND CIRCUIT OPEN
MAF SENSOR SIGNAL CIRCUIT SHORTED TO THE SENSOR GROUND CIRCUIT
5-VOLT SUPPLY CIRCUIT SHORTED TO VOLTAGE
5-VOLT SUPPLY CIRCUIT SHORTED TO VOLTAGE
MAF SENSOR CIRCUIT SHORTED TO VOLTAGE
ECM - MAF SENSOR SIGNAL CIRCUIT
TEST ACTION APPLICABILITY
1NOTE: If DTC P0641 or P0651 is present with this DTC, diagnose DTCs
P0641 and P0651 before diagnosing this DTC.
NOTE: Inspect the turbocharger inlet tube between the MAF Sensor and the
turbocharger for damage, restriction or poor connection. Any of these
conditions can cause a MAF Plausibility DTC.
Turn the ignition on.
With the DRBIIIt, erase the ECM DTCs.
Test drive the vehicle.
With the DRBIIIt, read the ECM DTCs.
Does the DRB III display a Mass Air Flow Sensor DTC?All
Ye s®Go To 2
No®Go To 20
2 Turn the ignition off.
Disconnect the MAF Sensor harness connector.
Turn the ignition on.
Measure the voltage of the 5-volt Supply circuit in MAF Sensor harness connector.
Is the voltage between 4.7 and 5.3 volts?All
Ye s®Go To 3
No®Go To 13
14
DRIVEABILITY - DIESEL
P0100-MASS AIR FLOW SENSOR PLAUSIBILITY ÐContinued
Page 1234 of 4284
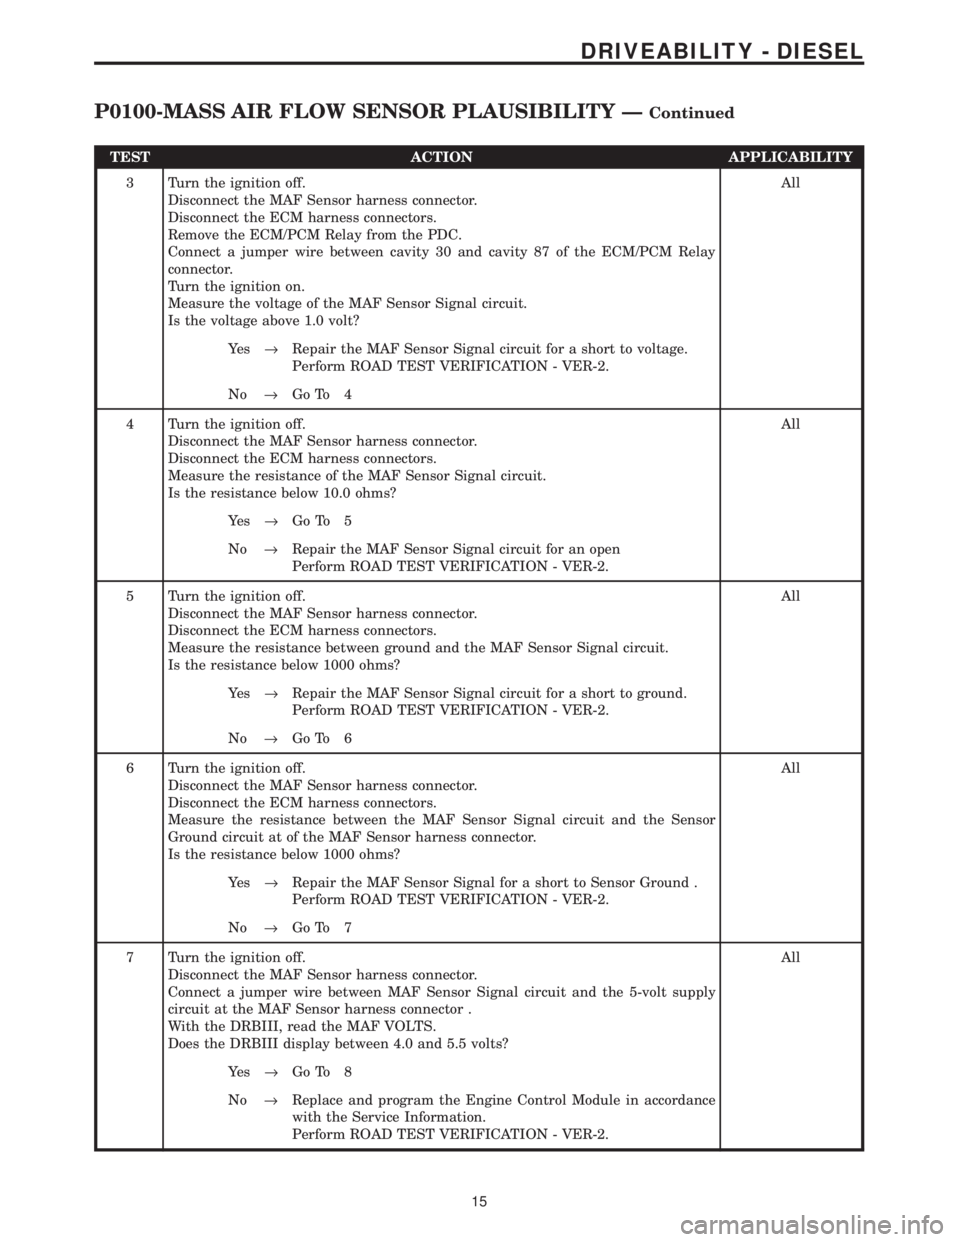
TEST ACTION APPLICABILITY
3 Turn the ignition off.
Disconnect the MAF Sensor harness connector.
Disconnect the ECM harness connectors.
Remove the ECM/PCM Relay from the PDC.
Connect a jumper wire between cavity 30 and cavity 87 of the ECM/PCM Relay
connector.
Turn the ignition on.
Measure the voltage of the MAF Sensor Signal circuit.
Is the voltage above 1.0 volt?All
Ye s®Repair the MAF Sensor Signal circuit for a short to voltage.
Perform ROAD TEST VERIFICATION - VER-2.
No®Go To 4
4 Turn the ignition off.
Disconnect the MAF Sensor harness connector.
Disconnect the ECM harness connectors.
Measure the resistance of the MAF Sensor Signal circuit.
Is the resistance below 10.0 ohms?All
Ye s®Go To 5
No®Repair the MAF Sensor Signal circuit for an open
Perform ROAD TEST VERIFICATION - VER-2.
5 Turn the ignition off.
Disconnect the MAF Sensor harness connector.
Disconnect the ECM harness connectors.
Measure the resistance between ground and the MAF Sensor Signal circuit.
Is the resistance below 1000 ohms?All
Ye s®Repair the MAF Sensor Signal circuit for a short to ground.
Perform ROAD TEST VERIFICATION - VER-2.
No®Go To 6
6 Turn the ignition off.
Disconnect the MAF Sensor harness connector.
Disconnect the ECM harness connectors.
Measure the resistance between the MAF Sensor Signal circuit and the Sensor
Ground circuit at of the MAF Sensor harness connector.
Is the resistance below 1000 ohms?All
Ye s®Repair the MAF Sensor Signal for a short to Sensor Ground .
Perform ROAD TEST VERIFICATION - VER-2.
No®Go To 7
7 Turn the ignition off.
Disconnect the MAF Sensor harness connector.
Connect a jumper wire between MAF Sensor Signal circuit and the 5-volt supply
circuit at the MAF Sensor harness connector .
With the DRBIII, read the MAF VOLTS.
Does the DRBIII display between 4.0 and 5.5 volts?All
Ye s®Go To 8
No®Replace and program the Engine Control Module in accordance
with the Service Information.
Perform ROAD TEST VERIFICATION - VER-2.
15
DRIVEABILITY - DIESEL
P0100-MASS AIR FLOW SENSOR PLAUSIBILITY ÐContinued
Page 1235 of 4284

TEST ACTION APPLICABILITY
8 Turn the ignition off.
Disconnect the MAF Sensor harness connector.
Disconnect the ECM harness connectors.
Measure the resistance of the Sensor Ground circuit between the MAF Sensor and
the ECM.
Is the resistance below 10.0 ohms?All
Ye s®Go To 9
No®Repair the Sensor Ground circuit for an open.
Perform ROAD TEST VERIFICATION - VER-2.
9 Turn the ignition off.
Disconnect the MAF Sensor harness connector.
Measure the voltage between the 5-volt Supply circuit and the Sensor Ground circuit
at the MAF Sensor harness connector.
Is the voltage above 4.5 volts?All
Ye s®Go To 10
No®Replace and program the ECM in accordance with the Service
Information.
Perform ROAD TEST VERIFICATION - VER-2.
10 Turn the ignition off.
Disconnect the MAF Sensor harness connector.
With the DRBIIIt, actuate the ECM/PCM Relay.
Measure the voltage of the 12-volt Supply circuit at the MAF Sensor harness
connector
Is the voltage above 10.0 volts?All
Ye s®Go To 11
No®Repair the ECM/PCM Relay Output circuit for an open.
Perform ROAD TEST VERIFICATION - VER-2.
11 Turn the ignition off.
NOTE: Inspect the turbocharger inlet tube between the MAF Sensor and the
Turbocharger. Ensure the airflow tube properly is secured at each end and
that there is no damage, restrictions or air leaks in the tube.
With a voltmeter, backprobe the MAF Sensor Signal circuit at the MAF Sensor
harness connector.
Allow the engine to idle for at least 2 minutes.
NOTE: The engine speed must be approximately 900 rpm for this test to be
valid.
Is the voltage between 2.1 and 2.7 volts?All
Ye s®Go To 12
No®Replace the Mass Air Flow Sensor in accordance with the Service
Information.
Perform ROAD TEST VERIFICATION - VER-2.
16
DRIVEABILITY - DIESEL
P0100-MASS AIR FLOW SENSOR PLAUSIBILITY ÐContinued
Page 1236 of 4284
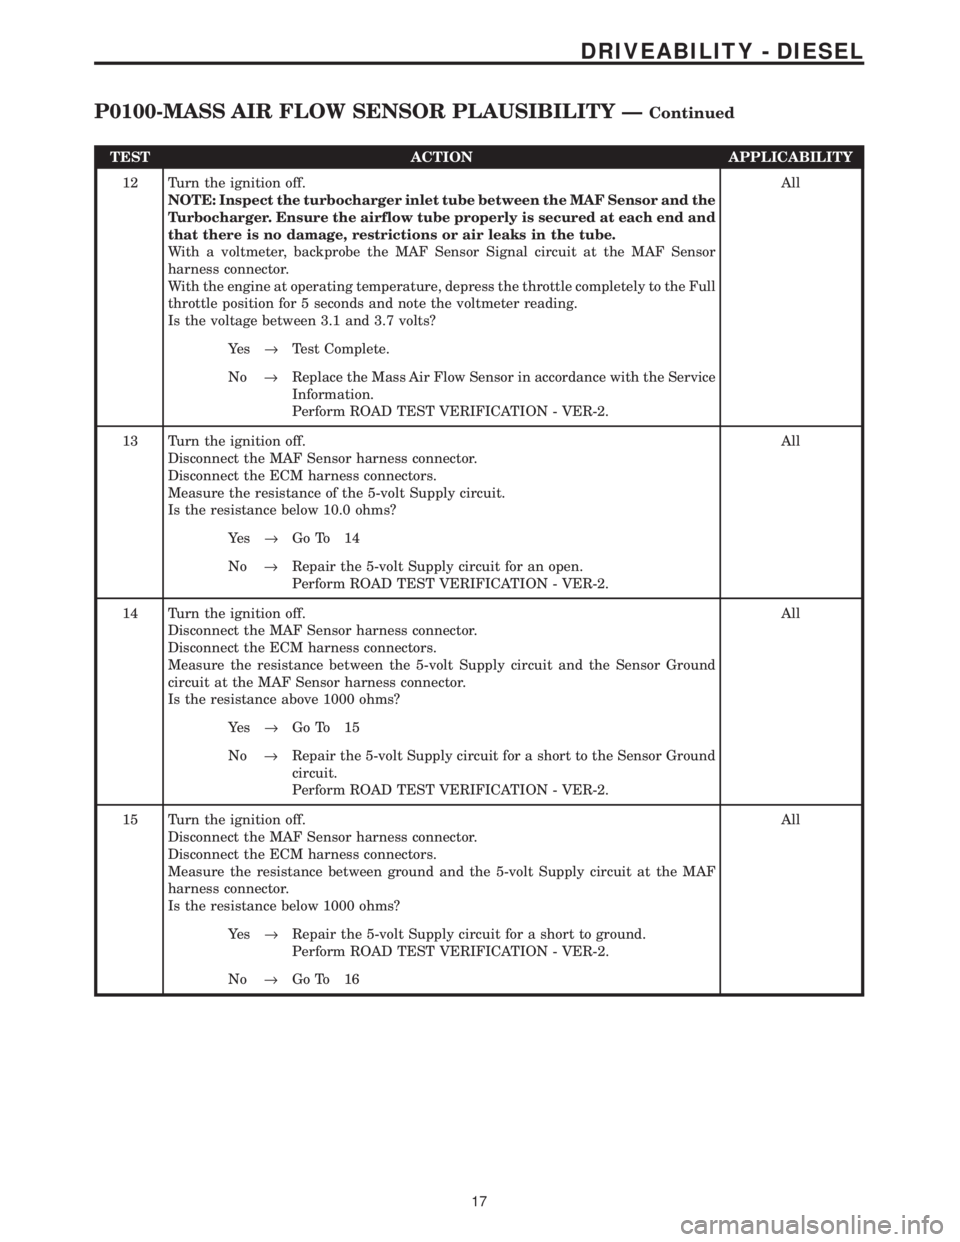
TEST ACTION APPLICABILITY
12 Turn the ignition off.
NOTE: Inspect the turbocharger inlet tube between the MAF Sensor and the
Turbocharger. Ensure the airflow tube properly is secured at each end and
that there is no damage, restrictions or air leaks in the tube.
With a voltmeter, backprobe the MAF Sensor Signal circuit at the MAF Sensor
harness connector.
With the engine at operating temperature, depress the throttle completely to the Full
throttle position for 5 seconds and note the voltmeter reading.
Is the voltage between 3.1 and 3.7 volts?All
Ye s®Test Complete.
No®Replace the Mass Air Flow Sensor in accordance with the Service
Information.
Perform ROAD TEST VERIFICATION - VER-2.
13 Turn the ignition off.
Disconnect the MAF Sensor harness connector.
Disconnect the ECM harness connectors.
Measure the resistance of the 5-volt Supply circuit.
Is the resistance below 10.0 ohms?All
Ye s®Go To 14
No®Repair the 5-volt Supply circuit for an open.
Perform ROAD TEST VERIFICATION - VER-2.
14 Turn the ignition off.
Disconnect the MAF Sensor harness connector.
Disconnect the ECM harness connectors.
Measure the resistance between the 5-volt Supply circuit and the Sensor Ground
circuit at the MAF Sensor harness connector.
Is the resistance above 1000 ohms?All
Ye s®Go To 15
No®Repair the 5-volt Supply circuit for a short to the Sensor Ground
circuit.
Perform ROAD TEST VERIFICATION - VER-2.
15 Turn the ignition off.
Disconnect the MAF Sensor harness connector.
Disconnect the ECM harness connectors.
Measure the resistance between ground and the 5-volt Supply circuit at the MAF
harness connector.
Is the resistance below 1000 ohms?All
Ye s®Repair the 5-volt Supply circuit for a short to ground.
Perform ROAD TEST VERIFICATION - VER-2.
No®Go To 16
17
DRIVEABILITY - DIESEL
P0100-MASS AIR FLOW SENSOR PLAUSIBILITY ÐContinued
Page 1237 of 4284
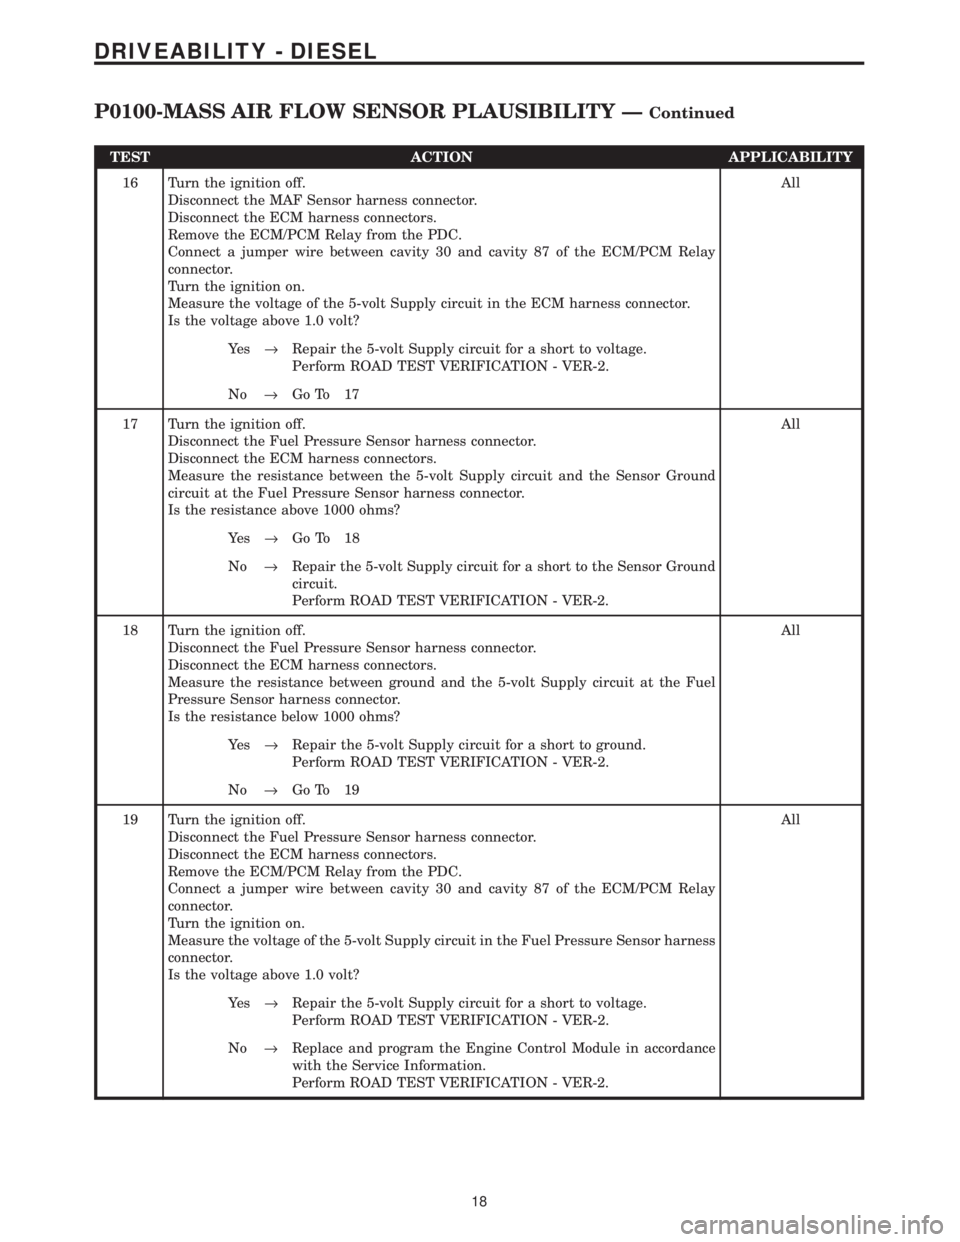
TEST ACTION APPLICABILITY
16 Turn the ignition off.
Disconnect the MAF Sensor harness connector.
Disconnect the ECM harness connectors.
Remove the ECM/PCM Relay from the PDC.
Connect a jumper wire between cavity 30 and cavity 87 of the ECM/PCM Relay
connector.
Turn the ignition on.
Measure the voltage of the 5-volt Supply circuit in the ECM harness connector.
Is the voltage above 1.0 volt?All
Ye s®Repair the 5-volt Supply circuit for a short to voltage.
Perform ROAD TEST VERIFICATION - VER-2.
No®Go To 17
17 Turn the ignition off.
Disconnect the Fuel Pressure Sensor harness connector.
Disconnect the ECM harness connectors.
Measure the resistance between the 5-volt Supply circuit and the Sensor Ground
circuit at the Fuel Pressure Sensor harness connector.
Is the resistance above 1000 ohms?All
Ye s®Go To 18
No®Repair the 5-volt Supply circuit for a short to the Sensor Ground
circuit.
Perform ROAD TEST VERIFICATION - VER-2.
18 Turn the ignition off.
Disconnect the Fuel Pressure Sensor harness connector.
Disconnect the ECM harness connectors.
Measure the resistance between ground and the 5-volt Supply circuit at the Fuel
Pressure Sensor harness connector.
Is the resistance below 1000 ohms?All
Ye s®Repair the 5-volt Supply circuit for a short to ground.
Perform ROAD TEST VERIFICATION - VER-2.
No®Go To 19
19 Turn the ignition off.
Disconnect the Fuel Pressure Sensor harness connector.
Disconnect the ECM harness connectors.
Remove the ECM/PCM Relay from the PDC.
Connect a jumper wire between cavity 30 and cavity 87 of the ECM/PCM Relay
connector.
Turn the ignition on.
Measure the voltage of the 5-volt Supply circuit in the Fuel Pressure Sensor harness
connector.
Is the voltage above 1.0 volt?All
Ye s®Repair the 5-volt Supply circuit for a short to voltage.
Perform ROAD TEST VERIFICATION - VER-2.
No®Replace and program the Engine Control Module in accordance
with the Service Information.
Perform ROAD TEST VERIFICATION - VER-2.
18
DRIVEABILITY - DIESEL
P0100-MASS AIR FLOW SENSOR PLAUSIBILITY ÐContinued