Page 353 of 460
6-2
Service
Your dealer knows your vehicle best and wants you to
be happy with it. We hope you'll go to your dealer for
all your service needs. You'll get genuine GM parts and
GM
-trained and supported service people.
We hope you'll want to keep your GM vehicle all GM.
Genuine GM parts have one of these marks:
Doing Your Own Service Work
If you want to do some of your own service work, you'll
want to use the proper service manual. It tells you much
more about how to service your vehicle than this manual
can. To order the proper service manual, see ªService
and Owner Publicationsº in the Index.
Your vehicle has an air bag system. Before attempting to
do your own service work, see ªServicing Your Air
Bag
-Equipped Vehicleº in the Index.
You should keep a record with all parts receipts and list
the mileage and the date of any service work you
perform. See ªMaintenance Recordº in the Index.
Page 354 of 460
6-3
CAUTION:
You can be injured and your vehicle could be
damaged if you try to do service work on a
vehicle without knowing enough about it.
�Be sure you have sufficient knowledge,
experience, the proper replacement parts
and tools before you attempt any vehicle
maintenance task.
�Be sure to use the proper nuts, bolts and
other fasteners. ªEnglishº and ªmetricº
fasteners can be easily confused. If you use
the wrong fasteners, parts can later break
or fall off. You could be hurt.
Adding Equipment to the Outside of
Your Vehicle
Things you might add to the outside of your vehicle can
affect the airflow around it. This may cause wind noise
and affect windshield washer performance. Check with
your dealer before adding equipment to the outside of
your vehicle.
Fuel
Use regular unleaded gasoline rated at 87 octane or
higher. It is recommended that the gasoline meet
specifications which were developed by the American
Automobile Manufacturers Association (AAMA) and
endorsed by the Canadian Motor Vehicle Manufacturers
Association for better vehicle performance and engine
protection. Gasolines meeting the AAMA specification
could provide improved driveability and emission
control system performance compared to
other gasolines.
In Canada, look for the
ªAuto Makers' Choiceº
label on the fuel pump.
Canada Only
Page 369 of 460
6-18
Passenger Compartment Air
Filter Replacement
Passenger compartment air, both outside air and
recirculated air, is routed through a passenger
compartment filter, which is part of a two
-piece filter
system. The filter removes certain contaminants from
the air, including pollen and dust particles, as well as
odors such as exhaust or fuel fumes. Reductions in
airflow, which may occur more quickly in dusty areas,
indicate that the filter needs to be replaced early. For
how often to change the air filter, see ªScheduled
Maintenanceº in the Index.
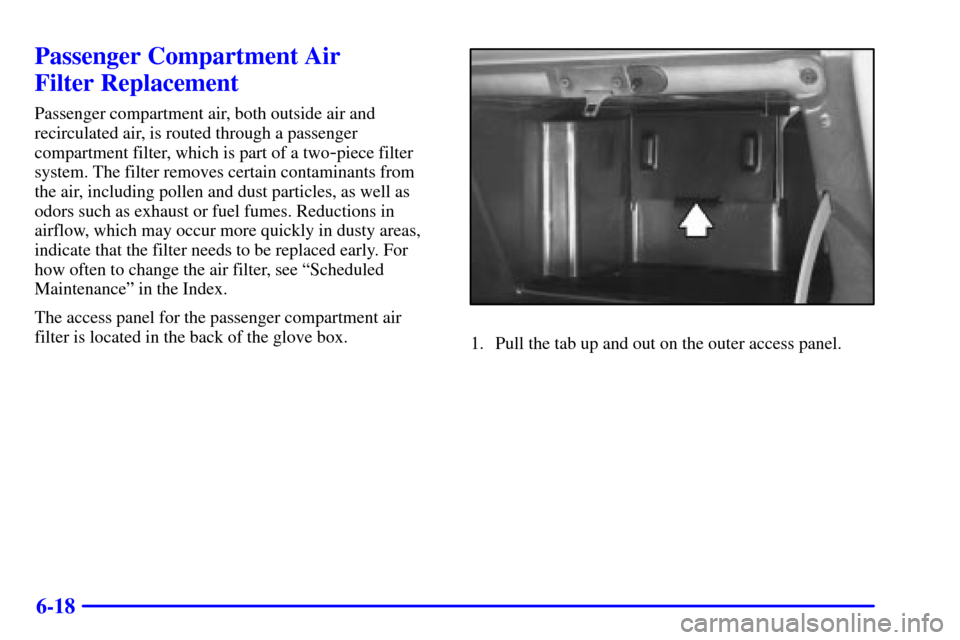
The access panel for the passenger compartment air
filter is located in the back of the glove box.
1. Pull the tab up and out on the outer access panel.
Page 370 of 460
6-19
2. Then push the tab, located on the left of the inner
access panel, to the right.
3. The first air filter will pull straight out. To remove
the second, reach in and slide it toward the opening.
Pull the second filter out.
4. Replace the filters by reversing Step 3. Make sure
the filters are inserted so that the sealing foam is
angled in the same direction on both filters. For the
type of filter to use, see ªNormal Maintenance
Replacement Partsº in the Index.
5. Close the inner access door, while squeezing the tab.
Be sure it is tightly closed.
6. Snap the outer access panel into the back of the
glove box.
Page 371 of 460
6-20
Automatic Transaxle Fluid
When to Check and Change
A good time to check your automatic transaxle fluid
level is when the engine oil is changed.
Change both the fluid and filter every 50,000 miles
(83 000 km) if the vehicle is mainly driven under one or
more of these conditions:
�In heavy city traffic where the outside temperature
regularly reaches 90�F (32�C) or higher.
�In hilly or mountainous terrain.
�When doing frequent trailer towing.
�Uses such as found in taxi, police or delivery service.
If you do not use your vehicle under any of
these conditions, change the fluid and filter at
100,000 miles (166 000 km).
See ªScheduled Maintenance Servicesº in the Index.
How to Check
Because this operation can be a little difficult, you may
choose to have this done at the dealership service department.
If you do it yourself, be sure to follow all the instructions
here, or you could get a false reading on the dipstick.
NOTICE:
Too much or too little fluid can damage your
transaxle. Too much can mean that some of the
fluid could come out and fall on hot engine parts
or exhaust system parts, starting a fire. Be sure to
get an accurate reading if you check your
transaxle fluid.
Wait at least 30 minutes before checking the transaxle
fluid level if you have been driving:
�When outside temperatures are above 90�F (32�C).
�At high speed for quite a while.
�In heavy traffic
-- especially in hot weather.
�While pulling a trailer.
To get the right reading, the fluid should be at normal
operating temperature, which is 180�F to 200�F
(82�C to 93�C).
Get the vehicle warmed up by driving about 15 miles
(24 km) when outside temperatures are above 50�F
(10�C). If it's colder than 50�F (10�C), you may
have to drive longer.
Page 373 of 460
6-22
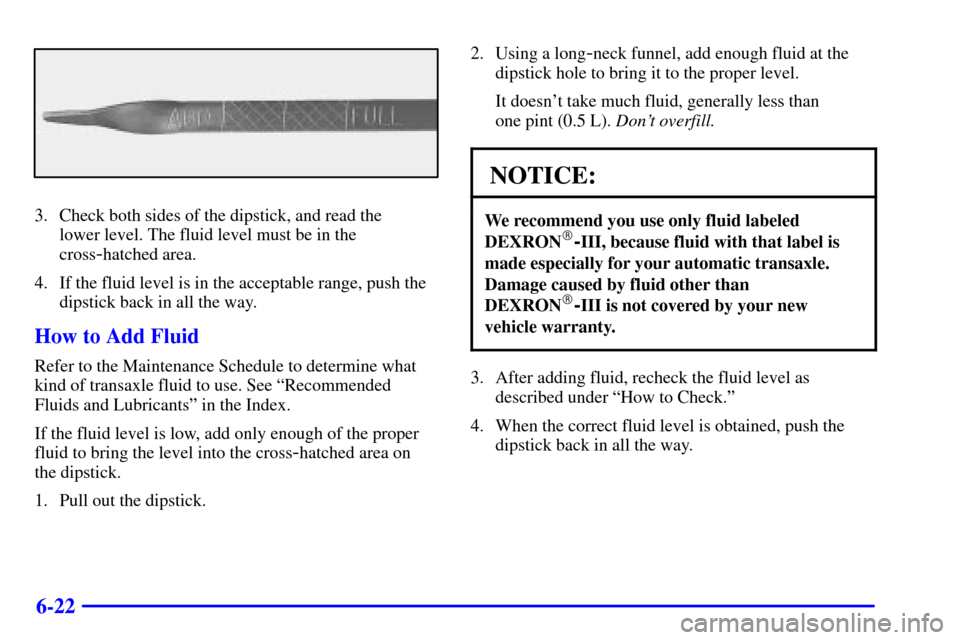
3. Check both sides of the dipstick, and read the
lower level. The fluid level must be in the
cross
-hatched area.
4. If the fluid level is in the acceptable range, push the
dipstick back in all the way.
How to Add Fluid
Refer to the Maintenance Schedule to determine what
kind of transaxle fluid to use. See ªRecommended
Fluids and Lubricantsº in the Index.
If the fluid level is low, add only enough of the proper
fluid to bring the level into the cross
-hatched area on
the dipstick.
1. Pull out the dipstick.2. Using a long
-neck funnel, add enough fluid at the
dipstick hole to bring it to the proper level.
It doesn't take much fluid, generally less than
one pint (0.5 L). Don't overfill.
NOTICE:
We recommend you use only fluid labeled
DEXRON�-III, because fluid with that label is
made especially for your automatic transaxle.
Damage caused by fluid other than
DEXRON
�-III is not covered by your new
vehicle warranty.
3. After adding fluid, recheck the fluid level as
described under ªHow to Check.º
4. When the correct fluid level is obtained, push the
dipstick back in all the way.
Page 382 of 460
6-31 Brake Wear
Your vehicle has front disc brakes and rear drum brakes.
Disc brake pads have built
-in wear indicators that make
a high
-pitched warning sound when the brake pads
are worn and new pads are needed. The sound may
come and go or be heard all the time your vehicle is
moving (except when you are pushing on the brake
pedal firmly).
CAUTION:
The brake wear warning sound means that soon
your brakes won't work well. That could lead to
an accident. When you hear the brake wear
warning sound, have your vehicle serviced.
NOTICE:
Continuing to drive with worn-out brake pads
could result in costly brake repair.
Some driving conditions or climates may cause a brake
squeal when the brakes are first applied or lightly
applied. This does not mean something is wrong with
your brakes.
Properly torqued wheel nuts are necessary to help
prevent brake pulsation. When tires are rotated, inspect
brake pads for wear and evenly tighten wheel nuts in the
proper sequence to GM torque specifications.
Your rear drum brakes don't have wear indicators, but if
you ever hear a rear brake rubbing noise, have the rear
brake linings inspected immediately. Also, the rear
brake drums should be removed and inspected each time
the tires are removed for rotation or changing. When
you have the front brake pads replaced, have the rear
brakes inspected, too.
Brake linings should always be replaced as complete
axle sets.
See ªBrake System Inspectionº in Section 7 of
this manual under Part C ªPeriodic
Maintenance Inspections.º
Page 383 of 460
6-32 Brake Pedal Travel
See your dealer if the brake pedal does not return to
normal height, or if there is a rapid increase in pedal
travel. This could be a sign of brake trouble.
Brake Adjustment
Every time you apply the brakes, with or without the
vehicle moving, your brakes adjust for wear.
Replacing Brake System Parts
The braking system on a vehicle is complex. Its many
parts have to be of top quality and work well together if
the vehicle is to have really good braking. Your vehicle
was designed and tested with top
-quality GM brake
parts. When you replace parts of your braking
system
-- for example, when your brake linings wear
down and you have to have new ones put in
-- be sure
you get new approved GM replacement parts. If you
don't, your brakes may no longer work properly. For
example, if someone puts in brake linings that are wrong
for your vehicle, the balance between your front and
rear brakes can change
-- for the worse. The braking
performance you've come to expect can change in many
other ways if someone puts in the wrong replacement
brake parts.
Battery
Your new vehicle comes with a maintenance free
ACDelco� battery. When it's time for a new battery, get
one that has the replacement number shown on the
original battery's label. We recommend an ACDelco
battery. See ªEngine Compartment Overviewº in the
Index for battery location.
WARNING: Battery posts, terminals and related
accessories contain lead and lead compounds, chemicals
known to the State of California to cause cancer and
reproductive harm. Wash hands after handling.
Vehicle Storage
If you're not going to drive your vehicle for 25 days or
more, remove the black, negative (
-) cable from the
battery. This will help keep your battery from
running down.