Page 135 of 468

2-52
Turn Signal/Multifunction Lever
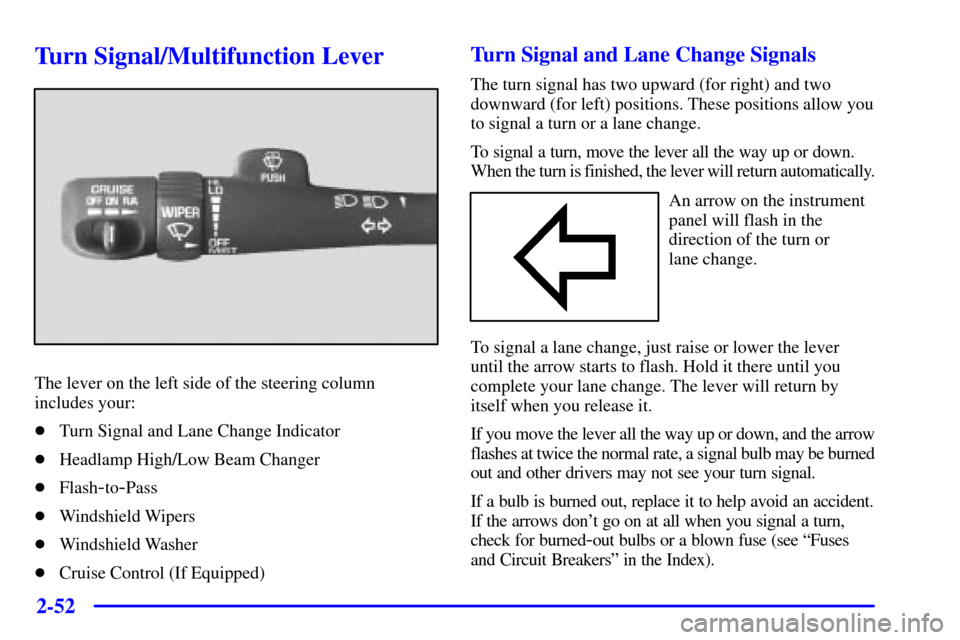
The lever on the left side of the steering column
includes your:
�Turn Signal and Lane Change Indicator
�Headlamp High/Low Beam Changer
�Flash
-to-Pass
�Windshield Wipers
�Windshield Washer
�Cruise Control (If Equipped)
Turn Signal and Lane Change Signals
The turn signal has two upward (for right) and two
downward (for left) positions. These positions allow you
to signal a turn or a lane change.
To signal a turn, move the lever all the way up or down.
When the turn is finished, the lever will return automatically.
An arrow on the instrument
panel will flash in the
direction of the turn or
lane change.
To signal a lane change, just raise or lower the lever
until the arrow starts to flash. Hold it there until you
complete your lane change. The lever will return by
itself when you release it.
If you move the lever all the way up or down, and the arrow
flashes at twice the normal rate, a signal bulb may be burned
out and other drivers may not see your turn signal.
If a bulb is burned out, replace it to help avoid an accident.
If the arrows don't go on at all when you signal a turn,
check for burned
-out bulbs or a blown fuse (see ªFuses
and Circuit Breakersº in the Index).
Page 297 of 468

4-75 Turn Signals When Towing a Trailer
The arrows on your instrument panel will flash
whenever you signal a turn or lane change. Properly
hooked up, the trailer lamps will also flash, telling other
drivers you're about to turn, change lanes or stop.
When towing a trailer, the arrows on your instrument
panel will flash for turns even if the bulbs on the trailer
are burned out. Thus, you may think drivers behind you
are seeing your signal when they are not. It's important
to check occasionally to be sure the trailer bulbs are
still working.
Driving On Grades
Reduce speed and shift to a lower gear before you start
down a long or steep downgrade. If you don't shift
down, you might have to use your brakes so much that
they would get hot and no longer work well.
If you have an automatic transmission, you can tow in
DRIVE (D). You may want to shift the transmission
to THIRD (3) or, if necessary, a lower gear selection if
the transmission shifts too often (e.g., under heavy loads
and/or hilly conditions).You may also want to activate the tow/haul mode if the
transmission shifts too often. See ªTow/Haul Modeº in
the Index.
If you have a 5
-speed manual transmission and you are
towing a trailer, it's better not to use FIFTH (5) gear.
Just drive in FOURTH (4) gear (or, as you need to,
a lower gear).
If you have a 6
-speed manual transmission and you
are towing a trailer, it's better not to use SIXTH (6)
gear. Drive in FIFTH (5) gear (or, as you need to,
a lower gear).
When towing at high altitude on steep uphill grades,
consider the following: Engine coolant will boil at a
lower temperature than at normal altitudes. If you turn
your engine off immediately after towing at high altitude
on steep uphill grades, your vehicle may show signs
similar to engine overheating. To avoid this, let the
engine run while parked (preferably on level ground)
with the automatic transmission in PARK (P) (or the
manual transmission out of gear and the parking brake
applied) for a few minutes before turning the engine off.
If you do get the overheat warning, see ªEngine
Overheatingº in the Index.
Page 387 of 468
6-45 Front Turn Signal, Sidemarker and
Daytime Running Lamps
A. Sidemarker Lamp
B. Retainer Clip
C. Front Turn Signal Lamp
D. Daytime Running Lamp1. Remove the headlamp lens assembly as
mentioned previously.
2. Press the retainer clip, located behind the turn
signal housing, towards the outside of the vehicle.
3. Pull the turn signal housing out from the vehicle.
4. Press the locking release lever, turn the bulb socket
counterclockwise and remove it from the turn signal
lens housing.
5. Remove the old bulb from the bulb socket.
6. Put the new bulb into the bulb socket. Use care
not to touch the bulb with your fingers or hands.
7. Put the bulb socket into the turn signal housing
and turn it clockwise until it locks.
8. Put the turn signal housing back onto the vehicle
placing the hook and posts on the inner side into the
alignment holes first and then the outer side into the
retainer bracket until you hear a click.
9. Put the headlamp lens assembly back into the vehicle.
Page 392 of 468
6-50
3. Press the release tab and turn the bulb socket
counterclockwise to remove it from the
taillamp housing.
4. Pull the old bulb straight out from the socket.
5. Press a new bulb into the socket and turn the socket
clockwise into the taillamp housing until it clicks.
6. Reinstall the rear lamp assembly and tighten
the screws.
7. Close the tailgate.
Taillamps (Chassis Cab Models)
A. Turn Signal Lamp
B. Stoplamp
C. Back
-up Lamp
1. Using your hands, peel the rubber seal away from
the lens.
2. Lift the lens off the lamp assembly.
3. Pull the old bulb straight out from the socket.
4. Put a new bulb into the socket and press it in until
it is tight.
5. Reinstall the lens and the lens seal.
Page 421 of 468
6-79
Name Usage
CIGAR Cigarette Lighter,
Auxiliary Power Outlets
RT TURN Right Turn Signals
BTSI Automatic Transmission Shift
Lock Control System
LT TURN Left Turn Signals
FR PRK Front Parking Lamps,
Sidemarker Lamps
W/W PMP Windshield Washer Pump
HORN Horn (Relay)
IGN C Ignition Switch, Fuel Pump,
PRND321 Display, Crank
RDO AMP Not Used
HAZ LP Exterior Lamps, Hazard Lamps
EXP LPS Not Used
HORN Horn
CTSY LP Interior Lamps
RR WPR Not Used
TBC Body Control Module, Remote
Keyless Entry, HeadlampsReplacement Bulbs
Low-Beam Headlamps2 9006
High
-Beam Headlamps2 9005
Daytime Running Lamps (DRL) 2 3157KX
Front Marker Lamp 2 194
Front Parking and Turn Lamp 2 3157 A
Rear Marker Lamp,
Taillamp and Stop Lamp2 3157
Taillamp and Stop Lamp** 2 1157
Rear Turn Lamp 2 3157
Rear Turn Lamp ** 2 1156
Back
-up Lamp2 3157
Back
-up Lamp **2 1156
Center High
-Mounted Stoplamp2 912
Cargo Lamp 2 912
* For replacement bulbs not listed here, please consult
your dealer.
** Chassis Cab Models