Page 281 of 392
5-27
2. Raise the vehicle by turning the jack handle
clockwise. Raise the vehicle far enough off the
ground for the spare tire to fit under the vehicle.
Remove all wheel nuts and take off the flat tire.
3. Remove any rust or dirt
from the wheel bolts,
mounting surfaces and
spare wheel.
CAUTION:
Rust or dirt on the wheel, or on the parts to
which it is fastened, can make the wheel nuts
become loose after a time. The wheel could come
off and cause an accident. When you change a
wheel, remove any rust or dirt from the places
where the wheel attaches to the vehicle. In an
emergency, you can use a cloth or a paper towel
to do this; but be sure to use a scraper or wire
brush later, if you need to, to get all the rust or
dirt off.
Page 282 of 392
5-28
CAUTION:
Never use oil or grease on studs or nuts. If you
do, the nuts might come loose. Your wheel could
fall off, causing a serious accident.
4. Install the spare tire.
5. Reinstall the wheel nuts
with the rounded end
of the nuts toward the
wheel. Tighten each nut
by hand until the wheel
is held against the hub.
6. Lower the vehicle by turning the jack handle
counterclockwise. Lower the jack completely.
Page 283 of 392

5-29
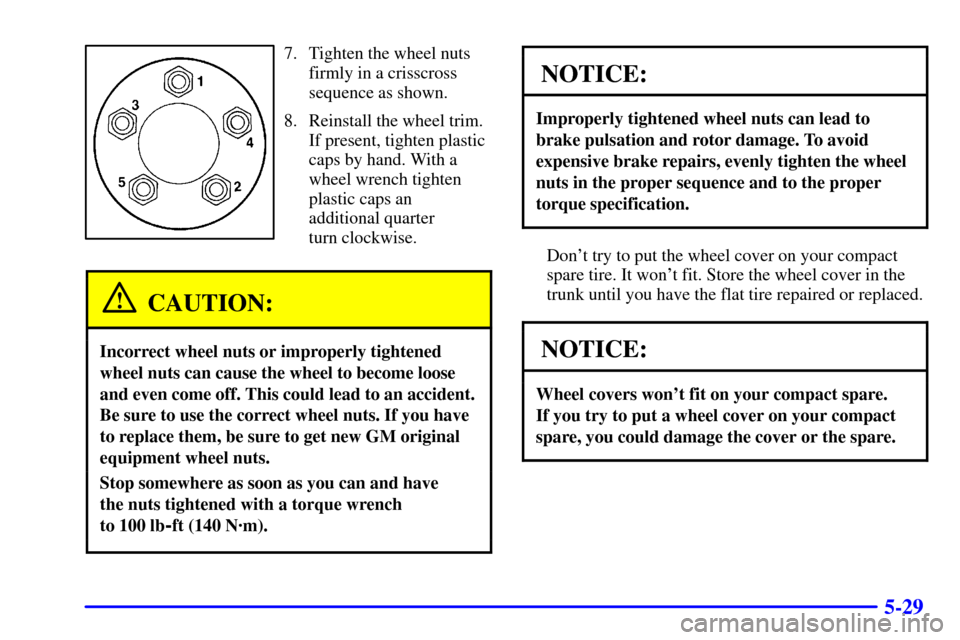
7. Tighten the wheel nuts
firmly in a crisscross
sequence as shown.
8. Reinstall the wheel trim.
If present, tighten plastic
caps by hand. With a
wheel wrench tighten
plastic caps an
additional quarter
turn clockwise.
CAUTION:
Incorrect wheel nuts or improperly tightened
wheel nuts can cause the wheel to become loose
and even come off. This could lead to an accident.
Be sure to use the correct wheel nuts. If you have
to replace them, be sure to get new GM original
equipment wheel nuts.
Stop somewhere as soon as you can and have
the nuts tightened with a torque wrench
to 100 lb
-ft (140 N´m).
NOTICE:
Improperly tightened wheel nuts can lead to
brake pulsation and rotor damage. To avoid
expensive brake repairs, evenly tighten the wheel
nuts in the proper sequence and to the proper
torque specification.
Don't try to put the wheel cover on your compact
spare tire. It won't fit. Store the wheel cover in the
trunk until you have the flat tire repaired or replaced.
NOTICE:
Wheel covers won't fit on your compact spare.
If you try to put a wheel cover on your compact
spare, you could damage the cover or the spare.
Page 293 of 392
6-6
The tethered cap is behind a hinged door on the driver's
side of your vehicle.While refueling, let the cap hang by the tether below the
fuel fill opening.
To remove the cap, turn it slowly to the left
(counterclockwise). The cap has a spring in it; if you let
go of the cap too soon, it will spring back to the right.
Page 294 of 392

6-7
CAUTION:
If you get gasoline on yourself and then
something ignites it, you could be badly burned.
Gasoline can spray out on you if you open the
fuel filler cap too quickly. This spray can happen
if your tank is nearly full, and is more likely in
hot weather. Open the fuel filler cap slowly and
wait for any ªhissº noise to stop. Then unscrew
the cap all the way.
Be careful not to spill gasoline. Clean gasoline from
painted surfaces as soon as possible. See ªCleaning the
Outside of Your Vehicleº in the Index.When you put the cap back on, turn it to the right
(clockwise) until you hear a clicking sound. Make sure
you fully install the cap. The diagnostic system can
determine if the fuel cap has been left off or improperly
installed. This would allow fuel to evaporate into the
atmosphere. See ªMalfunction Indicator Lampº in
the Index.
NOTICE:
If you need a new cap, be sure to get the right
type. Your dealer can get one for you. If you get
the wrong type, it may not fit properly. This may
cause your malfunction indicator lamp to light
and your fuel tank and emissions system may be
damaged. See ªMalfunction Indicator Lampº in
the Index.
Page 324 of 392

6-37
6. Turn the old bulb counterclockwise and remove it
from the retaining ring by gently pulling it away
from the headlamp.
7. Remove the electrical connector from the bulb by
raising the lock tab and pulling the connector away
from the bulb's base.
8. Install the electrical connector to the bulb.
9. Install the new bulb by inserting the smallest tab
on the bulb base into the matching notch in the
retaining ring. Turn the bulb a quarter
-turn
clockwise until it stops.
10. Reinstall the dust caps and reconnect the
electrical connector.
11. Reverse Steps 1 through 5 to reinstall the headlamp
assembly. Then, check the lamps.Headlamp Aiming
If your vehicle is damaged in an accident, the headlamp
aim may be affected. Aim adjustment to the low beam
may be necessary if it is difficult to see lane markers
(for horizontal aim), or if oncoming drivers flash their
high beams at you (for vertical aim). If you believe your
headlamps need to be re
-aimed, we recommend that you
take your vehicle to the dealer for service. However, it is
possible for you to re
-aim your headlamps by following
the procedure in the service manual for your vehicle.
Fog Lamps (If Equipped)
The fog lamps are located in the lower part of the front
bumper below the headlamps. To change the fog lamp
bulbs do the following:
1. Remove the T15 TORX
� screw.
2. Pull out the lamp assembly.
3. Remove the old bulb.
4. Insert new bulb into the assembly.
5. Reinstall the lamps and screw.
Page 325 of 392
6-38 Tail/Stop/Turn Signal and Rear
Sidemarker Lamps
A. Rear Sidemarker Lamp
B. Tail/Stop/Turn Signal Lamp
To remove the rear lamp assembly do the following:
1. Open the trunk. Remove the convenience net, if you
have one. Unhook the net from the upper wing nut.
2. Remove the two upper (convenience net) wing nuts.
3. Pull the carpet away from the rear of the vehicle.
4. Unscrew the two
remaining wing nuts.
5. Pull the assembly from the body carefully.
6. To remove a socket, press the tab, turn the socket
counterclockwise and pull it out.
7. Pull the old bulb out. Do not twist it.
8. Push the new bulb into the socket.
9. Reinstall the socket in the assembly. Tighten the
socket by turning it clockwise.
10. Reinstall the assembly and the two lower wing nuts.
11. Reinstall the carpeting.
12. Reinstall the upper (convenience net) wing nut and
convenience net, if equipped.
Page 326 of 392
6-39 Back-Up Lamp
The back-up lamps are located in the rear of the trunk
lid. To change the back
-up lamp bulbs do the following:
1. Open the trunk.
2. Remove the nine wing nuts.
3. Pull the rear applique away from the vehicle.
4. To remove a socket press the tab, turn the socket
counterclockwise and pull it out.
5. Pull the old bulb out. Do not twist it.
6. Push the new bulb into the socket.
7. Reinstall the socket in the assembly. Tighten the
socket by turning it clockwise.
8. Reinstall the applique and the nine wing nuts.
Rear Courtesy Lamps
The courtesy lamps are located in the assist handles
above the rear passenger doors. To change the rear
courtesy lamp bulbs do the following:
1. Remove the lens covers from the assist handle
assembly using a small coin.
2. Remove the old bulb from the small prongs
extending from the dome lamp base plate;
hook the new bulb onto the prongs.
3. Reinstall the lens cover.