Page 153 of 383
.
See ªDriver Information Centerº in the Index.
CAUTION:
Dont keep driving if the oil")
2-91
The engine oil pressure can also be displayed using the
GAGES button on the Driver Information Center (DIC).
See ªDriver Information Centerº in the Index.
CAUTION:
Don't keep driving if the oil pressure is low.
If you do, your engine can become so hot that it
catches fire. You or others could be burned.
Check your oil as soon as possible and have your
vehicle serviced.
NOTICE:
Damage to your engine from neglected oil
problems can be costly and is not covered by
your warranty.
Security Light
This light comes on to
remind you to arm your
theft
-deterrent system. If it
comes on and stays on when
your ignition is on, there
may be a problem with your
theft
-deterrent system.
See ªTheft
-Deterrent Systemº and ªPASS-Key Systemº
in the Index.
Check Gages Warning Light
This light will come on
briefly when you are
starting the engine. If the
light comes on and stays on
while you are driving, check
your gages to see if they are
in the warning areas.
This light can come on for the following reasons:
�Low Oil Pressure
�High Coolant Temperature
�High or Low Battery Voltage
�Low Fuel Level
Page 155 of 383

The Driver Information Center (DIC) will display
information about how your vehicle is functioning, as
well as warning messages if a system problem is
detected. Th")
2-93
Driver Information Center (DIC)
The Driver Information Center (DIC) will display
information about how your vehicle is functioning, as
well as warning messages if a system problem is
detected. The DIC display area is located in the
instrument panel cluster below the speedometer and
tachometer, directly above the steering column.
The following buttons are located on the DIC control panel
which is located to the right of the instrument panel cluster.
1 FUEL: Press this button to display fuel information
such as fuel economy and range.
2 GAGES: Use this button to display gage information
like oil pressure and temperature, coolant temperature,
automatic transmission fluid temperature, battery
voltage and front/rear tire pressures.
3 TRIP: Use this button to display your total and trip
miles, the elapsed time function, your average speed and
the engine oil life.
4 OPTIONS: This button allows you to choose personal
options that are available on your vehicle, depending on
the options your vehicle is equipped with, such as
security, door locks, easy entry seats and language.
5 E/M: Use this button to change the display between
English and metric units.
RESET: This button, used along with the other buttons,
will reset system functions and turn off or acknowledge
messages on the Driver Information Center (DIC).
At the top of the DIC control buttons is a light sensor.
Be sure not to block the sensor or your lighting
functions may be disrupted.
Page 162 of 383

2-100
If you choose TWILIGHT - ON, press the OPTIONS
button again to display DELAY TIME 1 2 in the DIC.
Use the OPTIONS button to switch between delay time
1 and 2. You can increase the delay time by pressing
button 1 (1 FUEL) or decrease the time by pressing
button 2 (2 GAGES). Each bar is equal to 12 seconds.
Lock and Arm
Press the OPTIONS button until LOCK & ARM
appears on the display, then use the RESET button to
page through the following selections:
�LOCK & ARM
- OFF
�LOCK & ARM
- HORN ONLY
�LOCK & ARM
- LIGHTS ONLY
�LOCK & ARM
- HORN & LIGHTS
If you choose LOCK & ARM
- OFF, you will receive no
security feedback when locking or unlocking your vehicle.
If you choose LOCK & ARM
- HORN ONLY, only the
horn will chirp to let you know when your alarm system
has armed when locking your vehicle.If you choose LOCK & ARM
- LIGHTS ONLY, only
your exterior lamps will flash to let you know when your
alarm system has armed when locking your vehicle.
If you choose LOCK & ARM
- HORN & LIGHTS, the
horn will chirp and the exterior lamps will flash briefly
to let you know the system has armed when locking
your vehicle.
Alarm
Press the OPTIONS button until ALARM appears on
the display, then use the RESET button to page through
the following selections:
�ALARM
-HORN
�ALARM HORN & LIGHTS
If you choose ALARM
-HORN, the horn will sound
during an alarm.
If you choose ALARM HORN & LIGHTS, the horn
will sound and the interior and exterior lamps will flash
during an alarm.
Page 205 of 383

3-27 Theft-Deterrent Feature
THEFTLOCK� is designed to discourage theft of your
radio. It works by using a secret code to disable all radio
functions whenever battery power is removed.
The THEFTLOCK feature for the radio may be used or
ignored. If ignored, the system plays normally and the
radio is not protected by the feature. If THEFTLOCK is
activated, your radio will not operate if stolen.
When THEFTLOCK is activated, the radio will display
LOC to indicate a locked condition anytime battery
power has been interrupted. If your battery loses power
for any reason, you must unlock the radio with the secret
code before it will operate.
Activating the Theft
-Deterrent Feature
The instructions which follow explain how to enter your
secret code to activate the THEFTLOCK system. It is
recommended that you read through all nine steps
before starting the procedure.
If you allow more than 15 seconds to elapse between
any steps, the radio automatically reverts to time and
you must start the procedure over at Step 4.1. Write down any three or four
-digit number from
000 to 1999 and keep it in a safe place separate from
the vehicle.
2. Turn the ignition to ACC or ON.
3. Turn the radio off.
4. Press the 1 and 4 buttons together. Hold them down
until
--- shows on the display. Next you will use the
secret code number which you have written down.
5. Press MN and 000 will appear on the display.
6. Press MN again to make the last two digits agree
with your code.
7. Press HR to make the first one or two digits agree
with your code.
8. Press AM
-FM after you have confirmed that the
code matches the secret code you have written down.
The display will show REP to let you know that you
need to repeat Steps 5 through 7 to confirm your
secret code.
9. Press AM
-FM and this time the display will show
SEC to let you know that your radio is secure. The
LED indicator by the volume control will begin
flashing when the ignition is turned off.
Page 206 of 383

3-28
Unlocking the Theft-Deterrent Feature After a
Power Loss
Enter your secret code as follows; pause no more than
15 seconds between steps:
1. Turn the ignition on. LOC will appear on the display.
2. Press MN and 000 will appear on the display.
3. Press MN again to make the last two digits agree
with your code.
4. Press HR to make the first one or two digits agree
with your code.
5. Press AM
-FM after you have confirmed that the
code matches the secret code you have written down.
The display will show SEC, indicating the radio is
now operable and secure.
If you enter the wrong code eight times, INOP will
appear on the display. You will have to wait an hour
with the ignition on before you can try again. When you
try again, you will only have three chances to enter the
correct code before INOP appears.
If you lose or forget your code, contact your dealer.Disabling the Theft
-Deterrent Feature
Enter your secret code as follows; pause no more than
15 seconds between steps:
1. Turn the ignition to ACC or ON.
2. Turn the radio off.
3. Press the 1 and 4 buttons together. Hold them down
until SEC shows on the display.
4. Press MN and 000 will appear on the display.
5. Press MN again to make the last two digits agree
with your code.
6. Press HR to make the first one or two digits agree
with your code.
7. Press AM
-FM after you have confirmed that the
code matches the secret code you have written down.
The display will show
---, indicating that the radio is
no longer secured.
If the code entered is incorrect, SEC will appear on the
display. The radio will remain secured until the correct
code is entered.
When battery power is removed and later applied to a
secured radio, the radio won't turn on and LOC will
appear on the display.
To unlock a secured radio, see ªUnlocking the
Theft
-Deterrent Feature After a Power Lossº earlier in
this section.
Page 237 of 383
4-27
Winter Driving
Here are some tips for winter driving:
�Have your vehicle in good shape for winter.
�You may want to put winter emergency supplies in
your vehicle.
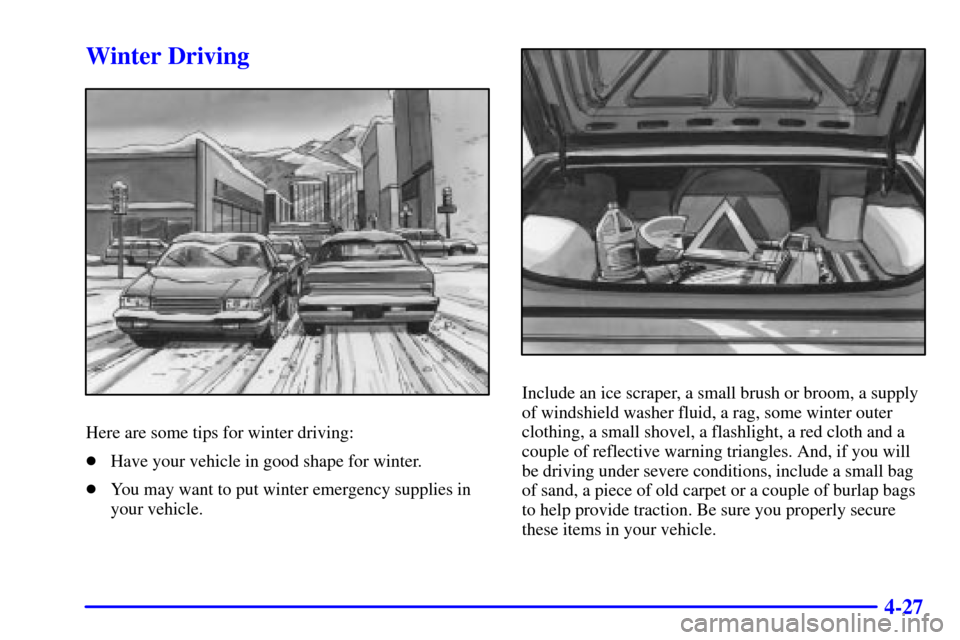
Include an ice scraper, a small brush or broom, a supply
of windshield washer fluid, a rag, some winter outer
clothing, a small shovel, a flashlight, a red cloth and a
couple of reflective warning triangles. And, if you will
be driving under severe conditions, include a small bag
of sand, a piece of old carpet or a couple of burlap bags
to help provide traction. Be sure you properly secure
these items in your vehicle.
Page 243 of 383

4-33
CAUTION:
Do not load your vehicle any heavier than the
GVWR, or either the maximum front or rear
GAWR. If you do, parts on your vehicle can
break, and it can change the way your vehicle
handles. These could cause you to lose control
and crash. Also, overloading can shorten the life
of your vehicle.
NOTICE:
Your warranty does not cover parts or
components that fail because of overloading.
If you put things inside your vehicle -- like suitcases,
tools, packages or anything else
-- they will go as fast as
the vehicle goes. If you have to stop or turn quickly, or
if there is a crash, they'll keep going.
CAUTION:
Things you put inside your vehicle can strike
and injure people in a sudden stop or turn, or
in a crash.
�Put things in the rear area of your vehicle.
Try to spread the weight evenly.
�Never stack heavier things, like suitcases,
inside the vehicle so that some of them are
above the tops of the seats.
�Don't leave an unsecured child restraint in
your vehicle.
�When you carry something inside the
vehicle, secure it whenever you can.
�Don't leave a seat folded down unless you
need to.
Towing a Trailer
Your Corvette is neither designed nor intended to tow
a trailer.
Page 267 of 383
5-24 Tire Inflator Kit Storage
The Tire Inflator Kit is stored in the rear hatch/trunk
area of your vehicle.
A. Removable Elastic Cord
B. Rear Retaining Hook
C. Elastic Band1. Remove the elastic cord (A) from around the
retaining hook (B) and slide the kit out from under
the elastic band (C) that is secured to the floor of the
hatch/trunk area.
2. Unwrap the elastic cord (A) from around the handle
of the Tire Inflator Kit. Open the Tire Inflator Kit
case by lifting up the two tabs located on either side
of the kit handle.
To Stow the Tire Inflator Kit:
CAUTION:
Storing the Tire Inflator Kit or other equipment
in the passenger compartment of the vehicle
could cause injury. In a sudden stop or collision,
loose equipment could strike someone. Store the
tire inflator kit in the proper place.