Page 2 of 371
Every
2001 Seville
under warranty is
backed with the
following
services:
Free lockout assistance
Free dead-battery assistance
Free out-of-fuel assistance
Free flat-tire change
Emergency towing
1-800-882-1112
that provides in an emergency:
1-800-882-1112
Courtesy
Transportation
Page 5 of 371
Section
3
Comfort Controls and Audio Systems
Section
4
Your Driving and the Road
Section
5
Table of Contents (cont'd)
Defensive Driving
Drunken Driving
Control of a Vehicle
BrakingSteering
Driving Tips for Various Road Conditions
Loading Your Vehicle
Towing a Trailer Heating and Air Conditioning
Setting the Radio Clock
Radio/Cassette Player/CD PlayerRadio Theft-Deterrent Feature
Steering Wheel Controls
Hazard Warning Flashers
Jump Starting
Towing Your VehicleEngine Overheating
Changing a Flat Tire
If You're Stuck
Problems on the Road
iii
Page 40 of 371

1-28
How does an air bag restrain?
In moderate to severe frontal or near frontal collisions,
even belted occupants can contact the steering wheel
or the instrument panel. In moderate to severe side
collisions, even belted occupants can contact the inside
of the vehicle. The air bag supplements the protection
provided by safety belts. Air bags distribute the force of
the impact more evenly over the occupant's upper body,
stopping the occupant more gradually. But the frontal
air bags would not help you in many types of collisions,
including rollovers, rear impacts, and side impacts,
primarily because an occupant's motion is not toward
the air bag. Side impact air bags would not help you
in many types of collisions, including frontal or near
frontal collisions, rollovers, and rear impacts, primarily
because an occupant's motion is not toward those air
bags. Air bags should never be regarded as anything
more than a supplement to safety belts, and then only in
moderate to severe frontal or near
-frontal collisions for
the driver's and right front passenger's frontal air bags,
and only in moderate to severe side collisions for the
driver's and right front passenger's side impact air bags.What will you see after an air bag inflates?
After an air bag inflates, it quickly deflates, so quickly
that some people may not even realize the air bag
inflated. Some components of the air bag module
-- the
steering wheel hub for the driver's air bag, the instrument
panel for the right front passenger's bag, the side of the
seatback closest to the door for the driver and right front
passenger's side impact air bags
-- will be hot for a short
time. The parts of the bag that come into contact with you
may be warm, but not too hot to touch. There will be
some smoke and dust coming from the vents in the
deflated air bags. Air bag inflation doesn't prevent the
driver from seeing or being able to steer the vehicle,
nor does it stop people from leaving the vehicle.
CAUTION:
When an air bag inflates, there is dust in the air.
This dust could cause breathing problems for
people with a history of asthma or other
breathing trouble. To avoid this, everyone in the
vehicle should get out as soon as it is safe to do so.
If you have breathing problems but can't get out
of the vehicle after an air bag inflates, then get
fresh air by opening a window or a door.
Page 53 of 371
1-41
Restraint Systems for Children
An infant car bed (A), a special bed made for use in a
motor vehicle, is an infant restraint system designed to
restrain or position a child on a continuous flat surface.
Make sure that the infant's head rests toward the center
of the vehicle.
A rear-facing infant seat (B) provides restraint with
the seating surface against the back of the infant.
The harness system holds the infant in place and, in a
crash, acts to keep the infant positioned in the restraint.
Page 66 of 371

1-54
Q:What if a child is wearing a lap-shoulder belt,
but the child is so small that the shoulder belt is
very close to the child's face or neck?
A:If the child is sitting in a seat next to a window,
move the child toward the center of the vehicle.
If the child is sitting in the center rear seat passenger
position, move the child toward the safety belt buckle.
In either case, be sure that the shoulder belt still is
on the child's shoulder, so that in a crash the child's
upper body would have the restraint that belts provide.
CAUTION:
Never do this.
Here a child is sitting in a seat that has a
lap
-shoulder belt, but the shoulder part is behind
the child. If the child wears the belt in this way,
in a crash the child might slide under the belt.
The belt's force would then be applied right on
the child's abdomen. That could cause serious or
fatal injuries.
The lap portion of the belt should be worn low and snug
on the hips, just touching the child's thighs. This applies
belt force to the child's pelvic bones in a crash.
Page 89 of 371
2-22
New Vehicle ªBreak-Inº
NOTICE:
Your vehicle doesn't need an elaborate
ªbreak
-in.º But it will perform better in the long
run if you follow these guidelines:
�Don't drive at any one speed -- fast or
slow
-- for the first 500 miles (805 km).
Don't make full
-throttle starts.
�Avoid making hard stops for the first
200 miles (322 km) or so. During this time
your new brake linings aren't yet broken
in. Hard stops with new linings can mean
premature wear and earlier replacement.
Follow this breaking
-in guideline every
time you get new brake linings.
�Don't tow a trailer during break
-in.
See ªTowing a Trailerº in the Index for
more information.
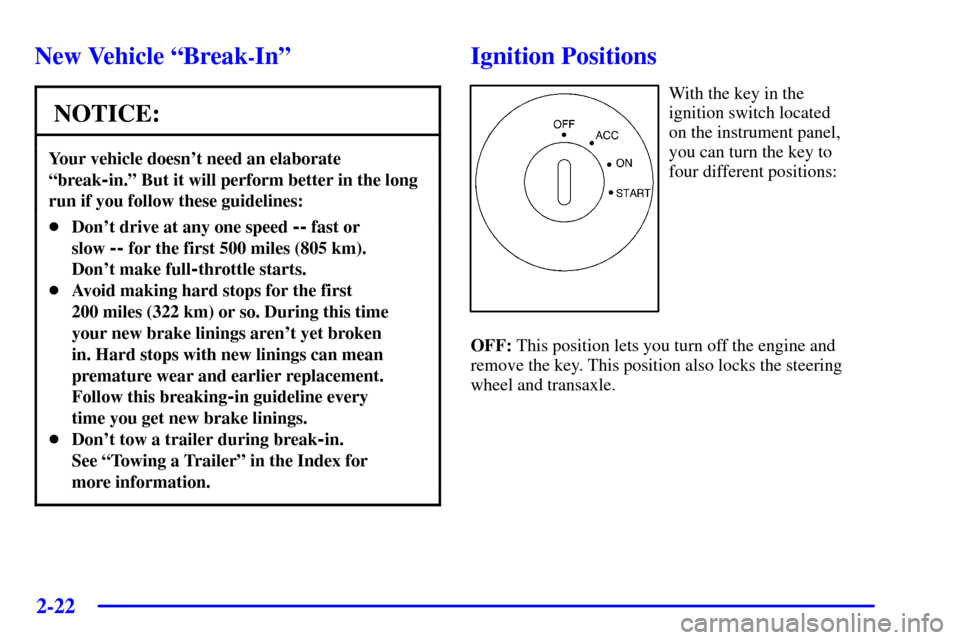
Ignition Positions
With the key in the
ignition switch located
on the instrument panel,
you can turn the key to
four different positions:
OFF: This position lets you turn off the engine and
remove the key. This position also locks the steering
wheel and transaxle.
Page 90 of 371

2-23
NOTICE:
If your key seems stuck in OFF and you can't
turn it, be sure you are using the correct key; if
so, is it all the way in? Turn the key only with
your hand. Using a tool to force it could break
the key or the ignition switch. If none of this
works, then your vehicle needs service.
ACC: This position lets you use things like the radio,
windshield wipers, power windows and sunroof (option)
when the engine is off. Use ACC if you must have your
vehicle in motion while the engine is off (for example, if
your vehicle is being pushed or towed).
ON: This is the position for driving.
START: This position starts the engine.
Retained Accessory Power (RAP)
The following accessories on your vehicle may be used
for up to 10 minutes after the ignition key is turned from
ON to OFF:
�Cellular Phone (If Equipped)
�Radio
�Power Windows
�Audio Steering Wheel Controls
�Sunroof (Option)
Power to these accessories stops after 10 minutes or if
any door is opened. If you want power for another
10 minutes, close all the doors and turn the ignition key
to ON and then back to OFF. If the cellular phone is
being used while retained accessory power is active, the
timer is suspended (to avoid interruption of the call).
The timer resets to 10 minutes at the end of the call.
Page 94 of 371
: This locks
the front wheels. Its the
best position to use when
you start the engine
because y")
2-27
Automatic Transaxle Operation
There are several different positions for the shift lever.
PARK (P): This locks
the front wheels. It's the
best position to use when
you start the engine
because your vehicle can't
move easily.
CAUTION:
It is dangerous to get out of your vehicle if the
shift lever is not fully in PARK (P) with the
parking brake firmly set. Your vehicle can roll.
Don't leave your vehicle when the engine is
running unless you have to. If you have left the
engine running, the vehicle can move suddenly.
CAUTION: (Continued)
CAUTION: (Continued)
You or others could be injured. To be sure your
vehicle won't move, even when you're on fairly
level ground, always set your parking brake and
move the shift lever to PARK (P).
See ªShifting Into PARK (P)º in the Index.
If you're pulling a trailer, see ªTowing a Trailerº
in the Index.
Ensure the shift lever is fully in PARK (P) before
starting the engine. Your vehicle has an automatic
transaxle shift lock control system. You have to fully
apply your regular brakes before you can shift from
PARK (P) when the ignition key is in ON. If you cannot
shift the shift lever all the way into PARK (P), ease
pressure on the shift lever and push the shift lever all the
way into PARK (P) as you maintain brake application.
Then move the shift lever into the gear you wish. See
ªShifting Out of PARK (P)º in the Index.


Defensive Driving
Drunken Driving
Control of a Vehicle
BrakingSteering
Drivi")
, a special bed made for use in a
motor vehicle, is an infant restraint system designed to
restrain or position a child on a continuous flat su")