Page 6 of 371
iv
Fuel
Checking Fluids and Lubricants
GM Oil Life System™
Engine Air Cleaner/Filter
Brakes
Bulb ReplacementWindshield Wiper Blade Replacement
Tires and Wheels
Appearance Care
Electrical System/Fuses and Circuit Breakers
Capacities and Specifications
Normal Maintenance Replacement Parts
Table of Contents (cont'd)
Maintenance Schedule Service and Appearance Care
Section
6
Scheduled Maintenance
Owner Checks and Services
Periodic Maintenance InspectionsRecommended Fluids and Lubricants
Maintenance Records
See separate Maintenance Schedule Booklet
Page 11 of 371

ix
For example,
these symbols
are used on an
original battery:
CAUTION
POSSIBLE
INJURY
PROTECT
EYES BY
SHIELDING
CAUSTIC
BATTERY
ACID COULD
CAUSE
BURNS
AVOID
SPARKS OR
FLAMES
SPARK OR
FLAME
COULD
EXPLODE
BATTERY
These symbols
are important for
you and your
passengers
whenever your
vehicle is driven:
CHILD
RESTRAINT
TOP STRAP
ANCHOR
DOOR LOCK
UNLOCK
FASTEN
SEAT
BELTS
POWER
WINDOW
AIR BAG
These symbols
have to do with
your lamps:
MASTER
LIGHTING
SWITCH
TURN
SIGNALS
PARKING
LAMPS
HAZARD
WARNING
FLASHER
DAYTIME
RUNNING
LAMPS
FOG LAMPS
These symbols
are on some of
your controls:
WINDSHIELD
WIPER
WINDSHIELD
WASHER
WINDSHIELD
DEFROSTER
REAR
WINDOW
DEFOGGER
VENTILATING
FAN
These symbols
are used on
warning and
indicator lights:
ENGINE
COOLANT
TEMP
BATTERY
CHARGING
SYSTEM
BRAKE
COOLANT
ENGINE OIL
PRESSURE
ANTI-LOCK
BRAKES
Here are some
other symbols
you may see:
FUSE
LIGHTER
HORN
FUEL
Vehicle Symbols
These are some of the symbols you may find on your vehicle. Also see ªWarning Lights and Gagesº in the Index.
Page 12 of 371
For
a More
Detailed Look at
What's Under the Hood
See Section 6
Tire Pressure
See Section 6
Service Station Guide
Oil Viscosity
Engine Oil
See Section 6
Engine Oil Dipstick
See Section 6Remote Fuel
Door Release
See Section 6
Cooling System
See Section 5
Hood Release
See Section 6
Windshield Washer
Fluid
See Section 6
Spare Tire Pressure
See Section 5
Alternate
Fuel Door Release
See Section 6
Battery
See Section 6
Fuel
Use unleaded only.
See Section 6
for octane ratings.
Page 92 of 371

2-25
3. If your engine still won't start (or starts but then
stops), it could be flooded with too much gasoline.
Try pushing your accelerator pedal all the way to the
floor and holding it there as you hold the key in
START for about three seconds. If the vehicle starts
briefly but then stops again, do the same thing.
NOTICE:
Your engine is designed to work with the
electronics in your vehicle. If you add electrical
parts or accessories, you could change the way
the engine operates. Before adding electrical
equipment, check with your dealer. If you don't,
your engine might not perform properly.
Engine Coolant Heater (If Equipped)
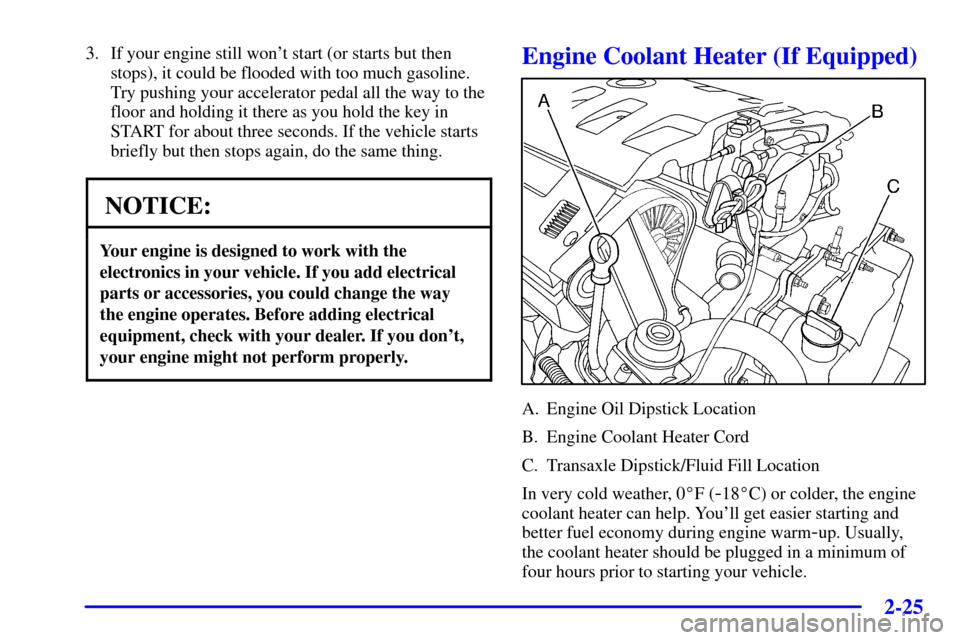
A. Engine Oil Dipstick Location
B. Engine Coolant Heater Cord
C. Transaxle Dipstick/Fluid Fill Location
In very cold weather, 0�F (
-18�C) or colder, the engine
coolant heater can help. You'll get easier starting and
better fuel economy during engine warm
-up. Usually,
the coolant heater should be plugged in a minimum of
four hours prior to starting your vehicle.
Page 93 of 371

2-26
To Use the Engine Coolant Heater
1. Turn off the engine.
2. Open the hood and unwrap the electrical cord.
The electrical cord is located on the driver's side of
the engine, behind the transaxle dipstick/fluid fill
location (C) and next to the engine.
3. Plug it into a normal, grounded 110
-volt AC outlet.
CAUTION:
Plugging the cord into an ungrounded outlet
could cause an electrical shock. Also, the wrong
kind of extension cord could overheat and cause
a fire. You could be seriously injured. Plug the
cord into a properly grounded three
-prong
11 0
-volt AC outlet. If the cord won't reach, use a
heavy
-duty three-prong extension cord rated for
at least 15 amps.
4. Before starting the engine, be sure to unplug
and store the cord as it was before to keep it away
from moving engine parts. If you don't, it could
be damaged.
How long should you keep the coolant heater plugged
in? The answer depends on the outside temperature, the
kind of oil you have, and some other things. Instead of
trying to list everything here, we ask that you contact
your dealer in the area where you'll be parking your
vehicle. The dealer can give you the best advice for that
particular area.
Page 153 of 371
2-86
Oil Pressure Light
This light tells you if there
could be a problem with
your engine oil pressure.
The light goes on when you turn your key to ON or
START. It goes off once you start your engine. That's a
check to be sure the light works. If it doesn't come on,
be sure to have it fixed so it will be there to warn you if
something goes wrong.
When the light comes on and stays on, it means that
oil isn't flowing through your engine properly. You
could be low on oil and you might have some other
system problem.CAUTION:
Don't keep driving if the oil pressure is low.
If you do, your engine can become so hot that
it catches fire. You or others could be burned.
Check your oil as soon as possible and have
your vehicle serviced.
NOTICE:
Damage to your engine from neglected oil
problems can be costly and is not covered by
your warranty.
Page 156 of 371

2-89
Driver Information Center (DIC)
This display gives you the status of many of your
vehicle's systems. The DIC is also used to display driver
personalization features and warning/status messages.
DIC Controls and Displays
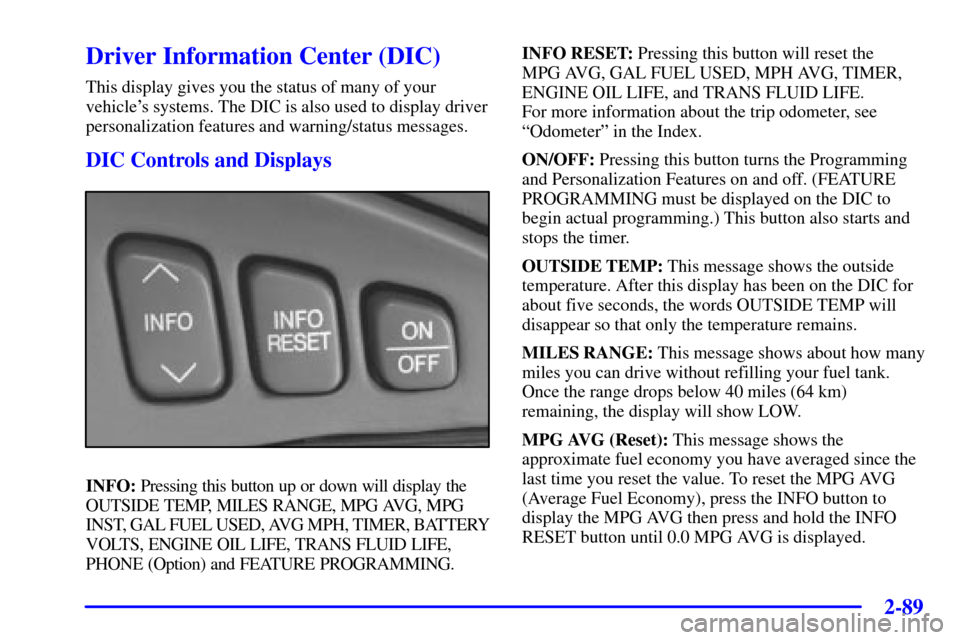
INFO: Pressing this button up or down will display the
OUTSIDE TEMP, MILES RANGE, MPG AVG, MPG
INST, GAL FUEL USED, AVG MPH, TIMER, BATTERY
VOLTS, ENGINE OIL LIFE, TRANS FLUID LIFE,
PHONE (Option) and FEATURE PROGRAMMING.INFO RESET: Pressing this button will reset the
MPG AVG, GAL FUEL USED, MPH AVG, TIMER,
ENGINE OIL LIFE, and TRANS FLUID LIFE.
For more information about the trip odometer, see
ªOdometerº in the Index.
ON/OFF: Pressing this button turns the Programming
and Personalization Features on and off. (FEATURE
PROGRAMMING must be displayed on the DIC to
begin actual programming.) This button also starts and
stops the timer.
OUTSIDE TEMP: This message shows the outside
temperature. After this display has been on the DIC for
about five seconds, the words OUTSIDE TEMP will
disappear so that only the temperature remains.
MILES RANGE: This message shows about how many
miles you can drive without refilling your fuel tank.
Once the range drops below 40 miles (64 km)
remaining, the display will show LOW.
MPG AVG (Reset): This message shows the
approximate fuel economy you have averaged since the
last time you reset the value. To reset the MPG AVG
(Average Fuel Economy), press the INFO button to
display the MPG AVG then press and hold the INFO
RESET button until 0.0 MPG AVG is displayed.
Page 158 of 371

2-91
LF-RF-LR-RR TIRE (If Equipped): On vehicles
equipped with the Tire Pressure Monitor, this message
shows the tire pressure for each tire (left front, right
front, left rear and right rear). Pressing the INFO button
will scroll through the tire pressure for each of the
four tires, such as the following:
�34 PSI LF TIRE OK or
�234 kPa LF TIRE OK
If a tire pressure is below 24 PSI (165 kPa) or above
36 PSI (248 kPa), the message will appear as shown
above except it will show TIRE LOW or TIRE HIGH as
appropriate. If desired, the tire pressure information can
be programmed not to appear when using the INFO
button to scroll through the DIC displays. See ªVehicle
Programming and Personalization Featuresº in
the Index.
If a low or high tire pressure is detected by the system
while driving, a CHECK TIRE PRESSURE message
will appear in the display. If this occurs, press the INFO
button to scroll to the tire(s) with a low or high pressure
condition. See ªDriver Information Center (DIC)
Messagesº in the Index for more information.ENGINE OIL LIFE (Reset): Press the INFO button to
display ENGINE OIL LIFE, then press and hold the
INFO RESET button until 100% ENGINE OIL LIFE is
displayed. (This only needs to be reset after you have
had the oil changed.)
TRANSMISSION FLUID LIFE MONITOR: Under
normal conditions, the rate of deterioration of the
transmission fluid is slow. See the Maintenance
Schedule booklet for proper fluid and change intervals.
To reset the transmission fluid life, press the INFO
button to display TRANS FLUID LIFE, then press and
hold the INFO RESET button until 100% TRANS
FLUID LIFE is displayed. (This only needs to be reset
after you have had the fluid changed.)
ENG/MET: Press this button to display information in
the English (miles) or metric (kilometers) system.