Page 187 of 392

3-19
SOURCE: Press this button to change to the disc
function when the radio is on. When a disc is inserted,
the disc will play until you press AM
-FM. Then the disc
will stop playing and the radio will play. Press SOURCE
again to play a disc again. CD PLAY will show on
the display.
EJECT: Press this button to remove the disc.
The radio will play.
If you turn off the ignition or radio with a disc in the
player, it will stay in the player. When you turn on the
ignition or system, the disc will start playing where it
stopped, if it was the last selected audio source.
Also, as a protection feature, if a CD is ejected and left
in the player, it will be pulled back in the player with the
ignition on or off.
Trunk-Mounted CD Changer (Option)
With the optional compact disc changer, you can play up
to 12 discs continuously. Normal size discs may be
played using the trays supplied in the magazine.
The small discs (8 cm) can be played only with specially
designed trays.
You must first load the magazine with discs before you
can play a compact disc. Each of the 12 trays holds one
disc. Press the button on the back of the magazine and
pull gently on one of the trays. Load the trays from
bottom to top, placing a disc on the tray label side down.
If you load a disc with the label side up, the disc will not
play and an error will occur. Gently push the tray back
into the magazine slot. Repeat this procedure for loading
up to 12 discs in the magazine.
Page 222 of 392
4-26
Winter Driving
Here are some tips for winter driving:
�Have your vehicle in good shape for winter.
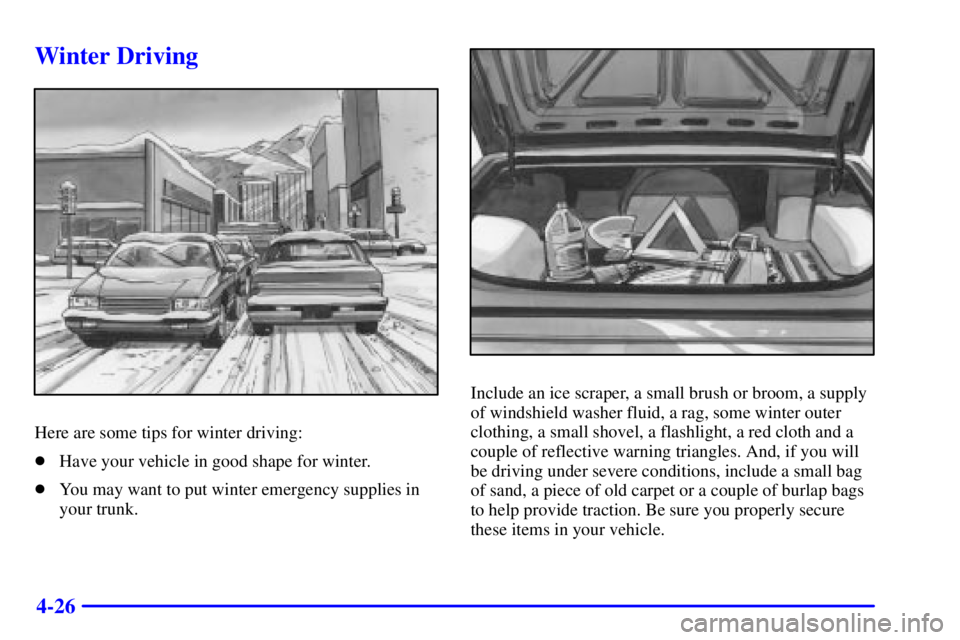
�You may want to put winter emergency supplies in
your trunk.
Include an ice scraper, a small brush or broom, a supply
of windshield washer fluid, a rag, some winter outer
clothing, a small shovel, a flashlight, a red cloth and a
couple of reflective warning triangles. And, if you will
be driving under severe conditions, include a small bag
of sand, a piece of old carpet or a couple of burlap bags
to help provide traction. Be sure you properly secure
these items in your vehicle.
Page 227 of 392
4-31
The other label is the Certification Label, found on the rear
edge of the driver's door. It tells you the gross weight
capacity of your vehicle, called the Gross Vehicle Weight
Rating (GVWR). The GVWR includes the weight of the
vehicle, all occupants, fuel and cargo. Never exceed the
GVWR for your vehicle, or the Gross Axle Weight
Rating (GAWR) for either the front or rear axle.
And, if you do have a heavy load, you should spread
it out. Don't carry more than 176 lbs. (80 kg) in
your trunk.
CAUTION:
Do not load your vehicle any heavier than the
GVWR, or either the maximum front or rear
GAWR. If you do, parts on your vehicle can
break, and it can change the way your vehicle
handles. These could cause you to lose control
and crash. Also, overloading can shorten the life
of your vehicle.
NOTICE:
Your warranty does not cover parts or
components that fail because of overloading.
Page 228 of 392

4-32
If you put things inside your vehicle -- like suitcases,
tools, packages, or anything else
-- they will go as fast
as the vehicle goes. If you have to stop or turn quickly,
or if there is a crash, they'll keep going.
CAUTION:
Things you put inside your vehicle can strike and
injure people in a sudden stop or turn, or in
a crash.
�Put things in the trunk of your vehicle. In a
trunk, put them as far forward as you can.
Try to spread the weight evenly.
�Never stack heavier things, like suitcases,
inside the vehicle so that some of them are
above the tops of the seats.
�Don't leave an unsecured child restraint in
your vehicle.
�When you carry something inside the
vehicle, secure it whenever you can.
Automatic Level Control
This feature keeps the rear of your vehicle level as
the load changes. It's automatic
-- you don't need to
adjust anything.
Towing a Trailer
CAUTION:
If you don't use the correct equipment and drive
properly, you can lose control when you pull a
trailer. For example, if the trailer is too heavy, the
brakes may not work well
-- or even at all. You
and your passengers could be seriously injured.
You may also damage your vehicle; the resulting
repairs would not be covered by your warranty.
Pull a trailer only if you have followed all the
steps in this section. Ask your dealer for advice
and information about towing a trailer with
your vehicle.
Page 254 of 392
5-18 Removing the Spare Tire and Tools
The equipment you'll need is located in the trunk.
Instructions for changing your tires are on the inside of
the tire cover. You can rest the cover near you for easy
reference while you change the tire.
1. Lift the tire cover to gain access to the spare tire and
jacking equipment.
2. Remove the wheel wrench and jack from the
jack container.3. Remove the spare tire from the trunk. See ªCompact
Spare Tireº later in this section for more information
about the compact spare.
The tools you'll be using include the jack (A) and the
wheel wrench (B).
Page 260 of 392
5-24
12. Don't try to put the wheel cover on the compact
spare tire. It won't fit.
Store the wheel cover in the trunk until you have
the flat tire repaired or replaced.
NOTICE:
Wheel covers won't fit on your compact spare.
If you try to put a wheel cover on your compact
spare, you could damage the cover or the spare.
Storing the Flat Tire and Tools
CAUTION:
Storing a jack, a tire or other equipment in the
passenger compartment of the vehicle could
cause injury. In a sudden stop or collision, loose
equipment could strike someone. Store all these
in the proper place.
After you've put the compact spare tire on your vehicle,
you'll need to store the flat tire in your trunk. Use the
following procedure to secure the flat tire in the trunk.
Store the flat tire as far forward in the trunk as possible.
Store the jack and wheel wrench in their compartment in
the trunk.
Page 269 of 392
6-6
The tethered cap is located behind a hinged door on the
driver's side of the vehicle.
The release button for the
fuel door is located to the
left of the steering column.
There is also a manual fuel
door release. It is located in
the top of the trunk
compartment, on the
driver's side of the vehicle.
Pull the tab to release the fuel door.
Page 271 of 392
6-8
NOTICE:
If you need a new cap, be sure to get the right
type. Your dealer can get one for you. If you get
the wrong type, it may not fit properly. This may
cause your malfunction indicator lamp to light
and your fuel tank and emissions system may be
damaged. See ªMalfunction Indicator Lampº in
the Index.
Filling a Portable Fuel Container
CAUTION:
Never fill a portable fuel container while it is in
your vehicle. Static electricity discharge from the
container can ignite the gasoline vapor. You can
be badly burned and your vehicle damaged if this
occurs. To help avoid injury to you and others:
�Dispense gasoline only into
approved containers.
�Do not fill a container while it is inside a
vehicle, in a vehicle's trunk, pickup bed or
on any surface other than the ground.
�Bring the fill nozzle in contact with the
inside of the fill opening before operating
the nozzle. Contact should be maintained
until the filling is complete.
�Don't smoke while pumping gasoline.
. The")


