Page 6 of 392
Table of Contents (cont'd)
Maintenance Schedule Service and Appearance Care
Section
7
Section
6
Scheduled Maintenance
Owner Checks and Services
Periodic Maintenance InspectionsRecommended Fluids and Lubricants
Maintenance Records
Fuel
Checking Fluids and Lubricants
GM Oil Life System™ (If Equipped)
Engine Air Cleaner/Filter
Passenger Compartment Air Filter
Brakes
Bulb ReplacementWindshield Wiper Blade Replacement
Tires and Wheels
Appearance Care
Electrical System/Fuses and Circuit Breakers
Capacities and Specifications
Normal Maintenance Replacement Parts
iv
Page 236 of 392
4-40 When You Are Ready to Leave After
Parking on a Hill
1. Apply your regular brakes and hold the pedal down
while you:
�Start your engine;
�Shift into a gear; and
�Release the parking brake.
2. Let up on the brake pedal.
3. Drive slowly until the trailer is clear of the chocks.
4. Stop and have someone pick up and store the chocks.
Maintenance When Trailer Towing
Your vehicle will need service more often when you're
pulling a trailer. See the Maintenance Schedule for more
on this. Things that are especially important in trailer
operation are automatic transaxle fluid (don't overfill),
engine oil, drive belt, cooling system and brake system.
Each of these is covered in this manual, and the Index will
help you find them quickly. If you're trailering, it's a good
idea to review this information before you start your trip.
Check periodically to see that all hitch nuts and bolts
are tight.
Engine Cooling When Trailer Towing
Your cooling system may temporarily overheat during
severe operating conditions. See ªEngine Overheatingº
in the Index.
Page 278 of 392
6-15
NOTICE:
Use only engine oil with the American Petroleum
Institute Certified For Gasoline Engines
starburst symbol. Failure to use the
recommended oil can result in engine damage not
covered by your warranty.
GM Goodwrench� oil meets all the requirements for
your vehicle.
If you are in an area where the temperature falls below
-20�F (-29�C), consider using either an SAE 5W-30
synthetic oil or an SAE 0W
-30 oil. Both will provide
easier cold starting and better protection for your engine
at extremely low temperatures.
Engine Oil Additives
Don't add anything to your oil. The recommended oils
with the starburst symbol are all you will need for good
performance and engine protection.
When to Change Engine Oil (Vehicles
Without the GM Oil Life System�)
If any one of these is true for you, use the short trip/city
maintenance schedule:
�Most trips are less than 5 to 10 miles (8 to 16 km).
This is particularly important when outside
temperatures are below freezing.
�Most trips include extensive idling (such as frequent
driving in stop
-and-go traffic).
�Most trips are through dusty areas.
�You frequently tow a trailer or use a carrier on top of
your vehicle.
�The vehicle is used for delivery service, police, taxi
or other commercial application.
Driving under these conditions causes engine oil to
break down sooner. If any one of these is true for your
vehicle, then you need to change your oil and filter
every 3,000 miles (5 000 km) or 3 months
-- whichever
occurs first.
If none of them is true, use the long trip/highway
maintenance schedule. Change the oil and filter every
7,500 miles (12 500 km) or 12 months
-- whichever
occurs first. Driving a vehicle with a fully warmed
engine under highway conditions causes engine oil to
break down slower.
Page 281 of 392
6-18
2. Remove the air intake hose that snaps over the
throttle body by pulling the hose upward and away
from the throttle body. As you are detaching the
hose, remove the air cleaner housing cover by
pulling upward and rearward.3. Check or replace the engine air cleaner/filter.
4. Reattach the air intake hose.
5. Reinstall the air cleaner housing cover.
Refer to the Maintenance Schedule to determine when to
replace the air filter.
See ªScheduled Maintenance Servicesº in the Index.
Page 283 of 392
6-20
The filter should be replaced as part of routine
scheduled maintenance. See ªMaintenance Scheduleº in
the Index for replacement intervals. See your dealer for
details on changing the filter.
Once you remove your filter, if you choose not to
replace it, it will not damage your vehicle.
However, the air will no longer be filtered.
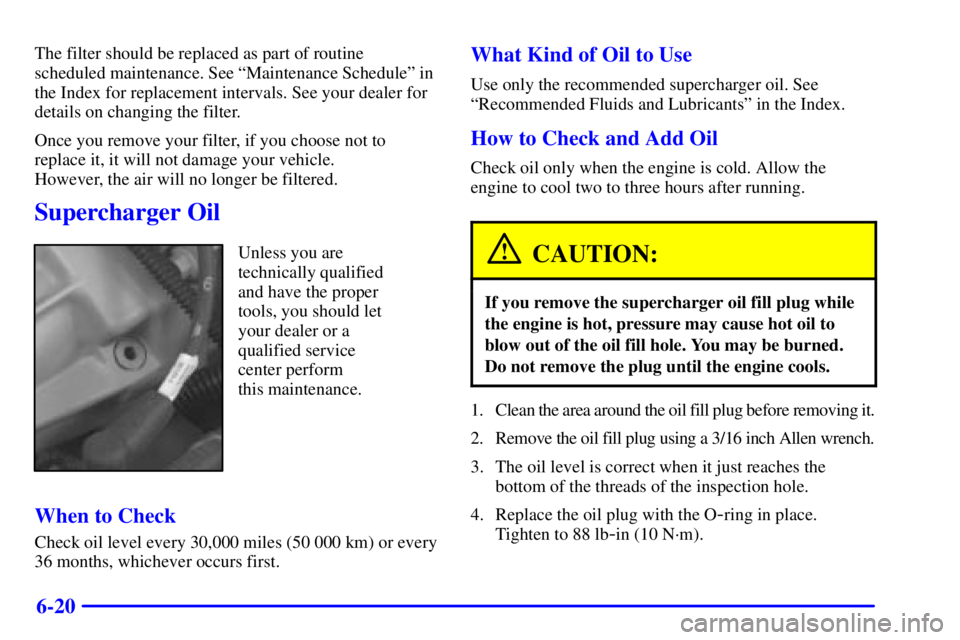
Supercharger Oil
Unless you are
technically qualified
and have the proper
tools, you should let
your dealer or a
qualified service
center perform
this maintenance.
When to Check
Check oil level every 30,000 miles (50 000 km) or every
36 months, whichever occurs first.
What Kind of Oil to Use
Use only the recommended supercharger oil. See
ªRecommended Fluids and Lubricantsº in the Index.
How to Check and Add Oil
Check oil only when the engine is cold. Allow the
engine to cool two to three hours after running.
CAUTION:
If you remove the supercharger oil fill plug while
the engine is hot, pressure may cause hot oil to
blow out of the oil fill hole. You may be burned.
Do not remove the plug until the engine cools.
1. Clean the area around the oil fill plug before removing it.
2. Remove the oil fill plug using a 3/16 inch Allen wrench.
3. The oil level is correct when it just reaches the
bottom of the threads of the inspection hole.
4. Replace the oil plug with the O
-ring in place.
Tighten to 88 lb
-in (10 N´m).
Page 284 of 392
6-21
Automatic Transaxle Fluid
When to Check and Change
A good time to check your automatic transaxle fluid
level is when the engine oil is changed.
Change both the fluid and filter every 50,000 miles
(83 000 km) if the vehicle is mainly driven under one or
more of these conditions:
�In heavy city traffic where the outside temperature
regularly reaches 90�F (32�C) or higher.
�In hilly or mountainous terrain.
�When doing frequent trailer towing.
�Uses such as found in taxi, police or delivery service.
If you do not use your vehicle under any of
these conditions, change the fluid and filter
at 100,000 miles (166 000 km).
See ªScheduled Maintenance Servicesº in the Index.
How to Check
Because this operation can be a little difficult, you may
choose to have this done at the dealership service department.
If you do it yourself, be sure to follow all the
instructions here, or you could get a false reading
on the dipstick.
NOTICE:
Too much or too little fluid can damage your
transaxle. Too much can mean that some of the
fluid could come out and fall on hot engine parts
or exhaust system parts, starting a fire. Be sure to
get an accurate reading if you check your
transaxle fluid.
Wait at least 30 minutes before checking the transaxle
fluid level if you have been driving:
�When outside temperatures are above 90�F (32�C).
�At high speed for quite a while.
�In heavy traffic
-- especially in hot weather.
�While pulling a trailer.
To get the right reading, the fluid should be
at normal operating temperature, which is 180�F to
200�F (82�C to 93�C).
Get the vehicle warmed up by driving about 15 miles
(24 km) when outside temperatures are above 50�F
(10�C). If it's colder than 50�F (10�C), you may
have to drive longer.
Page 286 of 392
6-23
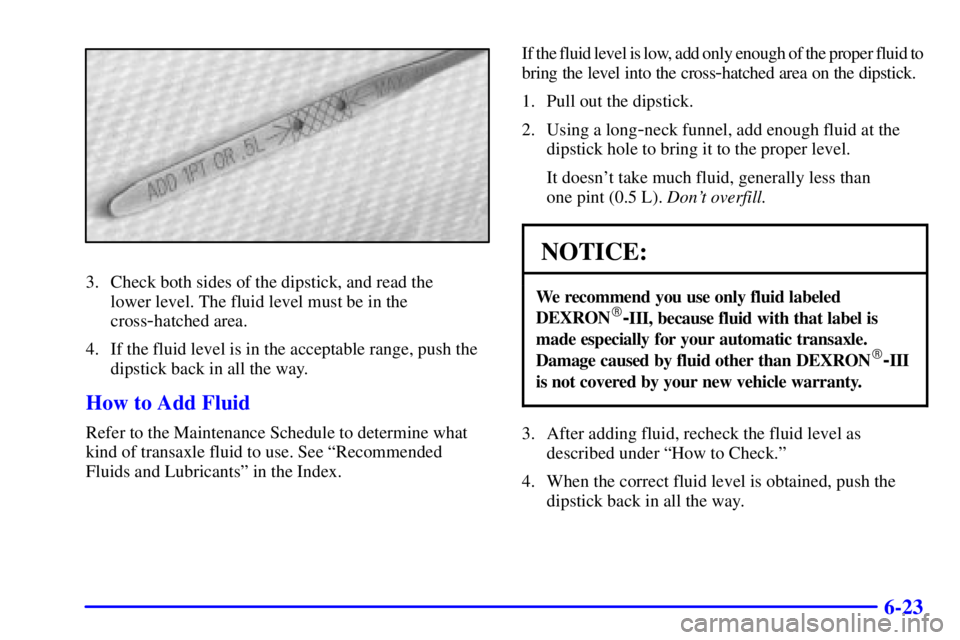
3. Check both sides of the dipstick, and read the
lower level. The fluid level must be in the
cross
-hatched area.
4. If the fluid level is in the acceptable range, push the
dipstick back in all the way.
How to Add Fluid
Refer to the Maintenance Schedule to determine what
kind of transaxle fluid to use. See ªRecommended
Fluids and Lubricantsº in the Index.If the fluid level is low, add only enough of the proper fluid to
bring the level into the cross
-hatched area on the dipstick.
1. Pull out the dipstick.
2. Using a long
-neck funnel, add enough fluid at the
dipstick hole to bring it to the proper level.
It doesn't take much fluid, generally less than
one pint (0.5 L). Don't overfill.
NOTICE:
We recommend you use only fluid labeled
DEXRON�-III, because fluid with that label is
made especially for your automatic transaxle.
Damage caused by fluid other than DEXRON
�-III
is not covered by your new vehicle warranty.
3. After adding fluid, recheck the fluid level as
described under ªHow to Check.º
4. When the correct fluid level is obtained, push the
dipstick back in all the way.
Page 294 of 392
6-31
When your brake fluid falls to a low level, your brake
warning light will come on. A chime will sound if you
try to drive with this warning light on. See ªBrake
System Warning Lightº in the Index.
What to Add
When you do need brake fluid, use only DOT
-3 brake
fluid. Use new brake fluid from a sealed container only.
Refer to ªRecommended Fluids and Lubricantsº in the
Maintenance Schedule.
Always clean the brake fluid reservoir cap and the area
around the cap before removing it. This will help keep
dirt from entering the reservoir.
CAUTION:
With the wrong kind of fluid in your brake
system, your brakes may not work well, or they
may not even work at all. This could cause a
crash. Always use the proper brake fluid.
NOTICE:
�Using the wrong fluid can badly damage
brake system parts. For example, just a few
drops of mineral
-based oil, such as engine
oil, in your brake system can damage brake
system parts so badly that they'll have to be
replaced. Don't let someone put in the
wrong kind of fluid.
�If you spill brake fluid on your vehicle's
painted surfaces, the paint finish can be
damaged. Be careful not to spill brake fluid
on your vehicle. If you do, wash it off
immediately. See ªAppearance Careº in
the Index.