2001 BMW M3 COUPE light
[x] Cancel search: lightPage 146 of 183

146n
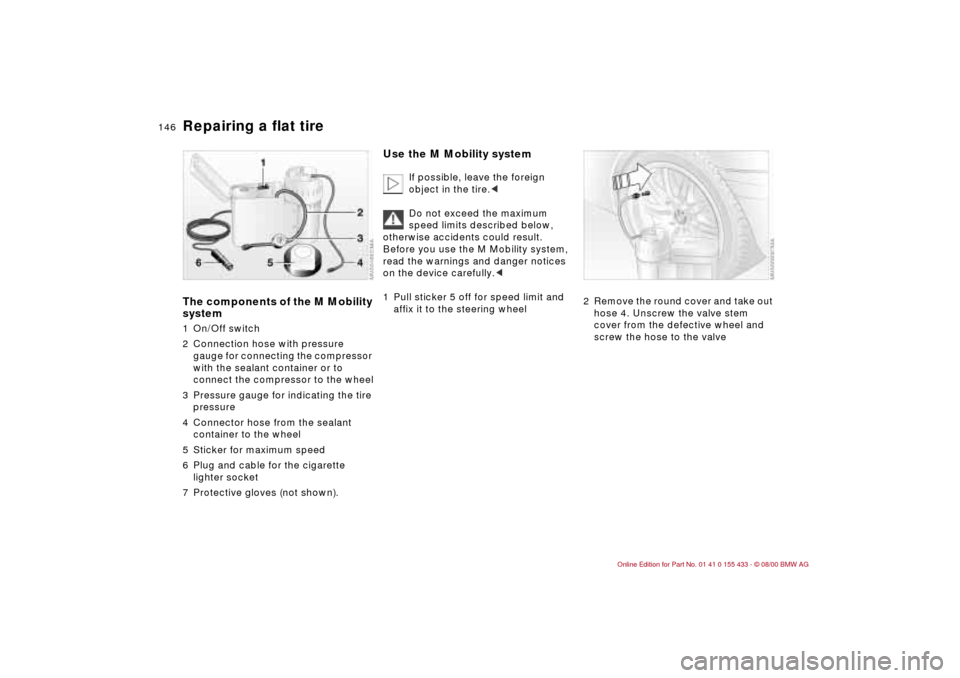
Repairing a flat tireThe components of the M Mobility
system1 On/Off switch
2 Connection hose with pressure
gauge for connecting the compressor
with the sealant container or to
connect the compressor to the wheel
3 Pressure gauge for indicating the tire
pressure
4 Connector hose from the sealant
container to the wheel
5 Sticker for maximum speed
6 Plug and cable for the cigarette
lighter socket
7 Protective gloves (not shown).
Use the M Mobility system
If possible, leave the foreign
object in the tire.<
Do not exceed the maximum
speed limits described below,
otherwise accidents could result.
Before you use the M Mobility system,
read the warnings and danger notices
on the device carefully.<
1 Pull sticker 5 off for speed limit and
affix it to the steering wheel
2 Remove the round cover and take out
hose 4. Unscrew the valve stem
cover from the defective wheel and
screw the hose to the valve
Page 147 of 183

IndexDataTechnologyRepairsCar careControlsOverview
147n
Repairing a flat tire3 Flip open the cover and pull out the
enclosed protective gloves. Take out
hose 2 with the pressure gauge and
screw it to the terminal for the sealant
container as shown in the illustration
4 Make sure that the system has been
switched off (position 0).
Take out the plug 6 and insert it into
the cigarette lighter socket in the
passenger compartment (refer to
page 93)
5 Make sure that the screw on the rear
of pressure gauge 3 is tightened
down. Turn on the M Mobility system
(position I, refer to illustration) and
allow three minutes to elapse to let
the sealant flow in. It does not matter
afterward what the tire's inflation
pressure is
6 Turn the device off.
Disconnect the connector hose from
the sealant container and the tire
valve. Stow the M Mobility system in
the luggage compartment
7 Then immediately drive at least
1.2 miles (2 km), so that the liquid
sealant distributes evenly throughout
the inside of the tire.
Do not exceed 40 mph (60 km/h), and
if possible, do not drop below
10 mph (20 km/h).
Stop at an appropriate spot
Page 148 of 183

148n
Repairing a flat tire Battery 8 Take out the hose with the pressure
gauge and screw it onto the valve.
Take out the plug and plug it into the
cigarette lighter socket in the
passenger compartment
9 Inflate the tire pressure:
>To increase the tire pressure: turn
on the M Mobility system
(position I). To check the new tire
pressure briefly turn off the device
>To reduce the tire pressure: turn
the screw on the back of the pres-
sure gauge; this will open the air
release valve
If the air pressure won't hold, still
carry out step 10 and then repeat
steps 7 through 10 again.
The use of the M Mobility system may
be ineffective if the damaged area in
the tire is larger than approx. 0.16 in
(4 mm). Please consult the nearest
BMW center if the tire cannot be
temporarily repaired with the M Mobility
system.<
10 Unscrew the hose from the valve
and stow the M Mobility system in
the luggage compartment.
After the flat tire has been fixed and you
start driving again, do not exceed a
maximum speed of 50 mph (80 km/h).
You will find corresponding instructions
for using the M Mobility system on the
device.
Replace the defective tire as soon as
possible and have the new wheel/tire
balanced. Re-initialize the Tire Pressure
Warning system (RDW), refer to
page 78 for further information. Have
the M Mobility system refilled. Contact
your BMW center for this.
Battery locationThe battery is located at the right-rear
of the luggage compartment. Raise the
luggage compartment floor panel (refer
to page 39). Using a screwdriver or a
coin and f turn, release both of the
caps as shown in the illustration, taking
them out along with an additional cap in
the top center of the right side trim
panel. Remove the fasteners. In order
to remove the storage tray, slide the
side trim panel slightly upward.
Battery posts, terminals, and
related accessories contain lead
and lead compounds. Wash hands after
handling.<
Page 149 of 183

IndexDataTechnologyRepairsCar careControlsOverview
149n
BatteryCharge conditionYou can read the charge condition of
the battery with the "Magic Eye
*" (a
hydrometer):
>Green: adequate charge
>Black: not charged adequately. The
battery must be recharged. Please
contact your BMW center for addi-
tional information
>Yellow: replace the battery.
The projected service life of the
battery can only be reached if the
battery is fully-charged at all times. If
the vehicle is primarily used for stop-
and-go traffic, be sure to check the
charge state often.<
MaintenanceThe battery is completely maintenance-
free. That means that the original
battery acid will normally last for the
service life of the battery under
moderate climate conditions.
For all questions that regard the
battery, please consult your BMW
center. Since the battery is absolutely
maintenance-free, the following infor-
mation is for your use only.<
SymbolsYou will find the following symbols on
your car battery. For your safety, please
be cautious whenever you work with or
near the battery.
Before handling the battery,
please read the following
information.
A highly-explosive gas is
generated when the battery is
charged.
Never allow sparks or open
flame near the battery. Do not
smoke in the vicinity of the
battery. Avoid creating sparks when
working around electrical cables or
equipment. Turn the key to position 0 in
the ignition when disconnecting or
connecting the battery. Don't short-
circuit the battery terminal. If you do so,
you could be injured by electrical
sparks.
In order to protect the battery
case from ultraviolet radiation,
do not place it in direct sunlight.
A discharged battery can freeze. Store
the battery in areas where temperature
remains above freezing.
Page 160 of 183

160n
M3 Engine concept Rain sensor
*
BMW M will continue to develop BMW
engines for the performance-oriented,
yet responsible driver. That is why value
is placed on an engine design that
guarantees maximum thrust over a
wide engine speed range.
This is done by using high-grade mate-
rials and components with optimized
details. The engine thereby produces
higher speeds than can be achieved
with conventional engines.
Associated with the proper transmis-
sion gear ratio and an especially perfor-
mance-oriented engine electronics
system, the torque opens up with this
so-called "high-speed aspirated
engine" extremely evenly throughout
the entire engine speed range from
1,000 to max. 8 ,000 rpm.
In actual usage, this means improved
acceleration and more spontaneous
response throughout the engine speed
range, thus affording more driving plea-
sure.
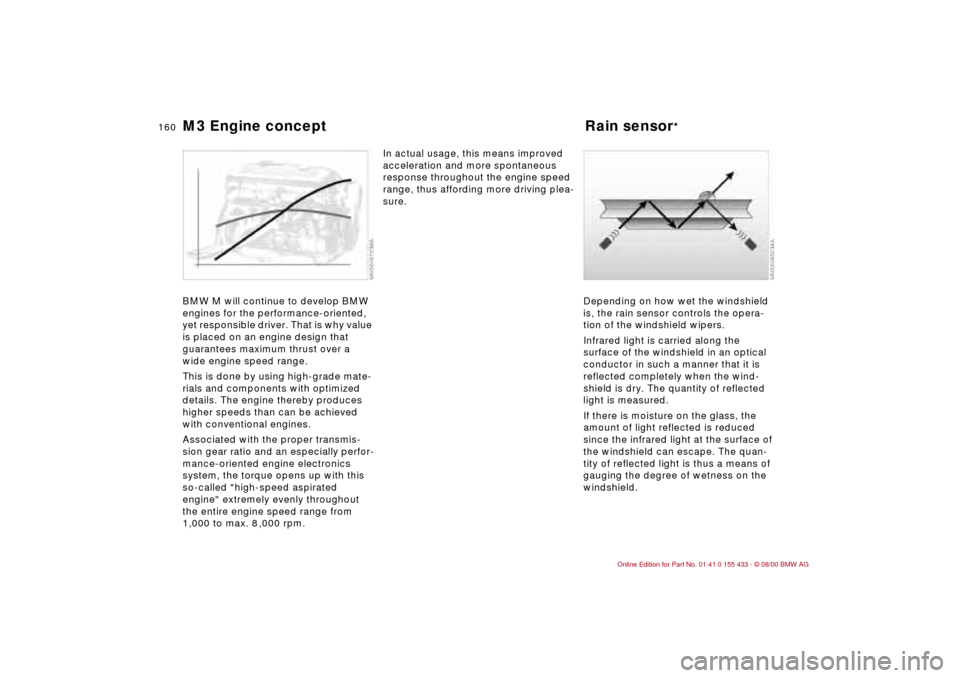
Depending on how wet the windshield
is, the rain sensor controls the opera-
tion of the windshield wipers.
Infrared light is carried along the
surface of the windshield in an optical
conductor in such a manner that it is
reflected completely when the wind-
shield is dry. The quantity of reflected
light is measured.
If there is moisture on the glass, the
amount of light reflected is reduced
since the infrared light at the surface of
the windshield can escape. The quan-
tity of reflected light is thus a means of
gauging the degree of wetness on the
windshield.
Page 161 of 183

161n
IndexDataTechnologyRepairsCar careControlsOverview
Rain sensor
*
Interior rearview mirror, automatic dimming feature
When the "intermittent wiper" speed
position is selected, the wiper reacts
immediately if water is splashed onto
the windshield from vehicles traveling
ahead, for example. As a result, the rain
sensor contributes to driving safety and
comfort.
The interior rearview mirror with auto-
matic dimming feature reduces blinding
from following traffic by adapting the
intensity of the reflected images to
correspond to levels of light registered
by the unit's sensors. The mirror reverts
to its undimmed setting as soon as the
light source disappears. One lamp
sensor is mounted on the front of the
mirror housing. This sensor is directed
forward. It measures light intensity in the
area ahead of the vehicle. The second
sensor is integrated within the mirror's
glass. The electronic control system
compares the light intensity from front
and rear. The difference provides the
basic parameter used to modulate an
electrical current and induce chemical
changes in a semisolid layer incorpo-
rated in the mirror glass.
The semisolid reacts chemically to this
electrical current, thus providing infi-
nitely-variable dimming of the mirror
(electrochromic technology).
As a result, it is no longer necessary to
dim the mirror manually, and the driver
can concentrate completely on traffic
conditions.
Page 163 of 183

163n
IndexDataTechnologyRepairsCar careControlsOverview
Xenon lamps
*
The xenon lamp provides forward illu-
mination with significantly more bright-
ness and uniformity than the traditional
halogen lamp.
In a xenon lamp, an electric arc
replaces the filament in order to
generate intense illumination. A gas
mixture in a quartz glass tube with
metal vapor is ignited by a high electric
voltage. The arc that is generated is
then sustained by a lower voltage.
When the lamp is turned, on there is a
brief warm-up period. Maximum bright-
ness is attained in approx. 15 seconds.
Xenon lamps improve the driver's visi-
bility and orientation to the road, espe-
cially in adverse weather conditions
and driving situations (driving at night in
heavy rain or through road repair areas
where there are no lane markers, for
instance).
Vehicles with xenon lamps are
equipped with automatic headlamp
range control. As a result, the highway
is always optimally lighted, regardless
of load conditions, and drivers in
oncoming traffic are not blinded.
Xenon lamps make a significant contri-
bution to highway safety since other
highway users, bicyclists and motorcy-
clists in the right lane, and pedestrians
are more easily detected.
Page 175 of 183

Everything from A to Z
175n
IndexDataTechnologyRepairsCar careControlsOverview
Caring for the vehicle
finish129
Cassette operation, refer to
the radio Owner's Manual
Catalytic converter103
starting problems103
CBC (Cornering Brake
Control)21, 104
CD operaton, refer to the
radio Owner's Manual
Cellular phone110
refer also to the separate
Owner's Manual
Center armrest91
Center (high-mount) brake
lamp143
Central locking system31
key36
Check Control72t
Checking air pressure26t
Checking engine oil
level123t
Child restraint
system55, 59
Child seat safety55, 60
Cigarette lighter93
Clean the headlamps67
Clean the windshield66
Clock73
Clothes hooks94
Cockpit16Code, refer to the radio
Owner's Manual
Coin box91
Combination switch65
Compression166
Computer72
Configuring the settings52
Consumption74
Consumption display70
Control elements16
Coolant108, 121t, 125
antifreeze108
Coolant temperature
gauge70
Cooling system169
Copyright4
Cornering Brake Control
(CBC)21, 104
Cruise control67
Cruising range74
Cup holder, refer to
beverage holder91
Curb weight168
DDashboard16
Data
dimensions167
engine166
technical166
weights168Daytime-driving lamp
switch81
Deep water103
Defrost position87t
Defrostable rear window88
Defrosting the
windows87t
Difficult steering110t
Digital clock73
Dimensions167
Dipstick123
Disk brakes106
Displacement166
Display lighting81
Displays18
Disposal
used batteries151
used engine oil124
Distance warning75
Diversity Antenna159
Door key30
Door locks, care108
Doors
emergency
actuation32t
operating manually32
remote control33
unlocking and
locking32, 33
DOT Quality Grades112
Draft-free ventilation88
Drive belts170Driving in winter108
Driving lamps81
Driving notes
aquaplaning103
brakes103
disk brakes106
sliding109
slippery roads108
DSC (Dynamic Stability
Control)22, 76, 159
Dynamic Stability Control
(DSC)22, 76, 159
EElectric power windows42
Electrical accessories,
failure151t
Electrical failure
fuel filler door152t
sliding/tilt sunroof153t
Electrical system170
Electronic vehicle
immobilizer31
Emergency actuation
doors32t
fuel filler door152t
sliding/tilt sunroof153t
Engine
compartment120
coolant125, 169
data166
displacement166